
Categorie popolari
State cercando un filato?


Commenti / Domande (46)
![]() Syberthe Langedijk ha scritto:
Syberthe Langedijk ha scritto:
Ik begrijp iets niet aan het patroon: maas a en b aan beide zijkanten. A en B vormen toch de respectievelijke linker- en rechtervooronder-en bovenpanden? En de 6 cm uitsparingen moeten de armsgaten zijn. Dan is er toch geen sprake van mazen , maar eerder van gewoon met een steekje vastzetten?
15.01.2015 - 14:08DROPS Design ha risposto:
Hoi Syberthe. A en B zijn de naden midden op de voorpanden. Je naait/maast deze stukken aan elkaar.
12.02.2015 - 17:23
![]() Claudia ha scritto:
Claudia ha scritto:
Thank you! Seems I got confused because I used a slightly different yarn and therefore needed to decrease in ALL rows. So I will begin to increase right away...
11.12.2014 - 13:31Claudia ha scritto:
I have knitted the first part of the body and the middle part of the body with less stitches. I thought I would now have to increase the stitches in the same way as I have decreased them before. BUT the pattern says that I have to knit 3 more cm (for size M) BEFORE I begin the increase again. Does that make sense? Doesn't the second part (where we increase stitches) become BIGGER than the first part when I knit THOSE THREE CENITIMETERS before increasing?? This is puzzling for me...
10.12.2014 - 19:57DROPS Design ha risposto:
Dear Claudia, both parts will be the same just reversed, you started with dec every other row a total of 4 times then continue until work measures 8 cm - for 2nd part, work first until 17 cm (= 3 more cm) and start inc. Happy knitting!
11.12.2014 - 09:49
![]() LAURENCE ha scritto:
LAURENCE ha scritto:
Bonjour je ne comprends pas au niveau de la bordure ce qu'il fait faire à 12 cm: a quoi correspnd "la moitie des mailles de la partie du dessus" ce n'est pas clair sur combien de cote doit on faire des augmentations? merci
29.10.2014 - 16:50DROPS Design ha risposto:
Bonjour Laurence, on augmente dans la partie supérieure de la bordure,c'est-à-dire toute la partie qui va former le col (et non celle qui sera en bas du dos) - on augmente 1 m env dans chacune des sections 4 m env dans cette partie. Bon tricot!
29.10.2014 - 17:33
![]() Mette Risbjerg ha scritto:
Mette Risbjerg ha scritto:
Jeg har ledt længe på hjemmesiden. Hvor finder jeg et målskema for kvinder, så jeg kan se brystvidden og taljevidden for S og M? Vh Mette
29.12.2013 - 20:10DROPS Design ha risposto:
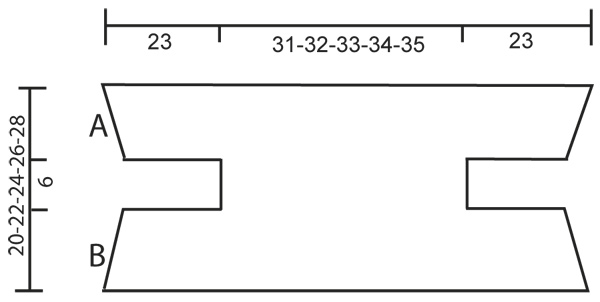
Hej Mette. Se nederst på mønstret. Her på skitsen ser du målene i alle str i cm. Du kan da f.eks se at den totale bredde af boleroen her er 23+31+23 = 77 cm (str S) osv.
30.12.2013 - 17:19
![]() Anton ha scritto:
Anton ha scritto:
Erst die Arbeit fertig haben DANN Fragen stellen???
06.11.2013 - 20:06
![]() Nicole ha scritto:
Nicole ha scritto:
Aber an welcher Stelle der Anleitung kommt das denn vor? Man soll doch an den Seiten (LG.Anleitung) abketten, nicht zusammenstricken. Oder ist das damit gemeint? Wenn ja, weiß ich nicht, wann ich 2 Re bzw. 2 li zus.stricken soll.
06.11.2013 - 17:49DROPS Design ha risposto:
Liebe Nicole, Sie können die M sehr gut einfach abketten, dann brauchen Sie das Video nicht. Wenn man zusammenstricken will, kann man diese Technik benutzen.
07.11.2013 - 09:20
![]() Nicole ha scritto:
Nicole ha scritto:
Ich habe noch eine Frage: Ihr habt u.a. das Video "zwei li. zusammenstricken" angegeben. An welcher Stelle verwende ich dies?
04.11.2013 - 15:37DROPS Design ha risposto:
Liebe Nicole, diese Technik braucht man an den Stellen, an denen im Perlmuster 2 Maschen links zusammengestrickt werden.
06.11.2013 - 07:54
![]() Nicole ha scritto:
Nicole ha scritto:
Ich habe das Strickstück fertig. Allerdings rollt sich bei mir die Abkettkante ziemlich nach aussen. Was habe ich falsch gemacht?
03.11.2013 - 18:53DROPS Design ha risposto:
Liebe Nicole, feuchten Sie den Bolero am besten an und bringen ihn durch Spannen in Form.Gutes Gelingen!
05.11.2013 - 08:13
![]() Pambacon ha scritto:
Pambacon ha scritto:
What is bust measurement for drops 132-16 xxl
30.05.2013 - 13:51DROPS Design ha risposto:
Dear Mrs Pambacon, back piece is 35 cm wide for this bolero. To figure out which size to work, you can have a look on another pattern (jacket) in the same catalog to check out the final measurements and choose the most fitting size. Happy knitting!
30.05.2013 - 15:31
|
|
Highland Beauty#highlandbeautybolero |
|
 |
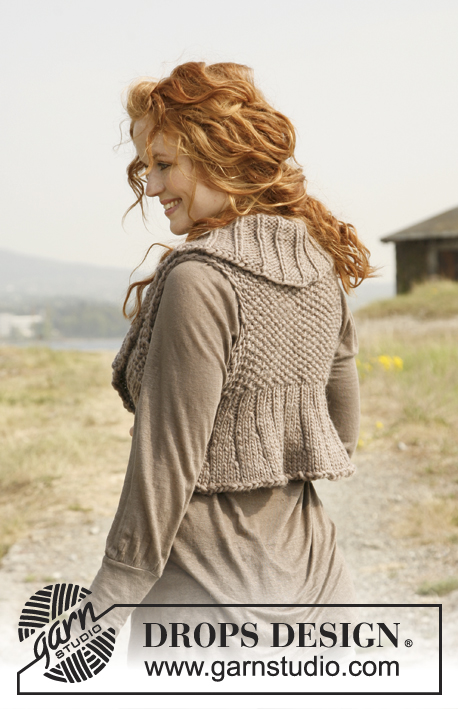 |
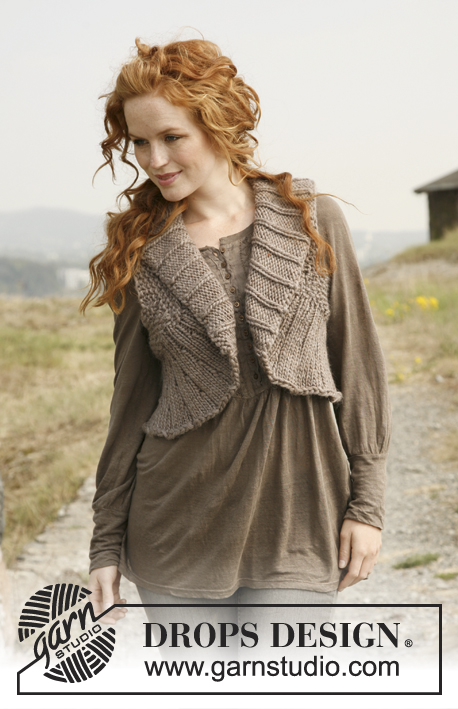
Bolero DROPS ai ferri in "Snow". Taglie dalla S alla XXL
DROPS 132-16 |
|
|
GRANA DI RISO: 1° ferro: * 1 m a dir, 1 m a rov *, ripetere da *-*. 2° ferro: lav a dir le m a rov e a rov le m a dir. Ripetere il 2° ferro. BOLERO: Si lavora avanti e indietro sui ferri e poi si cuciono i lati. Si riprendono poi le m tutto attorno il bolero e si lavora il bordo in tondo. DAVANTI E DIETRO: Avviare 70-71-72-73-74 m sui ferri n° 10 con il filato Snow. Lavorare a grana di riso – vedere le spiegazioni sopra - e allo stesso tempo, dim 1 m da ciascun lato ogni 2 ferri per 4 volte = 62-63-64-65-66 m. Quando il lavoro misura 7-8-9-10-11 cm chiudere da ciascun lato 17 m senza stringere troppo il filo; chiudere le m all'inizio dei 2 ferri successivi = 28-29-30-31-32 m. Proseguire finché il lavoro non misura 13-14-15-16-17 cm; avviare ora 17 nuove m da ciascun lato; avviare le nuove m alla fine dei 2 ferri successivi. Proseguire a grana di riso finché il lavoro non misura 15-17-19-21-23 cm. Aumentare ora 1 m da ciascun lato ogni 2 ferri per 4 volte = 70-71-72-73-74 m. Quando il lavoro misura 20-22-24-26-28 cm. mettere le m in attesa su un fermamaglie. CONFEZIONE: Cucire A e B insieme lungo i lati con punti nascosti - vedere il diagramma. BORDO: Si lavora in tondo con il ferro circolare n° 10. Passare le m dal fermamaglie al ferro di lavoro e riprendere 1 m in ciascuna m del ferro di avvio = 140-142-144-146-148 m - riprendere le m direttamente sul bordo per evitare che si formi uno spessore; in questo modo il bolero potrà essere indossato sia sul diritto che sul rovescio. Lavorare 1 giro a rovescio e allo stesso tempo portare il n° delle m del bordo a 141-144-147-150-153 m (NOTA: il numero delle m deve essere divisibile per 3). Lavorare a coste: * 1 m a dir, 2 m a rov *, ripetere da *-*. Quando le coste misurano 4 cm, aumentare 1 m a rov in tutti i gruppi di m a rov come segue: aumentare inserendo 1 m gettata nel passaggio m dir / m rov e nel giro successivo lavorare la m gettata a rov ritorto per evitare che si formi un buco (le coste ora sono 1 m a dir/3 m a rov) Dopo 8 cm, aumentare 1 m a rov in ciascun gruppo di m a rov (le coste ora sono 1 m a dir/4 m a rov). Quando le coste misurano 12 cm, aumentare nella metà delle m nella parte superiore del bolero (quindi nella metà delle m del bordo a coste) – 1 m a rov in ogni gruppo di 4 m lavorate a rov; aumentare come fatto in precedenza. Quando il bordo misura 17-17-17-17-17 cm. chiudere le m senza stringere troppo il filo. Passare leggermente con un po’ di vapore sul bordo. |
|
 |
|
Avete terminato questo modello?Allora taggate le vostre foto con #dropspattern #highlandbeautybolero o inviatele alla #dropsfan gallery. Avete bisogno di aiuto con questo modello?Troverete 5 video tutorial, una sezione per i commenti/domande e molto altro guardando il modello su www.garnstudio.com © 1982-2026 DROPS Design A/S. Ci riserviamo tutti i diritti. Questo documento, compreso tutte le sue sotto-sezioni, è protetto dalle leggi sul copyright. Potete leggere quello che potete fare con i nostri modelli alla fine di ogni modello sul nostro sito. |
|


Con oltre 40 anni di esperienza nel design di modelli di maglia e uncinetto, DROPS Design offre la più estesa collezione di modelli gratuiti su internet - tradotti in 17 lingue. Ad oggi vi possiamo fornire 324 cataloghi e 12290 modelli - 9561 dei quali sono tradotti in Italiano.
Ci stiamo impegnando molto per darvi il meglio che vi possiamo offrire in termini di maglia e uncinetto, ispirazioni e consigli così come filati di grande qualità ad un prezzo incredibile! Volete utilizzare i nostri modelli per qualcosa d'altro oltre al vostro uso personale? Potete leggere tutto ciò che è consentito nel testo sul Copyright in basso su tutte le pagine dei nostri modelli. Buon lavoro!
Lasciare un commento sul modello DROPS 132-16
Noi saremmo felici di ricevere i tuoi commenti e opinioni su questo modello!
Se vuoi fare una domanda, fai per favore attenzione a selezionare la categoria corretta nella casella qui sotto per velocizzare il processo di risposta. I campi richiesti sono indicati da *.