
Categorie popolari
State cercando un filato?


Commenti / Domande (427)
![]() Wendy B Nice ha scritto:
Wendy B Nice ha scritto:
I love this pattern! If I used Lima (yarn group B) instead of Nepal (yarn group c), what would be the difference of the finished jacket? Would I need to change the hook size? I would be concerned about the finished product not fitting correctly, but I like the idea of a lighter weight jacket that isn't as bulky. Any thoughts? Thanks.
07.11.2017 - 17:58DROPS Design ha risposto:
Dear Wendy, the Lima and the Nepal yarns are similar as far as the composition, however they are different weights, they are in different yarn groups. Nepal is thicker. It is not impossible to make the sweater, but you should make a gauge swatch and recalculate the stitchcount. I hope this helps. Happy crafting!
07.11.2017 - 19:52
![]() Johanna ha scritto:
Johanna ha scritto:
Hallo, ich habe die Jacke in Größe L/XL gehäkelt und sie gefällt mir sehr gut. Stellenweise fand ich die Anleitung etwas umständlich, z. B. bei den Ärmeln. Dort hat sich m. E. auch ein Fehler eingeschlichen. Wenn ich die ersten beiden Zunahmen wiederhole und dann das Ganze 8 Mal wiederhole, komme ich auf 32 Zunahmen anstelle von 16. Leichter verständlich wäre: in den folgenden 16 Reihen jeweils 1 Masche zunehmen, indem man 2 D-Stb in das letzte Stäbchen häkelt.
01.11.2017 - 07:22
![]() Gaby ha scritto:
Gaby ha scritto:
Wat een mooi patroon. Ik heb alleen echt geen idee hoe ik de mouwen vast moet zetten. Hoe naai ik het deel met de minderen erin? Ik hoop dat u mij kunt helpen.
19.08.2017 - 10:22DROPS Design ha risposto:
Hoi Gaby, Je kunt de mouw in de panden naaien met kleine steekjes met de hand, waarbij de mouwkop op de schouder komt. Bij de minderingen is het telkens even kijken waar je de steken naait, zodat het er mooi uit komt te zien. Je kan bijvoorbeeld de steek gebruiken die in deze video te zien is
20.08.2017 - 21:35
![]() Helen Smith ha scritto:
Helen Smith ha scritto:
Currently making the Wild Flower DROPS / 132 / 2 but have become confused when creating the sides. The pattern states I've to increase at the markers but then says I should follow the decrease tip at the end of each row. How can I do both? I have asked a few fellow crocheters & we're all stumped! Please help!
29.07.2017 - 19:16DROPS Design ha risposto:
Dear Mrs Smith, you will dec at the beg and end of each row as explained under DECREASE TIP 1, and at the same time, inc 2 sts on each row at each marker as explained under LEFT FRONT PIECE - each side of front will then be rounded with dec and inc at markers will give the correct shape. Happy crocheting!
31.07.2017 - 10:01
![]() Carol ha scritto:
Carol ha scritto:
Just finished one sleeve, sewed it on the jacket but it is about 5 inches too long. I can cuff the sleeve, but is there a way to cut the bottom (the pretty part-I hate to do it) of the sleeve? I crochet this will wool yarn and used size s/m. Obviously my arms don't fall into that realm !! help please
27.05.2017 - 23:24DROPS Design ha risposto:
Dear Carol, your DROPS store may have any tip for you to help in this case, remember you can contact them even per mail or telephone. Happy crocheting!
29.05.2017 - 09:26
![]() Carol ha scritto:
Carol ha scritto:
After row 19 do we fasten off and the begin with new yarn to begin the left front piece? It seems like this is what to do but this is the first pattern I have ever done that doesn't explicitly say.
24.05.2017 - 22:17DROPS Design ha risposto:
Dear Carol, you may have to cut the yarn to work front piece over the given sts, make sure to have the correct number of sts unworked on top and on bottom. Happy crocheting!
26.05.2017 - 10:09
![]() Beth ha scritto:
Beth ha scritto:
Hello, I am working on pattern 132-2 and am beginning the left front side which for me would be 81 stitches. I understand the increases and decreases - no problem. What I don't understand is the very first row of these 81 stitches. Do we begin the first row with a decrease? Or do we begin with a triple crochet and begin the decrease at the end of the first row of 81 stitches? Thank you for your time.
05.05.2017 - 15:27DROPS Design ha risposto:
Dear Beth, you will work as explained under DECREASE TIP 1, ie work first row (with inc) until 3 sts remain and dec at the end of row, then turn and dec at the beg of row, work until 3 sts remain. Happy crocheting!
05.05.2017 - 16:43
![]() Rebecca Tharp ha scritto:
Rebecca Tharp ha scritto:
I'm a little confused with how to sew the sleeves, since they get smaller at the top. How far up do you sew the seam? Just to the decreases, or all the way up? How exactly do you attach them to the body of the sweater? The entire pattern has been an exercise in frustration to try to follow, but I eventually figured out the crochet stuff--it's just the assembly that has me confused.
01.04.2017 - 12:55DROPS Design ha risposto:
Dear Mrs Tharp, sleeves are sewn on body as usual, ie the 3 sts dec on each side on 1st dec row will be sewn at the botom of armholes, with the top of sleeve cap towards the top. Then just sew each st along armhole. Your DROPS store will have any further tips & advices for you to sew these pieces tog, even per mail or telephone. Happy crocheting!
03.04.2017 - 09:16Melody Walls ha scritto:
So. I am at the sides. I understand the Dec at the beg/end of each row. . But..... do I skip the 3 slp stitches at the beginning and end of previous row? Or do I work my Dec over them? You have been very helpful. Thank You!
23.02.2017 - 02:15DROPS Design ha risposto:
Dear Mrs Walls, when dec on front piece, work until 3 dtr remain on row, then dec and turn, you will not have then any dtr at the beg of row anymore - see DECREASE TIP 1. Happy crocheting!
23.02.2017 - 10:09Melody W ha scritto:
I am confused! So, size S/M..Round 15-19. Do I work the tr and inc 6 up until round 19 OR do I work back and forth (omitting working the top and bottom) for rounds 15-19? If I do Not work the top and bottom for round 15-19, how do I work the sides at the same time? Thank You
21.02.2017 - 23:35DROPS Design ha risposto:
Dear Melody, rounds 15 to 19 are worked in the round as before (= around the whole circle, ie over all sts in the round), crochet in the round inc 6 sts evenly on each round, so that you will get 228 sts at the end of round 19. When round 19 is done, you will now crochet front pieces separately back and forth leaving sts on the top + at the bottom unworked. Happy crocheting!
22.02.2017 - 10:08
|
|
Wild Flower#wildflowercardigan |
|
 |
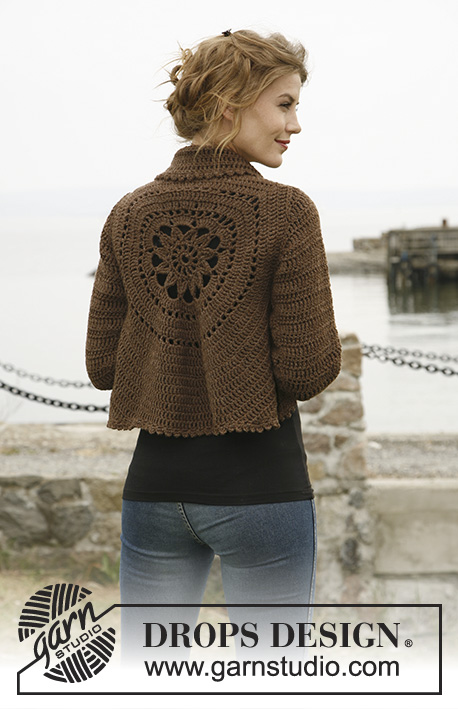 |
Giacchino DROPS lavorato all’uncinetto in tondo "Nepal". Taglie: dalla S alla XXXL
DROPS 132-2 |
|
|
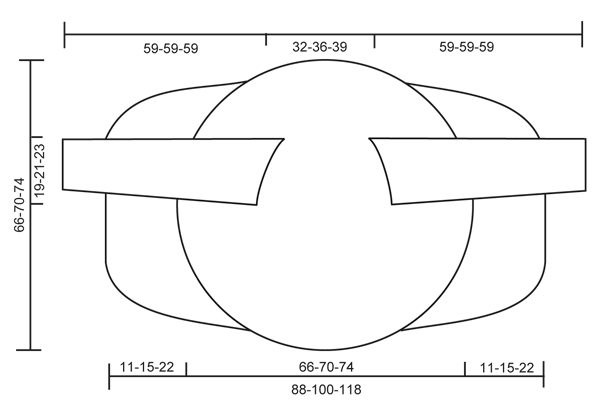
SUGGERIMENTO PER IL LAVORO: Sostituire la 1° m.a.d. su ogni giro/riga con 4 catenelle. SUGGERIMENTO PER LE DIMINUZIONI 1 (applicato al corpo): Diminuire come segue: lavorare a m.a.d. fino a quando rimangono 3 m.a.d., * nella prima di queste lavorare 1 m.a., nella successiva lavorare 1 m.m.a. e nell’ultima 1 m.b., girare con 1 catenella, saltare 1 m.b., lavorare 1 m.bss. nella m.m.a. e 1 m.bss. nella m.a., quindi 1 m.b. nella prima m.a.d., 1 m.m.a. nella m.a.d. seguente e 1 m.a. nella m.a.d. successiva, lavorare m.a.d. fino a quando rimangono 3 m.a.d. alla fine della riga *, ripetere da *-* fino ad un totale di 6-8-12 righe lavorate. SUGGERIMENTO PER LE DIMINUZIONI 2 (applicato all’aletta delle maniche): Diminuire all’inizio della riga lavorando m.bss. sul n° di m.a.d. da diminuire. Diminuire alla fine della riga lavorando fino a quando rimane il n° di m.a.d. da diminuire, girare il lavoro. -------------------------------------------------------- -------------------------------------------------------- CORPO: Lavorato in tondo a cerchio dal centro dietro. Con l’uncinetto misura 5 mm e il filato Nepal lavorare 8 catenelle e formare 1 anello con 1 m.bss. nella prima catenella. GIRO 1: Lavorare 12 m.b. nell’anello di catenelle, finire con 1 m.bss. nella prima m.b. GIRO 2: 5 catenelle (= 1 m.a. + 2 catenelle), * 1 m.a. nella m.b seguente, 2 catenelle *, ripetere da *-* per l’intero giro e finire con 1 m.bss. nella 3° catenella dall’inizio del giro = 12 m.a. con 2 catenelle tra ognuna. GIRO 3: 1 catenella, continuare a lavorare come segue in ogni occhiello di catenelle per l’intero giro: 1 m.b. + 1 catenella + 1 m.b. + 1 catenella, finire il giro con 1 m.bss. nella 1° catenella = 24 m.b. con 1 catenella tra ognuna. GIRO 4: 1 m.bss. nella 1° m.b., 1 m.bss. nella 1° catenella, 5 catenelle, 1 m.a.t. (maglia alta tripla) nella stessa catenella, * 7 catenelle, quindi lavorare 4 m.a.t. insieme come segue: lavorare 2 m.a.t. puntando l'uncinetto nella stessa catenella dove l'ultima m.a.t. è stata lavorata, ma aspettare con l’ultimo gettato e non far passare il filo attraverso entrambe le m.a.d., saltare 1 m.b. + 1 catenella + 1 m.b., lavorare 1 m.a.t. nella catenella seguente, ma aspettare con l’ultimo gettato e non far passare il filo, quindi lavorare l’ultima m.a.t. nella stessa catenella e fare passare l’ultimo gettato attraverso tutte e 5 le m. sull'uncinetto *, ripetere da *-* per un totale di 11 volte, 7 catenelle, lavorare 2 m.a.t. insieme nella stessa catenella (ma aspettare con l’ultimo gettato e non far passare il filo attraverso entrambi), lavorare 1 m.bss. nella 5° catenella dall’inizio del giro e far passare il filo attraverso tutte e 3 le m. sul ferro. GIRO 5: 1 m.bss. nel primo occhiello delle catenelle, 4 catenelle (= 1 m.a.d.), 7 m.a.d. nella stesso occhiello di catenelle, quindi lavorare 8 m.a.d. in ogni occhiello di catenelle, finire con 1 m.bss. nella 4° catenella dall’inizio del giro = un totale di 96 m.a.d. GIRO 6: 5 catenelle (= 1 m.a. + 2 catenelle), * saltare 1 m.a.d., 1 m.a. nella m.a.d. successiva, 2 catenelle *, ripetere da *-* per l’intero giro e finire con 1 m.bss. nella 3° catenella dall’inizio del giro = 48 occhielli di catenelle. GIRO 7 – LEGGERE I SUGGERIMENTI PER IL LAVORO: Lavorare 1 m.a.d. in ogni m.a. e lavorare 1 e 2 m.a.d. in modo alternato in ogni occhiello di catenelle per l’intero giro = 120 m.a.d. GIRO 8: Lavorare 1 m.a.d. in ogni m.a.d. ma lavorare 2 m.a.d. in ogni 10° m.a.d. = 132 m.a.d. GIRO 9: 5 catenelle (= 1 m.a. + 2 catenelle), * saltare 1 m.a.d., 1 m.a. nella m.a.d. successiva, 2 catenelle *, ripetere da *-* per l’intero giro e finire con 1 m.bss. nella 3° catenella dall’inizio del giro = 66 occhielli di catenelle. GIRO 10: Lavorare 1 m.a.d. in ogni m.a. e lavorare 1 e 2 m.a.d. in modo alternato in ogni occhiello di catenelle per l’intero giro = 165 m.a.d. GIRO 11: Lavorare 1 m.a.d. in ogni m.a.d. ma lavorare 2 m.a.d. in ogni 15° m.a.d. = 176 m.a.d. GIRO 12: Lavorare 1 m.a.d. in ogni m.a.d. ma lavorare 2 m.a.d in ogni 16° m.a.d. = 187 m.a.d. Il lavoro misura circa 20 cm dal centro verso l’esterno. TAGLIE S/M: GIRO 13: 1 catenella, quindi lavorare 1 m.b. in ognuna delle prime 45 m.a.d. (= su verso il collo), lavorare 30 catenelle lente, saltare le successive 27 m.a.d. (= scalfo), quindi lavorare 1 m.b. in ognuna delle 88 m.a.d. seguenti (= giù verso il dietro), lavorare 30 catenelle lente, saltare le 27 m.a.d. seguenti (= scalfo) e affrancare con 1 m.bss. nella prima m.b. sul giro. GIRO 14: Lavorare 1 m.a.d. in ogni m.b. – ma aumentare 2 m.a.d. in modo uniforme sulle prime 45 m.b. (= 47 m.a.d.), quindi lavorare 30 m.a.d. nella riga di catenelle sullo scalfo, lavorare 1 m.a.d. in ogni m.b. – ma aumentare 3 m.a.d. in modo uniforme sulle 88 m.b. in basso (= 91 m.a.d), e lavorare 30 m.a.d. nella riga di catenelle sullo scalfo = 198 m.a.d. GIRI DA 15 A 19: Continuare con m.a.d. – e allo stesso tempo aumentare 6 m.a.d in modo uniforme su ogni giro. Dopo il diciannovesimo giro ci sono 228 m.a.d. sul giro e il lavoro misura circa 33 cm dal centro verso l’esterno. Continuare a lavorare solo sulle 79 m.a.d. di ogni lato – cioè non lavorare sulle 35 m.a.d. in alto verso il collo e in basso dietro. Continuare con la spiegazione sotto del DAVANTI. TAGLIE L/XL: GIRO 13: Lavorare 1 m.a.d. in ogni m.a.d. ma lavorare 2 m.a.d. in ogni 17° m.a.d. = 198 m.a.d. GIRO 14: 1 catenella, quindi lavorare 1 m.b. in ognuna delle prime 50 m.a.d. (= su verso il collo), lavorare 32 catenelle lente, saltare le successive 29 m.a.d. (= scalfo), quindi lavorare 1 m.b. in ognuna delle 90 m.a.d. (= giù verso il dietro), lavorare 32 catenelle lente, saltare le successive 29 m.a.d. (= scalfo) e affrancare con 1 m.bss. nella prima m.b. sul giro. GIRO 15: Lavorare 1 m.a.d. in ogni m.b. – ma aumentare 3 m.a.d. in modo uniforme sulle prime 50 m.b. (= 53 m.a.d.), quindi lavorare 32 m.a.d. nella riga di catenelle sullo scalfo, lavorare 1 m.a.d. in ogni m.b. – ma aumentare 3 m.a.d. in modo uniforme sulle 90 m.b. in basso (= 93 m.a.d.), e lavorare 32 m.a.d. nella riga di catenelle sullo scalfo = 210 m.a.d. GIRI DA 16 A 20: Continuare con m.a.d. – e allo stesso tempo aumentare 6 m.a.d. in modo uniforme su ogni giro. Dopo il 20° giro ci sono 240 m.a.d. sul giro e il lavoro misura circa 35 cm dal centro verso l’esterno. Continuare a lavorare solo sulle 81 m.a.d. per ogni lato – cioè non lavorare sulle 39 m.a.d. in alto sul collo o sulle 39 m.a.d. in basso dietro. Continuare con la spiegazione sotto del DAVANTI. TAGLIE XXL E XXXL: GIRO 13: Lavorare 1 m.a.d. in ogni m.a.d. ma lavorare 2 m.a.d. in ogni 17° m.a.d. = 198 m.a.d. GIRO 14: Lavorare 1 m.a.d. in ogni m.a.d. ma lavorare 2 m.a.d. in ogni 18° m.a.d. = 209 m.a.d. GIRO 15: 1 catenella, quindi lavorare 1 m.b. in ognuna delle prime 54 m.a.d. (= su verso il collo), lavorare 36 catenelle lente, saltare le successive 32 m.a.d. (= scalfo), quindi lavorare 1 m.b. in ognuna delle 91 m.a.d. (= giù verso il dietro), lavorare 36 catenelle lente, saltare le successive 32 m.a.d. (= scalfo) e affrancare con 1 m.bss. nella prima m.b. sul giro. GIRO 16: Lavorare 1 m.a.d. in ogni m.b. – ma aumentare 2 m.a.d. in modo uniforme sulle prime 54 m.b. (= 56 m.a.d.), quindi lavorare 36 m.a.d. nella riga di catenelle sullo scalfo, lavorare 1 m.a.d. in ogni m.b. – ma aumentare 3 m.a.d. in modo uniforme sulle 91 m.b. in basso (= 94 m.a.d.), e lavorare 36 m.a.d. nella riga di catenelle sullo scalfo = 222 m.a.d. GIRI DA 17 A 22: Continuare con m.a.d. – e allo stesso tempo aumentare 6 m.a.d. in modo uniforme su ogni giro. Dopo il 22° giro ci sono 258 m.a.d. sul giro e il lavoro misura circa 37 cm dal centro verso l’esterno. Continuare a lavorare solo sulle 89 m.a.d. per ogni lato – cioè non lavorare sulle 40 m.a.d. in lato sul collo o sulle 40 m.a.d. in basso dietro. Continuare con la spiegazione sotto del DAVANTI. DAVANTI SX. – TUTTE LE TAGLIE: = 79-81-89 m.a.d. Inserire un segnapunti dopo 23-24-27 m. da ogni lato (cioè, in totale 2 segnapunti) (= 33-33-35 m. tra i segnapunti). Quindi lavorare a m.a.d. avanti e indietro su queste 79-81-89 m.a.d. e allo stesso tempo aumentare 1 m. su ogni segnapunti ad ogni giro (cioè aumentare 2 m. per riga, aumentarle in modo alternato prima e dopo il segnapunti) e diminuire 3 m. all’inizio e alla fine di ogni riga per ogni lato – VEDERE IL SUGGERIMENTO PER LE DIMINUZIONI 1 fino ad un totale di 6-8-12 righe lavorate avanti e indietro. DAVANTI DX.: Lavorato come per il davanti sx. sulle 79-81-89 m.a.d. al lato dx. MANICA (lavorare la manica avanti e indietro): Lavorare 46-48-53 catenelle lente (incluse 4 catenelle per girare) con l’uncinetto misura 5 mm e il filato Nepal. RIGA 1: 1 m.a.d. nella 5° catenella dal ferro, 1 m.a.d. in ognuna delle 2-4-2 catenelle successive, * saltare 1 catenella, 1 m.a.d. in ognuna delle successive 6 catenelle *, ripetere da *-* fino a quando rimangono 4 catenelle, saltare 1 catenella e lavorare 1 m.a.d. in ognuna delle ultime 3 m.a.d. = 37-39-43 m.a.d. RIGA 2: 1 m.a.d. in ogni m.a.d. – LEGGERE IL SUGGERIMENTO PER IL LAVORO! RIGA 3: 6 catenelle (= 1 m.a.d. + 2 catenelle), saltare 1 m.a.d., 1 m.a.d. nella m.a.d. seguente, * 2 catenelle, saltare 1 m.a.d., 1 m.a.d. nella m.a.d. seguente *, ripetere da *-* per l’intera riga = 18-19-21 occhielli di catenelle. RIGA 4: Lavorare 1 m.a.d. in ogni m.a.d. e 1 m.a.d. in ogni occhiello di catenelle = 37-39-43 m.a.d. Ripetere le righe 2-4 per un totale di 3 volte. Il lavoro misura circa 18 cm. Quindi lavorare a m.a.d. su tutte le righe fino alla lunghezza finale, mentre allo stesso tempo aumentare come segue: TAGLIE S/M: * Aumentare 1 m.a.d. da un lato lavorando 2 m.a.d. nella penultima m.a.d. Sulla riga seguente, aumentare 1 m.a.d dall’altro lato allo stesso modo. Aumentare un’altra volta nello stesso modo per ogni lato, quindi lavorare 1 riga senza aumenti *, ripetere da *-* per un totale di 13 volte = 12 aumenti = 49 m.a.d. TAGLIE L/XL + XXL/XXXL: Aumentare 1 m.a.d. da un lato lavorando 2 m.a.d. nella penultima m.a.d. Sulla riga seguente, aumentare 1 m.a.d dall’altro lato allo stesso modo *, ripetere da *-* per un totale di 8 volte = 16 aumenti = 55-59 m.a.d. TUTTE LE TAGLIE: Continuare a lavorare fino a quando il lavoro misura 49 cm per tutte le taglie. Ora diminuire su tutte le righe, da ciascun lato, per l’aletta della manica – VEDERE IL SUGGERIMENTO PER LE DIMINUZIONI 2: 3 m.a.d. 1 volta, 2 m.a.d. 3 volte e 3 m.a.d. 1 volta = 25-31-35 m.a.d. rimaste in alto. Tagliare il filo. CONFEZIONE: Cucire insieme i margini delle maniche bordo a bordo per evitare una cucitura spessa. Lavorare 1 giro lungo l’intero corpo e in basso alle maniche come segue: * 5 catenelle, 1 m.a. nella prima catenella, saltare 1 m., affrancare con 1 m.b. nella successiva m. *, ripetere da *-* per l’intero giro e finire con 1 m.bss. nella prima catenella. Attaccare le maniche. Se desiderato, chiudere il giacchino con una spilla o cucire un bottone sul davanti sx. (provare il giacchino per vedere dove attaccare il bottone) e allacciarlo nel bordo a uncinetto. |
|
 |
|
Avete terminato questo modello?Allora taggate le vostre foto con #dropspattern #wildflowercardigan o inviatele alla #dropsfan gallery. Avete bisogno di aiuto con questo modello?Troverete 9 video tutorial, una sezione per i commenti/domande e molto altro guardando il modello su www.garnstudio.com © 1982-2026 DROPS Design A/S. Ci riserviamo tutti i diritti. Questo documento, compreso tutte le sue sotto-sezioni, è protetto dalle leggi sul copyright. Potete leggere quello che potete fare con i nostri modelli alla fine di ogni modello sul nostro sito. |
|


Con oltre 40 anni di esperienza nel design di modelli di maglia e uncinetto, DROPS Design offre la più estesa collezione di modelli gratuiti su internet - tradotti in 17 lingue. Ad oggi vi possiamo fornire 324 cataloghi e 12290 modelli - 9561 dei quali sono tradotti in Italiano.
Ci stiamo impegnando molto per darvi il meglio che vi possiamo offrire in termini di maglia e uncinetto, ispirazioni e consigli così come filati di grande qualità ad un prezzo incredibile! Volete utilizzare i nostri modelli per qualcosa d'altro oltre al vostro uso personale? Potete leggere tutto ciò che è consentito nel testo sul Copyright in basso su tutte le pagine dei nostri modelli. Buon lavoro!
Lasciare un commento sul modello DROPS 132-2
Noi saremmo felici di ricevere i tuoi commenti e opinioni su questo modello!
Se vuoi fare una domanda, fai per favore attenzione a selezionare la categoria corretta nella casella qui sotto per velocizzare il processo di risposta. I campi richiesti sono indicati da *.