
Categorie popolari
State cercando un filato?


Commenti / Domande (427)
![]() Francine Boeckx ha scritto:
Francine Boeckx ha scritto:
Hallo! Ik heb erg gezocht maar heb geen antwoord gevonden op mijn vraag nl van waar begin ik het voorpand te haken? Vanaf de hals of vanaf de onderkant? Dank voor je opheldering! Groetjes! Francine
06.04.2020 - 21:10DROPS Design ha risposto:
Dag Francine,
In wezen maakt dit niet uit omdat je nu heen en weer haakt, maar ik zou er dan wel voor zorgen dat je de verkeerde en goede kant bij beide voorpanden hetzelfde hebt. Dat betekent dus als je bij het rechter voorpand aan de halskant begint, dat je bij het linker voorpand aan de onderkant zou moeten beginnen.
16.04.2020 - 12:24
![]() Myssed ha scritto:
Myssed ha scritto:
Bonjour, Tour 15 il faut piquer dans les brins de la chaînette des emmanchures ou juste faire comme si c'était un arceau et du coup faire les mailles autour de la chaînette ?
03.04.2020 - 23:03
![]() Kharma-Sel Barrowclough ha scritto:
Kharma-Sel Barrowclough ha scritto:
I'm still confused about where the markers go. My round ends at the top of the right hand arm hole. If I count 23 from there it means that the top 35 for neck over laps the left arm hole and makes it all wonkey. In order to get 35 top and bottom and 79 sides evenly my markers are 10 stitches left of starting tr and that I need to cut the yarn and re cast on to start on the left. Is this the case? any chance of pics or vid to show eactly how to place markers and transition to front pieces?
29.03.2020 - 12:11DROPS Design ha risposto:
Dear Mrs Barrowclough, fold your circle in double so that armholes are the one over the other one, and mark mid top and mid bottom, now you can count the middle 35 sts on top and the middle 35 sts on bottom and get the 79 sts on each side you will work on (cut the yarn and join it again where you should). Happy crocheting!
30.03.2020 - 10:28
![]() Ainsley ha scritto:
Ainsley ha scritto:
The first instruction is to not work over the top and bottom 35st But moving onto the “front piece” instructions “79tr insert marker after 23st from each side(33st between markers)” I understand how to dec but I’m not clear on where to place my markers if I am still working in the round or starting at a marker point Folding the circle in half using the top of the arm hole I get 35 on top/bottom w/ 79st between markers
18.07.2019 - 05:54DROPS Design ha risposto:
Dear Ainsley, the front piece will be now worked back and forth separately over the 79 sts on each side (leaving the bottom 35 sts and the top 35 sts unworked) see front pieces on measurement chart. Insert 2 markers 23 sts from each side = count 23 sts, add a marker here, count 23 sts, add a marker here. Increase now 1 st at each marker (= 2 sts increased) alternately before and after markers and at the same time decrease at the beg and end of row as explained under DECREASE TIP 1. Happy crocheting!
18.07.2019 - 10:42
![]() AinsleySara ha scritto:
AinsleySara ha scritto:
The first instruction is to not work over the top and bottom 35st But moving onto the “front piece” instructions “79tr insert marker after 23st from each side(33st between markers)” I understand how to dec but I’m not clear on where to place my markers if I am still working in the round or starting at a marker point Folding the circle in half using the top of the arm hole I get 35 on top/bottom w/ 79st between markers
18.07.2019 - 05:53
![]() Francisco Alves Macedo Neto ha scritto:
Francisco Alves Macedo Neto ha scritto:
Muito bonito está na lista das minhas realizações.
23.06.2019 - 13:31
![]() Francisco Alves Macedo Neto ha scritto:
Francisco Alves Macedo Neto ha scritto:
Bom dia! Sou iniciante uso uma máquina de tricô Lanofix antiga vocês têm receitas para máquina de tricô?
23.06.2019 - 13:28DROPS Design ha risposto:
Bom dia, Não, nossos modelos são criados para tricot manual. Bom tricô!
24.06.2019 - 13:39
![]() Wendy D ha scritto:
Wendy D ha scritto:
Question on row one of sleeve, I don't understand what you mean by "1 dtr in each of the next 2-4-2ch" I don't know what you mean by 2-4-2ch.
04.06.2019 - 23:23DROPS Design ha risposto:
Hi Wendy, The 3 numbers connected by hyphens are the 3 different sizes: S/M - L/XL - XXL/XXXL, so for example, 1 dtr in the next 2 ch when working size S/M. I hope this helps and happy crocheting!
05.06.2019 - 07:22
![]() Diane ha scritto:
Diane ha scritto:
I have reached the point where I start the left side of body but am confused by the instruction to increase and decrease at the markers. Should I increase and directly after make the decrease on the same row?
17.05.2019 - 11:09DROPS Design ha risposto:
Dear Diane, you will decrease 3 sts at the beginning and end of each row on each side - see DECREASE-TIP-1 and at the same time, increase 1 stitch at each marker (on first row inc before the marker, on next inc row after the marker etc;) for 6-8-12 rows. Happy knitting!
20.05.2019 - 08:39
![]() Jan Bishop ha scritto:
Jan Bishop ha scritto:
I love this pattern but I can't figure out what the pattern is trying to tell me. "Left front piece" and placing the markers. I just don't know where to put them, where do I start counting?
13.04.2019 - 20:49DROPS Design ha risposto:
Dear Jan, after working the main part of the jacket in the round, start working only 79-81-89 tr. (depending on the size). Before starting, insert the markers from the beginning of the row: 23-24-27 sts , insert first marker, 33-33-35 sts, insert 2nd marker. From now on, work the increases on each side of the markers.
14.04.2019 - 11:21
|
|
Wild Flower#wildflowercardigan |
|
 |
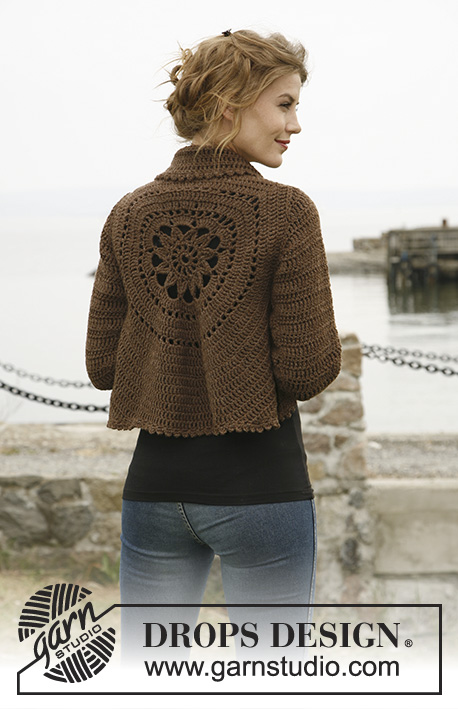 |
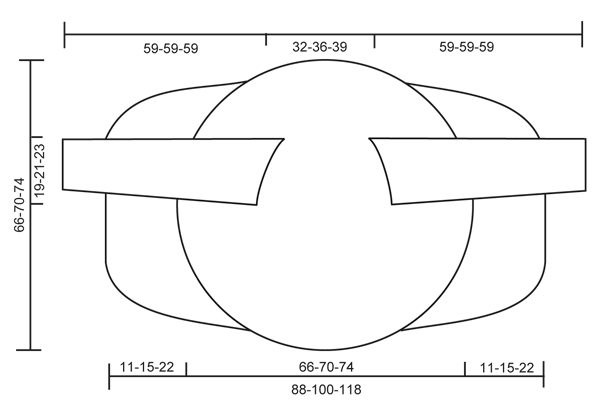
Giacchino DROPS lavorato all’uncinetto in tondo "Nepal". Taglie: dalla S alla XXXL
DROPS 132-2 |
|
|
SUGGERIMENTO PER IL LAVORO: Sostituire la 1° m.a.d. su ogni giro/riga con 4 catenelle. SUGGERIMENTO PER LE DIMINUZIONI 1 (applicato al corpo): Diminuire come segue: lavorare a m.a.d. fino a quando rimangono 3 m.a.d., * nella prima di queste lavorare 1 m.a., nella successiva lavorare 1 m.m.a. e nell’ultima 1 m.b., girare con 1 catenella, saltare 1 m.b., lavorare 1 m.bss. nella m.m.a. e 1 m.bss. nella m.a., quindi 1 m.b. nella prima m.a.d., 1 m.m.a. nella m.a.d. seguente e 1 m.a. nella m.a.d. successiva, lavorare m.a.d. fino a quando rimangono 3 m.a.d. alla fine della riga *, ripetere da *-* fino ad un totale di 6-8-12 righe lavorate. SUGGERIMENTO PER LE DIMINUZIONI 2 (applicato all’aletta delle maniche): Diminuire all’inizio della riga lavorando m.bss. sul n° di m.a.d. da diminuire. Diminuire alla fine della riga lavorando fino a quando rimane il n° di m.a.d. da diminuire, girare il lavoro. -------------------------------------------------------- -------------------------------------------------------- CORPO: Lavorato in tondo a cerchio dal centro dietro. Con l’uncinetto misura 5 mm e il filato Nepal lavorare 8 catenelle e formare 1 anello con 1 m.bss. nella prima catenella. GIRO 1: Lavorare 12 m.b. nell’anello di catenelle, finire con 1 m.bss. nella prima m.b. GIRO 2: 5 catenelle (= 1 m.a. + 2 catenelle), * 1 m.a. nella m.b seguente, 2 catenelle *, ripetere da *-* per l’intero giro e finire con 1 m.bss. nella 3° catenella dall’inizio del giro = 12 m.a. con 2 catenelle tra ognuna. GIRO 3: 1 catenella, continuare a lavorare come segue in ogni occhiello di catenelle per l’intero giro: 1 m.b. + 1 catenella + 1 m.b. + 1 catenella, finire il giro con 1 m.bss. nella 1° catenella = 24 m.b. con 1 catenella tra ognuna. GIRO 4: 1 m.bss. nella 1° m.b., 1 m.bss. nella 1° catenella, 5 catenelle, 1 m.a.t. (maglia alta tripla) nella stessa catenella, * 7 catenelle, quindi lavorare 4 m.a.t. insieme come segue: lavorare 2 m.a.t. puntando l'uncinetto nella stessa catenella dove l'ultima m.a.t. è stata lavorata, ma aspettare con l’ultimo gettato e non far passare il filo attraverso entrambe le m.a.d., saltare 1 m.b. + 1 catenella + 1 m.b., lavorare 1 m.a.t. nella catenella seguente, ma aspettare con l’ultimo gettato e non far passare il filo, quindi lavorare l’ultima m.a.t. nella stessa catenella e fare passare l’ultimo gettato attraverso tutte e 5 le m. sull'uncinetto *, ripetere da *-* per un totale di 11 volte, 7 catenelle, lavorare 2 m.a.t. insieme nella stessa catenella (ma aspettare con l’ultimo gettato e non far passare il filo attraverso entrambi), lavorare 1 m.bss. nella 5° catenella dall’inizio del giro e far passare il filo attraverso tutte e 3 le m. sul ferro. GIRO 5: 1 m.bss. nel primo occhiello delle catenelle, 4 catenelle (= 1 m.a.d.), 7 m.a.d. nella stesso occhiello di catenelle, quindi lavorare 8 m.a.d. in ogni occhiello di catenelle, finire con 1 m.bss. nella 4° catenella dall’inizio del giro = un totale di 96 m.a.d. GIRO 6: 5 catenelle (= 1 m.a. + 2 catenelle), * saltare 1 m.a.d., 1 m.a. nella m.a.d. successiva, 2 catenelle *, ripetere da *-* per l’intero giro e finire con 1 m.bss. nella 3° catenella dall’inizio del giro = 48 occhielli di catenelle. GIRO 7 – LEGGERE I SUGGERIMENTI PER IL LAVORO: Lavorare 1 m.a.d. in ogni m.a. e lavorare 1 e 2 m.a.d. in modo alternato in ogni occhiello di catenelle per l’intero giro = 120 m.a.d. GIRO 8: Lavorare 1 m.a.d. in ogni m.a.d. ma lavorare 2 m.a.d. in ogni 10° m.a.d. = 132 m.a.d. GIRO 9: 5 catenelle (= 1 m.a. + 2 catenelle), * saltare 1 m.a.d., 1 m.a. nella m.a.d. successiva, 2 catenelle *, ripetere da *-* per l’intero giro e finire con 1 m.bss. nella 3° catenella dall’inizio del giro = 66 occhielli di catenelle. GIRO 10: Lavorare 1 m.a.d. in ogni m.a. e lavorare 1 e 2 m.a.d. in modo alternato in ogni occhiello di catenelle per l’intero giro = 165 m.a.d. GIRO 11: Lavorare 1 m.a.d. in ogni m.a.d. ma lavorare 2 m.a.d. in ogni 15° m.a.d. = 176 m.a.d. GIRO 12: Lavorare 1 m.a.d. in ogni m.a.d. ma lavorare 2 m.a.d in ogni 16° m.a.d. = 187 m.a.d. Il lavoro misura circa 20 cm dal centro verso l’esterno. TAGLIE S/M: GIRO 13: 1 catenella, quindi lavorare 1 m.b. in ognuna delle prime 45 m.a.d. (= su verso il collo), lavorare 30 catenelle lente, saltare le successive 27 m.a.d. (= scalfo), quindi lavorare 1 m.b. in ognuna delle 88 m.a.d. seguenti (= giù verso il dietro), lavorare 30 catenelle lente, saltare le 27 m.a.d. seguenti (= scalfo) e affrancare con 1 m.bss. nella prima m.b. sul giro. GIRO 14: Lavorare 1 m.a.d. in ogni m.b. – ma aumentare 2 m.a.d. in modo uniforme sulle prime 45 m.b. (= 47 m.a.d.), quindi lavorare 30 m.a.d. nella riga di catenelle sullo scalfo, lavorare 1 m.a.d. in ogni m.b. – ma aumentare 3 m.a.d. in modo uniforme sulle 88 m.b. in basso (= 91 m.a.d), e lavorare 30 m.a.d. nella riga di catenelle sullo scalfo = 198 m.a.d. GIRI DA 15 A 19: Continuare con m.a.d. – e allo stesso tempo aumentare 6 m.a.d in modo uniforme su ogni giro. Dopo il diciannovesimo giro ci sono 228 m.a.d. sul giro e il lavoro misura circa 33 cm dal centro verso l’esterno. Continuare a lavorare solo sulle 79 m.a.d. di ogni lato – cioè non lavorare sulle 35 m.a.d. in alto verso il collo e in basso dietro. Continuare con la spiegazione sotto del DAVANTI. TAGLIE L/XL: GIRO 13: Lavorare 1 m.a.d. in ogni m.a.d. ma lavorare 2 m.a.d. in ogni 17° m.a.d. = 198 m.a.d. GIRO 14: 1 catenella, quindi lavorare 1 m.b. in ognuna delle prime 50 m.a.d. (= su verso il collo), lavorare 32 catenelle lente, saltare le successive 29 m.a.d. (= scalfo), quindi lavorare 1 m.b. in ognuna delle 90 m.a.d. (= giù verso il dietro), lavorare 32 catenelle lente, saltare le successive 29 m.a.d. (= scalfo) e affrancare con 1 m.bss. nella prima m.b. sul giro. GIRO 15: Lavorare 1 m.a.d. in ogni m.b. – ma aumentare 3 m.a.d. in modo uniforme sulle prime 50 m.b. (= 53 m.a.d.), quindi lavorare 32 m.a.d. nella riga di catenelle sullo scalfo, lavorare 1 m.a.d. in ogni m.b. – ma aumentare 3 m.a.d. in modo uniforme sulle 90 m.b. in basso (= 93 m.a.d.), e lavorare 32 m.a.d. nella riga di catenelle sullo scalfo = 210 m.a.d. GIRI DA 16 A 20: Continuare con m.a.d. – e allo stesso tempo aumentare 6 m.a.d. in modo uniforme su ogni giro. Dopo il 20° giro ci sono 240 m.a.d. sul giro e il lavoro misura circa 35 cm dal centro verso l’esterno. Continuare a lavorare solo sulle 81 m.a.d. per ogni lato – cioè non lavorare sulle 39 m.a.d. in alto sul collo o sulle 39 m.a.d. in basso dietro. Continuare con la spiegazione sotto del DAVANTI. TAGLIE XXL E XXXL: GIRO 13: Lavorare 1 m.a.d. in ogni m.a.d. ma lavorare 2 m.a.d. in ogni 17° m.a.d. = 198 m.a.d. GIRO 14: Lavorare 1 m.a.d. in ogni m.a.d. ma lavorare 2 m.a.d. in ogni 18° m.a.d. = 209 m.a.d. GIRO 15: 1 catenella, quindi lavorare 1 m.b. in ognuna delle prime 54 m.a.d. (= su verso il collo), lavorare 36 catenelle lente, saltare le successive 32 m.a.d. (= scalfo), quindi lavorare 1 m.b. in ognuna delle 91 m.a.d. (= giù verso il dietro), lavorare 36 catenelle lente, saltare le successive 32 m.a.d. (= scalfo) e affrancare con 1 m.bss. nella prima m.b. sul giro. GIRO 16: Lavorare 1 m.a.d. in ogni m.b. – ma aumentare 2 m.a.d. in modo uniforme sulle prime 54 m.b. (= 56 m.a.d.), quindi lavorare 36 m.a.d. nella riga di catenelle sullo scalfo, lavorare 1 m.a.d. in ogni m.b. – ma aumentare 3 m.a.d. in modo uniforme sulle 91 m.b. in basso (= 94 m.a.d.), e lavorare 36 m.a.d. nella riga di catenelle sullo scalfo = 222 m.a.d. GIRI DA 17 A 22: Continuare con m.a.d. – e allo stesso tempo aumentare 6 m.a.d. in modo uniforme su ogni giro. Dopo il 22° giro ci sono 258 m.a.d. sul giro e il lavoro misura circa 37 cm dal centro verso l’esterno. Continuare a lavorare solo sulle 89 m.a.d. per ogni lato – cioè non lavorare sulle 40 m.a.d. in lato sul collo o sulle 40 m.a.d. in basso dietro. Continuare con la spiegazione sotto del DAVANTI. DAVANTI SX. – TUTTE LE TAGLIE: = 79-81-89 m.a.d. Inserire un segnapunti dopo 23-24-27 m. da ogni lato (cioè, in totale 2 segnapunti) (= 33-33-35 m. tra i segnapunti). Quindi lavorare a m.a.d. avanti e indietro su queste 79-81-89 m.a.d. e allo stesso tempo aumentare 1 m. su ogni segnapunti ad ogni giro (cioè aumentare 2 m. per riga, aumentarle in modo alternato prima e dopo il segnapunti) e diminuire 3 m. all’inizio e alla fine di ogni riga per ogni lato – VEDERE IL SUGGERIMENTO PER LE DIMINUZIONI 1 fino ad un totale di 6-8-12 righe lavorate avanti e indietro. DAVANTI DX.: Lavorato come per il davanti sx. sulle 79-81-89 m.a.d. al lato dx. MANICA (lavorare la manica avanti e indietro): Lavorare 46-48-53 catenelle lente (incluse 4 catenelle per girare) con l’uncinetto misura 5 mm e il filato Nepal. RIGA 1: 1 m.a.d. nella 5° catenella dal ferro, 1 m.a.d. in ognuna delle 2-4-2 catenelle successive, * saltare 1 catenella, 1 m.a.d. in ognuna delle successive 6 catenelle *, ripetere da *-* fino a quando rimangono 4 catenelle, saltare 1 catenella e lavorare 1 m.a.d. in ognuna delle ultime 3 m.a.d. = 37-39-43 m.a.d. RIGA 2: 1 m.a.d. in ogni m.a.d. – LEGGERE IL SUGGERIMENTO PER IL LAVORO! RIGA 3: 6 catenelle (= 1 m.a.d. + 2 catenelle), saltare 1 m.a.d., 1 m.a.d. nella m.a.d. seguente, * 2 catenelle, saltare 1 m.a.d., 1 m.a.d. nella m.a.d. seguente *, ripetere da *-* per l’intera riga = 18-19-21 occhielli di catenelle. RIGA 4: Lavorare 1 m.a.d. in ogni m.a.d. e 1 m.a.d. in ogni occhiello di catenelle = 37-39-43 m.a.d. Ripetere le righe 2-4 per un totale di 3 volte. Il lavoro misura circa 18 cm. Quindi lavorare a m.a.d. su tutte le righe fino alla lunghezza finale, mentre allo stesso tempo aumentare come segue: TAGLIE S/M: * Aumentare 1 m.a.d. da un lato lavorando 2 m.a.d. nella penultima m.a.d. Sulla riga seguente, aumentare 1 m.a.d dall’altro lato allo stesso modo. Aumentare un’altra volta nello stesso modo per ogni lato, quindi lavorare 1 riga senza aumenti *, ripetere da *-* per un totale di 13 volte = 12 aumenti = 49 m.a.d. TAGLIE L/XL + XXL/XXXL: Aumentare 1 m.a.d. da un lato lavorando 2 m.a.d. nella penultima m.a.d. Sulla riga seguente, aumentare 1 m.a.d dall’altro lato allo stesso modo *, ripetere da *-* per un totale di 8 volte = 16 aumenti = 55-59 m.a.d. TUTTE LE TAGLIE: Continuare a lavorare fino a quando il lavoro misura 49 cm per tutte le taglie. Ora diminuire su tutte le righe, da ciascun lato, per l’aletta della manica – VEDERE IL SUGGERIMENTO PER LE DIMINUZIONI 2: 3 m.a.d. 1 volta, 2 m.a.d. 3 volte e 3 m.a.d. 1 volta = 25-31-35 m.a.d. rimaste in alto. Tagliare il filo. CONFEZIONE: Cucire insieme i margini delle maniche bordo a bordo per evitare una cucitura spessa. Lavorare 1 giro lungo l’intero corpo e in basso alle maniche come segue: * 5 catenelle, 1 m.a. nella prima catenella, saltare 1 m., affrancare con 1 m.b. nella successiva m. *, ripetere da *-* per l’intero giro e finire con 1 m.bss. nella prima catenella. Attaccare le maniche. Se desiderato, chiudere il giacchino con una spilla o cucire un bottone sul davanti sx. (provare il giacchino per vedere dove attaccare il bottone) e allacciarlo nel bordo a uncinetto. |
|
 |
|
Avete terminato questo modello?Allora taggate le vostre foto con #dropspattern #wildflowercardigan o inviatele alla #dropsfan gallery. Avete bisogno di aiuto con questo modello?Troverete 9 video tutorial, una sezione per i commenti/domande e molto altro guardando il modello su www.garnstudio.com © 1982-2026 DROPS Design A/S. Ci riserviamo tutti i diritti. Questo documento, compreso tutte le sue sotto-sezioni, è protetto dalle leggi sul copyright. Potete leggere quello che potete fare con i nostri modelli alla fine di ogni modello sul nostro sito. |
|


Con oltre 40 anni di esperienza nel design di modelli di maglia e uncinetto, DROPS Design offre la più estesa collezione di modelli gratuiti su internet - tradotti in 17 lingue. Ad oggi vi possiamo fornire 324 cataloghi e 12290 modelli - 9561 dei quali sono tradotti in Italiano.
Ci stiamo impegnando molto per darvi il meglio che vi possiamo offrire in termini di maglia e uncinetto, ispirazioni e consigli così come filati di grande qualità ad un prezzo incredibile! Volete utilizzare i nostri modelli per qualcosa d'altro oltre al vostro uso personale? Potete leggere tutto ciò che è consentito nel testo sul Copyright in basso su tutte le pagine dei nostri modelli. Buon lavoro!
Lasciare un commento sul modello DROPS 132-2
Noi saremmo felici di ricevere i tuoi commenti e opinioni su questo modello!
Se vuoi fare una domanda, fai per favore attenzione a selezionare la categoria corretta nella casella qui sotto per velocizzare il processo di risposta. I campi richiesti sono indicati da *.