
Categorie popolari
State cercando un filato?


Commenti / Domande (66)
![]() Linda Langlois ha scritto:
Linda Langlois ha scritto:
Bonjour, mon questionnement se situe au début du rang 7 c'est-à-dire: est-ce que je commence par une maille endroit selon le graphique ou si je dois faire le M.1A (2 mailles) avant le commencer le M.1B. Le nombre de répétition du motif est-il 4 fois comme le rang 3? J'ai essayé de le faire en commençant par 1 m. end., 1 jeté et en continuant avec le M.1B et en terminant le rang par 1 m. end. mais j'arrive à 5 répétitions au lieu de 4. Est-ce correct?
07.11.2019 - 15:10DROPS Design ha risposto:
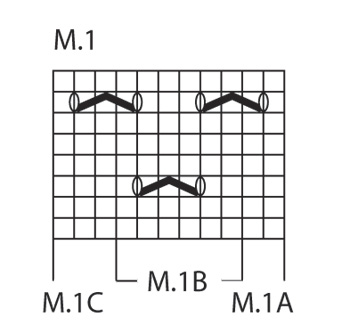
Bonjour Mme Langlois, vous devez toujours tricoter: 1 x M.1A, puis vous répétez M.1B et terminez par M.1C, au 7ème rang de M.1, tricotez les 2 premières m de A, puis vous répétez les mailles de B et terminez par les mailes de C - cf réponse ci-dessous pour le détail des mailles du 7ème rang. Bon tricot!
07.11.2019 - 15:23
![]() Linda Langlois ha scritto:
Linda Langlois ha scritto:
: M.1A (= 2 sts), then repeat M.1B a total of 4 times in width (= 24 sts) and finish with M.1C (= 3 sts) = 2+24+3= 29 stitches. Happy knitting! mais pour le rang 7???
05.11.2019 - 19:10
![]() Linda Langlois ha scritto:
Linda Langlois ha scritto:
Pouvez-vous m'explique le rang 7 du diagramme par rapport au rang 3? J'essaie de comprendre le M.1B Merci
05.11.2019 - 18:22DROPS Design ha risposto:
Bonjour Mme Langlois, au rang 7 de M.1, vous tricotez: 1 m end, 1 jeté (= 2 m pour A), glissez la m suivante (=la dernière m de A, 2 m ens à l'end, m glissée par-dessus m tricotée), 1 jeté, 3 m end, 1 jeté (= M.1B), tricotez maintenant la dernière m de M.1B avec les 2 premières m du M.1B suivant (puis de M.1C la dernière fois). Bon tricot!
06.11.2019 - 08:43
![]() Christine ha scritto:
Christine ha scritto:
I am almost ready to decrease for the toe shaping...once again, I do not understand...I have 52 stitches, but the pattern says separate 25 stitches , for the underfoot and 25 stitches for the upper foot...what happens to the other 2 sts?, sigh...sorry to be such a pain...
03.10.2019 - 02:34DROPS Design ha risposto:
Dear Christine, there should be 25 stitches for both upper and under foot + 1 stitch with marker on each side = 52 sts in total. Happy knitting!
03.10.2019 - 09:29
![]() Kendall ha scritto:
Kendall ha scritto:
Christine,thanks for your help I appreciated it😊I figured out to put the 35 stitches to the side by talking it over with my sister,she knits too,and the comment just confirmed it which is great and if you still need help on when to start the lace pattern,you start the lace pattern the row after you pick up the 14 side stitches go across the top of the sock and pick up the other 14 stitches once you get back to the 29 stitches that’s when you do the lace pattern I hope I helped😊
01.10.2019 - 15:40
![]() Christine ha scritto:
Christine ha scritto:
Kendall, clearly I was wrong. This is not a typo error. As you can see from the answers. I was wrong and hope I have not confused you. now I understand. if you need help, don’t be shy, I can now help 😊
01.10.2019 - 02:06
![]() Christine ha scritto:
Christine ha scritto:
Thank you for your answer. Does that mean that I should put 3 stitches from the 35 to the 14 stitches picked up on both sides, and work the decrease including those 3 stitches? Thank you.
30.09.2019 - 14:11DROPS Design ha risposto:
Dear Christine, you will decrease before the 29 stitches (first 3 from the 35 sts are worked with the picked up stitches in stocking stitch) and after the 29 stitches in pattern (= the last 3 from the 35 sts are worked with the picked up sts in stocking st), ie these 3 sts on either side of the 29 middle sts will be worked in stocking stitch and decreased for instep. Happy knitting!
30.09.2019 - 16:04
![]() Christine ha scritto:
Christine ha scritto:
At what point do you start working with the Diagram please? I am totally confused. I am at the point where I have picked up 14 stitches on both sides as well as the 35 stitches that were on the stitch holder. I now have 76 stitches on the needles, but I am unsure how to proceed at this point. With big thanks in advance.
28.09.2019 - 20:03DROPS Design ha risposto:
Dear Christine, once you get the 76 sts on the needle (= heel is now worked),k you now work the stitches from under foot in stocking stitch (= over the first 3 sts from the 35 sts slipped on a thread + the last 3 sts from these 35 sts (=29 sts remain for upper foot) + the stitches from heel while decreasing for instep and work the 29 stitches (upper foot, the stitches slipped on a thread) in pattern: : M.1A (= 2 sts), then repeat M.1B a total of 4 times in width (= 24 sts) and finish with M.1C (= 3 sts) = 2+24+3= 29 stitches. Happy knitting!
30.09.2019 - 10:26
![]() Christine ha scritto:
Christine ha scritto:
Kendall, I just started this yesterday and came across the same problem. I figured it out to be simply a typo, and followed the pattern with 35 (for the medium sock). It is working out perfectly like that. I hope this helps.
28.09.2019 - 18:49
![]() Kendall ha scritto:
Kendall ha scritto:
How come you go from 35 stitches on top of the foot to 29?wheres the rest of the stitches?and then at the end when you work the toe where’s the missing two stitches?
28.09.2019 - 16:28
|
|||||||
Neptunia Socks#neptuniasocks |
|||||||
|
|
|||||||
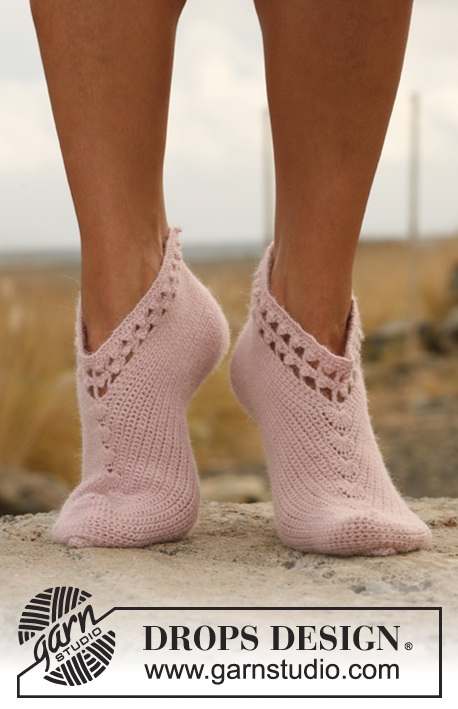
Calzini sotto la caviglia DROPS, con motivo traforato, in "Fabel"
DROPS 129-18 |
|||||||
|
MOTIVO: Vedere il diagramma M.1. DIMINUZIONI PER IL TALLONE: Ferro 1 (= diritto del lavoro): lavorare finché non rimangono 5-5-6 m, passare 1 m a dir senza lavorarla, 1 m dir, accavallare la m passata sulla m lavorata, girare il lavoro. Ferro 2 (= rovescio del lavoro): lavorare finché non rimangono 5-5-6 m, passare 1 m a rov senza lavorarla, 1 m rov, accavallare la m passata sulla m lavorata, girare il lavoro. Ferro 3 (= diritto del lavoro): lavorare finché non rimangono 4-4-5 m, passare 1 m a dir senza lavorarla, 1 m dir, accavallare la m passata sulla m lavorata, girare il lavoro. Ferro 4 (= rovescio del lavoro): lavorare finché non rimangono 4-4-5 m, passare 1 m a rov senza lavorarla, 1 m rov, accavallare la m passata sulla m lavorata, girare il lavoro. Continuare a diminuire in questo modo con 1 m in meno prima di ogni diminuzione, finché sul ferro non rimangono 13-13-15 m. -------------------------------------------------------- CALZINI: Si lavorano in tondo sui ferri a doppia punta. Avviare 50-56-60 m sui ferri a doppia punta n° 2,5 con il filato Fabel. Lavorare 1 giro a dir, proseguire a coste = 1 m dir / 1 m rov per 2-2-3 cm. Tenere ora le prime 21-21-25 m sui ferri per il tallone e mettere in attesa su un ferma maglie le ultime 29-35-35 m (= parte superiore del piede). Lavorare a maglia rasata avanti e indietro sulle m del tallone per 5-5,5-6 cm. Inserire un segno al centro del tallone - da adesso in avanti, misurare il lavoro da questo punto ! Diminuire ora per il tallone – vedere le DIMINUZIONI PER IL TALLONE ! Terminate le diminuzioni per il tallone, riprendere 13-14-15 m lungo ciascun lato del tallone e riportare sui ferri di lavoro le 29-35-35 m messe in attesa sul ferma maglie = 68-76-80 m. Inserire un segno da ciascun lato delle 29-29-35 m centrali della parte superiore del piede. Proseguire a maglia rasata sulle m della pianta del piede e lavorare le 29-29-35 m della parte superiore del piede come segue: diagramma M.1A (= 2 m), ripetere il diagramma M.1B sulle 24-24-30 m successive (= 4-4-5 volte) e finire con il diagramma M.1C (= 3 m). ALLO STESSO TEMPO, diminuire da ciascun lato come segue: lavorare insieme a dir ritorto (lavorare quindi nell’asola posteriore e non in quella anteriore) le ultime 2 m prima delle 29-29-35 m e lavorare insieme a dir le prime 2 m dopo le 29-29-35 m centrali della parte superiore del piede. Ripetere queste diminuzioni ogni 2 giri per un totale di 10-12-12 volte = 48-52-56 m. Proseguire finché il lavoro non misura 18-19-22 cm dal segno sul tallone (= rimangono ancora da lavorare ca. 4-5-5 cm). Inserire un segno nella prima m da ciascun lato in modo che ci siano 23-25-27 m per la parte superiore del piede e 23-25-27 m per la pianta del piede. Proseguire a maglia rasata su tutte le m e, ALLO STESSO TEMPO, diminuire per la punta da ciascun lato dei segni, come segue – iniziare 2 m prima del segno: lavorare 2 m insieme a dir, 1 m dir (il segno si trova tra queste m), 2 m insieme a dir ritorto. Proseguire a diminuire in questo modo da ciascun lato ogni 2 giri, per un totale di 4-7-6 volte e poi ad giro per un totale di 6-4-6 volte = sui ferri rimangono 8 m. Tagliare il filo, passarlo attraverso le m rimaste, stringere e fermare il filo. |
|||||||
Spiegazioni del diagramma |
|||||||
|
|||||||
 |
|||||||
Avete terminato questo modello?Allora taggate le vostre foto con #dropspattern #neptuniasocks o inviatele alla #dropsfan gallery. Avete bisogno di aiuto con questo modello?Troverete 18 video tutorial, una sezione per i commenti/domande e molto altro guardando il modello su www.garnstudio.com © 1982-2026 DROPS Design A/S. Ci riserviamo tutti i diritti. Questo documento, compreso tutte le sue sotto-sezioni, è protetto dalle leggi sul copyright. Potete leggere quello che potete fare con i nostri modelli alla fine di ogni modello sul nostro sito. |
|||||||


Con oltre 40 anni di esperienza nel design di modelli di maglia e uncinetto, DROPS Design offre la più estesa collezione di modelli gratuiti su internet - tradotti in 17 lingue. Ad oggi vi possiamo fornire 324 cataloghi e 12290 modelli - 9561 dei quali sono tradotti in Italiano.
Ci stiamo impegnando molto per darvi il meglio che vi possiamo offrire in termini di maglia e uncinetto, ispirazioni e consigli così come filati di grande qualità ad un prezzo incredibile! Volete utilizzare i nostri modelli per qualcosa d'altro oltre al vostro uso personale? Potete leggere tutto ciò che è consentito nel testo sul Copyright in basso su tutte le pagine dei nostri modelli. Buon lavoro!
Lasciare un commento sul modello DROPS 129-18
Noi saremmo felici di ricevere i tuoi commenti e opinioni su questo modello!
Se vuoi fare una domanda, fai per favore attenzione a selezionare la categoria corretta nella casella qui sotto per velocizzare il processo di risposta. I campi richiesti sono indicati da *.