
Categorie popolari
State cercando un filato?


Commenti / Domande (135)
![]() Camilla ha scritto:
Camilla ha scritto:
I give up! I am quite experienced knitter, this is the first time i give up
24.04.2026 - 22:30
![]() Camilla ha scritto:
Camilla ha scritto:
Jag har läst mönstret så här: varv 1 från höger till vänster, varv två från vänster till höger. Har för mig att det stod så i en kommentar, men varven kanske alltid ska läsas från hö - vä? Lite lurigt då mitten ändå blir ✅
24.04.2026 - 17:18DROPS Design ha risposto:
Hei Camilla. Ja, man leser et strikkediagram motsatt av slik man normalt leser: Fra høyre mot venstre, nedenfra og opp. Du begynner altså nederst i det høyre hjørnet, og jobber deg mot venstre og oppover. mvh DROPS Design
27.04.2026 - 10:51
![]() Camilla ha scritto:
Camilla ha scritto:
Är inte mönstret fel på aviga varven med att man ska FÖRST göra omslag sedan sticka ihop två rm i bakre maskbågen, borde man inte göra som på räta varv först sticka ihop, SEN omslag, resultatet ser konstigt ut på den sidan, blir inte lika snygga ”hål” på mönstrets vänstra sida jämfört med högra
24.04.2026 - 17:14DROPS Design ha risposto:
Hei Camilla. Skjønner hva du mener, men på denne oppskriften er det skrevet/tegnet slik. Det er ikke feil, men om du ønsker å forandre det slik du mener blir penere, må du gjerne gjøre det. mvh DROPS Design
27.04.2026 - 10:15
![]() Gillian ha scritto:
Gillian ha scritto:
I have completed the first row of the chart (23 sts) and knitted remaining sts to the end of the row. Do i have to knit another row ? if not how do i get back to the 23st to do the second row?
14.04.2026 - 18:03
![]() Gillian ha scritto:
Gillian ha scritto:
I have completed the first row of the chart (23 sts) and knitted remaining sts to the end of the row. Do i have to knit another row ? if not how do i get back to the 23st to do the second row?
14.04.2026 - 15:51DROPS Design ha risposto:
Dear Gillian, short rows start from the first row M.1, starting from the right side work 30 to 47 sts (see size) - with the first 23 sts as shown in M.1 and the remaining sts in garter stitch, turn and work garter stitch and 2nd row M.1 (read diagram from the left towards the right), turn work 46-70 sts with 3rd row M.1 and knit remaining sts, turn and knit + work 4th row M.1, turn and continue short rows as stated for the size continuing M.1 and knitting remaining sts. Happy knitting!
15.04.2026 - 07:36
![]() Gillian ha scritto:
Gillian ha scritto:
Can you tell me what 1 YO between 2 sts mean
14.04.2026 - 15:25DROPS Design ha risposto:
Dear Gillian, work the previous stitch as shown in diagram, make 1 yarn over then work the next stitch as shown in diagram = you have worked 1 yarn over between 2 stitches. On first row M.1 eg, work: K3, YO, K2 tog, P2, YO, slip 1, K1, psso, K5, K2 tog, YO,l P2, K1, YO, K2 tog, K2. Happy knitting!
14.04.2026 - 15:43
![]() Inge Glarborg ha scritto:
Inge Glarborg ha scritto:
Jeg for ikke det samme hulmønster frem på hver side af trekanterne, altså de første og sidste 5 masker, når jeg strikker M1, som det ser ud på fotoet
12.04.2026 - 22:19DROPS Design ha risposto:
Hei Inge. Om man følger diagrammet skal man få det hullmønstret man ser på bildet. Husk at bildet viser diagrammet loddrett, mens selve diagrammet ligger vannrett (jakken strikkes sidelengs). Men hvordan blir ditt mønster? mvh DROPS Design
13.04.2026 - 14:49
![]() Sibylle ha scritto:
Sibylle ha scritto:
Meine Frage ist leider noch nicht beantwortet. Das Muster wird doch nicht am unteren Rand begonnen. Die Blende besteht aus 4 Krausrippen. Dann beginnt das Muster. Doch nicht direkt am unteren Rand?
09.02.2026 - 19:57DROPS Design ha risposto:
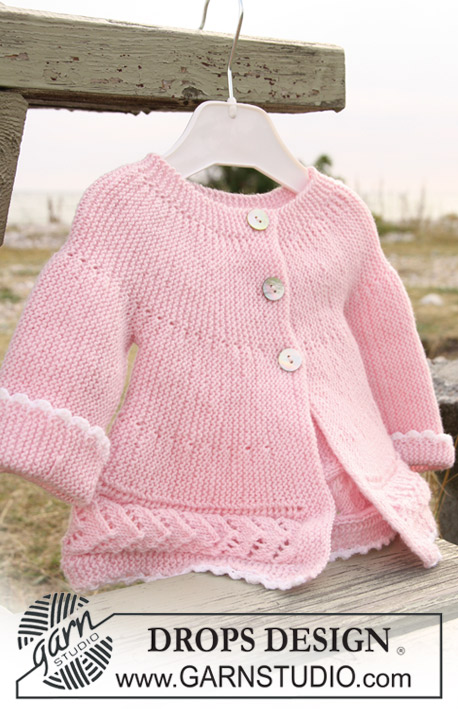
Liebe Sibylle, Sie stricken tatsächlich die ersten 23 Maschen gemäß Diagramm, dabei werden ja auch ein paar Maschen am Anfang des Diagramms kraus rechts gestrickt. Die Löcher (nach der 3. Masche im Diagramm) sind am unteren Rand nicht gut erkennbar, das liegt aber an der Fotoaufnahme bzw. daran, dass die Jacke genau an der Stelle etwas geknickt liegt. An der anderen Seite des mittleren Musters können Sie die Löcher gut erkennen.
18.02.2026 - 20:18
![]() Sibylle ha scritto:
Sibylle ha scritto:
Laut Beschreibung wird das Muster direkt am Rand begonnen. Laut Bild aber nicht.
08.02.2026 - 17:06DROPS Design ha risposto:
Liebe Sibylle, auch laut Beschreibung stricken Sie zuerst 4 Krausrippen, dann kommt erst das Muster. Sie stricken die vordere Blende also zuerst und dann geht es mit dem Muster weiter. Viel Spaß beim Stricken!
09.02.2026 - 08:38
![]() Lucia Nardella ha scritto:
Lucia Nardella ha scritto:
Se il diagramma M1 mostra come lavorare le maglie sul diritto del lavoro dove indica cone lavorare il rovescio quando necessario?
21.10.2025 - 13:47DROPS Design ha risposto:
Buonasera Lucia, i diagrammi mostrano tutti i ferri del lavoro, anche quelli lavorati sul rovescio. Buon lavoro!
21.10.2025 - 17:53
|
||||||||||||||||||||||
DROPS Baby 20-12 |
||||||||||||||||||||||
 |
 |
|||||||||||||||||||||
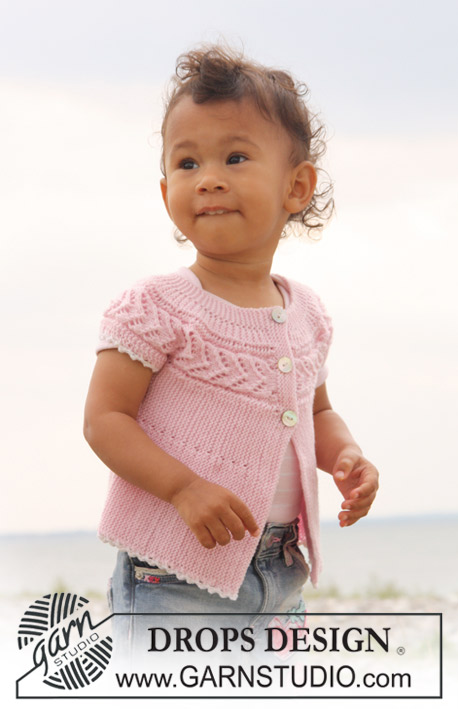
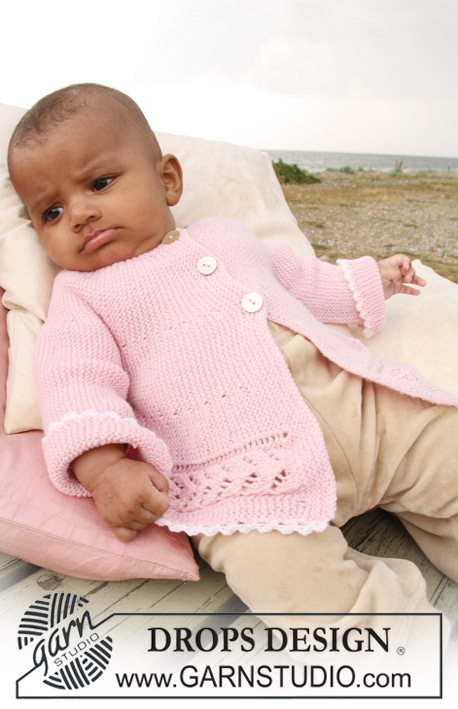
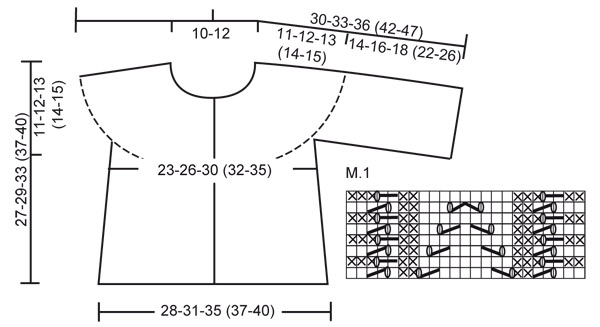
Cardigan lavorato ai ferri, da lato a lato, a punto legaccio e motivo traforato per neonati e bambini in DROPS BabyMerino.
DROPS Baby 20-12 |
||||||||||||||||||||||
|
GIACCA: MOTIVO: Vedere il diagramma M.1. Il diagramma mostra il motivo sul diritto del lavoro SUGGERIMENTO PER IL LAVORO: Quando si gira il lavoro nel corso del ferro, passare la prima m a dir, stringere il filo e proseguire come prima – queste serve per evitare che si formi un piccolo buco nel punto in cui viene girato il lavoro. -------------------------------------------------------- -------------------------------------------------------- GIACCA: Iniziare con il davanti sinistro, lavorare la manica, il dietro, l’altra manica e finire con il davanti destro. Avviare 62-68-78 (88-96) m lente sui ferri n° 2,5 con il filato Baby Merino. Lavorare 8 ferri a dir per il bordo davanti (1° ferro = diritto del lavoro). Lavorare il ferro successivo, sul diritto del lavoro, come segue: lavorare le prime 15 m a dir, ALLO STESSO TEMPO, aumentare 8 m in modo uniforme (aumentare 1 m facendo 1 m gettata), lavorare le restanti m a dir = 70-76-86 (96-104) m. Lavorare 1 ferro a dir, su tutte le m, sul rovescio del lavoro; lavorare le m gettate nell' asola posteriore per evitare che si formi un buco. Proseguire come segue: lavorare le prime 23 m del ferro seguendo il diagramma M.1, e lavorare a dir le restanti m sul ferro, per tutti i ferri. ALLO STESSO TEMPO, lavorare a ferri accorciati come segue – vedere il SUGGERIMENTO PER IL LAVORO: * lavorare le prime 30-32-38 (42-47) m, girare e lavorare il ferro di ritorno; lavorare le prime 46-50-57 (65-70) m, girare e lavorare il ferro di ritorno; lavorare le prime 64-70-80 (90-98) m, girare e lavorare il ferro di ritorno; lavorare tutte le 70-76-86 (96-104) m, girare e lavorare il ferro di ritorno *, ripetere da *-* finché il lavoro non misura ca. 16-17,5-19,5 (20,5-22) cm dal ferro di avvio (misurare all’altezza del primo ferro accorciato, quindi subito sopra al motivo M.1). Tagliare il filo. Mettere ora in attesa su un ferma maglie le prime 41-45-52 (60-65) m a partire dal basso (= lato). Avviare 36-42-46 (60-70) nuove m in corrispondenza delle m messe in attesa (quindi prima delle 29-31-34 (36-39) m rimaste sul ferro) per la manica e proseguire come segue (1° ferro = diritto del lavoro): * lavorare le prime 41-47-51 (65-75) m, girare e lavorare il ferro di ritorno; lavorare le prime 59-67-74 (90-103) m, girare e lavorare il ferro di ritorno; lavorare tutte le 65-73-80 (96-109) m, girare e lavorare il ferro di ritorno *. Ripetere da *-*. Quando il lavoro misura 16-17-18 (18-20) cm dal punto in cui sono state avviate le m per le maniche (misurare sul lato più largo, quindi lungo il bordo inferiore), intrecciare 36-42-46 (60-70) m dal bordo inferiore della manica verso la parte superiore della giacca. Tagliare il filo. Riprendere sui ferri di lavoro le 41-45-52 (60-65) m messe precedentemente in attesa sul ferma maglie e inserire un segno nel lavoro. Proseguire lavorando dal bordo inferiore come prima, da *-*, come indicato per il davanti (1° ferro = diritto del lavoro). Quando il lavoro misura 28-31-35 (37-40) cm dal segno (misurare all’altezza del primo ferro accorciato, quindi subito sopra al motivo M.1), tagliare il filo. Mettere in attesa su un ferma maglie le prime 41-45-52 (60-65) m dal bordo inferiore (= lato). Avviare 36-42-46 (60-70) nuove m in corrispondenza delle m messe in attesa sul ferma maglie (quindi prima delle 29-31-34 (36-39) m rimaste sul ferro) per la manica e proseguire come prima, da *-*, come indicato per l’altra manica. Quando la manica destra misura come la manica sinistra, intrecciare 36-42-46 (60-70) m a partire dal bordo inferiore della manica verso la parte superiore della giacca. Tagliare il filo. Riprendere sui ferri di lavoro le 41-45-52 (60-65) m messe precedentemente in attesa sul ferma maglie e proseguire dal bordo inferiore della giacca come prima, da *-*, come indicato per il davanti sinistro (1° ferro = diritto del lavoro). Quando il davanti destro misura come il davanti sinistro (senza considerare il bordo davanti), lavorare il ferro successivo, sul diritto del lavoro, come segue: lavorare le prime 23 m a dir, ALLO STESSO TEMPO, diminuire 8 m in modo uniforme (diminuire 1 m lavorando 2 m insieme a dir) e lavorare le restanti 47-53-63 (73-81) m a dir = 62-68-78 (88-96) m. Lavorare ora il bordo davanti come segue (1° ferro = rovescio del lavoro): 3 ferri a dir su tutte le m; al ferro successivo, sul diritto del lavoro, formare 3 asole come segue (iniziare dal bordo inferiore e procedere verso il collo): lavorare 41-45-53 (61-65) m a dir, 1 m gettata, 2 m insieme a dir, 7-8-9 (10-12) m a dir, 1 m gettata, 2 m insieme a dir, 7-8-9 (10-12) m a dir, 1 m gettata, 2 m insieme a dir e finire con 1 m dir. Girare e lavorare tutte le m a dir. Lavorare ora 5 ferri a dir su tutte le m; intrecciare le m, senza stringere troppo il filo, sul diritto del lavoro. CONFEZIONE: Cucire l’apertura sotto le maniche, bordo contro bordo. Attaccare i bottoni. BORDO ALL’UNCINETTO: Con l’uncinetto n° 3 e il colore bianco, lavorare il bordo seguente lungo il bordo inferiore della giacca: 1 m.b, * 3 cat, 1 m.a nella prima di queste 3 cat, 1 m.b*, ripetere da *-*. Lavorare un bordo uguale lungo il bordo inferiore delle maniche. |
||||||||||||||||||||||
Spiegazioni del diagramma |
||||||||||||||||||||||
|
||||||||||||||||||||||
 |
||||||||||||||||||||||
Avete terminato questo modello?Allora taggate le vostre foto con #dropspattern o inviatele alla #dropsfan gallery. Avete bisogno di aiuto con questo modello?Troverete 16 video tutorial, una sezione per i commenti/domande e molto altro guardando il modello su www.garnstudio.com © 1982-2026 DROPS Design A/S. Ci riserviamo tutti i diritti. Questo documento, compreso tutte le sue sotto-sezioni, è protetto dalle leggi sul copyright. Potete leggere quello che potete fare con i nostri modelli alla fine di ogni modello sul nostro sito. |
||||||||||||||||||||||


Con oltre 40 anni di esperienza nel design di modelli di maglia e uncinetto, DROPS Design offre la più estesa collezione di modelli gratuiti su internet - tradotti in 17 lingue. Ad oggi vi possiamo fornire 324 cataloghi e 12290 modelli - 9561 dei quali sono tradotti in Italiano.
Ci stiamo impegnando molto per darvi il meglio che vi possiamo offrire in termini di maglia e uncinetto, ispirazioni e consigli così come filati di grande qualità ad un prezzo incredibile! Volete utilizzare i nostri modelli per qualcosa d'altro oltre al vostro uso personale? Potete leggere tutto ciò che è consentito nel testo sul Copyright in basso su tutte le pagine dei nostri modelli. Buon lavoro!
Lasciare un commento sul modello DROPS Baby 20-12
Noi saremmo felici di ricevere i tuoi commenti e opinioni su questo modello!
Se vuoi fare una domanda, fai per favore attenzione a selezionare la categoria corretta nella casella qui sotto per velocizzare il processo di risposta. I campi richiesti sono indicati da *.