
Categorie popolari
State cercando un filato?


Commenti / Domande (44)
![]() Katherine Bushman ha scritto:
Katherine Bushman ha scritto:
When casting on stitches for the front band, is it actually between 196-236 on one half rather than all across both front sides? Based on the sleeves, it feels like there should be another 70 or so stitches per side.
16.12.2024 - 02:52DROPS Design ha risposto:
Dear Mrs Bushman, you pick up a total of 196 - 236 stitches along both front pieces and neck line for the front band/neck. Happy knitting!
20.12.2024 - 08:30
![]() Patrizia ha scritto:
Patrizia ha scritto:
Buongiorno, c'è scritto che il davanti sinistro deve essere lavorato come il davanti destro...l'avvio delle nuove maglie per il davanti sinistro dovranno essere fatte all'inizio del ferro o alla fine come il davanti destro?
08.11.2022 - 16:56DROPS Design ha risposto:
Buonasera Patrizia, può avviare le maglie all'inizio del ferro. Buon lavoro!
15.11.2022 - 22:19
![]() Patrizia ha scritto:
Patrizia ha scritto:
Buongiorno, vorrei capire quando bisogno avviare nuove maglie ai lati dei ferri nel frattempo come lavoro il resto delle maglie? grazie
02.11.2022 - 12:09DROPS Design ha risposto:
Buonasera Patrizia, deve centrare le 34 maglie del centro dietro, poi lavorare le maglie come riportato e mano a mano aumentare le maglie ai lati e incorporarle nel lavoro. Buon lavoro!
02.11.2022 - 18:09
![]() Lisa ha scritto:
Lisa ha scritto:
I am trying my hardest to understand your instructions regarding first line of pattern but it doesn't make sense ? I've added 6 begining of row which equals 86 stiches but your instructions only account for 76? Can you please explain what I am doing wrong
07.09.2021 - 02:24DROPS Design ha risposto:
Dear Lisa, the description below is worked over 80 sts (= 7+2+8+6+34+6+8+2+7), when you cast on 6 sts at the end of the row, you now work them as the next 6 sts in the description: on the right side of piece: Purl 5 (seen from RS), 1 st in M.1(to get 8 sts in M.1) and the next 6 sts at the left side of piece will be worked: (seen from RS): 1 st in M.2(to get 8 sts), Purl 5. and so on. Hope this will help.
07.09.2021 - 08:44
![]() Lisa ha scritto:
Lisa ha scritto:
I'm struggling to understand pattern. I have decreased to 80 stitches and I am now starting thr pattern . Would my first row be ad follows P6,k6,p6,knit until 18 left, p6,and cast on 6. Thanks for your help
06.09.2021 - 12:06DROPS Design ha risposto:
Dear Lisa, you have to center the pattern with the K 34 sts on mid back, this means on first row: K7 (last 7 sts in M.1), P2, M.2 (8 sts), P6, K34, P6, M.1 (8 sts), P2, K7 (fisrt 7 sts in M.2) and at the same time increase stitches on each side and work the new stitches as described (in pattern/ knit or purled). Happy knitting!
06.09.2021 - 16:14
![]() Lisa ha scritto:
Lisa ha scritto:
Hi on the back piece, when casting on for the sleeves, I'm not going from 80 stitches to 198, I keep getting 139 after the increases instead of 198 sts, what am I doing Wrong? Thanks
05.09.2021 - 15:02DROPS Design ha risposto:
Dear Lisa, By the amount of stitches you claim, it seems you are increasing only on one side. If you increase 18 + 24 + 17 stitches, you increase 59 stitches in one side (80+59 = 139 stitches). However, you need to increase on each side: 59x2 = 118 stitches, which, if you add to 80, you get the 198 stitches. Happy knitting!
05.09.2021 - 16:46
![]() Silvia ha scritto:
Silvia ha scritto:
Liegen zwischen dem verdrehen der Maschen, um das Zopfmuster zu erhalten, immer 5 Reihen und 13 Reihen oder sollen es 10 Reihen und 26 Reihen sein (also immer Hin- und Rückreihe)?
28.11.2017 - 16:56DROPS Design ha risposto:
Liebe Silvia, es sind immer 5 Reihen und 13 Reihen zwischen den Zöpfe. Viel Spaß beim stricken!
29.11.2017 - 08:20
![]() Josephine ha scritto:
Josephine ha scritto:
Frage zur re. Vorderseite. Werden die 83M. alle auf einmal für den Ärmel angeschlagen? Oder einseitig 3 x 6M., 2 x 13M und 1 x 18 (total 62M.) und was ist mit den restlichen 21M?
01.03.2017 - 16:24DROPS Design ha risposto:
Liebe Josephine, die Maschen werden am Ende jeder Reihe angeschlagen, dh beideitig in jeder 2. Reihe: 3 x 6 M, 2 x 13 M und 1 x 18 M (1. Größe), dann haben Sie: 66 M + (18 + 26 + 18)x2 (= 2 Ärmel) = 66 + 62x2 = 66+124= 190 M. Viel Spaß beim stricken!
01.03.2017 - 17:20
![]() Anna ha scritto:
Anna ha scritto:
"Rückenteil" verstehe das "auf beiden Seiten" anschlagen der neuen Maschen nicht. 6 M. 3 Mal ... soll das in der Rückreihe 6M. am Anfang und 6M. am Ende der Reihe anschlagen, Drehen, das gleiche wiederholen (für 3 Reihe) , dann mit 12 M. (in welchen Abständen?) am Anfang und 12 M. am Ende ...??? Das Muster ist klar, aber wie soll die zunahmen ins Muster einstricken?
27.02.2017 - 19:23DROPS Design ha risposto:
Liebe Anna, Sie müssen die neuen Maschen am Ende jeder Reihe (für beide Ärmel) anschlagen, diese neuen Maschen werden im Muster gestrickt, wenn sie alle zugenommen sind, haben Sie: 1 Randm, 6 M. li., M1, 6 M. li., 35-36-37-38-39-40 M. re., 6 M. li., M1, 2 li., M2, 6 li., 30-32-34-36-38-40 re. (hinten in der Mitte), 6 li., M1, 2 li., M2, 6 li., 35-36-37-38-39-40 r, 6 li., M2, 6 li., 1 Randm. Viel Spaß beim stricken!
28.02.2017 - 08:47Sophia ha scritto:
Thank you very much that answer me so soon. I think i understand now.
09.09.2016 - 13:23
|
|||||||||||||
Amazing Grace#amazinggracecardigan |
|||||||||||||
|
|
|||||||||||||
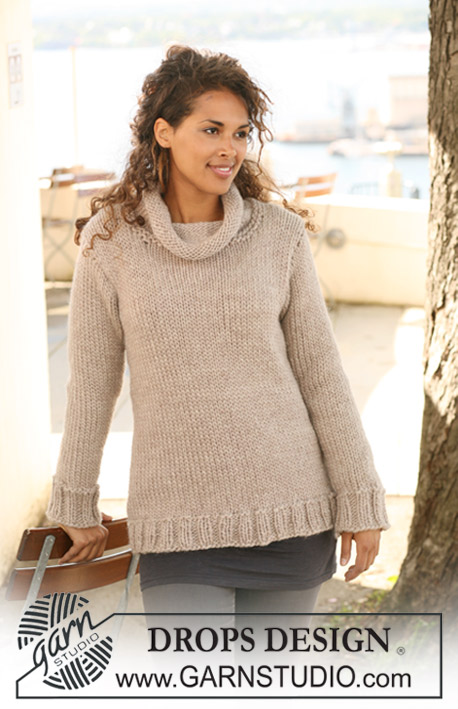
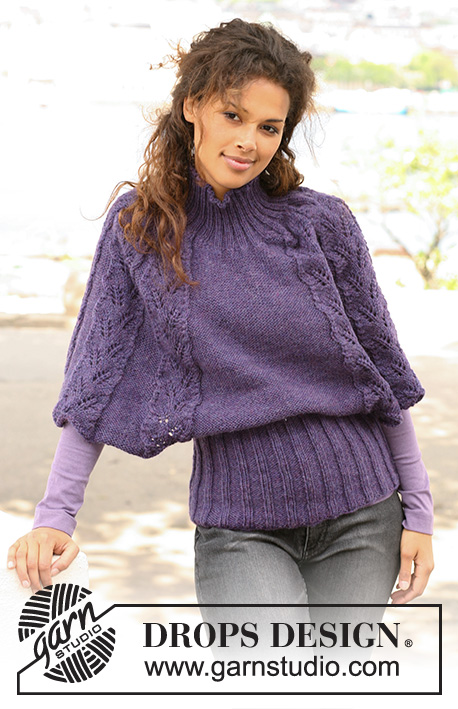
Giacchino DROPS lavorato ai ferri con trecce e colletto a scialle in 2 capi di "Alpaca". Taglie: dalla S alla XXXL.
DROPS 126-34 |
|||||||||||||
|
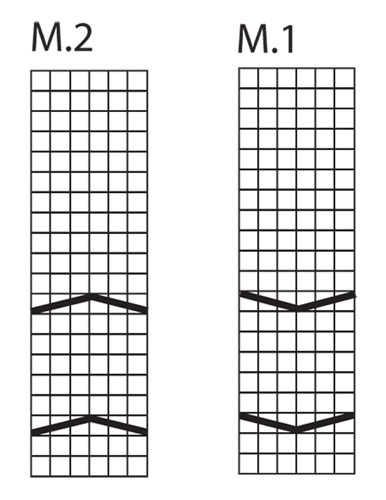
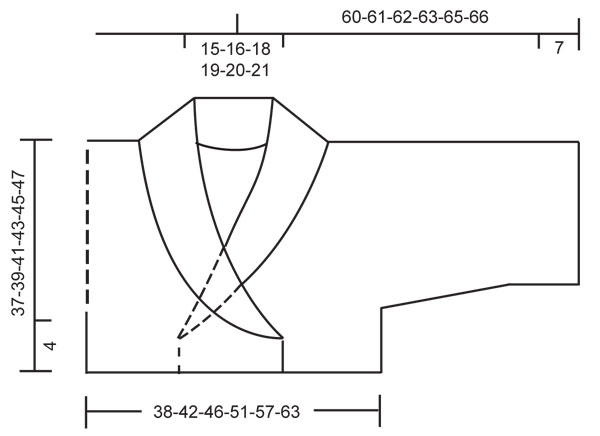
M LEGACCIO (avanti e indietro sui f): lavorare tutti i f a dir. M LEGACCIO (in tondo): 1 giro dir, 1 giro rov. MOTIVO: Vedere i diagrammi M.1 e M.2. Il diagramma mostra il motivo dal diritto del lavoro. 1° f del diagramma = diritto del lavoro. -------------------------------------------------------- DIETRO: Lavorato avanti e indietro sui f circolari. Avviare 84-92-100-112-124-140 m (compresa 1 m di vivagno a ogni lato) con i f n° 4,5 mm con 2 capi di Alpaca. Lavorare a coste come segue – visto dal diritto del lavoro: 1 m di vivagno, * 2 m dir, 2 m rov *, ripetere *-* e finire con 2 m dir e 1 m di vivagno. FARE ATTENZIONE ALLA TENSIONE DEL LAVORO! Quando il lavoro misura 4 cm passare ai f n° 5 mm e lavorare 2 f a M LEGACCIO – leggere sopra, ALLO STESSO TEMPO sul 1° f distribuire 18-18-20-24-26-30 diminuzioni in modo uniforme = 66-74-80-88-98-110 m. LEGGERE TUTTA LA SEZIONE SEGUENTE PRIMA DI CONTINUARE! Ora avviare nuove m a ogni lato per le maniche, ripetere alla fine di ogni f a ogni lato come segue: 6 m 3 volte, 13-12-12-11-10-8 m 2 volte e 18-18-17-17-16-16 m 1 volta = 190-194-198-202-206-210 m. LAVORARE LE M AUMENTATE NEL MOTIVO SEGUENTE DURANTE IL LAVORO (lavorare le m in M.1/M.2 a m rasata fino a quando rientrano nel motivo) – visto dall’inizio del f dal diritto del lavoro quando sono state avviate tutte le m: 1 m di vivagno, 6 m rov, M.1, 6 m rov, 35-36-37-38-39-40 m dir, 6 m rov, M.1, 2 m rov, M.2, 6 m rov, 30-32-34-36-38-40 m dir (queste m sono il centro dietro), 6 m rov, M.1, 2 m rov, M.2, 6 m rov, 35-36-37-38-39-40 m dir, 6 m rov, M.2, 6 m rov, 1 m di vivagno. Continuare questo motivo fino a quando il lavoro misura 35-37-39-41-43-45 cm, ora intrecciare le 26-28-30-32-34-36 m centrali per il collo e finire ogni spalla in modo separato = 82-83-84-85-86-87 m rimaste su ogni spalla/manica. Intrecciare quando il lavoro misura 37-39-41-43-45-47 cm. DAVANTI DESTRO: Avviare 26-30-34-38-42-50 m (compresa 1 m di vivagno a lato e 1 m di vivagno verso il bordo davanti) con i f n° 4,5 mm con 2 capi di Alpaca. Lavorare a coste 2 m dir/2 m rov con 1 m di vivagno a ogni lato. Quando il lavoro misura 4 cm passare ai f n° 5 mm e lavorare 2 f a m legaccio, ALLO STESSO TEMPO sul 1° f distribuire 5-6-8-9-9-12 diminuzioni in modo uniforme = 21-24-26-29-33-38 m. Ora avviare nuove m alla fine di ogni f dal diritto del lavoro (a lato) come descritto per il dietro = 83-84-85-86-87-88 m. LAVORARE LE M AUMENTATE CON IL MOTIVO SEGUENTE DURANTE IL LAVORO – visto dall’inizio del f dal diritto del lavoro, cioè al centro davanti: 1 m di vivagno, 2 m dir, 6 m rov, M.1, 2 m rov, M.2, 6 m rov, 35-36-37-38-39-40 m dir, 6 m rov, M.2, 6 m rov, 1 m di vivagno. Continuare questo motivo fino a quando il lavoro misura 37-39-41-43-45-47 cm, intrecciare. DAVANTI SINISTRO: Avviare e lavorare come per il davanti destro, ma lavorare il motivo come segue – dal diritto del lavoro e dal lato: 1 m di vivagno, 6 m rov, M.1, 6 m rov, 35-36-37-38-39-40 m dir, 6 m rov, M.1, 2 m rov, M.2, 6 m rov, 2 m dir, 1 m di vivagno. CONFEZIONE : Cucire i margini delle spalle. Cucire i margini sotto le braccia e i margini dei lati all’interno della m di vivagno. BORDO DAVANTI: Riprendere 196-204-212-220-228-236 m lungo il davanti destro, attorno al collo e giù lungo il davanti sinistro con i f circolari n° 4,5 mm con 2 capi. Lavorare 1 f dir e continuare come segue dal diritto del lavoro: 5 m a m legaccio, * 2 m dir, 2 m rov *, ripetere *-* e finire con 2 m dir e 5 m a m legaccio. Quando il lavoro misura 2-2-2-3-3-3 e 8-9-10-11-12-13 cm fare le asole come segue: lavorare insieme a dir la 3° e la 4° m sul davanti destro e fare 1 gettato. Sul f successivo lavorare i gettati a dir. ALLO STESSO TEMPO quando il bordo davanti misura 7 cm aumentare 1 m in ognuna delle 10-10-10-12-12-12 sezioni a rov centrali (= centro dietro) = 206-214-222-232-240-248 m. Continuare a coste fino a quando il bordo davanti misura 11-12-13-14-15-16 cm, intrecciare con dir su dir e rov su rov. POLSINI: Riprendere dal diritto del lavoro 124-128-132-136-140-144 m attorno ai bordi delle maniche con i f circolari n° 4,5 mm (60 cm) con 2 capi. Lavorare 2 giri a M LEGACCIO – leggere sopra – e continuare a coste 2 m dir/2 m rov fino a quando il lavoro misura 7 cm. Intrecciare con dir su dir e rov su rov. Attaccare i bottoni sul bordo davanti sinistro. |
|||||||||||||
Spiegazioni del diagramma |
|||||||||||||
|
|||||||||||||
 |
|||||||||||||
 |
|||||||||||||
Avete terminato questo modello?Allora taggate le vostre foto con #dropspattern #amazinggracecardigan o inviatele alla #dropsfan gallery. Avete bisogno di aiuto con questo modello?Troverete 17 video tutorial, una sezione per i commenti/domande e molto altro guardando il modello su www.garnstudio.com © 1982-2026 DROPS Design A/S. Ci riserviamo tutti i diritti. Questo documento, compreso tutte le sue sotto-sezioni, è protetto dalle leggi sul copyright. Potete leggere quello che potete fare con i nostri modelli alla fine di ogni modello sul nostro sito. |
|||||||||||||


Con oltre 40 anni di esperienza nel design di modelli di maglia e uncinetto, DROPS Design offre la più estesa collezione di modelli gratuiti su internet - tradotti in 17 lingue. Ad oggi vi possiamo fornire 324 cataloghi e 12290 modelli - 9561 dei quali sono tradotti in Italiano.
Ci stiamo impegnando molto per darvi il meglio che vi possiamo offrire in termini di maglia e uncinetto, ispirazioni e consigli così come filati di grande qualità ad un prezzo incredibile! Volete utilizzare i nostri modelli per qualcosa d'altro oltre al vostro uso personale? Potete leggere tutto ciò che è consentito nel testo sul Copyright in basso su tutte le pagine dei nostri modelli. Buon lavoro!
Lasciare un commento sul modello DROPS 126-34
Noi saremmo felici di ricevere i tuoi commenti e opinioni su questo modello!
Se vuoi fare una domanda, fai per favore attenzione a selezionare la categoria corretta nella casella qui sotto per velocizzare il processo di risposta. I campi richiesti sono indicati da *.