
Categorie popolari
State cercando un filato?


Commenti / Domande (83)
![]() Simone Van Der Gaag ha scritto:
Simone Van Der Gaag ha scritto:
Thank you for the lovely pattern. I knitted it with handspun yarn and it worked out very well. I really love the pattern amd the fact you almost knit the whole cardigan in one piece. Great!
01.02.2021 - 09:23
![]() Jo ha scritto:
Jo ha scritto:
Can you clarify the ribbing please? Is it two by two or four by four or two by four. (The site isn’t allowing me to write asterisks or numbers so apologies for weird phrasing.) thanks.
28.12.2020 - 14:05
![]() Sylvia Lees ha scritto:
Sylvia Lees ha scritto:
You say to buy 7 buttons, and to make 7 buttonholes, but there are 8 in the picture. Why?
23.05.2020 - 21:07DROPS Design ha risposto:
Dear Sylvia, there are 7 buttons on tthe sweter seen at the picture, the top button is abot 1-1.5 cm from the top, the bottom is left open. Where do you see an 8th? Happy Knitting!
25.05.2020 - 00:42
![]() Ine ha scritto:
Ine ha scritto:
Is er al iemand die het vest met lange mouwen heeft gebreid..? ( geprobeerd te breien..) Gelukkig 2020!
01.01.2020 - 12:58
![]() Lee ha scritto:
Lee ha scritto:
Would it be possible to give instructions on how to modify this sweater to a pull over instead of button front?
22.07.2019 - 21:45
![]() Anja ha scritto:
Anja ha scritto:
Hallo, Ik brei graag top-down en wil dat model ook zo breien. Zou het met het patroon lukken wanneer ik het omkeer en i.p.v. steken bijv. 2 steken Samen te breien - 1 steek toevoegen? Zou het lukken?
07.03.2019 - 11:09DROPS Design ha risposto:
Dag Anja,
Theoretisch zou je het om moeten kunnen keren. Waar je meerdert moet je dan minderen en vice versa. Zo kun j e ook de kabel andersom breien. Het is wel verstandig om het eerst even goed uit te denken en evt. ook uit te schrijven.
07.03.2019 - 20:42Arcadia ha scritto:
I'm not sure if I've understood correctly. I have just finished the rib. The next row, on the RS (where the rib looks like KK PPPP KK) is KNIT (with decreases - K2, * K2 tog, K2 tog, K2 *) Now it's asking for reverse stocking, which means the RS is all PURL - but I just did a row of KNIT. Is it correct that on the RS there's one row of KNIT before PURLing the rest of the garment? Thank you :)
01.05.2018 - 03:17DROPS Design ha risposto:
Dear Arcadia, Knit the sts as described on first row after rib (= from RS) then continue with reversed stocking st (= P from RS and K from WS). Happy knitting!
02.05.2018 - 09:45
![]() Bärbel ha scritto:
Bärbel ha scritto:
Hallo liebes Drops-Team, ich habe eben die Anleitung ausgedruckt. Leider ist das Diagramm und die Zeichnung mit den Maßen nicht dabei, auch nicht in der Druckvorschau. Da werden auch nur 2 Seiten angezeigt. Wie könnt Ihr mir helfen? LG, Bärbel
10.03.2018 - 10:50DROPS Design ha risposto:
Liebe Bärbel, prüfen Sie die Druckeinstellungen, damit alle Seiten gedrückt werden. Viel Spaß beim stricken!
12.03.2018 - 08:35
![]() Marti Hand ha scritto:
Marti Hand ha scritto:
I have a question about the number of stitches for the size Small. My test sample came out correct -> 17x22 stitches = 4"x4" in Alaska. The number of cast on stitches called for = 240 stitches =56" in circumference...is the number of CO stitches correct for a size small? My hip measurement is 35 inches, and feel the above 56" is much too big to fit my frame. Either I'm super small or Norwegians are super big! If this is the case, can you please provide knitting instructions for XS?
16.11.2017 - 13:03DROPS Design ha risposto:
Dear Mrs Hand, you first work in rib, so that you need more sts for the correct width, then you will decrease to 164 sts in size S after ribbing. If your tension is fine, you will the finished measurements as in chart at the bottom of the pattern. Happy knitting!
16.11.2017 - 13:28
![]() Anja ha scritto:
Anja ha scritto:
Hey ihr Lieben! Ist das Zufall oder habt Ihr meinen Namen, den ich dieser Jacke meinem Projekt dazu in der großen Strickcommunity gegeben hab, verwendet? Ist mir nur grad so aufgefallen. Vorher hatte die Jacke nämlich nur diese Nummer und ich hab mein Projekt "Keltischer Wintertraum" genannt... LG Anja
25.10.2017 - 09:46DROPS Design ha risposto:
Liebe Anja, die Namen der Modellen sind aus der Empfehlungen und Vorschläge der Website Besucher ausgewählt; es ist dann nur Zufall.
25.10.2017 - 12:22
|
|||||||||||||||||||||||||
Celtic Winter#celticwintercardigan |
|||||||||||||||||||||||||
|
|
|||||||||||||||||||||||||
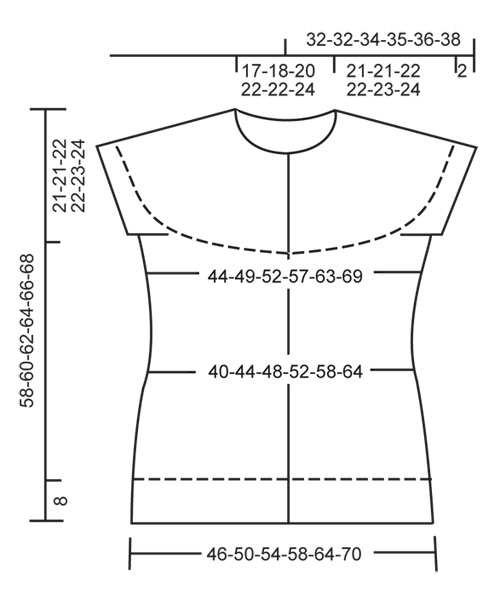
Cardigan DROPS, a maniche raglan corte e trecce in "Alaska". Dalla S alla XXXL.
DROPS 121-27 |
|||||||||||||||||||||||||
|
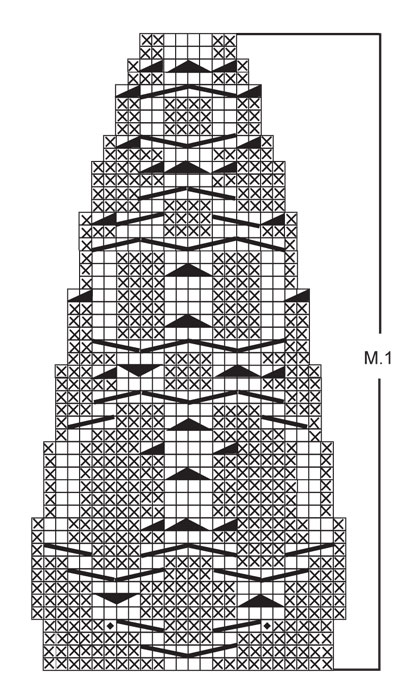
PUNTO LEGACCIO (avanti e indietro sul f): Lavorare tutti i ferri a dir. MOTIVO: Ved diag M.1 – il motivo mostra il diag sul diritto. ASOLE: Eseguire le asole sul bordo destro davanti. 1 asola = lavorare insieme a diritto la 3° e la 4° m centrale/a partire dal bordo , 1 gett. Posizionare le asole quando il lavoro misura: TAGLIA S: 12, 19, 26, 34, 41, 49 e 56 cm. TAGLIA M: 12, 20, 28, 36, 43, 51 e 58 cm. TAGLIA L: 12, 20, 28, 36, 44, 52 e 60 cm. TAGLIA XL: 12, 21, 29, 37, 45, 54 e 62 cm. TAGLIA XXL: 12, 21, 30, 39, 47, 56 e 64 cm. TAGLIA XXXL: 12, 21, 30, 39, 48, 57 e 66 cm. -------------------------------------------------------- CORPO (DIETRO&DAVANTI): Si lavora davanti e indietro sul ferro circolare dal centro davanti. Avviare 240-264-282-306-336-366 m (incl 5 m di bordo davanti ad ogni lato) con il ferro circolare 4 ed il filo Alaska. Lavorare così (sul diritto): 5 m di bordo davanti a PUNTO LEGACCIO – ved spieg sopra, 2 m dir, * 4 m rov, 2 m dir *, ripetere da *-*, e terminare con 5 m di bordo davanti a punto legaccio. Quando le coste misurano ca 8 cm (fare attenzione che il f seguente sarà sul diritto) continuare con il ferro circolare 5. Lavorare il f seguente così: 5 m di bordo davanti a punto legaccio, 2 m dir, * 2 m insieme a dir, 2 m insieme a dir, 2 m dir *, ripetere da *-*, e terminare con 5 m di bordo davanti a punto legaccio = 164-180-192-208-228-248 m. Continuare a maglia rasata rovescia e i bordi davanti a punto legaccio. Lasciare 1 segno dopo 43-47-50-54-59-64 m da ogni lato (= 78-86-92-100-110-120 m tra i segni sul dietro). RICORDATI LA TENSIONE DELLA MAGLIA! Quando il lavoro misura 10-10-11-11-12-12 cm, diminuire 1 m ad ogni lato dei segni ai lati, ripetere queste diminuzioni ogni 2 cm in totale 5 volte = 144-160-172-188-208-228 m. ALLO STESSO TEMPO, quando il lavoro misura 12 cm, eseguire le ASOLE – ved spieg sopra! Quando il lavoro misura 22-22-23-23-24-24 cm, aumentare 1 m ad ogni lato dei segni ai lati, ripetere questi aumenti ogni 3 cm in totale 4 volte = 160-176-188-204-224-244 m. Quando il lavoro misura 37-39-40-42-43-44 cm, intrecciare per gli scalfi sul diritto 6-6-8-8-10-10 m ad ogni lato (= 3-3-4-4-5-5 m ad ogni lato dei segni) = rimangono 148-164-172-188-204-224 m sul ferro. Mettere da parte il lavoro. BORDI DELLE MANICHE: Si lavora avanti e indietro sul ferro circolare. Avviare, LENTAMENTE, 58-61-70-73-78-79 m con il ferro circolare 4 ed il filo Alaska. Lavorare 3 f dir e poi lavorare il f seguente così: intrecciare le 3-3-4-4-5-5 prime m, lavorare a dir finché non rimangano 3-3-4-4-5-5 m, intrecciare queste m, tagliare il filo = rimangono 52-55-62-65-68-69 m sul f. Mettere da parte il lavoro e lavorare il 2° bordo di manica. SPRONE: Riprendere le m dai bordi delle maniche sullo stesso ferro circolare 5 del corpo (dietro&davanti), sopra le m intrecciate per gli scalfi = 252-274-296-318-340-362 m. Lavorare 1 f dir sul rovescio e poi 0-0-2-2-4-6 f maglia rasata rovescia (i bordi davanti a punto legaccio). Lavorare il f seguente sul diritto così: 5 m di bordo davanti a punto legaccio, 10 m rov, * lavorare 2 volte a dir ognuna delle 2 m seguenti (si passa da 2 m a 4 m dir), 20 m rov *, ripetere da *-* in totale 10-11-12-13-14-15 volte, lavorare 2 volte a dir ognuna delle 2 m seguenti (si passa da 2 m a 4 m dir), 10 m rov e 5 m di bordo davanti a punto legaccio = 274-298-322-346-370-394 m. Continuare seguendo M.1 e i bordi davanti al punto legaccio come prima (1° f = rovescio). Al 4° f di M.1, aumentare 2 m in ogni motivo come indica il diagramma = 296-322-348-374-400-426 m. Terminare poi M.1. Dopo M.1, ci sono 98-106-114-122-130-138 m. Lavorare 1 f sul rovescio del lavoro. Continuare con il ferro circolare 4. Lavorare 1 f dir sul dir, allo stesso tempo, distribuire uniformemente 16-18-22-24-30-30 diminuzioni (non diminuire sui bordi davanti) = 82-88-92-98-100-108 m. Lavorare 1 f diritto. Lasciare 1 segno in mezzo dietro. Continuare a punto legaccio su tutte le m, allo stesso tempo, lavorare a ferri accorciati dietro così (1° f = diritto): Lavorare 7 m oltre/dopo il segno in mezzo dietro, girare, lavorare 7 m oltre/dopo il segno dall’altro lato, girare, lavorare 14 m dopo il segno, girare, lavorare 14 m dopo il segno dall’altro lato, girare, continuare così con 7 m in più prima di girare ogni volta fino a quando non siano state lavorate in totale 35-35-35-42-42-42 m ad ogni lato del segno. Girare, lavorare a dir tutte le m, girare e lavorare 3 f su tutte le m, intrecciare a dir sul dir. CONFEZIONE: Cucire i bordi delle maniche bordo contro bordo e chiudere le aperture sotto le maniche. Attaccare i bottoni. |
|||||||||||||||||||||||||
Spiegazioni del diagramma |
|||||||||||||||||||||||||
|
|||||||||||||||||||||||||
 |
|||||||||||||||||||||||||
 |
|||||||||||||||||||||||||
Avete terminato questo modello?Allora taggate le vostre foto con #dropspattern #celticwintercardigan o inviatele alla #dropsfan gallery. Avete bisogno di aiuto con questo modello?Troverete 19 video tutorial, una sezione per i commenti/domande e molto altro guardando il modello su www.garnstudio.com © 1982-2026 DROPS Design A/S. Ci riserviamo tutti i diritti. Questo documento, compreso tutte le sue sotto-sezioni, è protetto dalle leggi sul copyright. Potete leggere quello che potete fare con i nostri modelli alla fine di ogni modello sul nostro sito. |
|||||||||||||||||||||||||


Con oltre 40 anni di esperienza nel design di modelli di maglia e uncinetto, DROPS Design offre la più estesa collezione di modelli gratuiti su internet - tradotti in 17 lingue. Ad oggi vi possiamo fornire 324 cataloghi e 12290 modelli - 9561 dei quali sono tradotti in Italiano.
Ci stiamo impegnando molto per darvi il meglio che vi possiamo offrire in termini di maglia e uncinetto, ispirazioni e consigli così come filati di grande qualità ad un prezzo incredibile! Volete utilizzare i nostri modelli per qualcosa d'altro oltre al vostro uso personale? Potete leggere tutto ciò che è consentito nel testo sul Copyright in basso su tutte le pagine dei nostri modelli. Buon lavoro!
Lasciare un commento sul modello DROPS 121-27
Noi saremmo felici di ricevere i tuoi commenti e opinioni su questo modello!
Se vuoi fare una domanda, fai per favore attenzione a selezionare la categoria corretta nella casella qui sotto per velocizzare il processo di risposta. I campi richiesti sono indicati da *.