
Categorie popolari
State cercando un filato?


Commenti / Domande (208)
![]() Doris Litz ha scritto:
Doris Litz ha scritto:
Hallo, ich noch mal. Fehler gefunden, nur 1 M abketten, nicht 17!! 17 sollen dann übrig bleiben und das stimmt dann auch. Wer lesen Kann ... Danke noch einmal für die tolle Anleitung Lg Doris Lietz
23.07.2020 - 12:50
![]() Doris Lietz ha scritto:
Doris Lietz ha scritto:
Hallo Ihr Lieben, Ich bin vorne bis zu den Schultern gut klar gekommen. Es bleibt nach Abnahme des Ausschnittes aber nur 1 Mache übrig. Wie soll ich mit 1 Mache bis 74 cm weiter hochstricken? 35 M, wenn der Armausschnitt fertig ist -6 stillgelegte -7, -4, -17 = 1 Masche? Ich mache erst einmal hinten weiter, vielleicht kommt noch eine Erleuchtung. Ich freue mich auf ihre Antwort, denn es ist ein schönes Stück, jetzt schon Lg Doris Lietz
23.07.2020 - 12:40DROPS Design ha risposto:
Liebe Doris, Sie dürfen zuletzt nicht 17 Maschen abnehmen, sondern nur 1 Masche, denn 17 ist die Angabe der restlichen Maschen auf der Nadel! Also 35 -6 -7 -4 -1 = 17 Maschen übrig. Gutes Gelingen weiterhin!
24.07.2020 - 10:20
![]() Cristina Rizzi ha scritto:
Cristina Rizzi ha scritto:
Credo vi sia un problema con il pattern e avrei bisogno di parlare con qualcuno Grazie
02.05.2020 - 14:49DROPS Design ha risposto:
Buongiorno Cristina. Può provare a indicare il problema qui oppure può contattare il suo rivenditore Drops di fiducia. Buon lavoro!
02.05.2020 - 14:54
![]() Ruth Burgherr ha scritto:
Ruth Burgherr ha scritto:
Nach 47 cm wie folgt: 38 M glatt, 6 M Krausrippe und am Schluss der Arbeit 6 M. anschlagen. Müssen diese 6 M am Schluss der Arbeit angenäht werden? Diese 6 M hängen ja in der Luft. Das sieht ja speziell aus?
26.12.2019 - 21:02DROPS Design ha risposto:
Liebe Frau Burgherr, es ist so richtig, dh die 6 Maschen am Ende der Reihe sind die "Blendemaschen", also die 6 Maschen beidseitig (Halsausschnitt) werden krausrechts gestrickt. Viel Spaß beim stricken!
02.01.2020 - 11:12
![]() Patty ha scritto:
Patty ha scritto:
Btw this pattern is so beautiful and fun. Going to make multiples in diff colors. Thank you!!
15.06.2018 - 04:43
![]() Patty ha scritto:
Patty ha scritto:
All good until here " turn and now continue back and forth on needle, work 6 GARTER STS – see above, stockinette st on..." Am I supposed to knit the 42 Purl 6 and then turn around and knit 6, Purl 42 to keep that stockinette stitch and then turn around again at the beginning of the round as would be usual and during that next row add the stitches? Thus making the right side 1 row longer?
15.06.2018 - 04:41DROPS Design ha risposto:
Dear Patty, you now continue working in rows (= alternately from RS and from WS starting with a WS row) with 6 sts in garter st at the beg of row (= from WS K the first 6 sts) and 6 sts at the end of row (on first row pick up 6 sts behind the 6 sts from beg of row - see video)., ie on first row from RS: K6, P to the end of row and pick up 6 sts behind the first 6 sts from beg of row. Happy knitting!
15.06.2018 - 08:41
![]() Nina ha scritto:
Nina ha scritto:
Auch ich bin anders vorgegangen, damit mir das Band aus Krausrippen nicht genau über foe Brust verläuft: nach 34cm hab ich 5 Krausrippen gearbeitet und dann ab deren oberem Rand nochmal 10cm glatt re gestrickt, bis ich mit den Abnahmen für die Armlöcher begonnen habe. Nun hat der Pulli in Gr M eine Gesamtlänge von gut 70cm und alles sitzt, wo es soll. Sehr schönes Modell!
17.05.2018 - 14:16
![]() Mel ha scritto:
Mel ha scritto:
I am having trouble making the XXL size. I have 264 stitches, have changed to 3.5mm needles, but cannot make sense of the instructions during the garter stitches, to reduce to 188 stitches. Can someone please tell me how to make the maths work to reduce by 76 stitches?
02.03.2018 - 15:21DROPS Design ha risposto:
Dear Mel, work as follows: 28 garter sts, K2 tog across the next sts until 28 sts remain before first marker, work now 56 garter sts (= 28 sts before + 28 sts after marker), K2 tog across until 28 sts remain before second marker, and finish with garter st on the remaining 28 sts = 188 sts. You will have 28 sts worked in garter st on each side of both markers (= 56 sts on each side) and work all sts on mid front + all sts on mid back tog 2 by 2. Happy knitting!
02.03.2018 - 16:24
![]() Husen ha scritto:
Husen ha scritto:
Hallo, Was heisst beim linken Vorderteil gegen die Mitte 6 M auf einen Hilfsfaden legen. Weiter bei jeder R von der Mitte gegen den Hals abk. Ich verstehe das gegen absolut nicht.
18.08.2017 - 22:58DROPS Design ha risposto:
Liebe Frau Husen, beim linken Vorderteil, die 6 ersten Maschen (bei einer Hin-Reihe) stricken dann auf einem Hilfsnadel stilllegen, weiter stricken und gleichzeitig für den Hals wie beschrieben abketten. Viel Spaß beim stricken!
28.08.2017 - 12:10
![]() Camilla ha scritto:
Camilla ha scritto:
Jeg er på på de siste fellingene på ermet. Men det står ikke noe om hvor mange masker som skal felles av til slutt? Litt misvisende å bare henvise til cm-lengde. Synes det hadde vært lettere å kontrollere mitt eget arbeid om jeg visste hvor mange masker jeg skal ha igjen etter hver felling.
18.02.2017 - 16:43DROPS Design ha risposto:
Hej Camilla. Det er ikke relevant hvor mange masker du har i dette mönster, derfor staar det der ikke. Fölger du beskrivelsen og har det rette antal cm (strikkefasthed), saa kommer det til at stemme fint. Du kan ogsaa skrive hvor mange masker du har tilbage naar du er faerdig med aerme 1 - saa har du det til dit aerme 2.
22.02.2017 - 12:23
|
|
Jane Austen#janeaustensweater |
|
 |
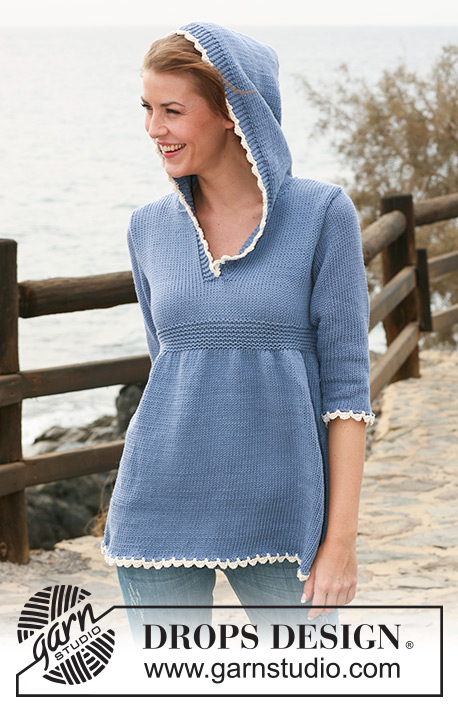 |
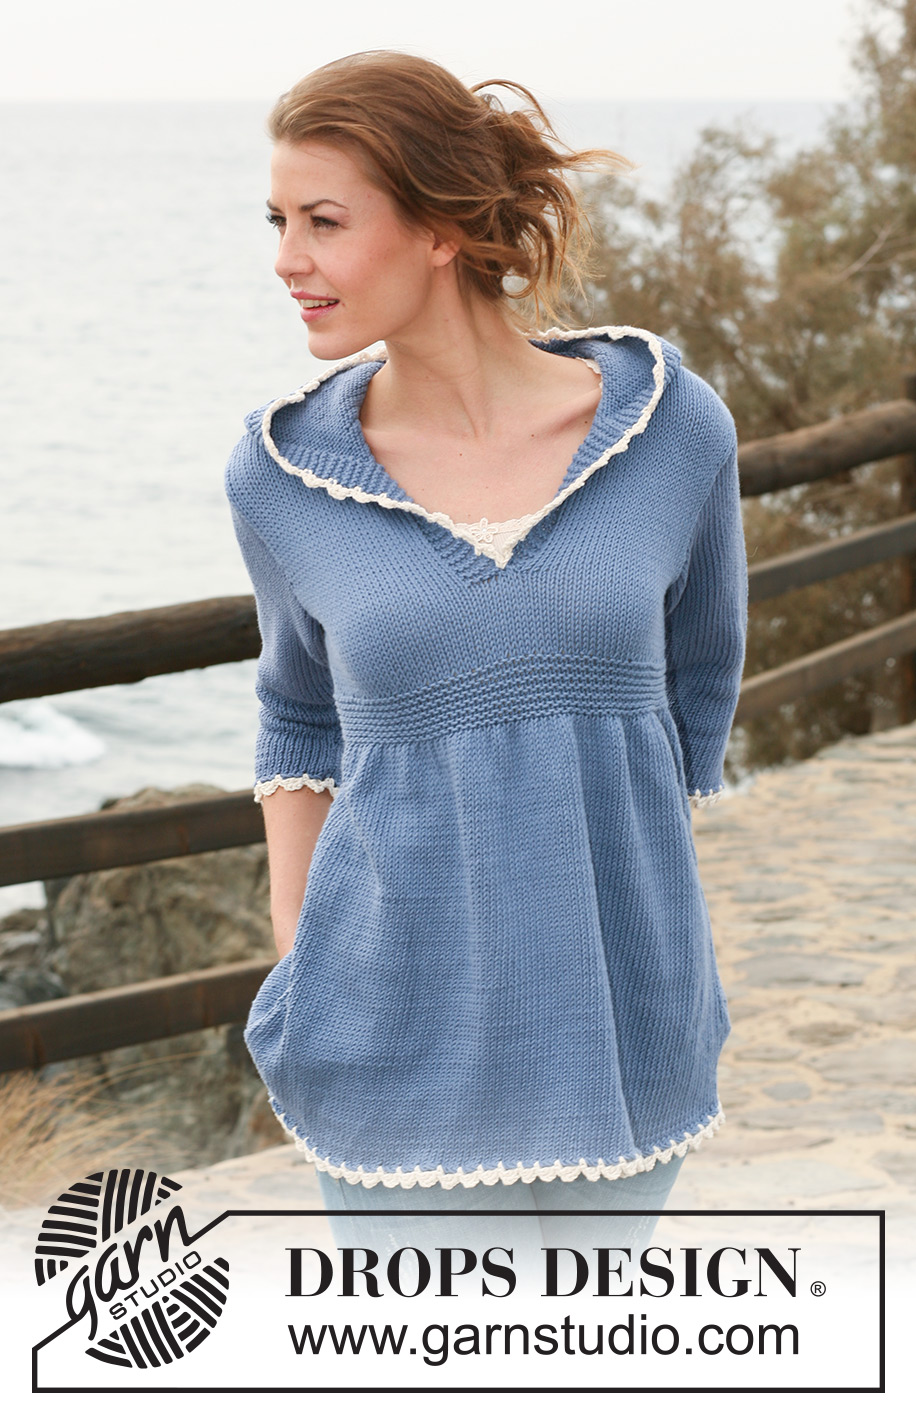
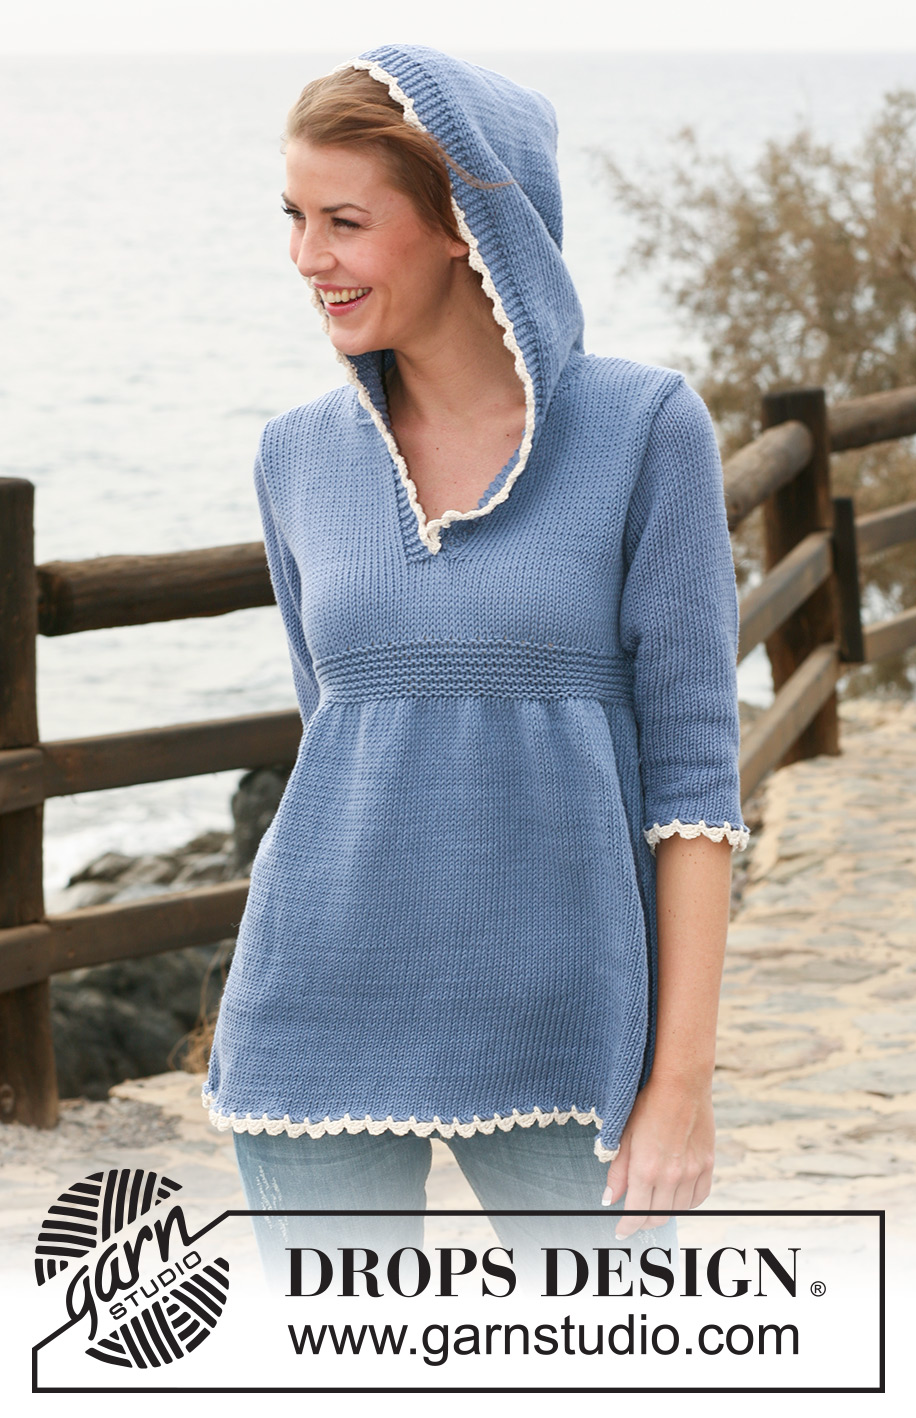
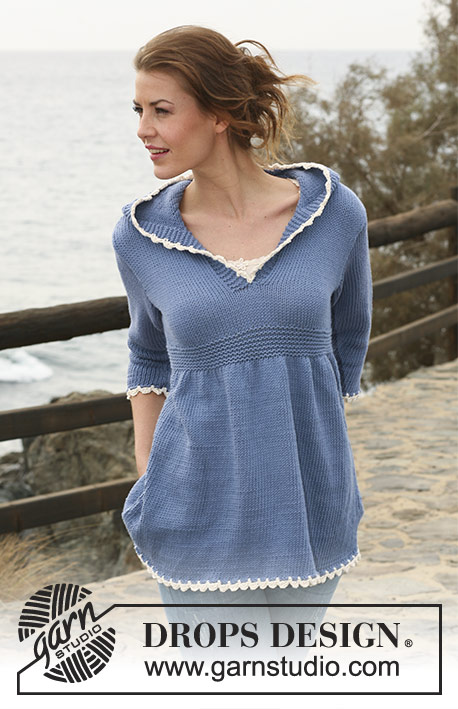
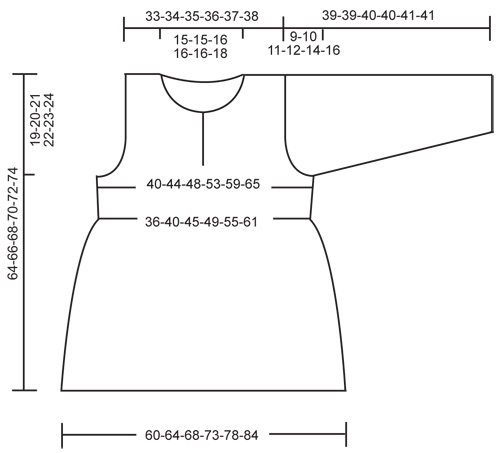
Pullover DROPS in maglia rasata con cappuccio e bordi all’uncinetto con 1 filo ”Paris” oppure 2 fili ”Alpaca”. Dal S al XXXL.
DROPS 120-1 |
|
|
PUNTO LEGACCIO (in tondo sul f circ): 1 giro dir, 1 giro rov. PUNTO LEGACCIO (avanti e indietro sul f): Lavorare tutti i ferri a diritto. CONSIGLIO PER MISURARE: Dovuto al peso del filato, tenere il lavoro appeso per misurarlo in altezza, se no potrebbe essere troppo lungo. DIETRO&DAVANTI: Si lavora in tondo sul ferro circolare. Con 1 filo Paris blu jeans o 2 fili Alpaca blu/viola e il ferro circolare 5, avviare 204-216-232-248-264-284 m. Lavorare 2 giri di PUNTO LEGACCIO – ved spieg sopra - e continuare a maglia rasata su tutte le m. VED CONSIGLIO PER MISURARE! RICORDATI LA TENSIONE DELLA MAGLIA! Quando il lavoro misura 36 cm per tutte le taglie, continuare con il ferro circolare 3,5. Lasciare 2 segni/fili, il 1° d’inizio giro e il 2° dopo 102-108-116-124-132-142 m. Lavorare 14 giri di punto legaccio, ALLO STESSO TEMPO, lavorare il 1° giro così: 11-14-18-22-28-33 m punto legaccio, 2 m insieme a dir sulle m seguenti finché non rimangano 11-14-18-22-28-33 m prima del 1° segno, 22-28-36-44-56-66 m punto legaccio, 2 m insieme a dir sulle m seguenti finché non rimangano 11-14-18-22-28-33 m prima del 2° segno, e punto legaccio sulle 11-14-18-22-28-33 m = 124-136-152-168-188-208 m. Dopo 14 giri di punto leg, lavorare 1 giro di maglia rasata, ALLO STESSO TEMPO, distribuire 12 aumenti per tutte le taglie ca dopo ogni 9-10-11-12-14-16 m (fare attenzione che vengano distribuiti 6 aumenti da ogni parte di ognuno dei segni)= 136-148-164-180-200-220 m. Riprendere il ferro circolare 5 e continuare a maglia rasata. Quando il lavoro misura 45-46-47-48-49-50 cm, lavorare così: 31-34-38-42-47-52 m maglia rasata, 6 m punto legaccio, girare il lavoro e continuare avanti e indietro da qui, lavorare 6 m Punto Legaccio – ved spieg sopra, maglia rasata sulle m rimanenti, avviare 6 nuove m verso il centro davanti = 142-154-170-186-206-226 m. Continuare a maglia rasata con 6 m punto legaccio ad ogni lato verso il centro davanti. ALLO STESSO TEMPO, al f seguente, intrecciare 6 m per gli scalfi ad ogni lato (= 3 m ad ogni lato del segno) e terminare ogni pezzo separatamente. DAVANTI SINISTRO: = 34-37-41-45-50-55 m. Continuare a intrecciare per gli scalfi d’inizio di ogni f così: 2 m 1-2-3-4-6-8 volte e 1 m 1-1-2-3-4-4 volte = 31-32-33-34-34-35 m. Quando il lavoro misura 58-60-61-63-64-66 cm (aggiustare perché l’ultimo f sia sul rovescio) mettere in attesa su un filo le 6 m punto legaccio lato centro davanti per lo scollo. Continuare intrecciando per lo scollo ogni ferro d’inizio f a partire dal centro davanti così: 5-6-6-6-6-7 m 1 volta, 2 m 2 volte e 1 m 1 volta = rimangono 15-15-16-17-17-17 m per la spalla. Intrecciare quando il lavoro misura 64-66-68-70-72-74 cm. DAVANTI DESTRO: Lavorare come il davanti sinistro, ma in senso inverso. NOTA! Fare attenzione che l’ultimo f prima dello scollo sia sul rovescio come per il davanti sinistro. DIETRO: = 62-68-76-84-94-104 m. Intrecciare per gli scalfi ad ogni lato come per il davanti = 56-58-60-62-62-64 m. Continuare a maglia rasata. Quando il lavoro misura 62-64-66-68-70-72 cm, intrecciare per lo scollo le 24-26-26-26-26-28 m centrali e terminare poi ogni spalla separatamente. Intrecciare 1 m dal lato scollo al f seguente = 15-15-16-17-17-17 m. Intrecciare tutte le m quando il lavoro misura 64-66-68-70-72-74 cm. CONFEZIONE: Cucire le spalle. CAPPUCCIO: Con 1 filo Paris blu jeans o 2 fili Alpaca blu/viola e il ferro circolare 5, riprendere 64-68-71-71-78-78 m (incl le m che sono in attesa sul filo). Lavorare 4 f a punto legaccio avanti e indietro sul ferro circolare, poi il f seguente sul diritto così: 6 m punto legaccio, 20-22-23-23-26-26 m a maglia rasata, * 1 gett, 1 m m rasata *, ripetere da *-* in totale 12-12-13-13-14-14 volte, terminare con 20-22-23-23-26-26 m a maglia rasata e 6 m punto legaccio = 76-80-84-84-92-92 m. Lavorare i gett ritorto al rov al f seguente. Continuare a maglia rasata con 6 m punto legaccio ad ogni lato. Intrecciare quando il lavoro misura 34-34-35-35-36-36 cm. Piegare il cappuccio in doppio e unirlo cucendo in alto. MANICHE: Si lavoro in tondo sul ferro a doppia punta (gioco di ferri). Con 1 filo Paris blu jeans o 2 fili Alpaca blu/viola e i ferri a doppia punta 5, avviare 42-44-46-48-50-50 m. Lavorare 2 giri punto legaccio. Lasciare 1 segno/filo d’inizio giro. Continuare a maglia rasata. Quando il lavoro misura 6 cm, aumentare 1 m ad ogni lato del segno/filo. Ripetere questi aumenti ogni 4-2,5-2,5-2-1,5-1 cm in totale 6-8-9-10-12-14 volte = 54-60-64-68-74-78 m. Quando il lavoro misura 30-29-29-28-27-25 cm (NOTA! misura più corta per le taglie grandi perché l’arrotondamento della manica è più lungo e le spalle più larghe) intrecciare 6 m in mezzo sotto la manica (= 3 m ad ogni lato del segno/filo). Continuare avanti e indietro, ALLO STESSO TEMPO, intrecciare ad ogni lato tutti i f all’inizio del f: 2 m 2-2-2-2-3-3 volte, 1 m 3-5-6-7-7-9 volte, poi intrecciare 2 m ad ogni lato fino a quando il lavoro non misuri 38-38-39-39-40-40 cm, poi 3 m 1 volta ad ogni lato. Intrecciare tutte le m. Attaccare le maniche. BORDO ALL’UNCINETTO: Con 1 filo Paris panna o 2 fili Alpaca eco-panna e l’uncinetto 4, creare il bordo seguendo lungo il basso del pullover: 1 m.b, * 4 cat, 1 m.a nella 1° cat, saltare 2 cm, 1 m.b *, ripetere da *-*, terminare con 1 m.bss nella 1° m.b. Lavorare lo stesso bordo intorno alle maniche, intorno al cappuccio e giù lungo la fessura davanti. Fissare il lato destro della fessura dietro il lato sinistro con 1 piccolo punto. |
|
 |
|
Avete terminato questo modello?Allora taggate le vostre foto con #dropspattern #janeaustensweater o inviatele alla #dropsfan gallery. Avete bisogno di aiuto con questo modello?Troverete 33 video tutorial, una sezione per i commenti/domande e molto altro guardando il modello su www.garnstudio.com © 1982-2026 DROPS Design A/S. Ci riserviamo tutti i diritti. Questo documento, compreso tutte le sue sotto-sezioni, è protetto dalle leggi sul copyright. Potete leggere quello che potete fare con i nostri modelli alla fine di ogni modello sul nostro sito. |
|


Con oltre 40 anni di esperienza nel design di modelli di maglia e uncinetto, DROPS Design offre la più estesa collezione di modelli gratuiti su internet - tradotti in 17 lingue. Ad oggi vi possiamo fornire 324 cataloghi e 12290 modelli - 9561 dei quali sono tradotti in Italiano.
Ci stiamo impegnando molto per darvi il meglio che vi possiamo offrire in termini di maglia e uncinetto, ispirazioni e consigli così come filati di grande qualità ad un prezzo incredibile! Volete utilizzare i nostri modelli per qualcosa d'altro oltre al vostro uso personale? Potete leggere tutto ciò che è consentito nel testo sul Copyright in basso su tutte le pagine dei nostri modelli. Buon lavoro!
Lasciare un commento sul modello DROPS 120-1
Noi saremmo felici di ricevere i tuoi commenti e opinioni su questo modello!
Se vuoi fare una domanda, fai per favore attenzione a selezionare la categoria corretta nella casella qui sotto per velocizzare il processo di risposta. I campi richiesti sono indicati da *.