
Categorie popolari
State cercando un filato?


Commenti / Domande (34)
![]() Ulla ha scritto:
Ulla ha scritto:
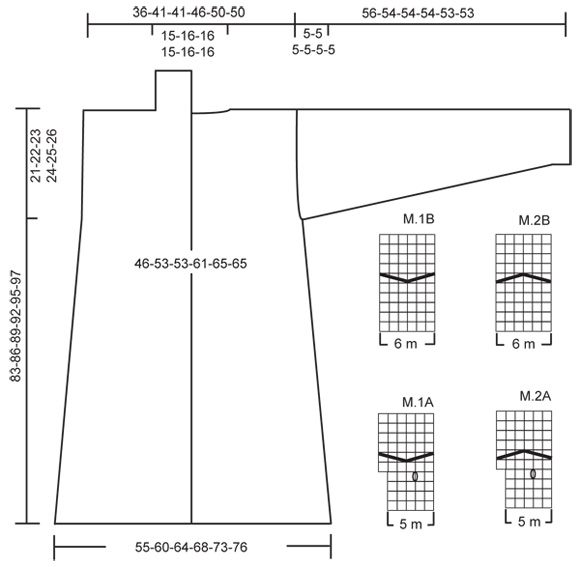
Men hvorfor skal der kun være 5 masker i den først skonning og 6 i den anden.
01.03.2026 - 20:58DROPS Design ha risposto:
Hei Ulla. Tenker du på diagram M.1A og M.2A som starter med 5 masker, men som på 4. pinne øker med 1 maske pr gang diagrammene strikkes? Snonningene trekker arbeidet sammen og for at det skal bli en pen overgang mellom snoningene og glattstrikk, må det økes noen masker. M. A diagrammene strikkes bare 1 gang i høyden, mens M.B diagrammene gjentas i høyden. mvh DROPS Design
03.03.2026 - 13:04
![]() Ulla ha scritto:
Ulla ha scritto:
Hvor mange masker skal der være imellem hver snoning??
29.12.2025 - 19:43DROPS Design ha risposto:
Hei Ulla. Kommer an på hvilken str. du strikker. Det er enten 2 eller 3 masker. 1 kantm, * 3(S)-2(M)-2(L)-3(XL)-2(XXL)-2(XXXL) m ret fra vrangen/vrang fra retten, M.1A (= 5 m) *, gjenta fra *-* totalt 6-8-8-8-10-10 ganger, avslutt med 3(S)-2(M)-2(L)-3(XL)-2(XXL)-2(XXXL) m ret fra vrangen/vrang fra retten, 1 kantm. mvh DROPS Design
12.01.2026 - 12:53
![]() Sharon Hunt ha scritto:
Sharon Hunt ha scritto:
I would like to make this two inches larger than the pattern calls for. Would adding 12 sts. and following the pattern as written make up my sts deficit. Am trying for the easiest and pain free way to make this a bit larger. Thank you.
11.10.2024 - 21:27DROPS Design ha risposto:
Dear Sharon, we don't make custom patterns. When you add up stitches, you will be modifying the pattern in the row as well, so you need to take that into account when you modify the pattern. The piece is worked from the bottom up so, to lengthen the pattern, the easiest way is to add more cm in stocking stitch before the decreases or to spread the decreases apart slightly, so that you can add more cm to the piece while working the same number of decreases as required. To widen the piece, you need to make a rule of three; you can see an example on how to calculate this here: https://www.garnstudio.com/lesson.php?id=25&cid=19. Happy knitting!
13.10.2024 - 20:57
![]() Gillian Hendry ha scritto:
Gillian Hendry ha scritto:
Am I right in thinking that at the beginning of the cable panel, worked from WS, that it should be knit 3/2 between each cable not purl?
30.08.2019 - 20:08DROPS Design ha risposto:
Dear Mrs Hendry, you are right, the stitches between cables should be P from RS and K from WS. Happy knitting!
09.09.2019 - 12:45
![]() Susan ha scritto:
Susan ha scritto:
Got another one for you - once you do add the YO where ever it goes the stitch count increases from 60 to 68 per the instructions. However where do the extra stitches go? The instuction calls for only P2 (med size) before the pattern starts, which would leave the extra 8 at the end of the row, which pushes the cable pattern way off on the next row.
18.03.2018 - 23:04DROPS Design ha risposto:
Dear Susan, the number of sts will increased due to the inc in M.1A, ie: Continue in pattern and inc in cables acc to diagram (= 59-68-68-77-84-84 sts ..., you are working M.1A a total of 8 times in width = 8 sts will be increased on row 4 in M.1A = 68 sts in size M. Happy knitting!
19.03.2018 - 11:13
![]() Susan ha scritto:
Susan ha scritto:
I have knitted cables before but I am totally mystified by the description of M1.A where is the YO made, in the front of the 3 on the needle, in the middle, at the end. Is the YO on the same row or before it, after? I have tested a small piece for two days now, I don't understand what is happening.
18.03.2018 - 21:33DROPS Design ha risposto:
Dear Susan, the Yo in M.1A is made on 4th row, ie K2, YO, K3 ( = there are now 6 sts in M.1A). On next row, P YO twisted to avoid a hole. On 6th row work the cable as explained under diagram. Happy knitting!
19.03.2018 - 11:10
![]() Dagmar ha scritto:
Dagmar ha scritto:
Ich würde mir manchmal etwas einfachere Anleitungen wünschen, wie sie in den strickheften stehen, bin KEINE Anfängern, aber mit euren Anleitungen manchmal sehr verwirrt..es ist eine Anregung, und ich spreche damit vielen meiner Freunde aus der Seele.Danke von einer begeisterten Strickerin😃
19.02.2016 - 17:10
![]() Dagmar ha scritto:
Dagmar ha scritto:
HILFE 😌 bitte, Wie lese ich das Diagramm richtig? man sieht es nur von der Vorderseite, der MS besteht aus 10glatten Reihen, das würde bedeuten, eine linke reihe ist gleichzeitig meine nächste Rechte Reihe, ODER werden die linken Reihen NICHT mitgezählt, dann würde aber der MS doppelt so lang??? Bin sehr verwirrt.bitte um baldige Antwort.danke😃
19.02.2016 - 17:04DROPS Design ha risposto:
Die Diagramme zeigen stets alle Reihen, also Hin- und Rück-R. Sie fangen unten rechts an zu lesen und lesen nach links, das ist die Hin-R, dann lesen Sie die Rück-R von rechts nach links usw.
24.02.2016 - 19:47
![]() Annelie Sörslätt ha scritto:
Annelie Sörslätt ha scritto:
Nu vill jag veta hur jag ska börja vad menas med3-2-2-3-2-2am,M,1A(=5m)*_*
15.12.2012 - 17:40
![]() Margretha ha scritto:
Margretha ha scritto:
Dank voor de reactie. Maar ik snap eigenlijk nog steeds niet hoe ik voor het linker voorpand aan de goede kant vanaf de schouder richting de hals steken af moet kanten. Dit kan toch niet? En wordt de kraag in tricotsteek gebreid?
09.10.2012 - 10:17DROPS Design ha risposto:
Dit staat er in het patroon: Kant in de volgende nld aan de goede kant 18-21-21-26-28-28 st af vanaf de schouder richting de hals. De goede kant van het linker voorpand begint bij het armsgat richting middenvoor. De kraag wordt in ribbelst gebreid net zoals de rand middenvoor.
09.10.2012 - 20:44
|
|||||||||||||
Manifesting Winter#manifestingwinterjacket |
|||||||||||||
|
|
|||||||||||||
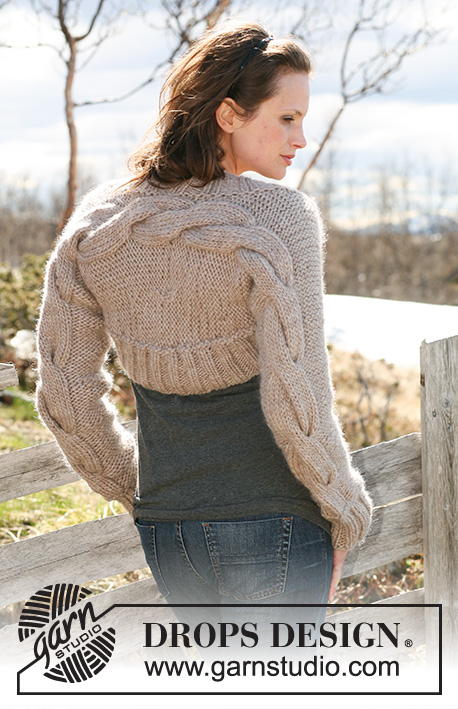
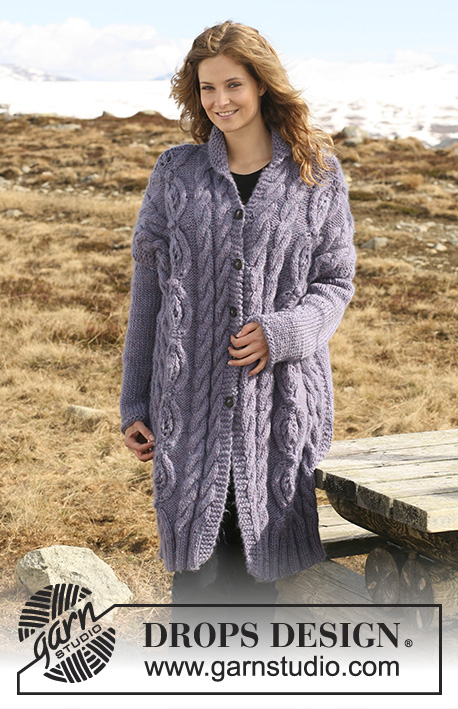
Giacca DROPS con trecce in ”Snow”. Dal S al XXXL.
DROPS 117-22 |
|||||||||||||
|
PUNTO LEGACCIO (tutti i ferri a diritto): 2 ferri consecutivi a diritto = Punto legaccio. CONSIGLI PER MISURARE: Dovuto al peso della lana, è consigliabile misurare l’altezza quando a lavoro appeso, se no il capo sarà troppo lungo una volta portato. MOTIVO: Ved M.1A, M.1B, M.2A e M.2B. Il diag mostra il modello sul diritto. ASOLE: Eseguire le asole sul bordo destro davanti. 1 asola = intrecciare la 4° m a partire dal bordo, 1 gett. Posizionamento delle asole: Taglia S: 28, 36, 44, 52, 60 e 68 cm. Taglia M: 30, 38, 46, 54, 62 e 70 cm. Taglia L: 32, 40, 48, 56, 64 e 72 cm. Taglia XL: 34, 42, 50, 58, 66 e 74 cm. Taglia XXL: 28, 36, 44, 52, 60, 68 e 76 cm. Taglia XXXL: 30, 38, 46, 54, 62, 70 e 78 cm. DIETRO: Si lavora avanti e indietro sul ferro circolare. Con il filo Snow e il ferro circolare 8, avviare 63-68-72-77-82-86 m (incl 1 m vivagno ad ogni lato). Lavorare 10 f da PUNTO LEGACCIO – ved spieg sopra, 2 f maglia rasata, poi 2 f punto legaccio. Continuare a maglia rasata. Quando il lavoro misura 12 cm, diminuire 1 m ad ogni lato. Ripetere queste diminuzioni ogni 8-12-8-12-12-8 cm in totale 5-4-6-4-4-6 volte = 53-60-60-69-74-74 m. RICORDATI LA TENSIONE DELLA MAGLIA! VED. CONSIGLI PER MISURARE! Quando il lavoro misura 46-49-52-48-51-53 cm, lavorare in MOTIVO al f seguente sul rov così – ved spieg sopra: 1 m vivagno, * 3-2-2-3-2-2 m dir (a rov sul dir), M.1A (= 5 m) *, ripetere da *-* in totale 6-8-8-8-10-10 volte, terminare con 3-2-2-3-2-2 m dir (a rov sul dir), 1 m vivagno. Continuare con il motivo e aumentare nelle trecce seguendo il diagramma (= 59-68-68-77-84-84 m. Lavorare a dir sul rov le m che vengono lavorate a rov sul dir). Dopo 1 motivo di M.1A in altezza, continuare poi M.1B (lavorare le m restanti come prima). Ripetere M.1B in totale 4-4-4-5-5-5 volte in altezza. ALLO STESSO TEMPO, dopo il f di trecce dell’ultimo motivo, diminuire 1 m sul rov in ognuna delle trecce = 53-60-60-69-74-74 m. Il lavoro misura ora ca 79-82-85-88-91-93 cm. Lavorare 2 f di punto legaccio su tutte le m. ALLO STESSO TEMPO, quando il lavoro misura 81-84-87-90-93-95 cm, intrecciare per lo scollo le 15-16-16-15-16-16 m centrali e terminare ogni lato separatamente. Intrecciare 1 m dalla parte dello scollo al f seguente = 18-21-21-26-28-28 m rimangono sul f per ogni spalla. Lavorare a maglia rasata fino a 83-86-89-92-95-97 cm di altezza totale. Intrecciare tutte le m. DAVANTI SINISTRO: Con il ferro circolare 8 avviare 39-41-45-45-48-52 m (incl 1 m vivagno al lato). Lavorare 10 f punto legaccio, 2 f maglia rasata con 2 m punto legaccio lato centro davanti, poi 2 f punto leg. Continuare poi a maglia rasata con 2 m punto legaccio lato centro davanti. Quando il lavoro misura 12 cm, diminuire 1 m al lato. Ripetere queste diminuzioni in modo alternato al lato e a 2 m punto legaccio dal bordo centro davanti ogni 4-6-4-6-6-4 cm in totale 9-7-11-7-7-11 volte = 30-34-34-38-41-41 m. Quando il lavoro misura 46-49-52-48-51-53 cm, lavorare il motivo al f seguente sul rov così: 1 m vivagno, * 3-2-2-3-2-2 m rov, M.1A (= 5 m) *, ripetere da *-* in totale 3-4-4-4-5-5 volte, terminare con 3 m rov, 2 m punto legaccio. Continuare con il motivo e aumentare nelle trecce seguendo il diag (= 33-38-38-42-46-46 m). Dopo 1 motivo di M.1A in altezza, lavorare poi M.1B (lavorare le m rimanenti come prima). Ripetere in totale 4-4-4-5-5-5 volte M.1B in altezza. ALLO STESSO TEMPO, dopo il f di trecce dell’ultimo motivo, diminuire 1 m sul rov in ognuna delle trecce = 30-34-34-38-41-41 m. Lavorare 2 f di punto legaccio su tutte le m, poi continuare in maglia rasata con 2 m punto legaccio lato centro davanti fino a 83-86-89-92-95-97 cm di altezza totale. Al f seguente sul dir, intrecciare per la spalla 18-21-21-26-28-28 m = 12-13-13-12-13-13 m rimangono sul f per il collo. Al f seguente sul dir, lavorare in giri accorciati sopra lo scollo con l’inizio sul rov così: * 2 f avanti e indietro su tutte le m, 2 f avanti e indietro sulle prime 7 m del collo *, ripetere da *-*. Intrecciare quando il collo misura 8 cm (misurato sul lato più corto a partire dalla spalla). DAVANTI DESTRO: Lavorare come il davanti sinistro, ma in senso inverso. NOTA! Lavorare M.2A e M.2B invece di M.1A e M.1B. ALLO STESSO TEMPO, quando il lavoro misura 28-30-32-34-28-30 cm intrecciare per la 1° ASOLA - ved spieg sopra! MANICHE: Si lavora avanti e indietro sul f circolare. Con il f circolare 8, avviare 30-31-32-33-34-35 m (incl 1 m vivagno ad ogni lato). Lavorare 10 f punto legaccio, 2 f maglia rasata, 2 f punto legaccio. Continuare in a maglia rasata. Quando il lavoro misura 8 cm, aumentare 1 m ad ogni lato. Ripetere questi aumenti ogni 8-6-5-5-4,5-4 cm in totale 6-7-8-8-9-10 volte = 42-45-48-49-52-55 m. Quando il lavoro misura 51-49-49-49-48-48 cm - NOTA! Meno altezza per la taglie grandi dovuto alle spalle più larghe - intrecciare ad ogni lato tutti i f all’inizio del f così: 4 m 1 volta, 2 m ad ogni lato fino a quando la manica non misuri 55-53-53-53-52-52 cm. Intrecciare poi 4 m 1 volta ad ogni lato. Intrecciare le m rimanenti. Il lavoro misura ca 56-54-54-54-53-53 cm. CONFEZIONE: Cucire le spalle. Unire cucendo il collare al centro dietro e poi il collare al collo. Cucire i lati nelle m vivagno, ma lasciare 21-22-23-24-25-26 cm per il giro manica. Cucire le maniche nelle m vivagno. Montare le maniche. Attaccare i bottoni. Per un bordo davanti leggermente più rigido, lavorare a uncinetto 1 giro di m.b con l’uncinetto 8 lungo i bordi davanti ad ogni lato. |
|||||||||||||
Spiegazioni del diagramma |
|||||||||||||
|
|||||||||||||
 |
|||||||||||||
Avete terminato questo modello?Allora taggate le vostre foto con #dropspattern #manifestingwinterjacket o inviatele alla #dropsfan gallery. Avete bisogno di aiuto con questo modello?Troverete 22 video tutorial, una sezione per i commenti/domande e molto altro guardando il modello su www.garnstudio.com © 1982-2026 DROPS Design A/S. Ci riserviamo tutti i diritti. Questo documento, compreso tutte le sue sotto-sezioni, è protetto dalle leggi sul copyright. Potete leggere quello che potete fare con i nostri modelli alla fine di ogni modello sul nostro sito. |
|||||||||||||


Con oltre 40 anni di esperienza nel design di modelli di maglia e uncinetto, DROPS Design offre la più estesa collezione di modelli gratuiti su internet - tradotti in 17 lingue. Ad oggi vi possiamo fornire 324 cataloghi e 12290 modelli - 9561 dei quali sono tradotti in Italiano.
Ci stiamo impegnando molto per darvi il meglio che vi possiamo offrire in termini di maglia e uncinetto, ispirazioni e consigli così come filati di grande qualità ad un prezzo incredibile! Volete utilizzare i nostri modelli per qualcosa d'altro oltre al vostro uso personale? Potete leggere tutto ciò che è consentito nel testo sul Copyright in basso su tutte le pagine dei nostri modelli. Buon lavoro!
Lasciare un commento sul modello DROPS 117-22
Noi saremmo felici di ricevere i tuoi commenti e opinioni su questo modello!
Se vuoi fare una domanda, fai per favore attenzione a selezionare la categoria corretta nella casella qui sotto per velocizzare il processo di risposta. I campi richiesti sono indicati da *.