
Categorie popolari
State cercando un filato?


Lasciare un commento sul modello DROPS 117-18
Noi saremmo felici di ricevere i tuoi commenti e opinioni su questo modello!
Se vuoi fare una domanda, fai per favore attenzione a selezionare la categoria corretta nella casella qui sotto per velocizzare il processo di risposta. I campi richiesti sono indicati da *.
|
||||||||||||||||||||||||||||||||||||||||||||||
Alaska Cables |
||||||||||||||||||||||||||||||||||||||||||||||
|
|
||||||||||||||||||||||||||||||||||||||||||||||
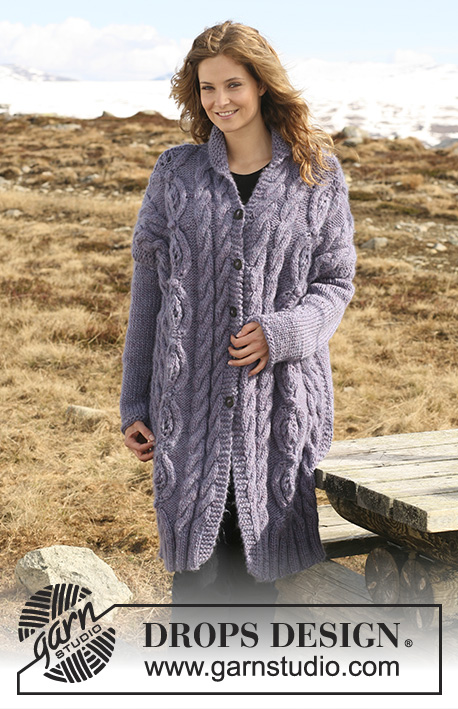
Tunica DROPS in ”Snow” con trecce al centro davanti. Dal S al XXXL.
DROPS 117-18 |
||||||||||||||||||||||||||||||||||||||||||||||
|
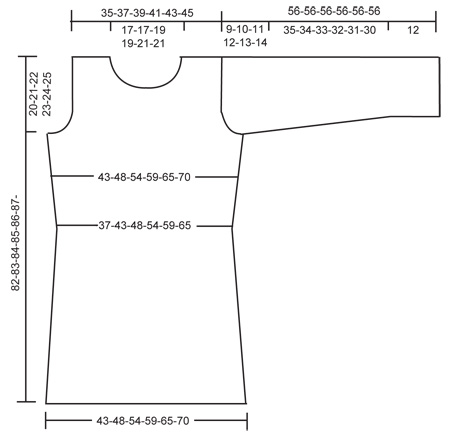
PUNTO LEGACCIO (avanti e indietro sul f): Lavorare tutti ferri a diritto. Ved diag M.1, M.2 e M.3 – il diag mostra il modello sul diritto. Nel M.2, il numero di m varia da 17 a 27 m. DAVANTI: Si lavora avanti e indietro sul f. Con il filo Snow e i ferri 7, avviare 61-69-75-83-89-97 m (incl 1 m di vivagno ad ogni lato). Lavorare così (1° f = diritto): TAGLIA S + L + XXL: 1 m di vivagno nel PUNTO LEGACCIO – ved spieg. sopra, * 3 m dir, 4 m rov * ripetere da *-*, terminare con 3 m dir e 1 m di vivagno nel punto legaccio. TAGLIA M + XL + XXXL: 1 m di vivagno nel PUNTO LEGACCIO– ved spieg sopra, * 4 m rov, 3 m dir * ripetere da *-*, terminare con 4 m rov e 1 m di vivagno nel punto legaccio. Quando il lavoro misura 4-4-4-5-5-5 cm, diminuire 1 m rov in ogni sezione di 4 m rov (4 m rov diventano 3 m rov) (visto dal diritto) = 53-59-65-71-77-83 m. Lavorare le maglie come si presentano (dir sopra dir e rov sopra rov). Quando il lavoro misura ca 8-8-9-10-10-11 cm (aggiustare perché il giro seguente sia sul diritto) continuare con i f 8. Lavorare il giro successive così: 1 m di vivagno nel punto legaccio, 9-12-15-18-21-24 m dir, 1 m punto legaccio, 2 m rov, lavorare 2 m dir in ognuna delle 3 m seguenti (= 3 m dir diventano 6 m dir), 3 m rov, 3 m dir, 9 m rov, 3 m dir, 3 m rov, lavorare 2 m dir in ognuna delle 3 m seguenti (= 3 m dir diventano 6 m dir), 2 m rov, 1 m punto legaccio, 9-12-15-18-21-24 m dir e 1 m vivagno nel punto legaccio = 6 aumenti in totale sul f = 59-65-71-77-83-89 m. Lavorare 1 f con le m come si presentano, dir sopra dir e rov sopra rov. Lavorare il f seguente così: 1 m di vivagno nel punto legaccio, 9-12-15-18-21-24 m maglia rasata, 1 m punto legaccio, 2 m rov, M.1 (= 6 m), M.2a (= 21 m), M.3 (= 6 m), 2 m rov, 1 m punto legaccio, 9-12-15-18-21-24 m maglia rasata e 1 m di vivagno nel punto legaccio. Dopo M.2a, continuare con M.2b (lavorare M.2b 4 volte in altezza). RICORDATI LA TENSIONE DELLA MAGLIA! ALLO STESSO TEMPO, quando il lavoro misura 25 cm, diminuire 1 m ad ogni lato al giro successivo sul diritto lavorando 2 m insieme dir a 1 m (m di vivagno) dal bordo, ripetere queste diminuzioni quando il lavoro misura 30 e 35 cm. Quando il lavoro misura 45 cm, aumentare 1 m ad ogni lato lavorando 2 volte la penultima m del giro, ripetere questi aumenti quando il lavoro misura 50 e 55 cm. Quando il lavoro misura 62 cm (per tutte le taglie), intrecciare per gli scalfi all’inizio di ogni f ad ogni lato: 3 m 1-1-1-1-2-2 volte, 2 m 0-1-2-2-2-3 volte e 1 m 2-2-2-4-3-3 volte. Dopo 4 motivi M.2b in altezza il lavoro misura ca 72 cm. Lavorare 1 volta M.2c sopra M.2b. Dopo M.2c, rimangono 49-51-53-55-57-59 m sul f. Mettere in attesa le 17-17-19-19-21-21 m centrali su 1 filo per il collo e finire ogni spalla separatamente – continuare il motivo come prima. Diminuire 2 m per lo scollo all’inizio del ferro lavorando le 3 prime m insieme a dir, ripetere queste diminuzioni in totale 3 volte ogni 2 ferri = 10-11-11-12-12-13 m rimangono per la spalla. Quando il lavoro misura ca 82-83-84-85-86-87 cm, intrecciare tutte le m rimanenti. DIETRO: Si lavora avanti e indietro sul f. Con il filo Snow e il f 7, avviare 62-68-76-82-90-96 m (incl 1 m di vivagno ad ogni lato). Lavorare così (1° f = diritto): TAGLIA S + L + XXL: 1 m di vivagno nel punto legaccio, * 4 m rov, 3 m dir * ripetere da *-*, terminare con 4 m rov e 1 m di vivagno nel punto legaccio. TAGLIA M + XL + XXXL: 1 m di vivagno nel punto legaccio, * 3 m dir, 4 m rov * ripetere da *-*, terminare con 3 m dir e 1 m di vivagno nel punto legaccio. Quando il lavoro misura 4-4-4-5-5-5 cm, diminuire 1 m rov in ogni sezione di 4 m rov (4 m rov diventano 3 m rov) (visto dal diritto) = 53-59-65-71-77-83 m. Continuare lavorando le m come si presentano (diro sopra dir e rov sopra rov). Quando il lavoro misura ca 8-8-9-10-10-11 cm (aggiustare con il davanti) continuare con il f 8 a maglia rasata – ALLO STESSO TEMPO, al 1° f, distribuire uniformemente 4 diminuzioni = 49-55-61-67-73-79 m. Quando il lavoro misura 25, 30 e 35 cm, diminuire 1 m ad ogni lato come per il davanti = 43-49-55-61-67-73 m. Quando il lavoro misura 45, 50 e 55 cm, aumentare 1 m ad ogni lato come per il davanti = 49-55-61-67-73-79 m. Quando il lavoro misura 62 cm, intrecciare per gli scalfi ad ogni lato come per il davanti = 39-41-43-45-47-49 m. Quando il lavoro misura ca 79-80-81-82-83-84 cm (aggiustare perché rimangano 3 cm prima della fine del davanti) intrecciare per lo scollo le 17-17-19-19-21-21 m centrali e terminare ogni spalla separatamente. Diminuire 1 m all’inizio del f successivo al lato scollo = 10-11-11-12-12-13 m rimangono per ogni spalla. Intrecciare tutte le m quando il lavoro ha la stessa misura del davanti. MANICA: Si lavora avanti e indietro sul f. Con il filo Snow e il f 7, avviare 32-32-38-38-38-38 m (incl 1 m di vivagno ad ogni lato). Lavorare le coste = 3 m dir / 3 m rov con 1 m di vivagno ad ogni lato nel punto legaccio. Quando il lavoro misura 12 cm, continuare con il f 8 a maglia rasata – ALLO STESSO TEMPO, distribuire uniformemente 2-0-4-2-0-0 m diminuzioni sul 1° giro = 30-32-34-36-38-38 m. Quando il lavoro misura 14 cm, aumentare 1 m ad ogni lato e ripetere questi aumenti ogni 6-6-5,5-5,5-5-4 cm in totale 6-6-6-6-6-7 volte = 42-44-46-48-50-52 m. Quando il lavoro misura 47-46-45-44-43-42 cm (misura più corta per le taglie grandi perché l’arrotondamento della manica è più lungo e le spalle più larghe) intrecciare ad ogni lato all’inizio del f: 1 volta 4 m e 1 volta 2 m, poi 1 m ad ogni lato fino a 54 cm di altezza totale. Poi, intrecciare 1 volta 4 m, intrecciare tutte le m rimanenti. Il lavoro misura ca 56 cm. CONFEZIONE: Cucire le spalle. COLLO: Con il ferro circolare 7, riprendere intorno al collo dalle 60 alle 72 m (divisibile con 6, incl le m in attesa sul filo davanti). Lavorare il p coste = 3 m dir / 3 m rov – controllare che le m dir si trovano sopra le m dir nel M.2 al centro davanti. Quando il collo misura 10 cm, aumentare 1 m in tutte le sezioni di 3 m dir (3 m di diventano 4 m dir) = 70 til 84 m. Continuare con 4 m dir / 3 m rov fin che il collo misura 20 cm. Aumentare 1 m in tutte le sezioni di 4 m dir (4 m dir diventano til 5 m dir) = 80-96 m. Continuare con 5 m dir / 3 m rov fin che il collo misura 25 cm. Intrecciare tutte le m (dir sopra dir e rov sopra rov). Non stringere troppo intrecciando. CONFEZIONE: Attaccare le maniche, cucire le maniche e i lati nella m di vivagno. |
||||||||||||||||||||||||||||||||||||||||||||||
Spiegazioni del diagramma |
||||||||||||||||||||||||||||||||||||||||||||||
|
||||||||||||||||||||||||||||||||||||||||||||||

|
||||||||||||||||||||||||||||||||||||||||||||||
|
||||||||||||||||||||||||||||||||||||||||||||||
|
Avete realizzato questo o un altro dei nostri modelli? Taggate le vostre foto nei social media con #dropsdesign in modo che possiamo vederle! Avete bisogno di aiuto con questo modello?Troverete video tutorial, una sezione per i commenti/domande e molto altro guardando il modello su www.garnstudio.com © 1982-2024 DROPS Design A/S. Ci riserviamo tutti i diritti. Questo documento, compreso tutte le sue sotto-sezioni, è protetto dalle leggi sul copyright. Potete leggere quello che potete fare con i nostri modelli alla fine di ogni modello sul nostro sito. |
||||||||||||||||||||||||||||||||||||||||||||||


Con oltre 40 anni di esperienza nel design di modelli di maglia e uncinetto, DROPS Design offre la più estesa collezione di modelli gratuiti su internet - tradotti in 17 lingue. Ad oggi vi possiamo fornire 304 cataloghi e 11422 modelli - 8666 dei quali sono tradotti in Italiano.
Ci stiamo impegnando molto per darvi il meglio che vi possiamo offrire in termini di maglia e uncinetto, ispirazioni e consigli così come filati di grande qualità ad un prezzo incredibile! Volete utilizzare i nostri modelli per qualcosa d'altro oltre al vostro uso personale? Potete leggere tutto ciò che è consentito nel testo sul Copyright in basso su tutte le pagine dei nostri modelli. Buon lavoro!
Commenti / Domande (62)
Kan dit patroon met rondbreinaalden gebreid worden?
20.03.2024 - 19:17DROPS Design answered:
Dag Myrande,
Jazeker, deze kun je prima op de rondbreinaald breien. Je hoeft dan geen kantsteken op te zetten, dus je telt de steken van het voor en achterpand bij elkaar op minus 4 kantsteken in totaal. In de zijnaden kun je markeerdraden plaatsen.
21.03.2024 - 20:50Hello, I have recently completed the front piece which has come out absolutely gorgeous and I am now tackling the sleeves. Am I understanding correctly for the sleeve cap: cast off 4 sts at beginning of row, then cast off 4 sts at beginning of next row, then 2 sts at beginning of next 2 rows, then cast off 1 st at beginning AND end of row, repeating this 1 stitch bind off at both sides of every row until sleeve is 54 cm long. Is that correct? Thanks for your help!
17.12.2021 - 20:06DROPS Design answered:
Dear Valerie, everything is correct except the last part. You don't cast off 1 stitch at the beginning and end of the row, only at the beggining of each row. Happy knitting!
19.12.2021 - 20:36I would like to know how many meters/yards this garment needs please, also, what size bust/hip fits a medium? Thank you for a beautiful pattern!
21.11.2021 - 16:10DROPS Design answered:
Dear Kay, you would need 950m of this specific yarn or any of the same thickness (50g/50m). You can see the measurements of the garment below the written instructions. Bust = 96cm for size M in this case; you can compare it to your measurements to see if this size can be applied to you. Happy knitting!
21.11.2021 - 20:11Na construção da gola é referido que as malhas que ficaram em espera (19 m) se tricotam conforme se apresentam. A questão é durante quantas voltas? Quando é que se começa a fazer o canelado nessas malhas? Obrigada.
08.12.2018 - 16:13DROPS Design answered:
Bom dia, O canelado começa a tricotar-se no princípio, depois de levantar as malhas. A gola tricota-se até ter 25 cm de altura. O número de voltas igual a 25 cm depende da sua tensão. Aconselhamos a que vá medindo a gola à medida que a for tricotando até ter 25 cm. Bom tricô!
10.12.2018 - 13:40As minhas dúvidas prendem-se com os símbolos nas linhas 9 (M2a), 13 (M2b) e 23 (M2b), pois quanto me apercebo, estes pontos são de diminuição pelo que me como é que é feita a compensação? O desenho não vai deixar de ficar direito? Obrigada
13.11.2018 - 09:38DROPS Design answered:
Bom dia, O desenho vai ficar direito porque os símbolos referidos não são de diminuição. O que se faz é criar um torcido mas não se diminui qualquer malha. Esperemos que consiga acabar esta lindíssima camisola! Bom tricô!
15.11.2018 - 11:16Hej! Är det någon som vet hur många färre maskor man behöver lägga upp om man stickar det här mönstret i slätstickning (istället för flätor)?
08.06.2018 - 16:11Hallo liebes Drops-Team, ich hänge gerade an der Anleitung bei 45cm. :( Ich nehme bei 25, 30 und 35 jeweils aus dem glatten Teil eine Masche ab. Habe also im glatten Teil dann rechts und links jeweils nur noch 12 re M, richtig? Bei 45cm soll ich nun 2M in 2M re stricken. Dass heißt nach 45cm habe ich dann je 14M, 50cm 16M und 55cm dann 18M? Oder verstehe ich das falsch? Ich musste leider den Pulli leider schon 2mal neu Anfangen. danke für Eure Hilfe! Liebe grüße, Christine
11.01.2017 - 20:06DROPS Design answered:
Liebe Christine, Sie nehmen zuerst 3 x 2 M beidseitig ab und dann nehmen Sie 3 x 2 M beidseitig zu, dann haben Sie wieder die 18 M glatt in der 4. Größe. Viel Spaß beim stricken!
12.01.2017 - 08:21Ik ben even de weg kwijt bij de hals. Als ik het patroon lees en de tekst volg, zou ik voor maat m op 83 cm alle steken moeten afkanten. Echter heb ik al 82 cm na het breien van m2c. Dan zou ik nog zeker 6 naalden moeten breien (om 3 x de 3 steken samen te moeten breien voor de hals). Per twee naalden komt er ong. 1 cm bij, bij mij. Dus dan zou mijn werk zeker op 85 cm komen. Ik heb 4 x m2b gebreid en dan m2c zoals in het patroon staat. Ben ik toch ergens gemist?
06.01.2017 - 21:31DROPS Design answered:
Hoi Shana. Klopt je stekenverhouding in de hoogte? Als je meer nld hebt in de hoogte dan de wat er staat (15 nld), dan wordt je werk ook hoger. Of je hebt het telpatroon verkeerd gebreid. Ik kan het helaas niet van afstand zien.
11.01.2017 - 11:55Na M.2.c. heb ik bij de hals 53 steken. Als ik 19 steken op de hulpdraad zet, heb ik nog 53-19/2=17 steken voor elke schouder. Hier snap ik het patroon niet meer goed. Als ik vanaf het midden die 17 steken ga afkanten is de kabel al snel weg terwijl die op de foto doorloopt tot aan de schouder naad. Hoe kan dat?
10.10.2016 - 12:15DROPS Design answered:
Hoi Ingrid. Je zou voor maat L, nog 1 st over hebben van M.2B voor M.1/M.3 bij het plaatsen van de 17 middelste st op een draad. De kabel zal inderdaad verdwijnen door het samenbreien van de st bij de hals. Maar je ziet dat niet op de foto (wordt bedekt door de col).
10.10.2016 - 14:07Beatriz Sztain wrote:
The pattern was very easy to follow. It came out beautiful and it fits perfectly.
10.03.2016 - 20:59