
Categorie popolari
State cercando un filato?


Commenti / Domande (13)
![]() Gun Wallenmark ha scritto:
Gun Wallenmark ha scritto:
Hej blir det samma storlek om jag väljer att sticka helt i slätstickning ? Stickas den på vanliga (två) stickor, eller kan jag ha rundsticka och sticka fram och tillbaka?
21.02.2024 - 13:38DROPS Design ha risposto:
Hej Gun, om du vil at hele tröjan stickas i slätstickning, kan du följa bakstycket. Kom ihåg att du skall ha 11 m på 10 cm :)
22.02.2024 - 11:51
![]() Annie ha scritto:
Annie ha scritto:
Hi, what measurements or UK dress sizes are the small, medium, XL and xxl please?
15.01.2021 - 07:32DROPS Design ha risposto:
Dear Annie, measure a similar garment you have and like the shape and compare these to the measurements in the chart, this is the best way to find the matching sizee - read more about chart here. Happy knitting!
15.01.2021 - 07:35
![]() Linda ha scritto:
Linda ha scritto:
Hej igen! Jag har kommit till slutet av framstycket men förstå inte hur jag ska sticka de maskor som inte är på restgarnet, då det kommer bli ett hål mellan axelmaskorna och halsingsmaskorna. Eller ska jag sticka de var för sig, alltså att jag tar andra stickor+garn till den andra axeln? Tack för svar.
29.04.2020 - 16:25DROPS Design ha risposto:
Hej Ja efter att du har satt maskorna på restgarn till halsringning så stickar du först den ena axeln färdig och sedan stickar du den andra. Mvh DROPS Design
30.04.2020 - 08:15
![]() Linda ha scritto:
Linda ha scritto:
Hej! Jag förstår bara inte varför jag ska sticka aviga maskor i M2. där mina flätor kommer att vara. "sticka 2 am i denna m" och sedan står det att 6 maskor har ökats. Ska jag sticka 1 maska som 2 aviga och sedan nästa varv sticka räta?
18.04.2020 - 02:19DROPS Design ha risposto:
Hej Tck för info. Det ser ut som om det är ett skrivfel där, det ska stickas 2 rm i maskan. Texten kommer att uppdateras. Mvh DROPS Design
20.04.2020 - 11:39
![]() Dalene ha scritto:
Dalene ha scritto:
The sleeves just don't work out. Knitting two together on each side makes the sleeve to short to fit into the arm hole. Am I doing anything wrong. I have now knitted my own sleeve with the help of a family member. Totally different to what the pattern suggests. I'm still busy after having to pull the knitted piece out to under the arm.
18.08.2019 - 11:33DROPS Design ha risposto:
Dear Dalene, for the sleeve cap you will cast off the stitches at the beg of every row (both from RS and from WS), ie not decrease. First cast off 4 sts 1 time, 2 sts 1 time and 1 st 0-1-1-2-2-3 times then cast off 2 sts each side until piece measures 54 cm for all sizes, now cast off 4 sts 1 time each side and cast off remaining sts. Sleeve cap should measure 6-12 cm. Happy knitting!
19.08.2019 - 10:26
![]() Marielle ha scritto:
Marielle ha scritto:
Is het in het begin de bedoeling dat de naald aan de verkeerde kant van het werk tegenovergesteld gebreid wordt van de goede kant? Dus aan de goede kant een rechte steek aan de verkeerde kant een averechts steek? Alvast bedankt voor uw antwoord
15.01.2019 - 20:14DROPS Design ha risposto:
Dag Marielle,
Ja, daar heb je inderdaad gelijk aan; recht aan de goede kant, averecht aan de verkeerde kant en vice versa, zodat je boordsteek breit.
17.01.2019 - 10:08
![]() Judit ha scritto:
Judit ha scritto:
Az ujjánál mit jelent amig 9cm ?
20.03.2018 - 08:05
![]() Claudia Wächtler ha scritto:
Claudia Wächtler ha scritto:
Hallo Vielen Dank für die Nachricht.Ich meinte da der Zopf vorne ist kann es ja sein das deswegen die 12 Maschen am Rücken abgenommen werden.Das Rückenteil wird glatt rechts gestrickt.Danke für Ihre schnelle Antort Liebe Grüße Claudia Wächtler
06.12.2017 - 10:02
![]() Claudia Wächtler ha scritto:
Claudia Wächtler ha scritto:
Hallo Warum bei diesen Pullover am Rückenteil 12 Maschen abnehmen?Damit ist das Rückenteil 10 Maschen kleiner als das Vorderteil.Vieleicht hängt es mit den Zöpfen zusammen.Können Sie mir genau schreiben,ob ich die 12 Maschen am Rückenteil abnehmen muss.Danke im Vorraus für die Antwort. Liebe Grüße Claudia
06.12.2017 - 09:06DROPS Design ha risposto:
Liebe Fau Wächtler, es gibt keinen Zopf am Rückenteil, es wird nur glatt rechts gestrickt, deshalb ist der Maschenanzahl unterschiedlich. Viel Spaß beim stricken!
06.12.2017 - 09:47
![]() Karen Zuurmond ha scritto:
Karen Zuurmond ha scritto:
Kan deze trui ook gebreid worden op rondbreinaalden? Hoe zit het dan met het patroon voor de armen??
27.11.2017 - 18:56DROPS Design ha risposto:
Hallo Karen, Jazeker, dat kan! Je zet 2 steken minder op (want je hebt geen kantsteken nodig bij rondbreien), 1 naald averecht aan de verkeerde kant, wordt 1 naald recht aan de goede kant. Verder plaats je een markeerdraad aan het begin van de naald (= midden onder de mouw) en de meerderingen doe je aan beide kanten van deze markeerdraad. Bij het minderen voor de mouwkop kant je eerst 8 steken midden onder de mouw af (aan beide kanten 4), daarna brei je heen en weer verder volgens patroon (waar bij je de 1 x 4st aan elke kant dus over kunt slaan, omdat je die al hebt afgekant)
28.11.2017 - 09:14
|
||||||||||||||||
Admiral's Braid |
||||||||||||||||
 |
 |
|||||||||||||||
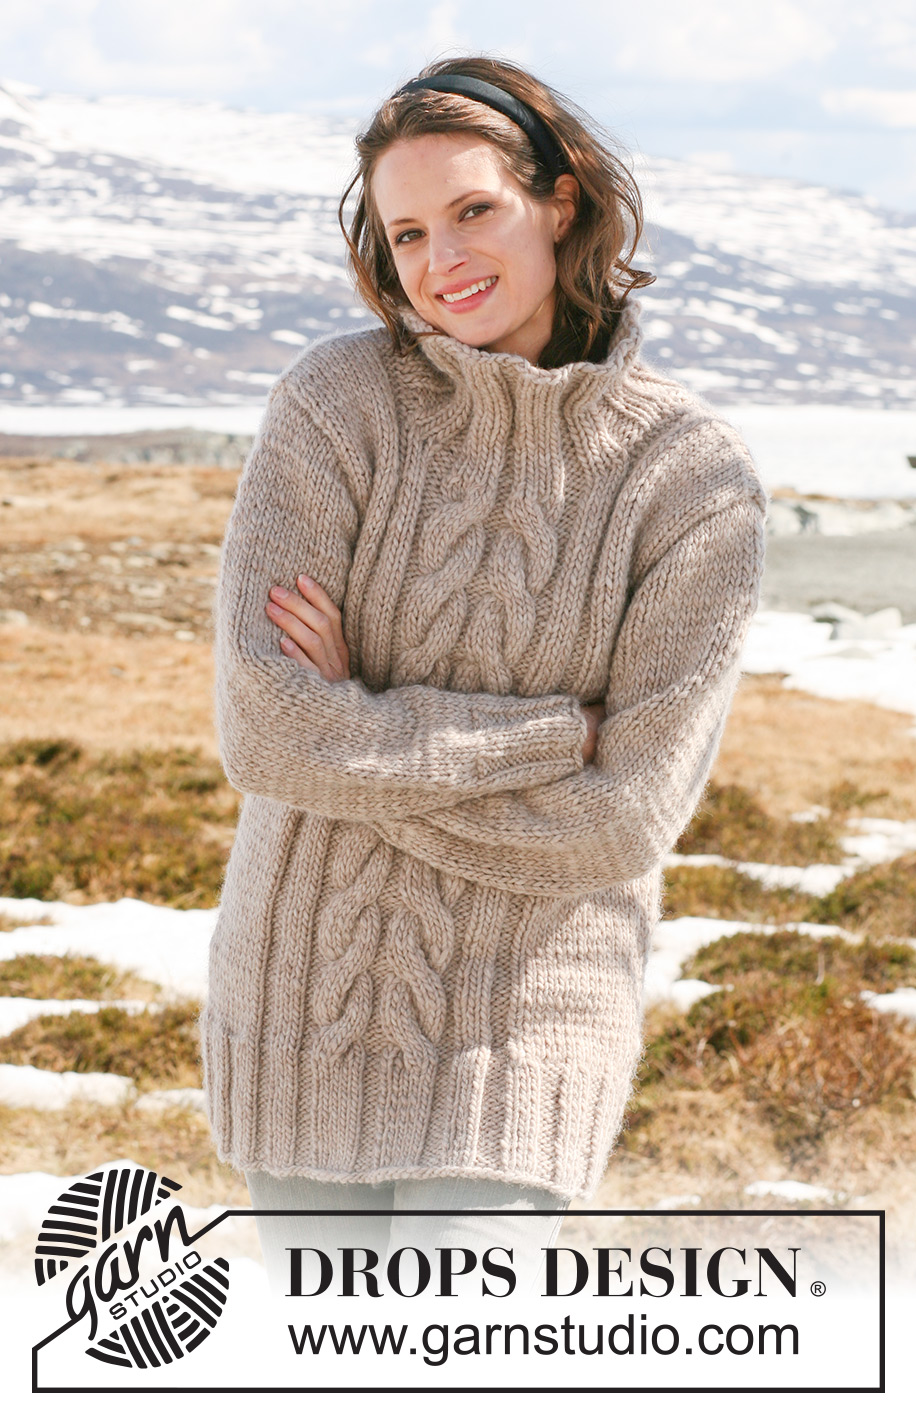
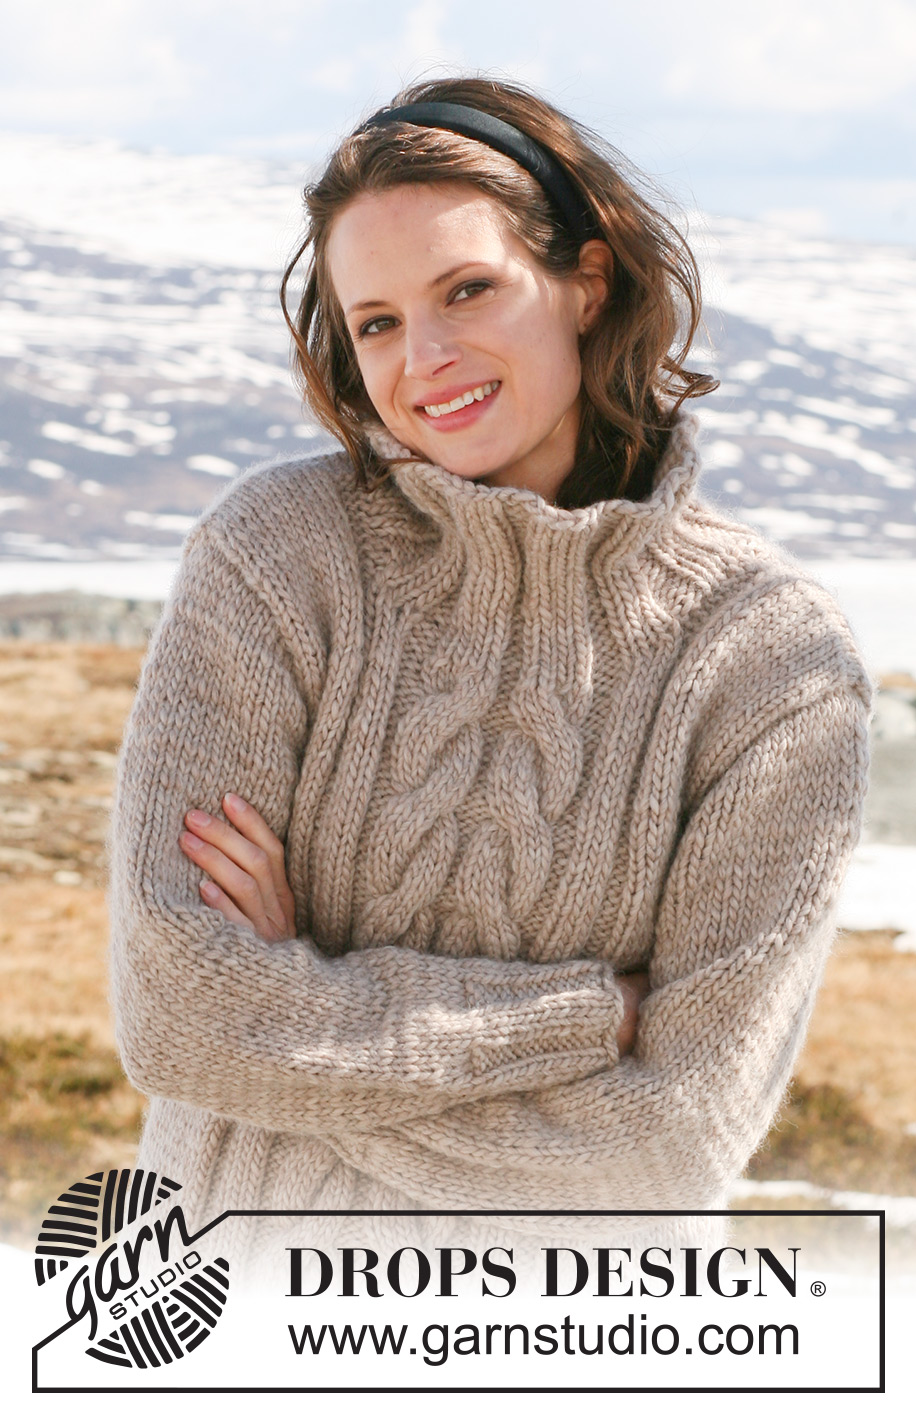
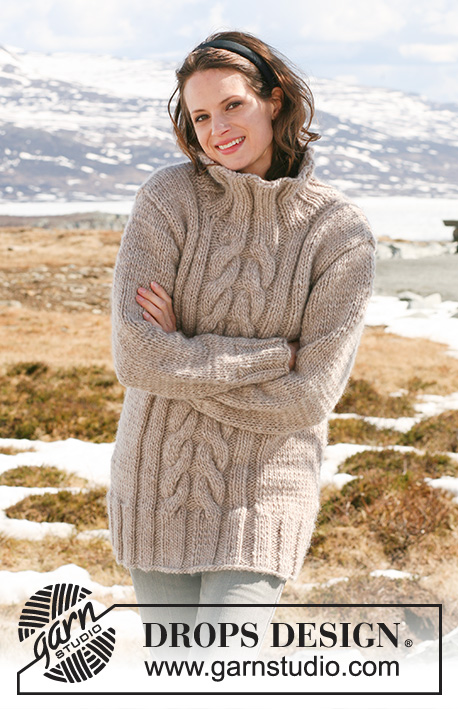
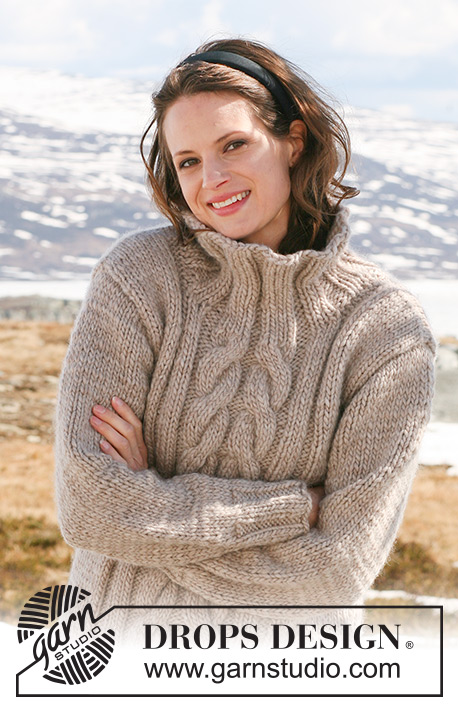
Tunica DROPS in ”Snow” con trecce al centro davanti. Taglie: S-XXXL.
DROPS 116-38 |
||||||||||||||||
|
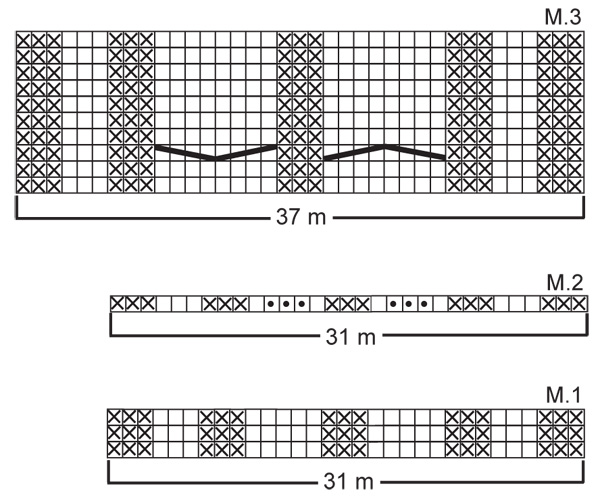
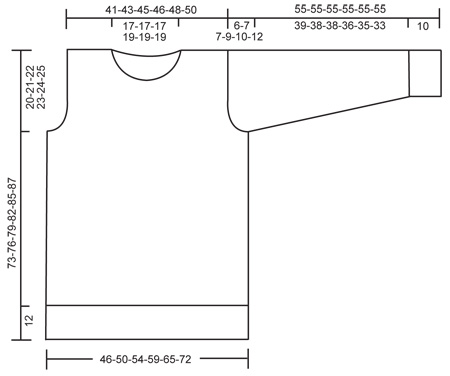
MOTIVO: Vedere il diagramma M.1-M.3 – il motivo nel diagramma è visto dal diritto del lavoro. In M.2 il n° delle m aumenta da 31 a 37 m. ---------------------------------------------------------- DAVANTI: Avviare 69-75-81-87-93-99 m (compresa 1 m di vivagno a ogni lato) con i f n° 7 mm con Snow. Lavorare 1 f rov dal rovescio del lavoro e lavorare il f successivo come segue dal diritto del lavoro: TAGLIE S + L + XXL: 1 m di vivagno, * 3 m rov, 3 m dir * ripetere *-* per un totale di 3-4-5 volte, M.1 (= 31 m), * 3 m dir, 3 m rov *, ripetere *-* per un totale di 3-4-5 volte e finire con 1 m di vivagno. TAGLIE M + XL + XXXL: 1 m di vivagno, 3 m dir, * 3 m rov, 3 m dir * ripetere *-* per un totale di 3-4-5 volte, M.1 (= 31 m), * 3 m dir, 3 m rov *, ripetere *-* per un totale di 3-4-5 volte e finire con 3 m dir e 1 m di vivagno. Continuare con il motivo in questo modo. Quando il lavoro misura 11 cm – aggiustarlo in modo che il f successivo sia dal rovescio del lavoro – lavorare 1 f con M.2 invece di M.1 – con le m rimaste come prima. Ora ci sono 75-81-87-93-99-105 m sul f (6 aumenti al centro davanti). Passare ai f n° 8 mm e continuare a m rasata, con le 37 m centrali in M.3. ALLO STESSO TEMPO sul 1° f distribuire 6-7-8-8-8-7 diminuzioni sulle m a m rasata a ogni lato di M.3 = 63-67-71-77-83-91 m. Continuare in M.3 sulle 37 m centrali e 12-14-16-19-22-26 m a m rasata e 1 m di vivagno a ogni lato. FARE ATTENZIONE ALLA TENSIONE DEL LAVORO! Quando il lavoro misura 53-55-57-59-61-62 cm intrecciare per lo scalfo a ogni lato all’inizio di ogni f: 3 m 1 volta, 2 m 0-0-1-1-2-3 volte e 1 m 1-2-1-3-3-4 volte = 55-57-59-61-63-65 m. Quando il lavoro misura 65-68-71-73-76-78 cm lavorare 2 m insieme a dir sulle 2 trecce al centro davanti e diminuire 1 m in ogni sezione a rov all’esterno delle 2 trecce = 10 diminuzioni. Sul f successivo trasferire le 11-11-11-13-13-13 m centrali su un fermamaglie per il collo e finire ogni spalla in modo separato. Intrecciare per il collo all’inizio di ogni f dalla scollatura: 2 m 1 volta e 1 m 2 volta = 13-14-15-15-16-17 m rimaste sulla spalla. Intrecciare quando il lavoro misura 73-76-79-82-85-87 cm. DIETRO: Avviare 65-71-77-83-89-95 m (compresa 1 m di vivagno a ogni lato) con i f n° 7 mm con Snow. Lavorare 1 f rov dal rovescio del lavoro e lavorare il f successivo come segue dal diritto del lavoro: TAGLIE S + L + XXL: 1 m di vivagno, * 3 m dir, 3 m rov * ripetere *-*, finire con 3 m dir e 1 m di vivagno. TAGLIE M + XL + XXXL: 1 m di vivagno, * 3 m rov, 3 m dir * ripetere *-* e finire con 3 m rov e 1 m di vivagno. Quando il lavoro misura 12 cm passare ai f n° 8 mm e continuare a m rasata, ALLO STESSO TEMPO sul 1° f distribuire 12-14-16-16-16-14 diminuzioni in modo uniforme = 53-57-61-67-73-81 m. Quando il lavoro misura 53-55-57-59-61-62 cm intrecciare per lo scalfo a ogni lato come descritto per il davanti = 45-47-49-51-53-55 m. Quando il lavoro misura circa 71-74-77-80-83-85 cm (aggiustare a 2 cm prima della fine sul davanti) intrecciare le 17-17-17-19-19-19 m centrali per il collo e finire ogni spalla in modo separato. Intrecciare 1 m sulla scollatura sul f successivo = 13-14-15-15-16-17 m rimaste sulla spalla. Intrecciare quando il lavoro misura 73-76-79-82-85-87 cm. MANICA: Avviare 32-32-38-38-38-38 m (compresa 1 m di vivagno a ogni lato) con i f n° 7 mm con Snow. Lavorare 1 f rov dal rovescio del lavoro e continuare a coste 2 m dir/2 m rov con 1 m di vivagno a ogni lato. Quando il lavoro misura 10 cm passare ai f n° 8 mm e continuare a m rasata, ALLO STESSO TEMPO sul 1° f distribuire 2-0-4-2-0-0 m in modo uniforme = 30-32-34-36-38-38 m. Quando il lavoro misura 12 cm aumentare 1 m a ogni lato. Ripetere gli aumenti ogni 6,5-6,5-5,5-5-5-4 cm per un totale di 6-6-7-7-7-8 volte = 42-44-48-50-52-54 m. Quando il lavoro misura 49-48-48-46-45-43 cm (meno per le taglie più grandi a causa dell’arrotondamento della manica più lungo e della maggiore ampiezza delle spalle) intrecciare per l’arrotondamento della manica a ogni lato all’inizio di ogni f: 4 m 1 volta, 2 m 1 volta e 1 m 0-1-1-2-2-3 volte, poi 2 m a ogni lato fino a quando il lavoro misura 54 cm per tutte le taglie, ora intrecciare 4 m 1 volta a ogni lato e intrecciare le m rimaste. Il lavoro misura circa 55 cm per tutte le taglie. CONFEZIONE: Cucire i margini delle spalle. COLLO: Riprendere circa 56-80 m (divisibile per 6 + 2, comprese le m sul fermamaglie sul davanti) attorno al collo con i f circolari n° 7 mm. Lavorare a coste 3 m dir/3 m rov – assicurarsi di avere dir su dir in M.3 al centro davanti – NOTA! Lavorare 4 m dir invece di 3 m dir sulle 2 trecce al centro davanti. Intrecciare senza stringere con dir su dir e rov su rov quando il collo misura 14-14-14-16-16-16 cm. CONFEZIONE: Attaccare le maniche, cucire le maniche e i margini dei lati all’interno della m di vivagno. |
||||||||||||||||
Spiegazioni del diagramma |
||||||||||||||||
|
||||||||||||||||
 |
||||||||||||||||
 |
||||||||||||||||
Avete terminato questo modello?Allora taggate le vostre foto con #dropspattern o inviatele alla #dropsfan gallery. Avete bisogno di aiuto con questo modello?Troverete 19 video tutorial, una sezione per i commenti/domande e molto altro guardando il modello su www.garnstudio.com © 1982-2026 DROPS Design A/S. Ci riserviamo tutti i diritti. Questo documento, compreso tutte le sue sotto-sezioni, è protetto dalle leggi sul copyright. Potete leggere quello che potete fare con i nostri modelli alla fine di ogni modello sul nostro sito. |
||||||||||||||||


Con oltre 40 anni di esperienza nel design di modelli di maglia e uncinetto, DROPS Design offre la più estesa collezione di modelli gratuiti su internet - tradotti in 17 lingue. Ad oggi vi possiamo fornire 324 cataloghi e 12290 modelli - 9561 dei quali sono tradotti in Italiano.
Ci stiamo impegnando molto per darvi il meglio che vi possiamo offrire in termini di maglia e uncinetto, ispirazioni e consigli così come filati di grande qualità ad un prezzo incredibile! Volete utilizzare i nostri modelli per qualcosa d'altro oltre al vostro uso personale? Potete leggere tutto ciò che è consentito nel testo sul Copyright in basso su tutte le pagine dei nostri modelli. Buon lavoro!
Lasciare un commento sul modello DROPS 116-38
Noi saremmo felici di ricevere i tuoi commenti e opinioni su questo modello!
Se vuoi fare una domanda, fai per favore attenzione a selezionare la categoria corretta nella casella qui sotto per velocizzare il processo di risposta. I campi richiesti sono indicati da *.