
Popular categories
Looking for a yarn?


|
||||||||||||||||
Admiral's Braid |
||||||||||||||||
|
|
||||||||||||||||
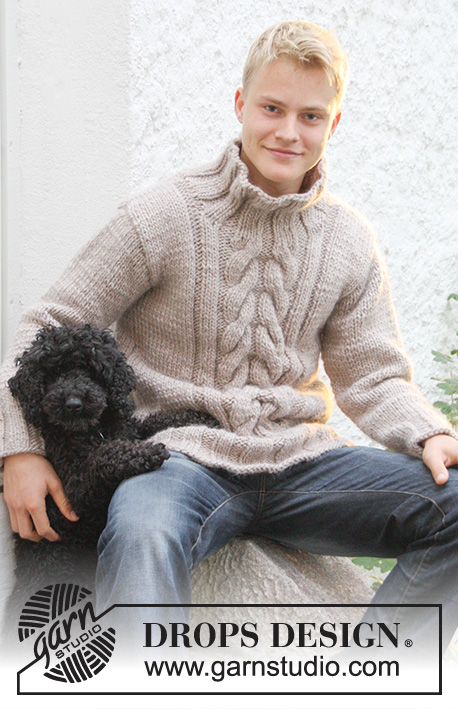
DROPS tunic in ”Snow” with cables mid front. Size S to XXXL.
DROPS 116-38 |
||||||||||||||||
|
PATTERN: See diagram M.1 to M.3 - pattern in diagram is seen from RS. In M.2 no of sts inc from 31 to 37 sts. ---------------------------------------------------------- ---------------------------------------------------------- FRONT PIECE: Cast on 69-75-81-87-93-99 sts (includes 1 edge st each side) on needle size 7 mm / US 10½ with Snow. P 1 row from WS and work next row as follows from RS: SIZE S + L + XXL: 1 edge st, * P3, K3 * repeat from *-* a total of 3-4-5 times, M.1 (= 31 sts), * K3, P3 *, repeat from *-* a total of 3-4-5 times and finish with 1 edge st. SIZE M + XL + XXXL: 1 edge st, K3, * P3, K3 * repeat from *-* a total of 3-4-5 times, M.1 (= 31 sts), * K3, P3 *, repeat from *-* a total of 3-4-5 times and finish with K3 and 1 edge st. Continue in pattern like this. When piece measures 11 cm / 4⅜" – adjust so that next row is from WS - work 1 row with M.2 instead of M.1 – with remaining sts as before. There are now 75-81-87-93-99-105 sts on row (6 inc sts mid front). Change to needle size 8 mm / US 11 and continue in stockinette st, with the middle 37 sts in M.3. AT THE SAME TIME on first row dec 6-7-8-8-8-7 sts evenly on the stockinette sts each side of M.3 = 63-67-71-77-83-91 sts. Continue in M.3 on the middle 37 sts and 12-14-16-19-22-26 stockinette sts and 1 edge st each side. REMEMBER THE GAUGE! When piece measures 53-55-57-59-61-62 cm / 21"-21⅝"-22½"-23¼"-24"-24⅜" bind off for armhole each side at the beg of every row: 3 sts 1 time, 2 sts 0-0-1-1-2-3 times and 1 st 1-2-1-3-3-4 times = 55-57-59-61-63-65 sts. When piece measures 65-68-71-73-76-78 cm / 25½"-26¾"-28"-28¾"-30"-30¾" K2 tog on the 2 cables mid front and dec 1 st in each P-section on the outside of the 2 cables = 10 dec sts. On next row slip the middle 11-11-11-13-13-13 sts on a stitch holder for neck and complete each shoulder separately. Bind off for neck at the beg of every row from neckline: 2 sts 1 time and 1 st 2 times = 13-14-15-15-16-17 sts left on shoulder. Bind off when piece measures 73-76-79-82-85-87 cm / 28¾"-30"-31"-32¼"-33½"-34¼". BACK PIECE: Cast on 65-71-77-83-89-95 sts (includes 1 edge st each side) on needle size 7 mm / US 10 ½ with Snow. P 1 row from WS and work next rows as follows from RS: SIZE S + L + XXL: 1 edge st, * K3, P3 *, repeat from *-*, finish with K3 and 1 edge st. SIZE M + XL + XXXL: 1 edge st, * P3, K3 *, repeat from *-* and finish with P3 and 1 edge st. When piece measures 12 cm / 4¾" change to needle size 8 mm / US 11 and continue in stockinette st, AT THE SAME TIME on first row dec 12-14-16-16-16-14 sts evenly = 53-57-61-67-73-81 sts. When piece measures 53-55-57-59-61-62 cm / 21"-21⅝"-22½"-23¼"-24"-24⅜" bind off for armhole each side as described for front piece = 45-47-49-51-53-55 sts. When piece measures approx 71-74-77-80-83-85 cm / 28"-29⅛"-30⅜"-31½"-32¾"-33½" (adjust to 2 cm / ¾" before finished measurements on front piece) bind off the middle 17-17-17-19-19-19 sts for neck and complete each shoulder separately. Bind off 1 st on neckline on next row = 13-14-15-15-16-17 sts left on shoulder. Bind off when piece measures 73-76-79-82-85-87 cm / 28¾"-30"-31"-32¼"-33½"-34¼". SLEEVE: Cast on 32-32-38-38-38-38 sts (includes 1 edge st each side) on needle size 7 mm / US 10 ½ with Snow. P 1 row from WS and continue in rib K3/P3 with 1 edge st each side. When piece measures 10 cm / 4" change to needle size 8 mm / US 11 and continue in stockinette st, AT THE SAME TIME on first row dec 2-0-4-2-0-0 sts evenly = 30-32-34-36-38-38 sts. When piece measures 12 cm / 4¾" inc 1 st each side. Repeat the inc on every 6.5-6.5-5.5-5-5-4 cm / 2½"-2½"-2¼"-2"-2"-1½" a total of 6-6-7-7-7-8 times = 42-44-48-50-52-54 sts. When piece measures 49-48-48-46-45-43 cm / 19¼"-19"-19"-18"-17¾"-17" (less for the larger sizes because of longer sleeve cap and wider shoulder) bind off for sleeve cap each side at the beg of every row: 4 sts 1 time, 2 sts 1 time and 1 st 0-1-1-2-2-3 times, then 2 sts each side until piece measures 54 cm / 21¼" for all sizes, now bind off 4 sts 1 time each side and bind off remaining sts. Piece measures approx 55 cm / 21⅝" for all sizes. ASSEMBLY: Sew shoulder seams. NECK: Pick up approx 56 to 80 sts (divisible by 6 + 2, includes sts on stitch holder at front) round neck on circular needle size 7 mm / US 10 ½. Work rib K3/P3 – make sure to have K sts over K sts in M.3 mid front – NOTE! Work K4 instead of K3 on the 2 cables mid front. Bind off loosely with K over K and P over P when neck measures 14-14-14-16-16-16 cm / 5½"-5½"-5½"-6¼"-6¼"-6¼". FURTHER ASSEMBLY: Set in sleeves, sew sleeve and side seams inside 1 edge st. |
||||||||||||||||
Diagram explanations |
||||||||||||||||
|
||||||||||||||||

|
||||||||||||||||

|
||||||||||||||||
|
Have you made this or any other of our designs? Tag your pictures in social media with #dropsdesign so we can see them! Do you need help with this pattern?You'll find tutorial videos, a Comments/Questions area and more by visiting the pattern on garnstudio.com. © 1982-2024 DROPS Design A/S. We reserve all rights. This document, including all its sub-sections, has copyrights. Read more about what you can do with our patterns at the bottom of each pattern on our site. |
||||||||||||||||


With over 40 years in knitting and crochet design, DROPS Design offers one of the most extensive collections of free patterns on the internet - translated to 17 languages. As of today we count 304 catalogs and 11422 patterns - 11417 of which are translated into English (US/in).
We work hard to bring you the best knitting and crochet have to offer, inspiration and advice as well as great quality yarns at incredible prices! Would you like to use our patterns for other than personal use? You can read what you are allowed to do in the Copyright text at the bottom of all our patterns. Happy crafting!
Comments / Questions (13)
Hej blir det samma storlek om jag väljer att sticka helt i slätstickning ? Stickas den på vanliga (två) stickor, eller kan jag ha rundsticka och sticka fram och tillbaka?
21.02.2024 - 13:38DROPS Design answered:
Hej Gun, om du vil at hele tröjan stickas i slätstickning, kan du följa bakstycket. Kom ihåg att du skall ha 11 m på 10 cm :)
22.02.2024 - 11:51Hi, what measurements or UK dress sizes are the small, medium, XL and xxl please?
15.01.2021 - 07:32DROPS Design answered:
Dear Annie, measure a similar garment you have and like the shape and compare these to the measurements in the chart, this is the best way to find the matching sizee - read more about chart here. Happy knitting!
15.01.2021 - 07:35Hej igen! Jag har kommit till slutet av framstycket men förstå inte hur jag ska sticka de maskor som inte är på restgarnet, då det kommer bli ett hål mellan axelmaskorna och halsingsmaskorna. Eller ska jag sticka de var för sig, alltså att jag tar andra stickor+garn till den andra axeln? Tack för svar.
29.04.2020 - 16:25DROPS Design answered:
Hej Ja efter att du har satt maskorna på restgarn till halsringning så stickar du först den ena axeln färdig och sedan stickar du den andra. Mvh DROPS Design
30.04.2020 - 08:15Hej! Jag förstår bara inte varför jag ska sticka aviga maskor i M2. där mina flätor kommer att vara. "sticka 2 am i denna m" och sedan står det att 6 maskor har ökats. Ska jag sticka 1 maska som 2 aviga och sedan nästa varv sticka räta?
18.04.2020 - 02:19DROPS Design answered:
Hej Tck för info. Det ser ut som om det är ett skrivfel där, det ska stickas 2 rm i maskan. Texten kommer att uppdateras. Mvh DROPS Design
20.04.2020 - 11:39The sleeves just don't work out. Knitting two together on each side makes the sleeve to short to fit into the arm hole. Am I doing anything wrong. I have now knitted my own sleeve with the help of a family member. Totally different to what the pattern suggests. I'm still busy after having to pull the knitted piece out to under the arm.
18.08.2019 - 11:33DROPS Design answered:
Dear Dalene, for the sleeve cap you will cast off the stitches at the beg of every row (both from RS and from WS), ie not decrease. First cast off 4 sts 1 time, 2 sts 1 time and 1 st 0-1-1-2-2-3 times then cast off 2 sts each side until piece measures 54 cm for all sizes, now cast off 4 sts 1 time each side and cast off remaining sts. Sleeve cap should measure 6-12 cm. Happy knitting!
19.08.2019 - 10:26Is het in het begin de bedoeling dat de naald aan de verkeerde kant van het werk tegenovergesteld gebreid wordt van de goede kant? Dus aan de goede kant een rechte steek aan de verkeerde kant een averechts steek? Alvast bedankt voor uw antwoord
15.01.2019 - 20:14DROPS Design answered:
Dag Marielle,
Ja, daar heb je inderdaad gelijk aan; recht aan de goede kant, averecht aan de verkeerde kant en vice versa, zodat je boordsteek breit.
17.01.2019 - 10:08Az ujjánál mit jelent amig 9cm ?
20.03.2018 - 08:05Hallo Vielen Dank für die Nachricht.Ich meinte da der Zopf vorne ist kann es ja sein das deswegen die 12 Maschen am Rücken abgenommen werden.Das Rückenteil wird glatt rechts gestrickt.Danke für Ihre schnelle Antort Liebe Grüße Claudia Wächtler
06.12.2017 - 10:02Hallo Warum bei diesen Pullover am Rückenteil 12 Maschen abnehmen?Damit ist das Rückenteil 10 Maschen kleiner als das Vorderteil.Vieleicht hängt es mit den Zöpfen zusammen.Können Sie mir genau schreiben,ob ich die 12 Maschen am Rückenteil abnehmen muss.Danke im Vorraus für die Antwort. Liebe Grüße Claudia
06.12.2017 - 09:06DROPS Design answered:
Liebe Fau Wächtler, es gibt keinen Zopf am Rückenteil, es wird nur glatt rechts gestrickt, deshalb ist der Maschenanzahl unterschiedlich. Viel Spaß beim stricken!
06.12.2017 - 09:47Kan deze trui ook gebreid worden op rondbreinaalden? Hoe zit het dan met het patroon voor de armen??
27.11.2017 - 18:56DROPS Design answered:
Hallo Karen, Jazeker, dat kan! Je zet 2 steken minder op (want je hebt geen kantsteken nodig bij rondbreien), 1 naald averecht aan de verkeerde kant, wordt 1 naald recht aan de goede kant. Verder plaats je een markeerdraad aan het begin van de naald (= midden onder de mouw) en de meerderingen doe je aan beide kanten van deze markeerdraad. Bij het minderen voor de mouwkop kant je eerst 8 steken midden onder de mouw af (aan beide kanten 4), daarna brei je heen en weer verder volgens patroon (waar bij je de 1 x 4st aan elke kant dus over kunt slaan, omdat je die al hebt afgekant)
28.11.2017 - 09:14