
Categorie popolari
State cercando un filato?


Commenti / Domande (61)
![]() Loessmit ha scritto:
Loessmit ha scritto:
Wat moet je na Na de eerste nld met de 5 ribbels? Moet je die dan blijven breien aan het begin en eind van de nld?En...moet je anders gelijk beginnen met het golvenpatroon of eerst 1 recht, zoals in de video te zien is?
13.06.2013 - 20:41DROPS Design ha risposto:
Je hebt eerst 6 nld ribbelst gebreid. Daarna brei je de volgende nld als volgt: 5 ribbelst, M.1 (golvenpatroon) over de volgende 34 st, 1 omsl, 1 st r, 1 omsl, 1 st r (= st met de markeerdraad), 1 st r, 1 omsl, 1 st r (= st met markeerder), 1 omsl, 1 st r, M.1 over de volgende 34 st, en eindig met 5 ribbelst. Brei zo door en meerder volgens de beschrijving.
19.06.2013 - 13:57
![]() Kaija ha scritto:
Kaija ha scritto:
Ohjeessa sanotaan, että 34 silmukan mallineuleen jälkeen neulotaan *1 o, 1 langankierto, 1 o(=merkitty s) 1 langankierto, 1 o* ja seuraavilla 34 s:lla mallineuletta. Onko tämä *---* neulottava JOKA kerroksella?
10.01.2013 - 12:45DROPS Design ha risposto:
Kyllä, jatka neulomista samaan tapaan. Lisätyt s:t neulotaan piirroksen M.1 mukaan.
14.01.2013 - 16:24
![]() Marika ha scritto:
Marika ha scritto:
Neulotaan pyöröpuikoilla,mutta ei suljettuna neuleena.Kyseisiä puikkoja käytetään koska silmukoita tulee lisäysten myötä paljon.
09.01.2013 - 04:58
![]() Kaija Jarske ha scritto:
Kaija Jarske ha scritto:
Onko tämä hartialämmitin todella neulottava pyöröpuikoilla, jolloin osat ovat suljettuja neuleita? Miten nämä sitten yhdistetään? Lisäksi tuottaa ongelmia joka toisen mallikuvion 2 s:n lisäys joka 2.lla kerroksella. Ohjeistusta tähän lisää jos mahdollista. Kiitos!
08.01.2013 - 22:28DROPS Design ha risposto:
Tämä malli neulotaan tasona pyöröpuikoilla, koska silmukoita on niin paljon. Lisätyt s:t neulotaan piirroksen mukaisesti. Voit tarvittaessa piirtää oma ruutupiirroksesi ja lisätä tähän tarvittava määrä silmukoita, jolloin silmukoiden lisääminen mallineuleeseen on sitten neulottaessa helpompaa.
09.01.2013 - 15:17
![]() A.fuchs ha scritto:
A.fuchs ha scritto:
Klopt het dat in dit patroon een foutje staat in de eerste naald na de ribbelsteken in het patroon? Ik heb nl. 81 st. opgezet en zoals ik het patroon lees, kom ik uit op 83 st.
28.11.2012 - 12:41DROPS Design ha risposto:
Het patroon klopt. Je hebt 81 st en door de 2 omslagen, die je maakt aan beide kanten van de merkdraad krijg je steeds 2 st bij. Dus na de eerste nld heb je 83 st. Je moet ook steeds meerderen volgens het patroon.
29.11.2012 - 11:59
![]() Amelie ha scritto:
Amelie ha scritto:
Seguro que este patron es en aguja circular, si es en aguja circular porque tengo que trabajarlo 2 veces, no se supone que en aguja circular es una sola pieza???
20.11.2012 - 16:28DROPS Design ha risposto:
Amelie, no es una regla usar aguja circular solamente cuando se tejen prendas en una sola pieza. También se usan para tener espacio suficiente para colocar todos los pts y que el peso del tejido lo soporte el cable de la aguja, no tus manos.
21.11.2012 - 07:00Cora ha scritto:
Thank you for your answer. I think I understand correctly now, the number of stch increases with 2 on every row from RS, one on each side of the stch with marker.
13.03.2012 - 07:19Cora ha scritto:
Hi, I began this poncho and I think I understand correct, just want to be sure: in the middle I keep the pattern K1, 1 YO, K1 (= st with marker), 1 YO, K1 and I increase, at the same time, one more stich between Yo and st with the marker, every other row ? So I increase 2 st on every side of the middle st (Yo and the new one, increased)? Thank you.
12.03.2012 - 21:14DROPS Design ha risposto:
Yes, keep inc with one yo on each side of st with marker on every row from RS. On next row from WS work the yo as a stitch. So on next row from RS again make a yo on each side of middle stitch. Work the new sts into the pattern, but the row with K2 tog first when you have inc 17 new sts.
12.03.2012 - 21:29
![]() Georgine ha scritto:
Georgine ha scritto:
Genial
05.01.2012 - 15:57
![]() DROPS Design ha scritto:
DROPS Design ha scritto:
Hi Lisa, Pattern say to "inc 1 st on each side of st with marker on every other row".
14.10.2011 - 19:25
|
|||||||||||||
Mallard#mallardponcho |
|||||||||||||
|
|
|||||||||||||
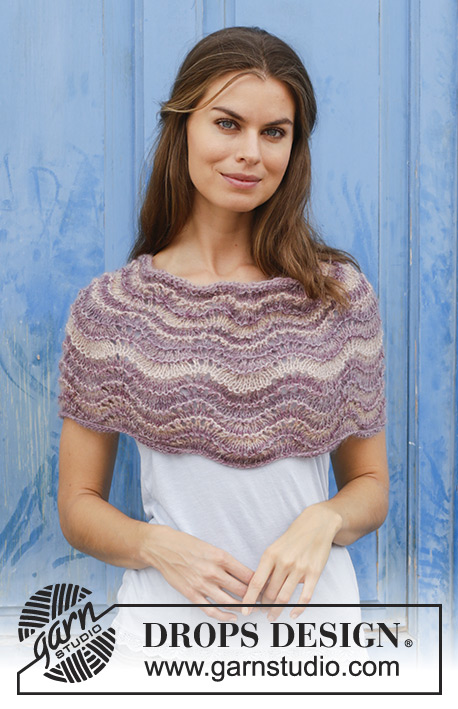
Coprispalle DROPS lavorato ai ferri con motivo a onde in ”Silke-Alpaca”.
DROPS 112-33 |
|||||||||||||
|
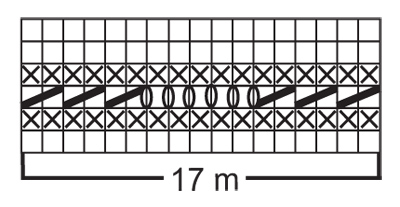
M LEGACCIO (avanti e indietro sui f): Lavorare tutti i f a dir. MOTIVO: Vedere il diagramma M.1. Il diagramma mostra il motivo dal diritto del lavoro. -------------------------------------------------------- COPRISPALLE: Lavorato dalla scollatura in giù, avanti e indietro sui f in 2 parti che vengono cucite alla fine. Avviare 81 m con I f circolari n° 5 mm con Silke-Alpaca. Lavorare 6 f a m legaccio. Inserire un segnapunti nella m centrale. Continuare come segue dal diritto del lavoro: 5 m a m legaccio, M.1 sulle 34 m successive, 1 m dir, 1 gettato, 1 m dir (= m con il segnapunti), 1 gettato, 1 m dir, M.1 sulle 34 m successive, e finire con 5 m a m legaccio. Continuare il motivo in questo modo, ALLO STESSO TEMPO aumentare 1 m a ogni lato della m con il segnapunti a f alterni – aumentare con 1 gettato come prima. Incorporare gli aumenti in M.1 durante il lavoro. NOTA! Sui f del motivo con 2 m insieme a dir e 1 gettato, lavorare tutte le m a dir fino a quando ci sono abbastanza m per una nuova ripetizione intera. Quando il lavoro misura 35 cm, o la lunghezza desiderata – misurare nella direzione del lavoro e aggiustarlo a una ripetizione intera di M.1 - intrecciare. Fare un’altra parte uguale e cucirle insieme nei fili più esterni delle m legaccio a ogni lato. CORDINI: Tagliare 2 capi che misurano circa 300 cm ognuno. Arrotolarli fino a quando è possibile, piegarli a metà e lasciarli arrotolare ancora. Fare un nodo ad ogni estremità e far passare il filo attraverso il ferro in alto sulla scollatura. Fare un fiocco sul davanti. |
|||||||||||||
Spiegazioni del diagramma |
|||||||||||||
|
|||||||||||||
 |
|||||||||||||
Avete terminato questo modello?Allora taggate le vostre foto con #dropspattern #mallardponcho o inviatele alla #dropsfan gallery. Avete bisogno di aiuto con questo modello?Troverete 13 video tutorial, una sezione per i commenti/domande e molto altro guardando il modello su www.garnstudio.com © 1982-2026 DROPS Design A/S. Ci riserviamo tutti i diritti. Questo documento, compreso tutte le sue sotto-sezioni, è protetto dalle leggi sul copyright. Potete leggere quello che potete fare con i nostri modelli alla fine di ogni modello sul nostro sito. |
|||||||||||||


Con oltre 40 anni di esperienza nel design di modelli di maglia e uncinetto, DROPS Design offre la più estesa collezione di modelli gratuiti su internet - tradotti in 17 lingue. Ad oggi vi possiamo fornire 324 cataloghi e 12290 modelli - 9561 dei quali sono tradotti in Italiano.
Ci stiamo impegnando molto per darvi il meglio che vi possiamo offrire in termini di maglia e uncinetto, ispirazioni e consigli così come filati di grande qualità ad un prezzo incredibile! Volete utilizzare i nostri modelli per qualcosa d'altro oltre al vostro uso personale? Potete leggere tutto ciò che è consentito nel testo sul Copyright in basso su tutte le pagine dei nostri modelli. Buon lavoro!
Lasciare un commento sul modello DROPS 112-33
Noi saremmo felici di ricevere i tuoi commenti e opinioni su questo modello!
Se vuoi fare una domanda, fai per favore attenzione a selezionare la categoria corretta nella casella qui sotto per velocizzare il processo di risposta. I campi richiesti sono indicati da *.