
Categorie popolari
State cercando un filato?


Commenti / Domande (66)
![]() Molly ha scritto:
Molly ha scritto:
Hi, Just to clarify, do you mean the "Increase – with yo (yarn over)" video for the increase tip demo? thanks!
20.12.2012 - 19:34DROPS Design ha risposto:
Oops sorry Molly, you are right, it should mean "Increase - with yo "yarn over" " - the part of the video where you work the yo into back of loop- to match the increase tips - ! Happy knitting!
20.12.2012 - 20:48
![]() Molly ha scritto:
Molly ha scritto:
Could you direct me to the DROPS instructional videos that demonstrate the increase & decrease tips for this pattern? Thanks!
20.12.2012 - 12:21DROPS Design ha risposto:
Dear Molly, you'll find these videos under "Increase with loop" and "decrease 3 sts to 1". happy Knitting!
20.12.2012 - 13:33
![]() Molly ha scritto:
Molly ha scritto:
Hi! Is it possible to use DROPS Alpaca Silk for this pattern? If so, what modifications would I need to make to make it work? Thanks for your help!
20.12.2012 - 00:32DROPS Design ha risposto:
Hi Molly, we do not recommend substituting with BabyAlapca Silk, because this belongs to another yarn group, but you can follow b21-34 which is quite similar and is a pattern for yarn group A.
20.12.2012 - 08:35Eva ha scritto:
Regarding the bind off... so i k1,k2tog & pull the first stitch over to bind off. next k1,k2tog.. now there are 3 sts on the right needle... can somebody give me a tip how this is meant to work. thank you : )
26.09.2012 - 17:40DROPS Design ha risposto:
Dear Eva, for binding off, you will work this way : K1, K2 tog, pull the first st over to bind off, then work K1, pull over the first st over to bind off, then work K2 tog and pull over the first st over to bind off etc... Happy Knitting !
13.11.2012 - 11:06
![]() Eva ha scritto:
Eva ha scritto:
Such a nice pattern... in the section for M4, what does "(i.e. when dec on every other row no of sts will dec)" mean?
26.09.2012 - 13:03DROPS Design ha risposto:
Dear Eva, when you dec 1 st each side of M4 every 4th row, you will dec total number of sts, but when you will then dec 1 st each side of M4 every other row, the dec will be compensate by inc at other places. Happy Knitting !
13.11.2012 - 11:02
![]() Anne Remus ha scritto:
Anne Remus ha scritto:
Komme mit der Anleitung nicht zurecht. Zu- oder abnehmen (Ausführung) ist nicht das Problem. Was mache ich in der 1.Reihe nach den 4 Reihen rechts? Nehme ich nach der ersten und vor der letzten Masche zu oder ab?
24.09.2012 - 21:11DROPS Design ha risposto:
Liebe Anne, die spezielle Form entsteht durch Auf- und durch Abnahmen. Es ist in der Anleitung genau beschrieben in welcher R an welchem Markierungsfaden (vor oder nach oder auch beidseitig) aufgenommen oder abgenommen wird. Folgen Sie genau der Anleitung. Gutes Gelingen!
25.09.2012 - 07:38
![]() Schneider ha scritto:
Schneider ha scritto:
Les explications pour les diminutions ne sont pas juste, il ne faut diminuer que devant le marqueur et non après
05.08.2012 - 09:29DROPS Design ha risposto:
Bonjour Schneider, les explications du bonnet sont juste telles quelles, il a déjà été tricoté avec succès à maintes reprises par plusieurs de nos clientes. Bon tricot !
06.08.2012 - 09:31
![]() Jitka ha scritto:
Jitka ha scritto:
Nerozumim vete pred DOKONČENI. Jakym zpusobem mam v jedne rade plest 1 oko hladce, 2 oka spleteme hladce a současně oka uzavíráme?Děkuji.
29.07.2012 - 23:49
![]() Kristina ha scritto:
Kristina ha scritto:
Varför ska man sticka räta m pü sistsa varvets avigsida innan avmaskning? Lättstickad mössa fram till monteringen. Inga problem att förstü hur den ska monteras men far inte till nagon fin söm.Tips nügon?
19.02.2012 - 14:14DROPS Design ha risposto:
Hej, om du tittar längst ned på mönstret har vi en bra videofilm som visar hur du monterar mössan! Lycka till!
20.02.2012 - 11:14Drops Design ha scritto:
Emilija, 1st row is RS, when inc every 4th row, you inc on row 1, 5, 9 and so on. Always on RS.
06.02.2012 - 18:46
|
|||||||||||||
Fairy Rose#fairyrosebonnet |
|||||||||||||
|
|
|||||||||||||
Cappello lavorato ai ferri a maglia rasata per neonati e bambini in DROPS Merino Extra Fine.
DROPS Baby 16-5 |
|||||||||||||
|
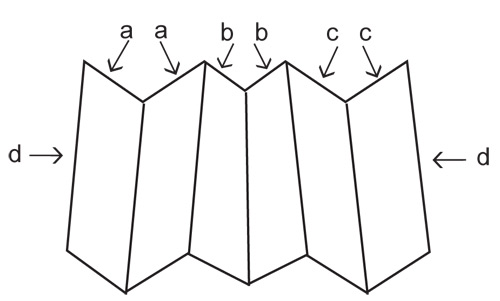
CONSIGLIO AUMENTI: Tutti gli aumenti si fanno sul diritto. Aumentare facendo 1 gett. Al ferro seguente, lavorare il gett ritorto per evitare un buco. CONSIGLI DIMINUZIONI: Tutti le diminuzioni si fanno sul diritto. Diminuire 1 m ad ogni lato della m con il segno così: passare la m prima d i quella con il segno sul ferro ausiliario dietro il lavoro senza lavorarla, passare 1 m a dir senza lavorarla (= m con il segno), lavorare insieme a dir la m seguente e la m sul ferro ausiliario, accavallare la m passata (quella con il segno) sopra quella lavorata. ---------------------------------------------------------- ---------------------------------------------------------- CAPPELLO: Si lavora avanti e indietro sul ferro. Avviare 97-105-109 (113-121) m con il ferro 4 ed il filo Merino Extra Fine. Lavorare 4 f a dir (1° f = diritto). Lasciare 7 segni nel lavoro così (sul diritto): 1° segno nella 1° m sul f 2° segno nella 18°-20°-21° (22°-24°) m 3° segno nella 35°-39°-41° (43°-47°) m 4° segno nella 49°-53°-55° (57°-61°) m 5° segno nella 63°-67°-69° (71°-75°) m 6° segno nella 80°-86°-89° (92°-98°) m e il 7° segno nell’ultima m sul f. Continuare a maglia rasata - ALLO STESSO TEMPO, sul 1° f, iniziare a aumentare e diminuire – VED CONSIGLIO AUMENTI E DIMINUZIONI! AUMENTARE 1 m DOPO il 1° segno ogni 2 ferri. DIMINUIRE 1 m ad ogni lato del 2° segno ogni 2 ferri. AUMENTARE 1 m PRIMA del 3° segno ogni 2 ferri. AUMENTARE 1 m DOPO il 3° segno ogni 4 ferri. DIMINUIRE 1 m ad ogni lato del 4° segno ogni 4 ferri 3-4-5 (5-6) volte e poi ogni 2 ferri fino alla fine. Questo vuol dire che quando si diminuisce ogni 2 ferri, il numero di maglie diminuirà. AUMENTARE 1 m PRIMA del 5° segno ogni 4 ferri. AUMENTARE 1 m DOPO il 5° segno ogni 2 ferri. FELL 1 m ad ogni lato del 6° segno ogni 2 ferri. AUMENTARE 1 m PRIMA del 7° segno ogni 2 ferri. Quando il lavoro misura 13-15-16 (18-19) cm (misurato dalla punta in basso al 2° o al 6° segno) lavorare 1 f a dir sul rovescio, poi il ferro seguente sul diritto così: * 1 m dir, 2 m insieme a dir *, ripetere da *-* ALLO STESSO TEMPO, intrecciare. CONFEZIONE: Il dietro del cappello = l’ultimo ferro (bordo intrecciato), cioè 2 punte intere e 2 punte a metà. La punta centrale delle 3 punte intere dall’altra parte del lavoro = bordo di avviamento, scende giù in mezzo sulla fronte. Fare le cuciture bordo contro bordo lungo il ferro dove sono state intrecciate le m: cucire la 1° punta a metà alla 1° punta intera. Cucire l’altro lato della 1° punta intera alla 1° punta a metà della 2° punta intera. Cucire l’altro lato della 2° punta intera all’ultima punta a metà. Alla fine, cucire il cappello in mezzo dietro – cucire bordo contro bordo per evitare cuciture troppo spesse. NASTRO: Avviare 4 m con il ferro 4 e lavorare così: * 1 m dir, posizionare il filo davanti al lavoro (verso di voi), passare 1 m a rov senza lavorarla, posizionare di nuovo il filo dietro il lavoro *, ripetere da *-* tutto il giro = tubo. Intrecciare quando il nastro misura ca 20-22-24 (26-28) cm. Lavorare 1 altro nastro identico. Cucire un nastro sulla punta in basso ad ogni lato del cappello. |
|||||||||||||
Spiegazioni del diagramma |
|||||||||||||
|
|||||||||||||
 |
|||||||||||||
Avete terminato questo modello?Allora taggate le vostre foto con #dropspattern #fairyrosebonnet o inviatele alla #dropsfan gallery. Avete bisogno di aiuto con questo modello?Troverete 13 video tutorial, una sezione per i commenti/domande e molto altro guardando il modello su www.garnstudio.com © 1982-2026 DROPS Design A/S. Ci riserviamo tutti i diritti. Questo documento, compreso tutte le sue sotto-sezioni, è protetto dalle leggi sul copyright. Potete leggere quello che potete fare con i nostri modelli alla fine di ogni modello sul nostro sito. |
|||||||||||||


Con oltre 40 anni di esperienza nel design di modelli di maglia e uncinetto, DROPS Design offre la più estesa collezione di modelli gratuiti su internet - tradotti in 17 lingue. Ad oggi vi possiamo fornire 324 cataloghi e 12290 modelli - 9561 dei quali sono tradotti in Italiano.
Ci stiamo impegnando molto per darvi il meglio che vi possiamo offrire in termini di maglia e uncinetto, ispirazioni e consigli così come filati di grande qualità ad un prezzo incredibile! Volete utilizzare i nostri modelli per qualcosa d'altro oltre al vostro uso personale? Potete leggere tutto ciò che è consentito nel testo sul Copyright in basso su tutte le pagine dei nostri modelli. Buon lavoro!
Lasciare un commento sul modello DROPS Baby 16-5
Noi saremmo felici di ricevere i tuoi commenti e opinioni su questo modello!
Se vuoi fare una domanda, fai per favore attenzione a selezionare la categoria corretta nella casella qui sotto per velocizzare il processo di risposta. I campi richiesti sono indicati da *.