
Categorie popolari
State cercando un filato?


Commenti / Domande (49)
![]() Katiuscia ha scritto:
Katiuscia ha scritto:
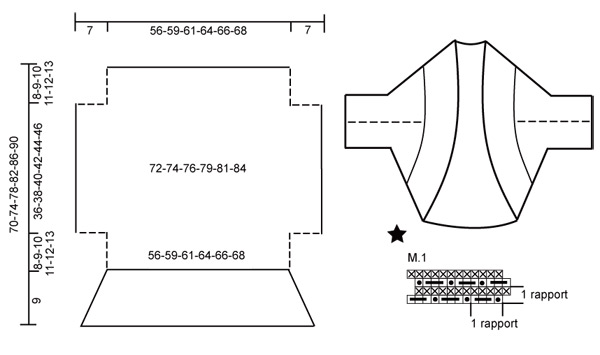
Scusate, le misure scritte,sono giuste? Ad esempio l'altezza,36+8+8+9 voi scrivete 70. Forse non sono capace di leggere i modelli. Sono alle prime armi. Vi ringrazio.
03.01.2019 - 14:45DROPS Design ha risposto:
Buongiorno Katiuscia. Alle misure indicate, deve aggiungere altri 9 cm del bordo a coste anche nella parte in alto. E' il bordo a coste che viene lavorato tutto intorno al bolero, alla fine, ma nel grafico è disegnata solo la parte in basso. Buon lavoro!
03.01.2019 - 15:18
![]() Beth Cole ha scritto:
Beth Cole ha scritto:
I am going to take this pattern and knit st st instead of the bobble with some colored yarn. I have two daughters and doing the bobbles for 2 boleros might just drive me mad ;) I will tackle the pattern as is for myself, however. Great pattern!
24.07.2013 - 16:08
![]() Carol Brown ha scritto:
Carol Brown ha scritto:
I have completed the body of the shrug and am ready to begin the ribbing. It looks to me as though I should sew up the side seams before I do the ribbing, but the directions are written in such a way as to make me think the seams are done after the ribbing. Could you clarify for me? Thank you.
20.12.2012 - 19:07DROPS Design ha risposto:
Dear Mrs Brown, you are right, you work the edge around the shrug : sts on needle + sts picked up along cast on edge. Seams for sleeves are done afterwards (see dotted lines on charts). Happy knitting!
20.12.2012 - 21:09
![]() Margreet ha scritto:
Margreet ha scritto:
Hallo Rita, dank je wel, je bevestigt mijn vermoeden. Dit blijft een mooie bolero, maar dus minder flatteus voor wat vollere vrouwen. Ik kies een ander patroon.
04.10.2012 - 21:22
![]() Rita ha scritto:
Rita ha scritto:
Hallo Margreet, ik heb dit gemaakt in XL en het verdikt verschrikkellijk op de boezem,heb het maar een keer gedragen.
04.10.2012 - 16:15
![]() Margreet ha scritto:
Margreet ha scritto:
Wat een prachtige bolero, ik zou 'm graag maken voor mezelf, maar ik vraag mij af of het in XL nog steeds leuk is?
03.10.2012 - 22:49
![]() Eva ha scritto:
Eva ha scritto:
Hallo zusammen, habe mir dieses Modell passenderweise in "brombeer" gestrickt. Was mich etwas stört, ist das es im nacken eine große Falte gibt, und würde beim nächsten mal einen Halsausschnitt einbringen. Aber sonst eine Top Anleitung trage den Bolero gerne. Danke!
07.09.2012 - 10:30
![]() Rina Luban ha scritto:
Rina Luban ha scritto:
I am about to start this pattern. what is the measurement for the two smallest sizes? the pattern does not say. Thanks so much.
14.05.2012 - 22:35DROPS Design ha risposto:
We are publishing a measure chart with each design. There you see the actual garments finished measures. The measures in the chart is in cm and measured from side to side. So to figure out which size to make, the best is to measure a garment you already have and like the size of and then compare with the chart.
17.05.2012 - 20:38
![]() DROPS Deutsch ha scritto:
DROPS Deutsch ha scritto:
Links auf rechts = li. auf der Vorderseite.
25.12.2010 - 20:06
![]() A.m. ha scritto:
A.m. ha scritto:
Frage zum Brombeermuster: in der Legende zum Diagramm steht, man möge in der Hinreihe "links auf rechts" stricken (verstehe ich als Maschen so stricken, wie sie erscheinen, ist das ein bundesdeutscher Ausdruck??), bei der Videoanleitung steht "1. u. 3. R. li stricken". Habe ich irgendwas falsch verstanden? Danke im Voraus.
25.12.2010 - 08:54
|
|||||||||||||
Coyote |
|||||||||||||
 |
 |
||||||||||||
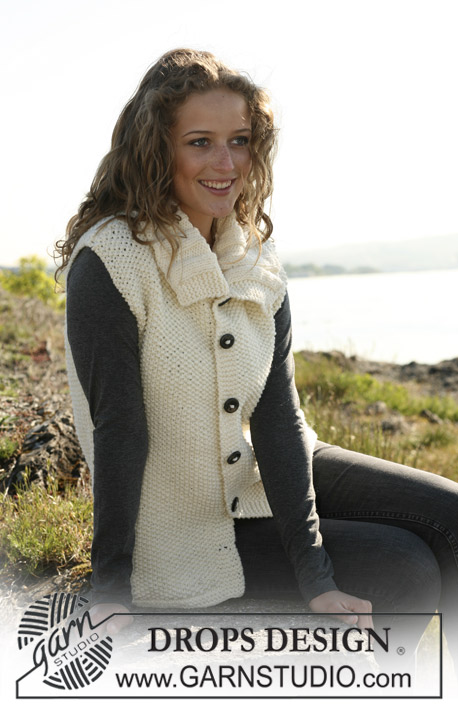
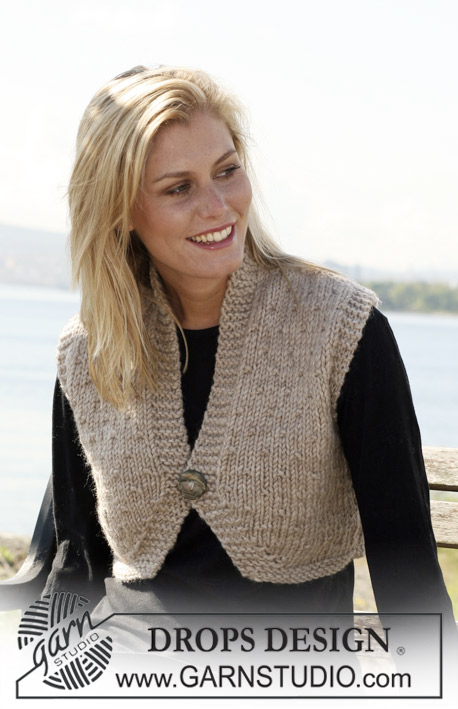
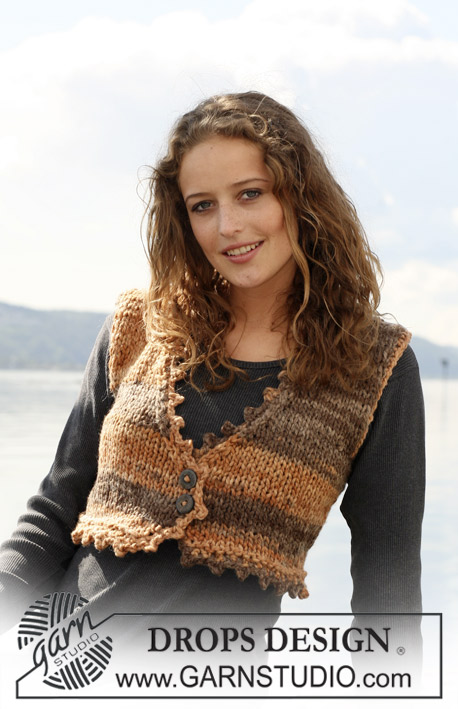
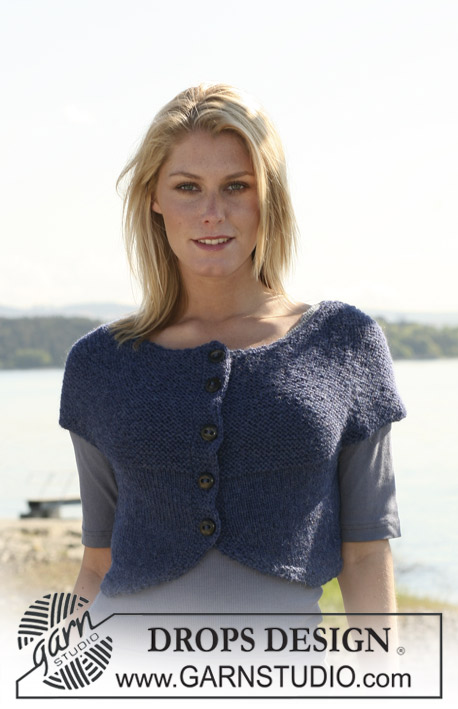
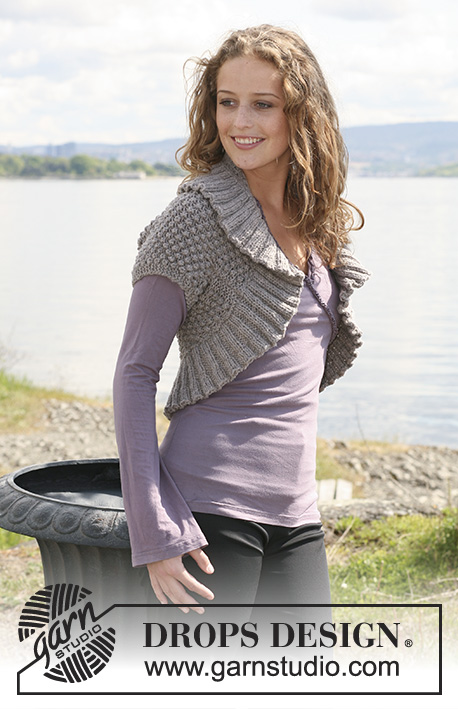
Bolero DROPS lavorato ai ferri a punto mimosa e coste in ”Alaska”. Taglie: S-XXXL.
DROPS 110-28 |
|||||||||||||
|
M LEGACCIO (avanti e indietro sui f): Lavorare tutti i f a dir. PUNTO MIMOSA: Vedere il diagramma M.1. Nota! Il primo ferro del motivo è lavorato dal rovescio del lavoro. SUGGERIMENTO PER GLI AUMENTI: Aumentare 1 m facendo 1 gettato. Sul f successivo lavorare il gettato nel filo dietro della m per evitare un buco. ------------------------------------------------------------- BOLERO: Lavorare il punto mimosa avanti e indietro sui f circolari, poi riprendere altre m per le coste e lavorare le coste in tondo. Avviare 122-126-130-134-138-142 m (compresa 1 m di vivagno a ogni lato) con i f circolari n° 5 mm. Lavorare 3 f dir, ALLO STESSO TEMPO distribuire 24 diminuzioni sul 3° f (lavorare insieme a dir ogni 5° e 6° m) = 98-102-106-110-114-118 m. Continuare come segue: 3 m a M LEGACCIO – leggere sopra – PUNTO MIMOSA – leggere sopra – fino a quando rimangono 3 m, 3 m a m legaccio. Continuare con il punto mimosa in questo modo con 3 m a m legaccio a ogni lato. FARE ATTENZIONE ALLA TENSIONE DEL LAVORO! Quando il lavoro misura 8-9-10-11-12-13 cm avviare 12 nuove m a ogni lato per le maniche = 122-126-130-134-138-142 m. Continuare con il motivo su tutte le m con e m a m legaccio a ogni lato. Inserire un segnapunti quando il lavoro misura 26-28-30-32-34-36 cm. Ora lavorare a specchio da qui. Quando il lavoro misura 44-47-50-53-56-59 cm intrecciare 12 m a ogni lato = 98-102-106-110-114-118 m. Continuare con il punto mimosa con 3 m a m legaccio a ogni lago fino a quando il lavoro misura 52-56-60-64-68-72 cm (aggiustarlo in modo che l’ultimo f sia un f a rov dal diritto del lavoro). Lavorare 3 f dir, ALLO STESSO TEMPO distribuire 24 aumenti in modo uniforme sul 1° f = 122-126-130-134-138-142 m. Passare ai f circolari n° 4,5 mm. Riprendere 122-126-130-134-138-142 m da f di avvio = 244-252-260-268-276-284 m. Ora continuare in tondo su tutte le m. Lavorare 1 giro rov, distribuendo 60-64-64-68-68-72 aumenti in modo uniforme (circa 1 m tra ogni 4° e 5° m) – leggere il SUGGERIMENTO PER GLI AUMENTI = 304-316-324-336-344-356 m. Lavorare 1 giro dir e continuare a coste, 2 m dir/2 m rov su tutte le m. Quando le coste misurano 3 cm aumentare 1 m in ogni sezione a rov (lavorare 2 m nella 1° m a rov) = 380-395-405-420-430-445 m. Ora continuare a coste, 2 m dir/3 m rov fino a quando le coste misurano 6 cm. Ora aumentare 1 m in ogni sezione a dir (lavorare 2 m nell’ultima m dir) = 456-474-486-504-516-534 m. Continuare a coste, 3 m dir/3 m rov fino a quando le coste misurano circa 9 cm. Intrecciare a coste. CONFEZIONE: Cucire i margini dei lati. Cucire sotto il braccio – vedere la linea tratteggiata nello schema delle misure. |
|||||||||||||
Spiegazioni del diagramma |
|||||||||||||
|
|||||||||||||
 |
|||||||||||||
Avete terminato questo modello?Allora taggate le vostre foto con #dropspattern o inviatele alla #dropsfan gallery. Avete bisogno di aiuto con questo modello?Troverete 17 video tutorial, una sezione per i commenti/domande e molto altro guardando il modello su www.garnstudio.com © 1982-2026 DROPS Design A/S. Ci riserviamo tutti i diritti. Questo documento, compreso tutte le sue sotto-sezioni, è protetto dalle leggi sul copyright. Potete leggere quello che potete fare con i nostri modelli alla fine di ogni modello sul nostro sito. |
|||||||||||||


Con oltre 40 anni di esperienza nel design di modelli di maglia e uncinetto, DROPS Design offre la più estesa collezione di modelli gratuiti su internet - tradotti in 17 lingue. Ad oggi vi possiamo fornire 324 cataloghi e 12290 modelli - 9561 dei quali sono tradotti in Italiano.
Ci stiamo impegnando molto per darvi il meglio che vi possiamo offrire in termini di maglia e uncinetto, ispirazioni e consigli così come filati di grande qualità ad un prezzo incredibile! Volete utilizzare i nostri modelli per qualcosa d'altro oltre al vostro uso personale? Potete leggere tutto ciò che è consentito nel testo sul Copyright in basso su tutte le pagine dei nostri modelli. Buon lavoro!
Lasciare un commento sul modello DROPS 110-28
Noi saremmo felici di ricevere i tuoi commenti e opinioni su questo modello!
Se vuoi fare una domanda, fai per favore attenzione a selezionare la categoria corretta nella casella qui sotto per velocizzare il processo di risposta. I campi richiesti sono indicati da *.