
Categorie popolari
State cercando un filato?


Commenti / Domande (79)
![]() Kerstin ha scritto:
Kerstin ha scritto:
Hallo, ich habe eine Frage zu den Pulswärmern: Beginne ich M1 oben und stricke bis zum Pfeil oder fange ich dort erst an? Nach der Beschreibung scheint mir ersteres logisch, jedoch würde dann nicht das Muster auf dem Foto erscheinen. Zudem scheint es mir etwas kurz für Pulswärmer? Danke im Voraus!
20.11.2015 - 00:28DROPS Design ha risposto:
Sie lesen das Diagramm ganz normal von unten nach oben. Sie beginnen ganz unten und stricken es bis zum Pfeil nach oben.
24.11.2015 - 22:07
![]() Laelia ha scritto:
Laelia ha scritto:
Bonjour, je fais les mitaines, j'ai fait le rang 26 du diagramme M1 et je repart sur du jersey envers, est-ce normal? ou me suis-je trompée quelque part ( ce qui est tout a fait possible !).Merci.
04.04.2015 - 20:48DROPS Design ha risposto:
Bonjour Laelia, c'est exact, au rang 29, vous tricotez toutes les mailles de M1 à l'envers sur l'envers, pour continuer au rang suivant le point ajouré. Bon tricot!
07.04.2015 - 09:05
![]() Kerstin ha scritto:
Kerstin ha scritto:
Guten Abend, ich verstehe den Pfeil auf der linken Seite bei M1 nicht. Muss ich ab hier immer wiederholen? Und mir ist nicht klar, wie ich bei einem Teil auf 65cm kommen soll. Ich hoffe, ihr könnt mit helfen. Vielen lieben Dank. Kerstin
16.11.2014 - 20:12DROPS Design ha risposto:
Liebe Kerstin, der Pfeil gilt nur für die Pulswärmer, nicht für den Schal, beim Schal hat er also einfach keine Bedeutung. Sie stricken die 90 R von M.1 1x in der Höhe, dann wdh Sie M.2 so oft, bis Sie eine Länge von ca. 65 cm erreicht haben (dabei sollten Sie einen ganzen M.2 zu Ende gestrickt haben). Weiterhin gutes Gelingen!
18.11.2014 - 09:56
![]() Krause, Ilona (w) ha scritto:
Krause, Ilona (w) ha scritto:
Sehr geehrtes Team, was bedeutet bitte "1 R. re. auf links stricken"? Danke für Ihre Antwort I. Krause
06.11.2014 - 17:40DROPS Design ha risposto:
Das soll bedeuten, dass Sie 1 Rück-R re stricken. "auf links" = "Rück-R", "auf rechts" = "Hin-R". Gutes Gelingen!
07.11.2014 - 17:35
![]() Krause, Ilona (w) ha scritto:
Krause, Ilona (w) ha scritto:
Sehr geehrtes Team, im Modell "DROPS 108-4 by DROPS Design" ist angegeben, dass der Schal in zwei Teilen= Hälften gestrickt werden soll, die nach Vollendung eines jeden mittig aneinander genäht werdejn. Weshalb wird der Schal nicht in einem Teil als Ganzes gestrickt? Danke für Ihre Antwort Ilona Krause
06.11.2014 - 17:32DROPS Design ha risposto:
Das Muster soll symmetrisch werden, daher werden beide Teile gleich gestrickt und dann hinten zusammengenäht. Würde der Schal in einem Stück gestrickt, würde das Muster an einer Seite "auf dem Kopf" stehen.
07.11.2014 - 17:34
![]() Gill ha scritto:
Gill ha scritto:
Please explain how I am supposed to slip a stitch knit 2 together and pass the slip stitch over in 1 stitch of the pattern - the triangle. English patterns are not written like this - I'm confused! Hjelp meg!
08.02.2014 - 18:19DROPS Design ha risposto:
Dear Gill, these double dec is shown in only 1 square in diag since the 2 yos compensating the 2 dec are also taking 1 whole square. Follow diagram as shown, ie on 1st row M1A: K1, YO, K4, slip 1, K2 tog, psso, K4, YO = 12 sts. Happy knitting!
10.02.2014 - 10:26
![]() Nane ha scritto:
Nane ha scritto:
Ich bin Anfängerin und finde nirgends, was am Ende der Anleitung für die Pulswärmer: "danach mit 2 Fäden locker abketten" bedeutet? Wäre sehr sehr dankbar für eine kurze Erklärung, vielen Dank!
28.01.2014 - 10:26DROPS Design ha risposto:
Liebe Nane, das bedeutet, dass man mit doppeltem Faden abkettet, damit die Abkettkante schön stabil wird.
30.01.2014 - 08:01Kim ha scritto:
Hi everyone! The pattern seems to be coming out nicely, but at the first row of M1 I have to unravel and start over, because the stich count doesn’t add up (there are far too few in the end, even though I counted 59 before starting this row, which is how many it says there should be). What am I doing wrong? I am grateful for any suggestions.
23.11.2013 - 13:44DROPS Design ha risposto:
Dear Kim, try to insert markers between each repeat so that you can check number of sts. Each dec should be compensate by 1 yo - 2 sts dec (black triangle) = 2 yos. Happy knitting!
25.11.2013 - 08:54
![]() Sharon Beardmore ha scritto:
Sharon Beardmore ha scritto:
Do you start the pattern M.1 where the arrow is and then work up to the top and then go to the bottom. I am rather confused. Where does M.2 come in? Be glad of help!
12.09.2013 - 20:42DROPS Design ha risposto:
Dear Mrs Beardmore, if you are working the scarf, just work M.1 from bottom up, starting at the right corner towards left side, and after full diagram M.1 has been worked, repeat then M.2 until scarf measures 65 cm. The arrow in M.1 is for the wrist warmers. Happy knitting!
13.09.2013 - 00:27
![]() Bibi ha scritto:
Bibi ha scritto:
Une écharpe douce et légère, agréable à tricoter (en restant bien concentrée !) merci pour les explications.
29.04.2011 - 15:50
|
|||||||||||||||||||
DROPS 108-4 |
|||||||||||||||||||
|
|
|||||||||||||||||||
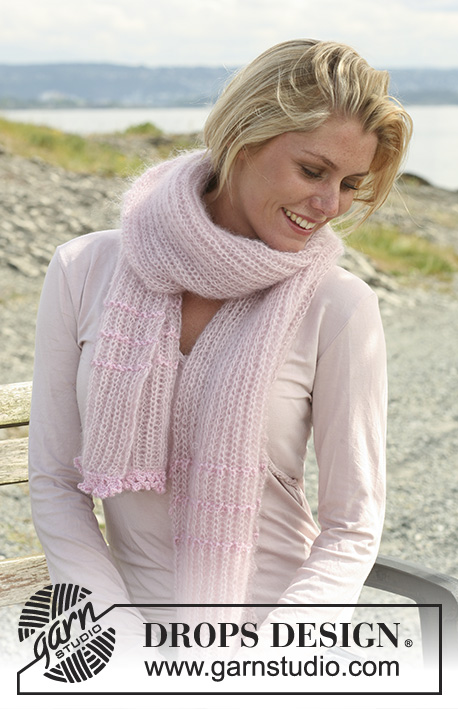
Sciarpa e scaldapolsi DROPS con motivo traforato in "Kid-Silk".
DROPS 108-4 |
|||||||||||||||||||
|
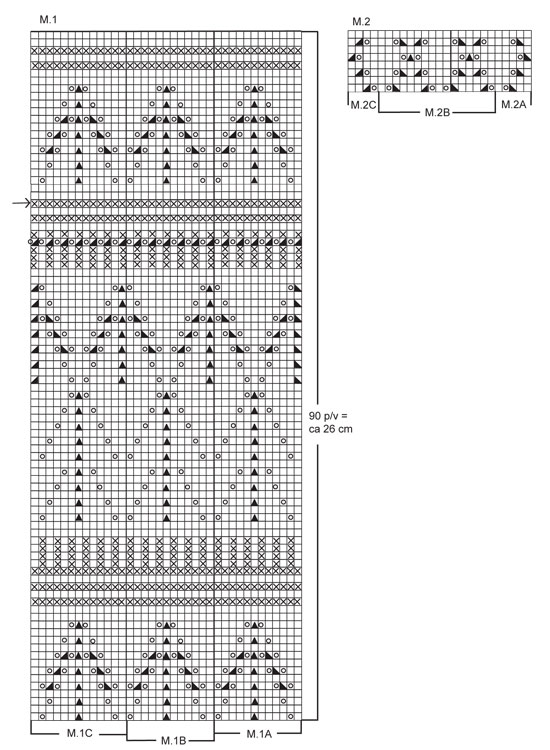
PUNTO LEGACCIO (avanti e indietro sui ferri): Lavorare tutti i ferri a dir. MOTIVO: Vedere i diagrammi M.1 e M.2. I diagrammi mostrano il motivo sul diritto del lavoro. SCIARPA: Viene lavorata in 2 parti unite successivamente. Avviare 75 m lente sui ferri n° 3,5 con il filato Kid-Silk. Lavorare 1 ferro a dir sul rovescio del lavoro. Lavorare il ferro successivo come segue: 5 m a punto legaccio per il bordo, * 5 m dir, passare 1 m a dir senza lavorarla, 1 m dir, accavallare la m passata sulla m lavorata, passare 1 m a dir senza lavorarla, 2 m insieme a dir, accavallare la m passata sulla m lavorata, 2 m insieme a dir, 4 m dir *, ripetere da *-* per un totale di 4 volte e finire con 1 m dir e 5 m a punto legaccio per il bordo = 59 m. Lavorare 1 ferro a rov sul rovescio del lavoro con 5 m a punto legaccio da ciascun lato. Proseguire seguendo il diagramma M.1, in questo modo: 5 m a punto legaccio, M.1A (= 12 m), M.1B 2 volte (= 24 m), M.1C (= 13 m) e finire con 5 m a punto legaccio. Proseguire in questo modo finché non è stato lavorato tutto il diagramma M.1. Lavorare ora il diagramma M.2 come segue: 5 m a punto legaccio, M.2A (= 5 m), M.2B finché non rimangono 9 m, M.2C (= 4 m) e 5 m a punto legaccio. Quando il lavoro misura ca. 65 cm – assicurarsi di aver completato un’intera ripetizione del diagramma – lavorare 3 ferri a dir e mettere le m in attesa su un fermamaglie/filo. Lavorare un secondo pezzo in modo uguale. Unire le due parti a punto maglia (la cucitura si trova al centro della sciarpa). SCALDAPOLSI: Avviare 51 m lente sui ferri n° 3,5 con il filato Kid-Silk. Lavorare 1 ferro a dir sul rovescio del lavoro. Lavorare il ferro successivo come segue: 1 m vivagno, * 5 m dir, passare 1 m a dir senza lavorarla, 1 m dir, accavallare la m passata sulla m lavorata, passare 1 m a dir senza lavorarla, 2 m insieme a dir, accavallare la m passata sulla m lavorata, 2 m insieme a dir, 4 m dir *, ripetere da *-* per un totale di 3 volte e finire con 1 m dir e 1 m vivagno = 39 m. Lavorare 1 ferro a rov sul rovescio del lavoro con 1 m vivagno a punto legaccio da ciascun lato. Proseguire seguendo il diagramma M.1 con 1 m vivagno da ciascun lato fino al punto indicato dalla freccia a sinistra nel diagramma. Chiudere le m, lavorandole con due capi del filato e senza stringere troppo il filo. Cucire all’interno della m vivagno. |
|||||||||||||||||||
Spiegazioni del diagramma |
|||||||||||||||||||
|
|||||||||||||||||||
 |
|||||||||||||||||||
Avete terminato questo modello?Allora taggate le vostre foto con #dropspattern o inviatele alla #dropsfan gallery. Avete bisogno di aiuto con questo modello?Troverete 16 video tutorial, una sezione per i commenti/domande e molto altro guardando il modello su www.garnstudio.com © 1982-2026 DROPS Design A/S. Ci riserviamo tutti i diritti. Questo documento, compreso tutte le sue sotto-sezioni, è protetto dalle leggi sul copyright. Potete leggere quello che potete fare con i nostri modelli alla fine di ogni modello sul nostro sito. |
|||||||||||||||||||


Con oltre 40 anni di esperienza nel design di modelli di maglia e uncinetto, DROPS Design offre la più estesa collezione di modelli gratuiti su internet - tradotti in 17 lingue. Ad oggi vi possiamo fornire 324 cataloghi e 12290 modelli - 9561 dei quali sono tradotti in Italiano.
Ci stiamo impegnando molto per darvi il meglio che vi possiamo offrire in termini di maglia e uncinetto, ispirazioni e consigli così come filati di grande qualità ad un prezzo incredibile! Volete utilizzare i nostri modelli per qualcosa d'altro oltre al vostro uso personale? Potete leggere tutto ciò che è consentito nel testo sul Copyright in basso su tutte le pagine dei nostri modelli. Buon lavoro!
Lasciare un commento sul modello DROPS 108-4
Noi saremmo felici di ricevere i tuoi commenti e opinioni su questo modello!
Se vuoi fare una domanda, fai per favore attenzione a selezionare la categoria corretta nella casella qui sotto per velocizzare il processo di risposta. I campi richiesti sono indicati da *.