
Categorie popolari
State cercando un filato?


Commenti / Domande (79)
![]() Camille ha scritto:
Camille ha scritto:
Bonjour, J'ai réussi à la réaliser et suis très fière du résultat. Jai appris beaucoup de choses notamment la couture au point de maille qui est géniale car on dirait que je l'ai tricoté d'un seul tenant. Ce projet m'a redonné confiance en moi et j'ai déjà choisi mon prochain modèle. Merci beaucoup!
25.10.2020 - 21:28
![]() María José Alberto Cantizano ha scritto:
María José Alberto Cantizano ha scritto:
Hola. No entiendo si se montan 75 puntos, en el inicio ¿por qué en la segunda y tercera vuelta la suma total es 59 puntos? que se hace con los 16 puntos restantes? Gracias
29.11.2019 - 00:59DROPS Design ha risposto:
Hola Maria Jose. Lee atentamente el patrón. En la primera fila se disminuyen 16 puntos para obtener el borde ondulado.
30.11.2019 - 19:15
![]() Paula C. ha scritto:
Paula C. ha scritto:
Dankeschön für die schnelle Rückmeldung! Dann schaue ich mal, wie ich zurecht komme :)
12.11.2018 - 18:30
![]() Paula C. ha scritto:
Paula C. ha scritto:
Hallo, bei den Pulswärmern gibt es eine Korrektur/Neues Diagramm. Bedeutet diese, dass nur 39 Maschen angeschlagen werden sollen (entgegen der alten Anleitung, wo es 51 Machen sind) und ist die neu angegebene Reihe "li auf li" dann die erste Reihe des Pulswärmers?? Oder gilt die Änderung für eine andere Passage der Anleitung. Das ist für mich leider nicht erkennbar. Danke für eine Rückmeldung. Lg Paula
12.11.2018 - 09:03DROPS Design ha risposto:
Liebe Paula, bei den Pulswärmern werden 51 M. angeschlagen, dann der 1. Reihe wie beschrieben stricken (der Text wurde auch schon korrigiert), dh Sie werden 4 Maschen in jedem Rapport von *bis* abnehmen x 3 Mal = 12 Maschen werden bei dieser Reihe abgenommen: 51 - 12 = es sind noch 39 M übrig. Viel Spaß beim stricken!
12.11.2018 - 10:40
![]() Lebigot ha scritto:
Lebigot ha scritto:
Bonjour, Est-il possible de tricoter l'écharpe en une seule fois, c'est à dire pas en deux parties qu'il faut ensuite coudre? Merci
20.12.2016 - 00:12DROPS Design ha risposto:
Bonjour Mme Lebigot, l'écharpe se tricote en 2 parties en commençant par les extrémités pour qu'elles soient toutes les 2 identiques, au lieu de rabattre et coudre les mailles vous pouvez les assembler en grafting pour un assemblage plus discret. Bon tricot!
20.12.2016 - 09:15
![]() Theresa ha scritto:
Theresa ha scritto:
Herzlichen Dank!
29.11.2016 - 13:41
![]() Theresa ha scritto:
Theresa ha scritto:
Hallo. Ich meinte die Reihe, die danach kommt (nach der mit den Umschlägen). Können Sie mir sagen, wie diese geht?
28.11.2016 - 18:36DROPS Design ha risposto:
Liebe Theresa, bei der Rück-R (nach den Umschlägen) stricken Sie die Umschläge li und die 2 Maschen zs rechts. (siehe auch Diagram Text). Viel Spaß beim stricken!
29.11.2016 - 09:03
![]() Theresa ha scritto:
Theresa ha scritto:
Hallo. Ich habe noch eine Frage zu den Pulswärmern. Wie ist die 5. Reihe vor Schluss (Pfeil) zu stricken? Auf der Nadel erscheint immer im Wechsel eine linke Masche aus den in der Reihe zuvor zwei re zusammengestrickten Maschen und ein Umschlag. Ich beginne also mit einer Randmasche, einer re Masche und dann? Das Diagramm müsste übrigens in der Reihe davor am Ende noch angepasst werden. Das letzte Kästchen müsste leer sein. Vielen Dank!
25.11.2016 - 15:41DROPS Design ha risposto:
Liebe Theresa, bei dieser Reihe enden Sie mit 1 re. M. so daß die Maschenanzahl gleich bleibt (je 1 Umschlag für 2 M. re zs). Viel Spaß beim stricken!
25.11.2016 - 16:26
![]() Theresa ha scritto:
Theresa ha scritto:
Dankeschön! :)
21.11.2016 - 22:16
![]() Theresa ha scritto:
Theresa ha scritto:
Hallo! Ich stricke die Pulswärmer und in der 6. Reihe vor Schluss geht das Muster bei mir nicht auf. Wenn ich jeweils 2 Maschen re zusammenstricke, komme ich auf 38 Maschen. Da ja noch zwei Randmaschen dazu kommen, bräuchte ich insgesamt 40 Maschen. Aber ich habe in der Reihe ja nur 39 zur Verfügung. Mache ich etwas falsch? Ich wäre sehr dankbar über Hilfe! Liebe Grüße.
11.11.2016 - 18:17DROPS Design ha risposto:
Liebe Theresa, bei dieser Reihe stricken Sie, 1 Randm, (2 Maschen re. zs, 1 Umschlag) x 18, 1 M re, 1 Randm = 39 Maschen. Viel Spaß beim stricken!
14.11.2016 - 09:05
|
|||||||||||||||||||
DROPS 108-4 |
|||||||||||||||||||
|
|
|||||||||||||||||||
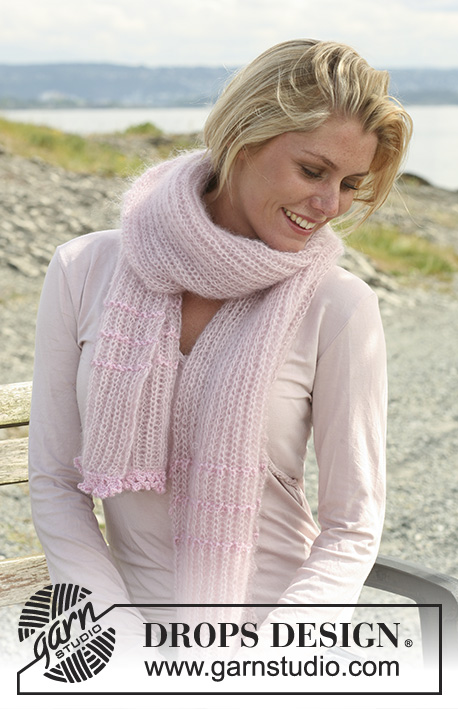
Sciarpa e scaldapolsi DROPS con motivo traforato in "Kid-Silk".
DROPS 108-4 |
|||||||||||||||||||
|
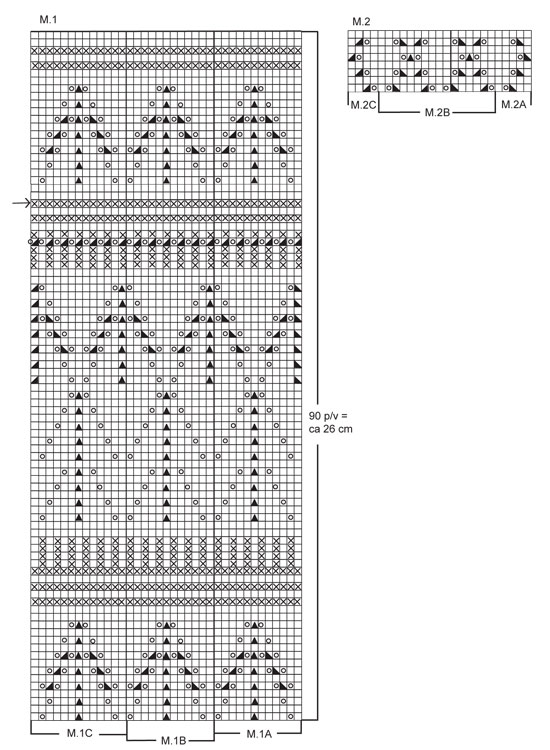
PUNTO LEGACCIO (avanti e indietro sui ferri): Lavorare tutti i ferri a dir. MOTIVO: Vedere i diagrammi M.1 e M.2. I diagrammi mostrano il motivo sul diritto del lavoro. SCIARPA: Viene lavorata in 2 parti unite successivamente. Avviare 75 m lente sui ferri n° 3,5 con il filato Kid-Silk. Lavorare 1 ferro a dir sul rovescio del lavoro. Lavorare il ferro successivo come segue: 5 m a punto legaccio per il bordo, * 5 m dir, passare 1 m a dir senza lavorarla, 1 m dir, accavallare la m passata sulla m lavorata, passare 1 m a dir senza lavorarla, 2 m insieme a dir, accavallare la m passata sulla m lavorata, 2 m insieme a dir, 4 m dir *, ripetere da *-* per un totale di 4 volte e finire con 1 m dir e 5 m a punto legaccio per il bordo = 59 m. Lavorare 1 ferro a rov sul rovescio del lavoro con 5 m a punto legaccio da ciascun lato. Proseguire seguendo il diagramma M.1, in questo modo: 5 m a punto legaccio, M.1A (= 12 m), M.1B 2 volte (= 24 m), M.1C (= 13 m) e finire con 5 m a punto legaccio. Proseguire in questo modo finché non è stato lavorato tutto il diagramma M.1. Lavorare ora il diagramma M.2 come segue: 5 m a punto legaccio, M.2A (= 5 m), M.2B finché non rimangono 9 m, M.2C (= 4 m) e 5 m a punto legaccio. Quando il lavoro misura ca. 65 cm – assicurarsi di aver completato un’intera ripetizione del diagramma – lavorare 3 ferri a dir e mettere le m in attesa su un fermamaglie/filo. Lavorare un secondo pezzo in modo uguale. Unire le due parti a punto maglia (la cucitura si trova al centro della sciarpa). SCALDAPOLSI: Avviare 51 m lente sui ferri n° 3,5 con il filato Kid-Silk. Lavorare 1 ferro a dir sul rovescio del lavoro. Lavorare il ferro successivo come segue: 1 m vivagno, * 5 m dir, passare 1 m a dir senza lavorarla, 1 m dir, accavallare la m passata sulla m lavorata, passare 1 m a dir senza lavorarla, 2 m insieme a dir, accavallare la m passata sulla m lavorata, 2 m insieme a dir, 4 m dir *, ripetere da *-* per un totale di 3 volte e finire con 1 m dir e 1 m vivagno = 39 m. Lavorare 1 ferro a rov sul rovescio del lavoro con 1 m vivagno a punto legaccio da ciascun lato. Proseguire seguendo il diagramma M.1 con 1 m vivagno da ciascun lato fino al punto indicato dalla freccia a sinistra nel diagramma. Chiudere le m, lavorandole con due capi del filato e senza stringere troppo il filo. Cucire all’interno della m vivagno. |
|||||||||||||||||||
Spiegazioni del diagramma |
|||||||||||||||||||
|
|||||||||||||||||||
 |
|||||||||||||||||||
Avete terminato questo modello?Allora taggate le vostre foto con #dropspattern o inviatele alla #dropsfan gallery. Avete bisogno di aiuto con questo modello?Troverete 16 video tutorial, una sezione per i commenti/domande e molto altro guardando il modello su www.garnstudio.com © 1982-2026 DROPS Design A/S. Ci riserviamo tutti i diritti. Questo documento, compreso tutte le sue sotto-sezioni, è protetto dalle leggi sul copyright. Potete leggere quello che potete fare con i nostri modelli alla fine di ogni modello sul nostro sito. |
|||||||||||||||||||


Con oltre 40 anni di esperienza nel design di modelli di maglia e uncinetto, DROPS Design offre la più estesa collezione di modelli gratuiti su internet - tradotti in 17 lingue. Ad oggi vi possiamo fornire 324 cataloghi e 12290 modelli - 9561 dei quali sono tradotti in Italiano.
Ci stiamo impegnando molto per darvi il meglio che vi possiamo offrire in termini di maglia e uncinetto, ispirazioni e consigli così come filati di grande qualità ad un prezzo incredibile! Volete utilizzare i nostri modelli per qualcosa d'altro oltre al vostro uso personale? Potete leggere tutto ciò che è consentito nel testo sul Copyright in basso su tutte le pagine dei nostri modelli. Buon lavoro!
Lasciare un commento sul modello DROPS 108-4
Noi saremmo felici di ricevere i tuoi commenti e opinioni su questo modello!
Se vuoi fare una domanda, fai per favore attenzione a selezionare la categoria corretta nella casella qui sotto per velocizzare il processo di risposta. I campi richiesti sono indicati da *.