
Categorie popolari
State cercando un filato?


Commenti / Domande (86)
![]() Sharon ha scritto:
Sharon ha scritto:
DOn't understand the instructions for the yoke on 109-3, Celtic charms sweater. It says when piece measures 53 cm slip 10 stitches each side on separate stitch holders towards mid front. I don't understand which 10 stitches on each side of what? Do you mean the first and last 10 stitches on the round needle?
10.05.2019 - 16:44DROPS Design ha risposto:
Hello Sharon. Yes, you slip first and last 10 sts on two separate stitch holders. Happy knitting!
11.05.2019 - 07:34
![]() Beth ha scritto:
Beth ha scritto:
OK I figured out the increases. I forgot about M.2. But I still do need to know how many stitches from sleeve go on needle with body. Thanks!
12.12.2018 - 04:59DROPS Design ha risposto:
Dear Beth, after M.2 you work in garter stitch over the 62 sts until sleeve measures 48 cm, then you bind off 4 sts on each side of the marker mid under sleeve = 54 sts remain for sleeve to go on needle with body. Happy knitting!
12.12.2018 - 10:02
![]() Beth ha scritto:
Beth ha scritto:
For my size, before starting M1 on sleeve, I should have 52 stitches. After an increase on each side of marker a total of 8 times I should have 68 but pattern says 62 after all increases and decreases. The pattern doesn't call for any decreases on sleeve. Also, when I put sleeves on needle with body, will it just be the 24 stitches with the cables with the test on a holder?
12.12.2018 - 04:23DROPS Design ha risposto:
Dear Beth, after all increases are done you will have 68 sts, but after you have worked M.2 over M.1 you will decrease 6 sts in M.2 (see last symbol under diagram text worked in A.2 over the cables = 2 sts dec over each cable) = 62 sts remain. Happy knitting!
12.12.2018 - 10:00
![]() Thecraftywiccan ha scritto:
Thecraftywiccan ha scritto:
I'm really enjoying knitting this project, I am however having a few issues with the pattern, its quite confusing to read scattered around as it it. I already have a few more patterns bookmarked and Im looking forward to knitting them.
16.03.2018 - 13:23
![]() Tammy Lebel ha scritto:
Tammy Lebel ha scritto:
Also, it says to insert a M1, 11 stitches after M1, I just don’t understand
10.10.2017 - 07:44DROPS Design ha risposto:
Dear Mrs Lebel, you are inserting a marking thread = MT for marking thread. Happy knitting!
10.10.2017 - 09:45
![]() Tammy Lebel ha scritto:
Tammy Lebel ha scritto:
Thanks for the fast response, I’ve read the chart that way, still not working out, when it says to increase 6 stitches evenly, do I do that in the reverse stockingnette part of the sleeve?
10.10.2017 - 07:38DROPS Design ha risposto:
Dear Mrs Lebel, row 1 in M.1= P2, Slip 2 sts on cable needle behind piece, K2, K2 from cable needle, P4, Slip 2 sts on cable needle behind piece, K2, K2 from cable needle, P4, Slip 2 sts on cable needle behind piece, K2, K2 from cable needle, P2. The 6 sts increased evenly on sleeve after M.1 are increased all the sts worked in garter st except over M.1. Happy knitting!
10.10.2017 - 09:44
![]() Tammy Lebel ha scritto:
Tammy Lebel ha scritto:
I’m not understanding this M1, do I read leftvto right? This is the first cable pattern that is not written out, so I’m struggling with the chart
09.10.2017 - 09:51DROPS Design ha risposto:
Dear Mrs Lebel, read diagrams from the right towards the left from RS and from the left towards the right from RS, starting from bottom corner on the right side. Happy knitting!
09.10.2017 - 10:12
![]() Sue ha scritto:
Sue ha scritto:
Hi I am afraid that I can't read a chart is it possible to have written instructions for the 2 charts please? Many thanks Sue
16.08.2016 - 16:53DROPS Design ha risposto:
Dear Sue, only diagram is available to this pattern, but please read more about diagrams here and remember your DROPS store will have more tips & advices for you, even per mail or telephone. Happy knitting!
17.08.2016 - 09:03
![]() Becky Matthews ha scritto:
Becky Matthews ha scritto:
Not sure what to do after I put the 10 stitches on the stitch holder. When I am knitting the next row, do I tighten up my yarn behind the ten stitches or leave a loose line of yarn. I can't visualize what the ten stitches do.
06.07.2016 - 00:01DROPS Design ha risposto:
Dear Mrs Matthews, these 10 sts will be then worked tog with the hood afterwards. From RS work these 10 sts and slip them onto a stitch holder (to avoid cutting yarn), then work remaining sts on row, turn, work the first 10 sts from WS, slip them on to a st holder, work remaining sts. And continue casting off for neck as stated. Happy knitting!
06.07.2016 - 08:07
![]() Brigid McHugh ha scritto:
Brigid McHugh ha scritto:
I am having problems with the diagram. Am I supposed to read from the bottom up or the top down? I've tried it 5 different ways and not getting the cable to come out correctly. Mind you I have made many cable knit sweaters... Please help?
01.03.2016 - 07:31Brigid McHugh ha risposto:
I see what I have done. Nevermind :-)
01.03.2016 - 07:46
|
||||||||||||||||||||||||||||
Celtic Charm |
||||||||||||||||||||||||||||
 |
 |
|||||||||||||||||||||||||||
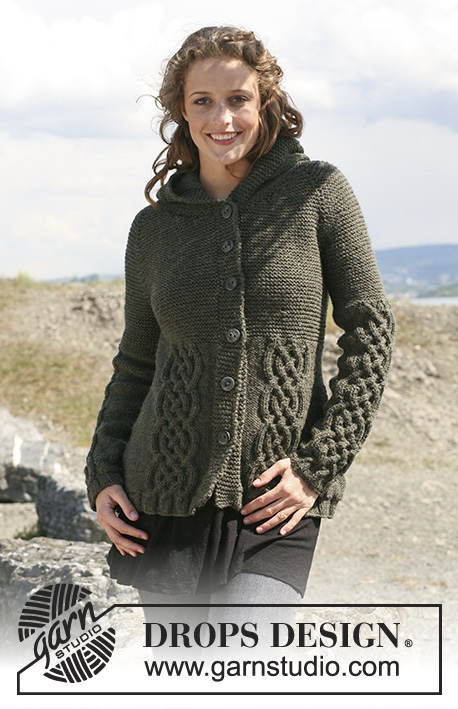
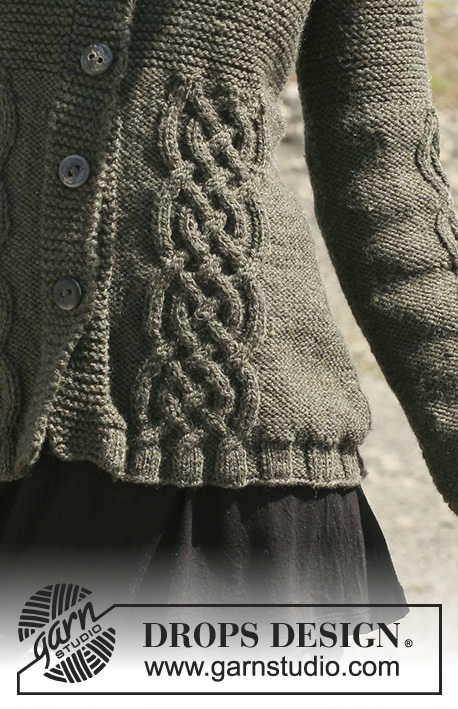
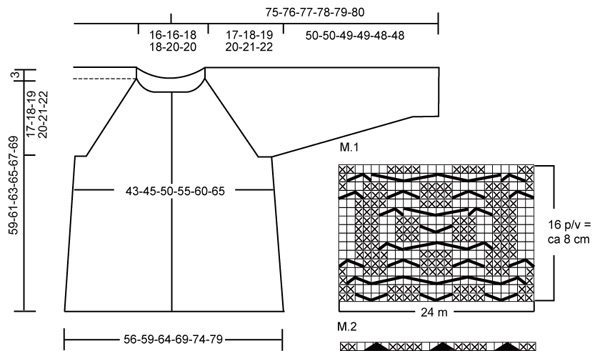
Giacca DROPS in "Alaska" con trecce, maniche a raglan e cappuccio. Taglie: Dalla S alla XXXL.
DROPS 109-3 |
||||||||||||||||||||||||||||
|
PUNTO LEGACCIO (avanti e indietro sui ferri): Lavorare tutti i ferri a dir. PUNTO LEGACCIO (in tondo): 1 giro a dir, 1 giro a rov MOTIVO: Vedere i diagrammi M1 e M2. I diagrammi mostrano il motivo sul diritto del lavoro. SUGGERIMENTO PER IL LAVORO: Se la tensione del lavoro è troppo stretta, il raglan sarà troppo corto e le maniche troppo strette. Si può correggere lavorando, a intervalli regolari, 1 ferro aggiuntivo senza diminuzioni tra i ferri con diminuzioni. DIMINUZIONI PER IL RAGLAN: Tutte le diminuzioni vengono fatte sul diritto del lavoro: Iniziare 2 m prima del segno, lavorare 2 m insieme a dir, segno, passare 1 m a dir senza lavorarla, 1 m dir, accavallare la m passata sulla m lavorata. ASOLE: Intrecciare le m per le asole lungo il davanti destro. 1 asola = intrecciare la 4° m a partire dal bordo; al ferro successivo, avviare 1 m in corrispondenza della m chiusa. Intrecciare le m per le asole quando il lavoro misura: Taglia S: 16, 23, 30, 37, 44 e 52 cm. Taglia M: 16, 23, 30, 38, 46 e 54 cm. Taglia L: 16, 24, 32, 40, 48 e 56 cm. Taglia XL: 16, 23, 30, 37, 44, 51 e 58 cm. Taglia XXL: 16, 23, 30, 37, 44, 52 e 59 cm. Taglia XXXL: 16, 23, 30, 37, 45, 53 e 61 cm. DAVANTI & DIETRO: Si lavorano avanti e indietro sui ferri circolari iniziando dal centro davanti. Avviare 220-228-244-260-276-292 m (comprese 8 m per i bordi davanti da ciascun lato) sui ferri circolari n° 5 con il filato Alaska. Lavorare 1 ferro a rovescio sul rovescio del lavoro e proseguire come segue: 8 m a punto legaccio (bordo davanti, al centro), coste 4 m dir / 4 m rov sulle 200-208-224-240-256-272 m successive, finire con 4 m dir e 8 m a punto legaccio (bordo davanti, al centro). Quando il lavoro misura 4 cm, passare ai ferri circolari n° 5,5 e proseguire come segue sul diritto del lavoro: 8 m a punto legaccio, 6-6-6-6-14-14 m a maglia rasata rovescia, M.1 (= 24 m), 40-40-48-56-56-64 m a maglia rasata rovescia, M.1, 16-24-24-24-24-24 m a maglia rasata rovescia, M.1, 40-40-48-56-56-64 m a maglia rasata rovescia, M.1, 6-6-6-6-14-14 m a maglia rasata rovescia e finire con 8 m a punto legaccio. Attenzione: le 4 m dir del motivo M.1 devono trovarsi sopra a 4 m dir delle coste. Inserire 2 segni nel lavoro: il 1° dopo le prime 59-61-65-69-73-77 m e il 2° prima delle ultime 59-61-65-69-73-77 m (= tra i due segni ci sono 102-106-114-122-130-138 m per il dietro). Proseguire seguendo il diagramma. Ricordarsi la tensione del lavoro! Quando il lavoro misura 8 cm diminuire 1 m da ciascun lato dei 2 segni (= 4 diminuzioni per ferro) ogni 2 cm per un totale di 11 volte = 176-184-200-216-232-248 m. Ricordarsi di intrecciare le m per le asole – vedere le spiegazioni precedenti. Dopo aver ripetuto il diagramma M.1 quattro volte in verticale (il lavoro misura ca. 36 cm), lavorare 1 volta in verticale il diagramma M.2 sopra il diagramma M.1; lavorare le restanti m a maglia rasata rovescia = 152-160-176-192-208-224 m. Al ferro successivo, passare ai ferri n° 5 e finire il lavoro a punto legaccio – vedere le spiegazioni precedenti. Quando il lavoro misura 42-43-44-45-46-47 cm, intrecciare 8 m da ciascun lato, per gli scalfi (intrecciare quindi le 4 m che precedono e le 4 m che seguono ciascuno dei 2 segni) = 136-144-160-176-192-208 m. Mettere da parte il lavoro. MANICHE: Si lavorano in tondo sui ferri a doppia punta. Avviare 40-40-40-48-48-48 m sui ferri a doppia punta n° 5 con il filato Alaska. Lavorare 4 cm a coste 4 m dir / 4 m rov. Passare ai ferri a doppia punta n° 5,5 e lavorare il giro successivo come segue: 10-10-10-18-18-18 m a maglia rasata rovescia, M.1 (= 24 m) e finire con 6-6-6-6-6-6 m a maglia rasata rovescia. Attenzione: le 4 m dir del motivo M.1 devono trovarsi sopra a 4 m dir delle coste. Al giro successivo aumentare 2-4-6-0-2-4 m in modo uniforme = 42-44-46-48-50-52 m; non aumentare in corrispondenza delle m del motivo M.1 Inserire un segno nel lavoro 9-10-11-12-13-14 m dopo il motivo M.1 = centro, sotto la manica. Proseguire seguendo il motivo M.1 e a maglia rasata rovescia. Quando il lavoro misura 8 cm, aumentare 1 m da ciascun lato del segno ogni 9,5-7,5-7,5-6-5-5 cm per un totale di 5-6-6-7-8-8 volte. Dopo aver ripetuto il diagramma M.1 5 volte in verticale (il lavoro misura ca. 44 cm), lavorare 1 volta in verticale il diagramma M.2 sopra il diagramma M.1; lavorare le restanti m a maglia rasata rovescia. Passare ai ferri n° 5 e terminare il lavoro a punto legaccio. Terminati tutti gli aumenti e le diminuzioni, sul ferro ci sono 46-50-52-56-60-62 m. Quando il lavoro misura 50-50-49-49-48-48 cm – misure più piccole nelle taglie maggiori perchè l’arrotondamento della manica è più lungo e le spalle sono più larghe – intrecciare le 4 m che precedono e le 4 m che seguono il segno, per lo scalfo = 38-42-44-48-52-54 m. Mettere da parte il lavoro e lavorare l’altra manica. SPRONE: Vedere il suggerimento per il lavoro! Passare le m delle maniche sullo stesso ferro circolare usato per lavorare il dietro e il davanti, nel punto in cui sono state chiuse le m per gli scalfi = 212-228-248-272-296-316 m. Inserire un segno in corrispondenza di ogni passaggio tra le maniche e il davanti / dietro = 4 segni. Lavorare lo sprone a punto legaccio, avanti e indietro sui ferri. Lavorare 2-1-0-1-0-1 ferri; diminuire ora per il raglan – vedere il suggerimento per le diminuzioni! Diminuire ogni 4 ferri per 13-13-14-13-13-13 volte e poi ogni 2 ferri per 0-2-2-5-7-8 volte. Allo stesso tempo, quando il lavoro misura 53-55-57-59-60-62 cm mettere in attesa, su due ferma maglie, le 10 m da ciascun lato, per il collo. Intrecciare per lo scollo all’inizio di ogni ferro come segue: 2 m 3-3-6-8-9-9 volte e 1 m 5-5-2-0-0-0 volte. Terminate tutte le diminuzioni, sul ferro ci sono 66-66-72-76-80-86 m. Lavorare 1 ferro a dir e distribuire 8-8-12-16-16-22 diminuzioni in modo uniforme = 58-58-60-60-64-64 m. CAPPUCCIO: Riprendere 25-25-28-28-30-30 m su ciascun dei due davanti (comprese le m messe in attesa sui fermamaglie) = 108-108-116-116-124-124 m. Passare ai ferri n° 5,5 e lavorare 4 ferri a punto legaccio; allo stesso tempo, diminuire 18 m in modo uniforme durante il primo ferro = 90-90-98-98-106-106 m. Inserire un segno al centro sul dietro (dopo 45-45-49-49-53-53 m). Proseguire a maglia rasata rovescia con 8 m a punto legaccio da ciascun lato. Allo stesso tempo, aumentare 1 m da ciascun lato del segno ogni 8 ferri per un totale di 4 volte = 98-98-106-106-114-114 m. Intrecciare quando il cappuccio misura 38-38-39-39-40-40 cm. CONFEZIONE: Cucire le aperture sotto le maniche. Cucire i bottoni. Piegare il cappuccino in 2 e cucire insieme la parte superiore sul diritto del lavoro. |
||||||||||||||||||||||||||||
Spiegazioni del diagramma |
||||||||||||||||||||||||||||
|
||||||||||||||||||||||||||||
 |
||||||||||||||||||||||||||||
Avete terminato questo modello?Allora taggate le vostre foto con #dropspattern o inviatele alla #dropsfan gallery. Avete bisogno di aiuto con questo modello?Troverete 23 video tutorial, una sezione per i commenti/domande e molto altro guardando il modello su www.garnstudio.com © 1982-2026 DROPS Design A/S. Ci riserviamo tutti i diritti. Questo documento, compreso tutte le sue sotto-sezioni, è protetto dalle leggi sul copyright. Potete leggere quello che potete fare con i nostri modelli alla fine di ogni modello sul nostro sito. |
||||||||||||||||||||||||||||


Con oltre 40 anni di esperienza nel design di modelli di maglia e uncinetto, DROPS Design offre la più estesa collezione di modelli gratuiti su internet - tradotti in 17 lingue. Ad oggi vi possiamo fornire 324 cataloghi e 12290 modelli - 9561 dei quali sono tradotti in Italiano.
Ci stiamo impegnando molto per darvi il meglio che vi possiamo offrire in termini di maglia e uncinetto, ispirazioni e consigli così come filati di grande qualità ad un prezzo incredibile! Volete utilizzare i nostri modelli per qualcosa d'altro oltre al vostro uso personale? Potete leggere tutto ciò che è consentito nel testo sul Copyright in basso su tutte le pagine dei nostri modelli. Buon lavoro!
Lasciare un commento sul modello DROPS 109-3
Noi saremmo felici di ricevere i tuoi commenti e opinioni su questo modello!
Se vuoi fare una domanda, fai per favore attenzione a selezionare la categoria corretta nella casella qui sotto per velocizzare il processo di risposta. I campi richiesti sono indicati da *.