
Categorie popolari
State cercando un filato?


Commenti / Domande (86)
![]() Béa ha scritto:
Béa ha scritto:
Bonjour, Je m'interroge pour la couture de la capuche. Il est indiqué coudre sur l'endroit, mais est-ce qu'on parle de l'endroit de l'ouvrage, qui est donc le côté point envers puisqu'on est sur un jersey envers, ou bien sur le côté endroit du jersey envers ? C'est béta, mais je ne sais pas quoi faire...
13.02.2022 - 15:59DROPS Design ha risposto:
Bonjour Béa, vous assemblez effectivement bien la capuche sur l'endroit, mais non pas en jersey endroit comme dans la vidéo (standard), mais en jersey envers, autrement dit, comme le montre cette vidéo ci. Bonnes finitions!
14.02.2022 - 10:27
![]() Gera Van Ommen ha scritto:
Gera Van Ommen ha scritto:
De minderingen aan de zijkant: worden die recht of averechts gebreid? Bij recht breien ontstaat een rij van twee rechten tot een bepaalde hoogte. Of moet ik op de goede kant (averechtse steken) averechts minderen ?
16.06.2021 - 18:25
![]() Gera Van Ommen ha scritto:
Gera Van Ommen ha scritto:
Tellen de opzet-steken als 1e naald? In dit patroon betekent dat een geribbelde onderkant, Klopt dat?
17.05.2021 - 18:47DROPS Design ha risposto:
Dag Gera,
Nee, de eerste naald na het opzetten is de eerste naald. Na het opzetten brei je de eerste naald averecht aan de verkeerde kant. Dan begin je aan de goede kant met het boordpatroon.
20.05.2021 - 16:58
![]() Isabelle ha scritto:
Isabelle ha scritto:
Bonjour, lorsque nous sommes rendu à réduire 13 fois tous les 4 rangs puis 7 fois tous les 2 rangs, est-ce qu'on réduit n'importe où sur le tricot? Et est-ce qu'on alterne les 13 réductions avec les 7? Besoin d'être éclairée svp merci
29.12.2020 - 23:53DROPS Design ha risposto:
Bonjour Isabelle, vous devez diminuer comme indiqué sous Diminutions pour le raglan autrement dit 1 m de chaque côté de chaque marqueur et donc 8 mailles au total, d'abord 13 fois tous les 4 rangs puis 7 fois tous les 2 rangs. Bon tricot!
04.01.2021 - 12:08
![]() Trisha Lentz ha scritto:
Trisha Lentz ha scritto:
My second question in my last response wasn't answered. Where exactly is mid front? This is needed when looking at the yoke. The yoke pattern says "slip 10 stitches each side on separate stitch holders towards mid front." Again, I appreciate your response.
21.10.2020 - 13:17DROPS Design ha risposto:
Dear Trisha, sorry for leaving out the second half of the answer. "Mid front" refers to the stitches that will at the two front edges, that is the first and the last stitches of the row. The easiest way to do this is that you knit the first 10 stitches, put them on a holder, knit the rest of the row, turn, knit the first 10 stitches, and knit the rest of the row. I hope this helps. Happy Knitting!
21.10.2020 - 14:16
![]() Trisha Lentz ha scritto:
Trisha Lentz ha scritto:
Hello, I have several questions after reading the pattern. It states after repeating m.1 4 times, knit m.2 over m.1. What does this mean? Also, when doing the yoke, it states to slip 10 stitches onto separate stitch holders towards mid front. Where exactly is mid front? Thank you for your time, and I look forward to your response.
20.10.2020 - 22:49DROPS Design ha risposto:
Dear Trisha, "m.1 4 times, knit m.2 over m.1" means that first you knit the M.1 pattern above each outher 4 times, then on these stitches you will have to continue with pattern M.2. Happy Knitting!
21.10.2020 - 04:05
![]() Saije ha scritto:
Saije ha scritto:
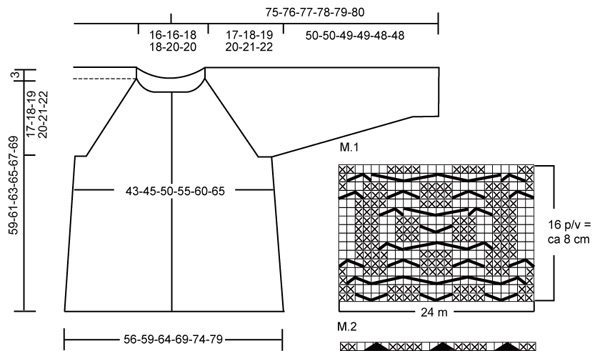
"continue as follows from RS: 8 garter sts, 6-6-6-6-14-14 sts in reverse stockinette st, M.1 (= 24 sts)." I am stitching the large size. Says I should have 24 stitches and I only have 15. What am I doing wrong? This is on the body of the jacket, and is important to know for the rest of the pattern. Please don't tell me to look at the diagram. After decades of knitting, I still can't read them. I also didn't see a video regarding this either.
24.09.2020 - 03:34DROPS Design ha risposto:
Dear Saije, in size L you have 244 sts and work them as follows: 8 sts in garter st, 6 sts in reversed stocking st, the next 24 sts as shown in M.1, 48 sts in reversed stocking st, the next 24 sts as in M.1, 24 sts reversed stocking st, the next 24 sts as in M.1, 48 sts in reversed stocking st, the next 24 sts as in M1, 6 sts in reversed stocking st, 8 sts in garter st = 8+6+24+48+24+24+24+48+24+6+8= 244 sts. We only have diagrams, not written pattern for the diagrams but you will find how to read knitting diagrams here. Happy knitting!
24.09.2020 - 09:49
![]() Anja ha scritto:
Anja ha scritto:
Hallo, complimenten voor uw gratis patronen, ik heb al verschillende projecten gemaakt. Wat ik echter niet begrijp is als u zegt, brei de mouw in het rond op de sokkenbreinaald. Ik zie in uw assortiment niet een kleine rondbreinaald waar je sokken op kunt breien, zeker niet in maat 5 of 6 mm. Dus wat bedoelt u dan eigenlijk? Ik heb de set van rondbreinaalden met verwisselbare naalden en kabeltjes maar deze zijn ook nog te lang voor een mouw.
22.02.2020 - 15:18DROPS Design ha risposto:
Dag Anja,
Je kunt naalden zonder knop gebruiken of een rondbreinaald. Als de rondbreinaald te lang is kun je volgens de magic loop techniek in deze video breien.
23.02.2020 - 13:52
![]() Laperriere ha scritto:
Laperriere ha scritto:
J aimerais savoir comment fait on pour savoir quel grandeur faire notre tricot( small, médium, large). J aimerais comprendre. Merci.
17.09.2019 - 01:52DROPS Design ha risposto:
Bonjour Mme Laperriere, mesurez un vêtement similaire que vous avez et dont vous aimez la forme et comparez ces mesures à celles du schéma - plus d'infos sur les schémas ici. Bon tricot!
17.09.2019 - 10:07
![]() Mary ha scritto:
Mary ha scritto:
Bei 55cm auf beiden Seiten gegen die Mitte je 10 M. auf einen Hilfsfaden legen... was genau ist hier gemeint? Lässt man die ersten sowie die letzten 10 M jetzt einfach "aus" ?
20.06.2019 - 10:54DROPS Design ha risposto:
Liebe Mary, am Anfang der nächsten beide Reihe (=HIn + Rückreihe) stricken Sie zuerst diese 10 Maschen und legen Sie sie still. Diese Maschen werden dann später für die Kapuze aufgefasst und gestrickt. Viel Spaß beim stricken!
20.06.2019 - 14:12
|
||||||||||||||||||||||||||||
Celtic Charm |
||||||||||||||||||||||||||||
 |
 |
|||||||||||||||||||||||||||
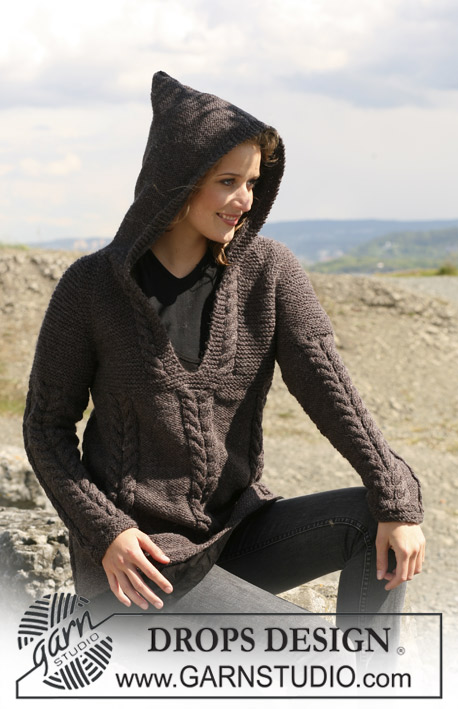
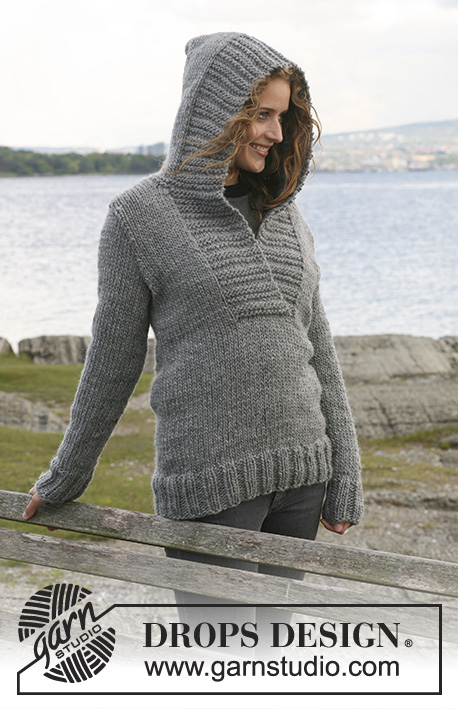
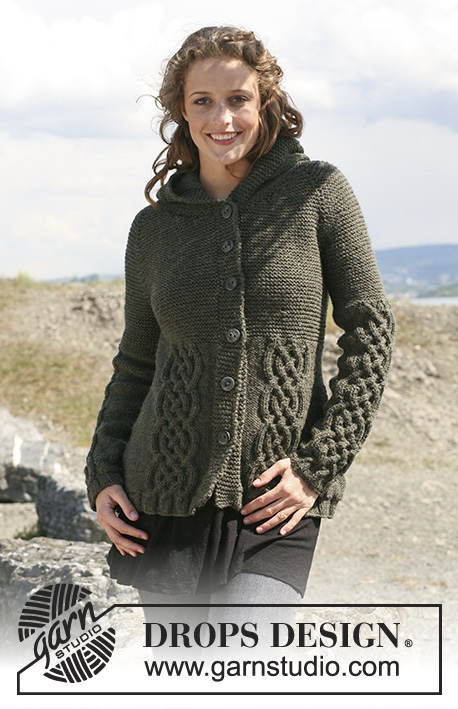
Giacca DROPS in "Alaska" con trecce, maniche a raglan e cappuccio. Taglie: Dalla S alla XXXL.
DROPS 109-3 |
||||||||||||||||||||||||||||
|
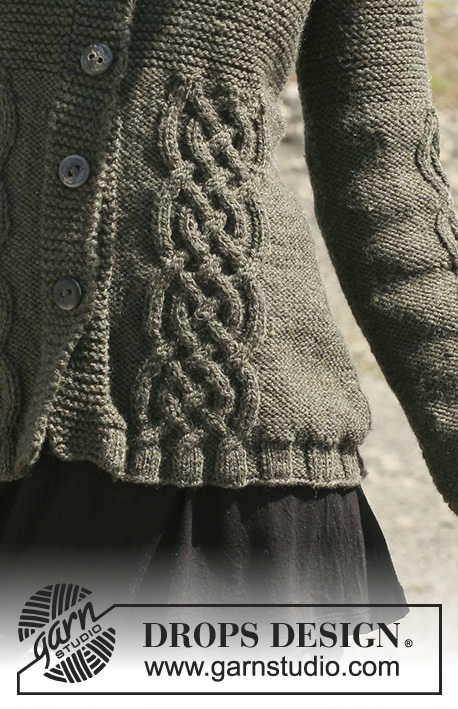
PUNTO LEGACCIO (avanti e indietro sui ferri): Lavorare tutti i ferri a dir. PUNTO LEGACCIO (in tondo): 1 giro a dir, 1 giro a rov MOTIVO: Vedere i diagrammi M1 e M2. I diagrammi mostrano il motivo sul diritto del lavoro. SUGGERIMENTO PER IL LAVORO: Se la tensione del lavoro è troppo stretta, il raglan sarà troppo corto e le maniche troppo strette. Si può correggere lavorando, a intervalli regolari, 1 ferro aggiuntivo senza diminuzioni tra i ferri con diminuzioni. DIMINUZIONI PER IL RAGLAN: Tutte le diminuzioni vengono fatte sul diritto del lavoro: Iniziare 2 m prima del segno, lavorare 2 m insieme a dir, segno, passare 1 m a dir senza lavorarla, 1 m dir, accavallare la m passata sulla m lavorata. ASOLE: Intrecciare le m per le asole lungo il davanti destro. 1 asola = intrecciare la 4° m a partire dal bordo; al ferro successivo, avviare 1 m in corrispondenza della m chiusa. Intrecciare le m per le asole quando il lavoro misura: Taglia S: 16, 23, 30, 37, 44 e 52 cm. Taglia M: 16, 23, 30, 38, 46 e 54 cm. Taglia L: 16, 24, 32, 40, 48 e 56 cm. Taglia XL: 16, 23, 30, 37, 44, 51 e 58 cm. Taglia XXL: 16, 23, 30, 37, 44, 52 e 59 cm. Taglia XXXL: 16, 23, 30, 37, 45, 53 e 61 cm. DAVANTI & DIETRO: Si lavorano avanti e indietro sui ferri circolari iniziando dal centro davanti. Avviare 220-228-244-260-276-292 m (comprese 8 m per i bordi davanti da ciascun lato) sui ferri circolari n° 5 con il filato Alaska. Lavorare 1 ferro a rovescio sul rovescio del lavoro e proseguire come segue: 8 m a punto legaccio (bordo davanti, al centro), coste 4 m dir / 4 m rov sulle 200-208-224-240-256-272 m successive, finire con 4 m dir e 8 m a punto legaccio (bordo davanti, al centro). Quando il lavoro misura 4 cm, passare ai ferri circolari n° 5,5 e proseguire come segue sul diritto del lavoro: 8 m a punto legaccio, 6-6-6-6-14-14 m a maglia rasata rovescia, M.1 (= 24 m), 40-40-48-56-56-64 m a maglia rasata rovescia, M.1, 16-24-24-24-24-24 m a maglia rasata rovescia, M.1, 40-40-48-56-56-64 m a maglia rasata rovescia, M.1, 6-6-6-6-14-14 m a maglia rasata rovescia e finire con 8 m a punto legaccio. Attenzione: le 4 m dir del motivo M.1 devono trovarsi sopra a 4 m dir delle coste. Inserire 2 segni nel lavoro: il 1° dopo le prime 59-61-65-69-73-77 m e il 2° prima delle ultime 59-61-65-69-73-77 m (= tra i due segni ci sono 102-106-114-122-130-138 m per il dietro). Proseguire seguendo il diagramma. Ricordarsi la tensione del lavoro! Quando il lavoro misura 8 cm diminuire 1 m da ciascun lato dei 2 segni (= 4 diminuzioni per ferro) ogni 2 cm per un totale di 11 volte = 176-184-200-216-232-248 m. Ricordarsi di intrecciare le m per le asole – vedere le spiegazioni precedenti. Dopo aver ripetuto il diagramma M.1 quattro volte in verticale (il lavoro misura ca. 36 cm), lavorare 1 volta in verticale il diagramma M.2 sopra il diagramma M.1; lavorare le restanti m a maglia rasata rovescia = 152-160-176-192-208-224 m. Al ferro successivo, passare ai ferri n° 5 e finire il lavoro a punto legaccio – vedere le spiegazioni precedenti. Quando il lavoro misura 42-43-44-45-46-47 cm, intrecciare 8 m da ciascun lato, per gli scalfi (intrecciare quindi le 4 m che precedono e le 4 m che seguono ciascuno dei 2 segni) = 136-144-160-176-192-208 m. Mettere da parte il lavoro. MANICHE: Si lavorano in tondo sui ferri a doppia punta. Avviare 40-40-40-48-48-48 m sui ferri a doppia punta n° 5 con il filato Alaska. Lavorare 4 cm a coste 4 m dir / 4 m rov. Passare ai ferri a doppia punta n° 5,5 e lavorare il giro successivo come segue: 10-10-10-18-18-18 m a maglia rasata rovescia, M.1 (= 24 m) e finire con 6-6-6-6-6-6 m a maglia rasata rovescia. Attenzione: le 4 m dir del motivo M.1 devono trovarsi sopra a 4 m dir delle coste. Al giro successivo aumentare 2-4-6-0-2-4 m in modo uniforme = 42-44-46-48-50-52 m; non aumentare in corrispondenza delle m del motivo M.1 Inserire un segno nel lavoro 9-10-11-12-13-14 m dopo il motivo M.1 = centro, sotto la manica. Proseguire seguendo il motivo M.1 e a maglia rasata rovescia. Quando il lavoro misura 8 cm, aumentare 1 m da ciascun lato del segno ogni 9,5-7,5-7,5-6-5-5 cm per un totale di 5-6-6-7-8-8 volte. Dopo aver ripetuto il diagramma M.1 5 volte in verticale (il lavoro misura ca. 44 cm), lavorare 1 volta in verticale il diagramma M.2 sopra il diagramma M.1; lavorare le restanti m a maglia rasata rovescia. Passare ai ferri n° 5 e terminare il lavoro a punto legaccio. Terminati tutti gli aumenti e le diminuzioni, sul ferro ci sono 46-50-52-56-60-62 m. Quando il lavoro misura 50-50-49-49-48-48 cm – misure più piccole nelle taglie maggiori perchè l’arrotondamento della manica è più lungo e le spalle sono più larghe – intrecciare le 4 m che precedono e le 4 m che seguono il segno, per lo scalfo = 38-42-44-48-52-54 m. Mettere da parte il lavoro e lavorare l’altra manica. SPRONE: Vedere il suggerimento per il lavoro! Passare le m delle maniche sullo stesso ferro circolare usato per lavorare il dietro e il davanti, nel punto in cui sono state chiuse le m per gli scalfi = 212-228-248-272-296-316 m. Inserire un segno in corrispondenza di ogni passaggio tra le maniche e il davanti / dietro = 4 segni. Lavorare lo sprone a punto legaccio, avanti e indietro sui ferri. Lavorare 2-1-0-1-0-1 ferri; diminuire ora per il raglan – vedere il suggerimento per le diminuzioni! Diminuire ogni 4 ferri per 13-13-14-13-13-13 volte e poi ogni 2 ferri per 0-2-2-5-7-8 volte. Allo stesso tempo, quando il lavoro misura 53-55-57-59-60-62 cm mettere in attesa, su due ferma maglie, le 10 m da ciascun lato, per il collo. Intrecciare per lo scollo all’inizio di ogni ferro come segue: 2 m 3-3-6-8-9-9 volte e 1 m 5-5-2-0-0-0 volte. Terminate tutte le diminuzioni, sul ferro ci sono 66-66-72-76-80-86 m. Lavorare 1 ferro a dir e distribuire 8-8-12-16-16-22 diminuzioni in modo uniforme = 58-58-60-60-64-64 m. CAPPUCCIO: Riprendere 25-25-28-28-30-30 m su ciascun dei due davanti (comprese le m messe in attesa sui fermamaglie) = 108-108-116-116-124-124 m. Passare ai ferri n° 5,5 e lavorare 4 ferri a punto legaccio; allo stesso tempo, diminuire 18 m in modo uniforme durante il primo ferro = 90-90-98-98-106-106 m. Inserire un segno al centro sul dietro (dopo 45-45-49-49-53-53 m). Proseguire a maglia rasata rovescia con 8 m a punto legaccio da ciascun lato. Allo stesso tempo, aumentare 1 m da ciascun lato del segno ogni 8 ferri per un totale di 4 volte = 98-98-106-106-114-114 m. Intrecciare quando il cappuccio misura 38-38-39-39-40-40 cm. CONFEZIONE: Cucire le aperture sotto le maniche. Cucire i bottoni. Piegare il cappuccino in 2 e cucire insieme la parte superiore sul diritto del lavoro. |
||||||||||||||||||||||||||||
Spiegazioni del diagramma |
||||||||||||||||||||||||||||
|
||||||||||||||||||||||||||||
 |
||||||||||||||||||||||||||||
Avete terminato questo modello?Allora taggate le vostre foto con #dropspattern o inviatele alla #dropsfan gallery. Avete bisogno di aiuto con questo modello?Troverete 23 video tutorial, una sezione per i commenti/domande e molto altro guardando il modello su www.garnstudio.com © 1982-2026 DROPS Design A/S. Ci riserviamo tutti i diritti. Questo documento, compreso tutte le sue sotto-sezioni, è protetto dalle leggi sul copyright. Potete leggere quello che potete fare con i nostri modelli alla fine di ogni modello sul nostro sito. |
||||||||||||||||||||||||||||


Con oltre 40 anni di esperienza nel design di modelli di maglia e uncinetto, DROPS Design offre la più estesa collezione di modelli gratuiti su internet - tradotti in 17 lingue. Ad oggi vi possiamo fornire 324 cataloghi e 12290 modelli - 9561 dei quali sono tradotti in Italiano.
Ci stiamo impegnando molto per darvi il meglio che vi possiamo offrire in termini di maglia e uncinetto, ispirazioni e consigli così come filati di grande qualità ad un prezzo incredibile! Volete utilizzare i nostri modelli per qualcosa d'altro oltre al vostro uso personale? Potete leggere tutto ciò che è consentito nel testo sul Copyright in basso su tutte le pagine dei nostri modelli. Buon lavoro!
Lasciare un commento sul modello DROPS 109-3
Noi saremmo felici di ricevere i tuoi commenti e opinioni su questo modello!
Se vuoi fare una domanda, fai per favore attenzione a selezionare la categoria corretta nella casella qui sotto per velocizzare il processo di risposta. I campi richiesti sono indicati da *.