
Categorie popolari
State cercando un filato?


Commenti / Domande (158)
![]() Annelise Kristensen ha scritto:
Annelise Kristensen ha scritto:
Jeg kan desværre komme videre. Jeg kan ikke forstå jeg SKAL KLIPPE TRÅDEN EFTER EFTER 34 cm og begynde at strikke efter den 17. maske. Hvad skal jeg bruge de 17 masker til???. På forhånd tak for hjælpen. Venlig hilsen Annelise
02.11.2023 - 07:50DROPS Design ha risposto:
Hej Annelise, det er fordi du nu skal starte omgangen midt foran, se videoen vi har lavet for at vise hvordan du strikker den overlappende krave :)
03.11.2023 - 11:52
![]() Smo ha scritto:
Smo ha scritto:
E' possibile adattare il modello per uomo?
31.07.2023 - 21:18DROPS Design ha risposto:
Buonasera Smo, in questa sede non ci è possibile adattare i modelli alle singole esigenze: provi a sfogliare i cataloghi da uomo, troverà sicuramente qualcosa che le piace. Buon lavoro!
03.08.2023 - 19:36
![]() Nancy Daems ha scritto:
Nancy Daems ha scritto:
Zou het kunnen dat de stekenverhouding niet klopt ? Als ik kijk naar xxl zou ik meer dan 200 steken moeten opzetten terwijl het patroon veel minder geeft
29.06.2023 - 06:07
![]() Lea ha scritto:
Lea ha scritto:
Hallo, ein paar Fragen zur Blende bzw. zum Weiterstricken, da ich hier leider nicht weiterkomme und bei den Vorderteilen (re+li) nicht bei 110 M bin, sondern auf der Strickhöhe, wo die Blende anfängt. D. h. ich habe lediglich die Blendenreihe hin und her gestrickt. 1. Muss eine Blendenreihe still gelegt werden? 2. Wie gehe ich da mit der Rundnadel bei der Blende um, da ich niemals mit der verdrehten Rundnadel ohne Stilllegung eine komplette Runde stricken könnte. Danke vorab.
20.09.2021 - 20:44DROPS Design ha risposto:
Liebe Lea, wenn die Arbeit 33 cm (1. Größe) misst, schneiden Sie den Faden (am Ende der Runde) ab; dann zählen Sie 15 M ab der Markierungs an der Seite, hier beginnen nun die Reihen: 14 M Blende, bis zur Ende der Reihe stricken und 1 Masche aus jeder der 14 ersten Maschen der Reihe aufnehmen - dieses Video zeigt, wie man diese Maschen auffasst, und dann in Hin- und Rückreihen weiterstrickt. Viel Spaß beim stricken!
21.09.2021 - 08:59
![]() Britta Riess ha scritto:
Britta Riess ha scritto:
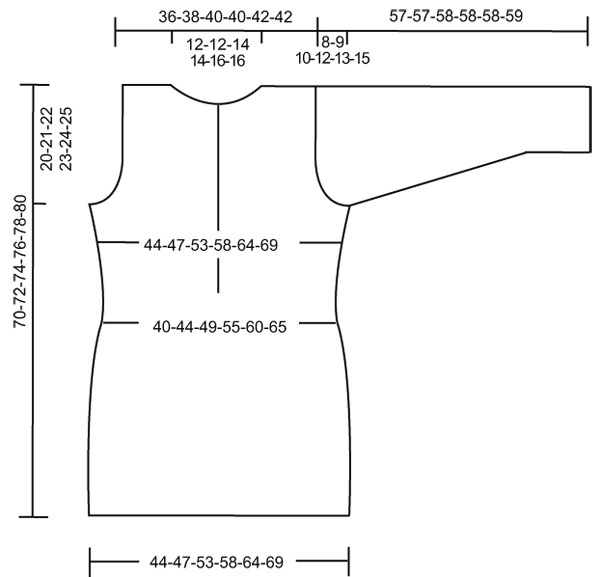
Hallo, in der Skizze ist angegeben das der Pulli in Größe M bis zum Armausschnitt eine Länge von 72 cm hat. Wenn ich die Anleitung richtig lese komme ich aber auf 10 cm Bund + 51 cm bis zur Armlochabnahme. Was ist jetzt richtig, oder wo liegt mein Fehler? Viele Grüsse Britta Riess
12.07.2021 - 10:24DROPS Design ha risposto:
Liebe Frau Riess, die 72 cm in M sind für die ganze Länge, dh von der Anschlagskante bis zur Schulter = 51 cm vor Armauschnitt + 21 cm Armausschnitt = 72 cm. Viel Spaß beim stricken!
12.07.2021 - 16:14
![]() SA ha scritto:
SA ha scritto:
" Beg after the 15-17-20-23-26-29 st from the first MT. Work 14 sts front band" I am not sure I understand this instruction, why do I start 20 st from MT why not 7 before and 7 after the TM?
29.06.2021 - 00:00DROPS Design ha risposto:
Dear Sa, because the rows should now start with the first of the 14 sts for the front band stitches, there are 54 sts between markers: 20 sts for one side/shoulder, 14 sts for front band sts, 20 sts for the other side/shoulder. Join the yarn after 20 sts and work the 14 front band sts, the next sts on needle ending with the 20 sts before these 14 sts and pick up 1 st behind each of these 14 sts. This video shows how to work such a row picking up sts behind the 14 front band sts. Happy knitting!
29.06.2021 - 09:08
![]() Nupur ha scritto:
Nupur ha scritto:
Hi! I am having trouble seaming the sleeves with the main body. Is there a tutorial available on how I can seam the two when it has been knit in the round? Thanks!
07.11.2020 - 12:03DROPS Design ha risposto:
Dear Mrs Nupur, sleeves are worked first in the round, then you continue back and forth for the sleeve cap - you should now sew sleeves to yoke - this video shows. Hope this video can help you. Happy knitting!
09.11.2020 - 09:56
![]() Kathy ha scritto:
Kathy ha scritto:
This is a lovely hooded sweater. I am excited to make it for the coming fall
23.08.2019 - 12:36
![]() Rebecca P ha scritto:
Rebecca P ha scritto:
Confused, bind off 3 sts each side of MT, now complete back and forth on needle. Bind off to shape sleeve cap each side at beginning of every row... Do I work through to the the end of the row after my 6 BO sts, then begin again where I had been when working in the round, but work the WS? Or, work through to the armhole and then turn to work WS, doing the BO for the sleeve cap?
24.02.2019 - 22:35DROPS Design ha risposto:
Dear Rebecca, after you have bound off the 6 sts mid under sleeve, continue back and forth for sleeve cap binding off at the beginning of each row (=both from RS and from WS) 2 sts 1 time, then 1 stitch 2-6 times (see size) etc.. Happy knitting!
25.02.2019 - 11:19
![]() Petra ha scritto:
Petra ha scritto:
Ich finde die Abnahme mit den Makierungsfäden etwas verwirrend. Wenn ich das richtig verstanden habe, setzt man am Anfang der Reihe eine Markierung und dann in der Mitte bei 52M. Anschließend bei z.B. 16cm nimmt man um die Markierungen jeweils 2M ab =4 M. Wie macht man das genau? 1 Abnahme, 1M stricken, wieder eine Abnahme? Dann würde da aber ein Loch entstehen:( Danke ganz herzlichst im Voraus!
19.11.2018 - 17:17DROPS Design ha risposto:
Liebe Petra, da die Maschenanzahl gerade ist, können Sie entweder 1 Abnahme, Markierung, 1 Abnahme stricken, oder mit 2 Maschen zwischen den Abnahmen: 1 Abnahme, 1 Masche, Markierung, 1 Masche, 1 Abnahme. Es soll kein Loch entstehen. Viel Spaß beim stricken!
20.11.2018 - 08:01
|
|
Campfire |
|
 |
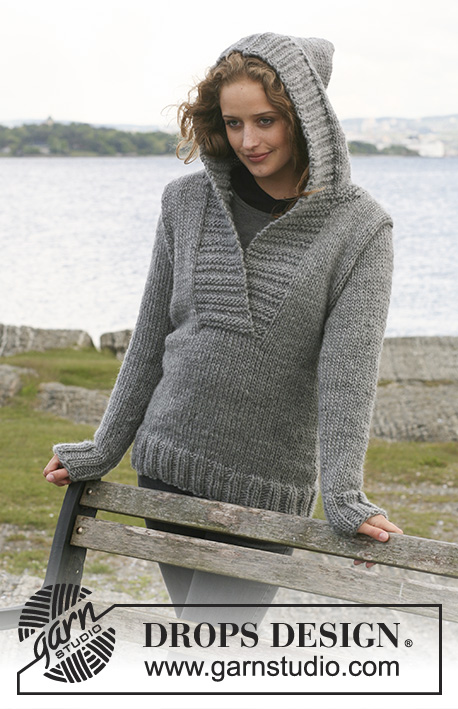 |
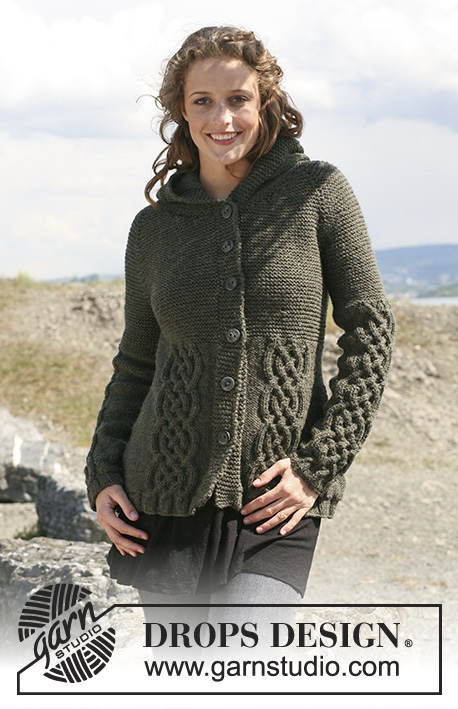
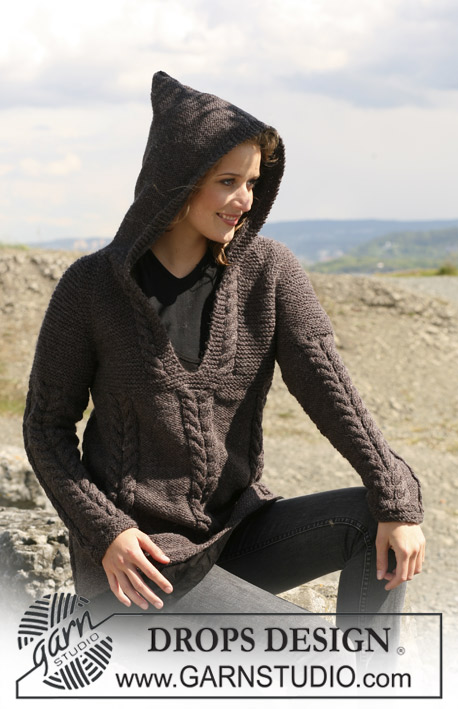
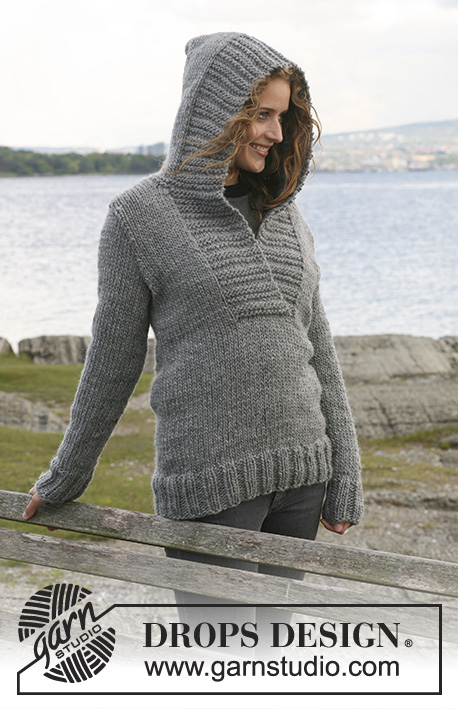
Maglione DROPS lavorato ai ferri con cappuccio in ”Snow”. Taglie: S - XXXL.
DROPS 109-1 |
|
|
BORDI DAVANTI: Iniziando dal diritto del lavoro: * 4 f dir, 2 f rov *, ripetere *-*. Nota! Il davanti sinistro, cioè le m che vengono riprese dietro il davanti destro = il ferro in cui si riprendono le m viene contato come il 1° dei 4 ferri a dir. CORPO: Lavorato in tondo. Avviare 96-104-116-128-140-152 m con i f n° 8 mm con Snow. Lavorare 1 giro rov e continuare a coste, 2 m dir/2 m rov. Quando il lavoro misura 10 cm continuare a m rasata. Inserire 1 segnapunti all'inizio del giro e 1 segnapunti dopo 48-52-58-64-70-76 m (= i lati). FARE ATTENZIONE ALLA TENSIONE DEL LAVORO! Quando il lavoro misura 15-16-17-18-19-20 cm diminuire 1 m a ogni lato di entrambi i segnapunti (= 4 diminuzioni per giro). Ripetere le diminuzioni quando il lavoro misura 30-31-32-33-34-35 cm = 88-96-108-120-132-144 m (= 44-48-54-60-66-72 m sul dietro e sul davanti). Quando il lavoro misura 33-34-35-36-37-38 cm, tagliare il filo. Ora continuare come segue: iniziare dopo le 15-17-20-23-26-29 m dal 1° segnapunti. Lavorare 14 m per il bordo davanti – leggere sopra – e a m rasata sulle 74-82-94-106-118-130 m successive. Ora riprendere 14 nuove m dietro le m del bordo davanti = 102-110-122-134-146-158 m. Continuare avanti e indietro sui f con 14 m per il bordo davanti a ogni lato. ALLO STESSO TEMPO quando il lavoro misura 36-37-38-39-40-41 cm aumentare 1 m a entrambi i lati di tutti i segnapunti (= 4 aumenti per giro). Ripetere l'aumento quando il lavoro misura 46-47-48-49-50-51 cm = 110-118-130-142-154-166 m. Quando il lavoro misura 50-51-52-53-54-55 cm intrecciare 6 m a ogni lato (cioè 3 m a ogni lato del segnapunti) per lo scalfo = 98-106-118-130-142-154 m. Ora finire i davanti e il dietro in modo separato. DIETRO: = 42-46-52-58-64-70 m. Intrecciare per modellare lo scalfo a ogni lato all'inizio di ogni f: 2 m 0-0-1-2-3-4 volte e 1 m 1-2-2-3-3-4 volte = 40-42-44-44-46-46 m. Quando il lavoro misura 68-70-72-74-76-78 cm intrecciare le 12-12-14-14-16-16 m centrali per il collo e diminuire 1 m sulla scollatura sul f successivo = 13-14-14-14-14-14 m rimaste su ogni spalla. Intrecciare quando il lavoro misura 70-72-74-76-78-80 cm. DAVANTI DESTRO: = 28-30-33-36-39-42 m. Intrecciare per modellare lo scalfo come descritto per il dietro = 27-28-29-29-30-30 m. Quando il lavoro misura 60-62-64-66-68-70 cm trasferire 14 m verso il centro davanti su un fermamaglie e ora diminuire per modellare la scollatura a f alterni come segue: 1 m 0-0-1-1-2-2 volte = 13-14-14-14-14-14 m rimaste sulla spalla. Intrecciare quando il lavoro misura 70-72-74-76-78-80 cm. DAVANTI SINISTRO: Come il davanti destro, ma a specchio. MANICA: Lavorata in tondo con i f a doppia punta. Avviare 28-28-28-32-32-32 m con i f n° 8 mm. Inserire 1 segnapunti all'inizio del giro. Lavorare 1 giro rov e continuare a coste, 2 m dir/2 m rov. Quando il lavoro misura 8 cm continuare a m rasata, ALLO STESSO TEMPO distribuire 2-2-0-4-2-2 diminuzioni sul 1° giro = 26-26-28-28-30-30 m. Quando il lavoro misura 10 cm aumentare 1 m a entrambi i lati del segnapunti ogni 6-5-5-3,5-3,5-2,5 cm per un totale di 7-8-8-10-10-12 volte = 40-42-44-48-50-54 m. Quando il lavoro misura 49-48-48-46-45-44 cm - Nota! Meno per le taglie più grandi a causa dell'arrotondamento della manica più lungo e della maggiore ampiezza delle spalle – intrecciare 3 m a entrambi i lati del segnapunti per lo scalfo, e ora continuare avanti e indietro sui f. Intrecciare per modellare l'arrotondamento della manica a ogni lato all'inizio di ogni f: 2 m 1 volta e 1 m 2-3-4-5-6-7 volte, poi 2 m a ogni lato fino a quando il lavoro misura 56-56-57-57-57-58 cm, intrecciare 3 m a ogni lato 1 volta e intrecciare le m rimaste. Il lavoro misura circa 57-57-58-58-58-59 cm. CAPPUCCIO: Riprendere circa 60-65 m attorno alla scollatura (comprese le m sul fermamaglie) con i f n° 8 mm con Snow. Lavorare 4 f a m legaccio con i bordi davanti come prima. ALLO STESSO TEMPO distribuire 5 aumenti in modo uniforme (non aumentare sulle m del bordo davanti) sull'ultimo ferro = 65-70 m. Continuare a m rasata con 14 m per i bordi davanti a ogni lato come prima fino a quando il cappuccio misura 35-35-36-36-37-37 cm. Intrecciare. Piegare il cappuccio e cucire in cima dal diritto del lavoro. CONFEZIONE: Attaccare le maniche. |
|
 |
|
Avete terminato questo modello?Allora taggate le vostre foto con #dropspattern o inviatele alla #dropsfan gallery. Avete bisogno di aiuto con questo modello?Troverete 21 video tutorial, una sezione per i commenti/domande e molto altro guardando il modello su www.garnstudio.com © 1982-2026 DROPS Design A/S. Ci riserviamo tutti i diritti. Questo documento, compreso tutte le sue sotto-sezioni, è protetto dalle leggi sul copyright. Potete leggere quello che potete fare con i nostri modelli alla fine di ogni modello sul nostro sito. |
|


Con oltre 40 anni di esperienza nel design di modelli di maglia e uncinetto, DROPS Design offre la più estesa collezione di modelli gratuiti su internet - tradotti in 17 lingue. Ad oggi vi possiamo fornire 324 cataloghi e 12290 modelli - 9561 dei quali sono tradotti in Italiano.
Ci stiamo impegnando molto per darvi il meglio che vi possiamo offrire in termini di maglia e uncinetto, ispirazioni e consigli così come filati di grande qualità ad un prezzo incredibile! Volete utilizzare i nostri modelli per qualcosa d'altro oltre al vostro uso personale? Potete leggere tutto ciò che è consentito nel testo sul Copyright in basso su tutte le pagine dei nostri modelli. Buon lavoro!
Lasciare un commento sul modello DROPS 109-1
Noi saremmo felici di ricevere i tuoi commenti e opinioni su questo modello!
Se vuoi fare una domanda, fai per favore attenzione a selezionare la categoria corretta nella casella qui sotto per velocizzare il processo di risposta. I campi richiesti sono indicati da *.