
Categorie popolari
State cercando un filato?


Commenti / Domande (180)
![]() Suzie De Feijter ha scritto:
Suzie De Feijter ha scritto:
Wat doe ik verkeerd? Ik heb na M1 44 lboogjes ipv 105
20.04.2017 - 21:22DROPS Design ha risposto:
Hallo Suzie, Vanaf hier kan ik helaas niet goed meekijken wat er bij jou precies verkeerd is gegaan. Misschien kun je nog een keer heel goed het patroon door lezen. Heb je ook de meerderingen gemaakt die beschreven zijn in de tekst? En heb je telpatroon M1 voor jouw maat genomen?
24.04.2017 - 16:06Janice ha scritto:
Thanks for the reply on my question regarding increasing in this pattern at the beginning. I had figured out the part about dividing the stitches by the amount needed to increase but here is my dilemma: I have 54 sc and need to increase by 22. 54 divided by 22 is 2.45 so no matter which way I crochet this I only end up with 18 on the increase. I have tried increasing after every 2nd stitch, with various compilations but nothing works out to 22 on the increase. HELP :)
13.04.2017 - 13:14DROPS Design ha risposto:
Dear Janice, you will work 2 sts, inc in next st, and repeat this all the round a total of 18 times (= 18x3= 54 sts), finishing with 4 sc: 18 x 4 + 4= 76 sc. Happy crocheting!
18.04.2017 - 08:50Janice ha scritto:
New to crochet and haven't worked in diagrams. I am having a hard time with increasing from 56 stitches to 78 at the beginning of the pattern. How do I work out where I do the increase on the sc.
11.04.2017 - 14:28DROPS Design ha risposto:
Dear Janice, you will find here how to increase evenly on a round. Happy crocheting!
12.04.2017 - 12:03Lee ha scritto:
Can I please ask how many gms of yarn you use for this pattern. Many thanks Lee
16.03.2017 - 07:02DROPS Design ha risposto:
Dear Lee, you will find total amount of yarn required under tab "Materials", ie in size S for example, you need 200 g DROPS Alpaca + 300 g DROPS Cotton Viscose. Happy crocheting!
16.03.2017 - 08:57
![]() Valeria ha scritto:
Valeria ha scritto:
Buongiorno una piccola domanda... quando inizio la seconda riga del diagramma m1 devo fare una maglia alta e poi 2 maglie alte in catenella a venire, oppure una maglia alta, 2maglie alte nella successiva, una maglia alta, 2nella successiva e così via? Grazie per l'aiuto
15.01.2017 - 22:27DROPS Design ha risposto:
Buongiorno Valeria. Lavora il secondo giro come segue: * 1 maglia alta nell’arco di catenelle, 1 catenella, 1 maglia alta nell’arco di cat successivo, 1 catenella, 1 maglia alta nello stesso arco di catenelle, 1 catenella * ; ripete queste istruzioni su tutto il giro. Buon lavoro!
15.01.2017 - 23:09
![]() Katrine Jensen ha scritto:
Katrine Jensen ha scritto:
Når jeg skal igang med M2, så er der en stm som laves ned i ingenting? Jeg forstår simpelthen ikke de første to omgange. Eller jo - det er luftmaskebuer som jeg har lavet hele vejen, men hvordan starter jeg de to omgange? Når jeg starter med en stm, som jeg har gjort i foregående rækker, så vil jeg vel ende med 144 masker igen, men så tager jeg en ind på næste række, så passer maskeantallet ikke med 8*18 masker. Jeg må have misforstået noget, men hvad? :)
11.10.2016 - 19:54DROPS Design ha risposto:
Hej Karin. Jeg er ikke 100%, men jeg vil sige st denne förste st hörer til den sidste st fra sidste omg (se til sidst paa diagrammet - der har du 2 st - og der mangler en st). Dette var nok den nemmeste maade at tegne det paa. Saa jeg vil sige du starter med 1 st i den sidste st fra sidste omg, saa du kan starte en ny omgang med 1 lm, spring förste st over osv.
12.10.2016 - 12:45Barbara ha scritto:
Lovely pattern! I need to increase the neck line and underarm. Can I just start with more chains for the neck opening and increase the underarm from 8 stitches to 12?
29.09.2016 - 08:32DROPS Design ha risposto:
Dear Barbara, we are unfortunately not able to adjust every pattern to each individual request, you will have to recalculating with your gauge and required finished measurements - Further personnal assistance will be provided by the store where you bought your yarn. Happy crocheting!
29.09.2016 - 09:16Nikki ha scritto:
Can I do this pattern with 1 strand as I get too confused with 2?
26.08.2016 - 16:27DROPS Design ha risposto:
Dear Nikki, if you want oyu cna work it with one strand, but remember to check your gauge, the gauge indicated in the pattern is for 1 strand of each quality (= 2 strand). Happy crocheting!
28.08.2016 - 14:38
![]() Caroline ha scritto:
Caroline ha scritto:
Thank you for posting this pretty pattern. In diagram M1, it shows each subsequent row slightly offset to the left.... does that mean to slip stitch to where the dc (or other stitch as indicated) begins? Thank you.
02.08.2016 - 17:28DROPS Design ha risposto:
Dear Caroline, that's right, you have to work the dc around the ch from previous round, so sl st to 1st ch and crochet 1st dc ( = 3 ch) over the chain, then ch 1 and continue as in diagram. Happy crocheting!
03.08.2016 - 09:18
![]() Cathleen Wilbourn ha scritto:
Cathleen Wilbourn ha scritto:
Ok, so i finished this tunic. thank you for posting the pattern. however, i have an issue with the fit. the top fits comfortably but the bottom with the mussels is too loose for my liking. to adjust for this, can i just use a smaller hook size than the top mesh part or are there any other ideas im not aware of? thanks so much
05.07.2016 - 08:17DROPS Design ha risposto:
Dear Mrs Wilbourn, for any individual assistance, remember you can get tips & advices from your DROPS store, even per mail or telephone. Happy crocheting!
05.07.2016 - 09:02
|
||||||||||||||||||||||
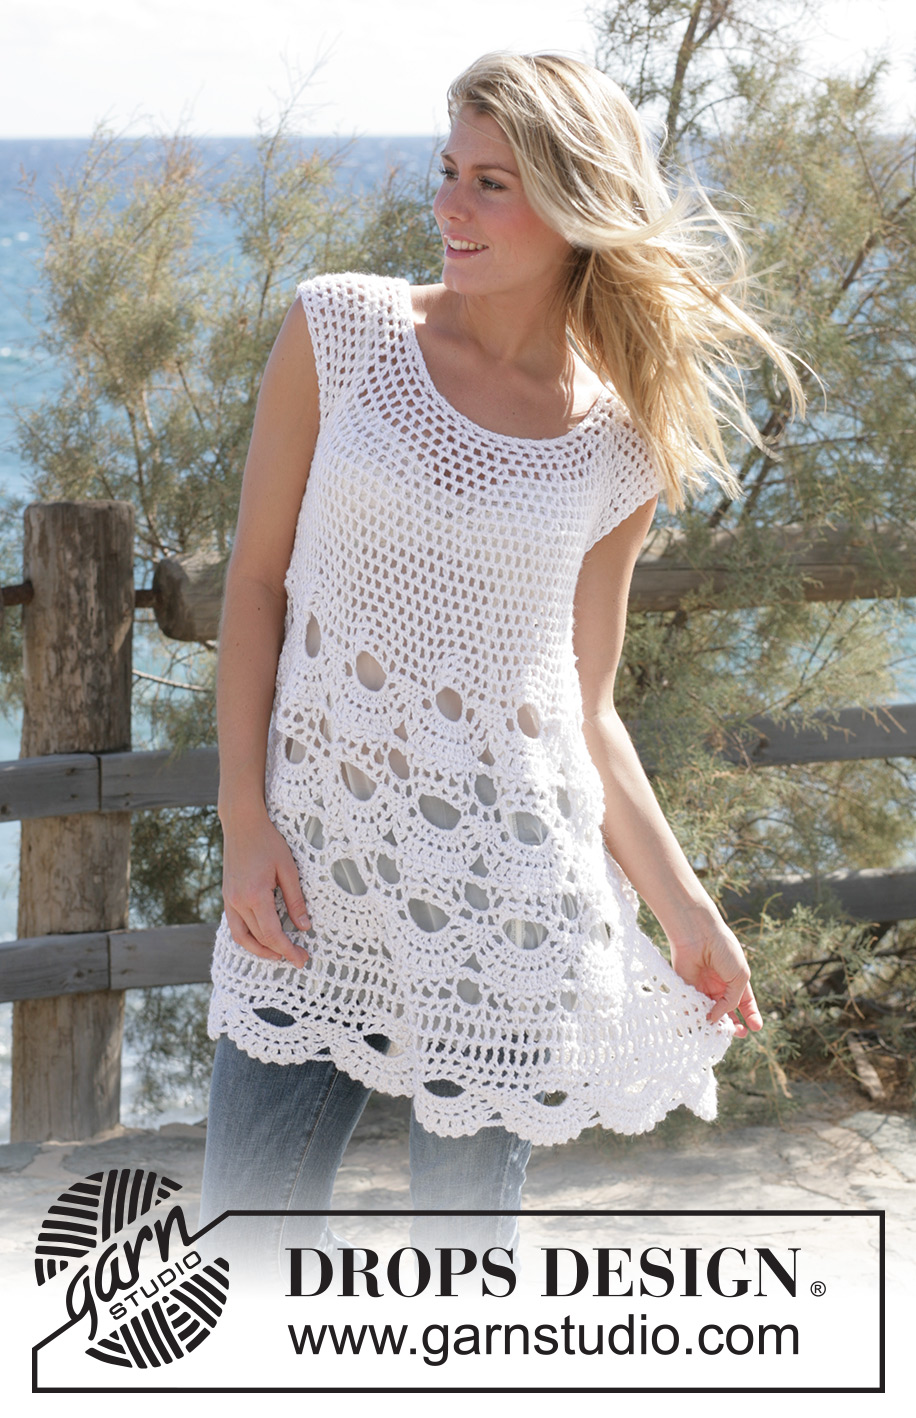
Breath of Summer#breathofsummertunic |
||||||||||||||||||||||
|
|
||||||||||||||||||||||
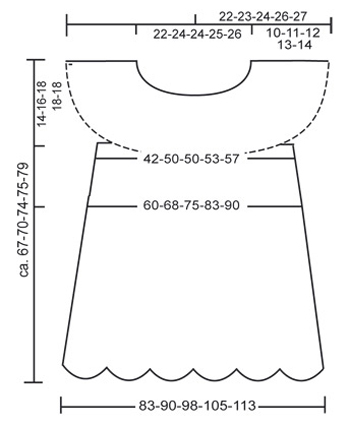
Tunica DROPS all’uncinetto, con motivo a ventagli, in Alpaca e Cotton Viscose o Bomull-Lin. Taglie: Dalla S alla XXL.
DROPS 99-4 |
||||||||||||||||||||||
|
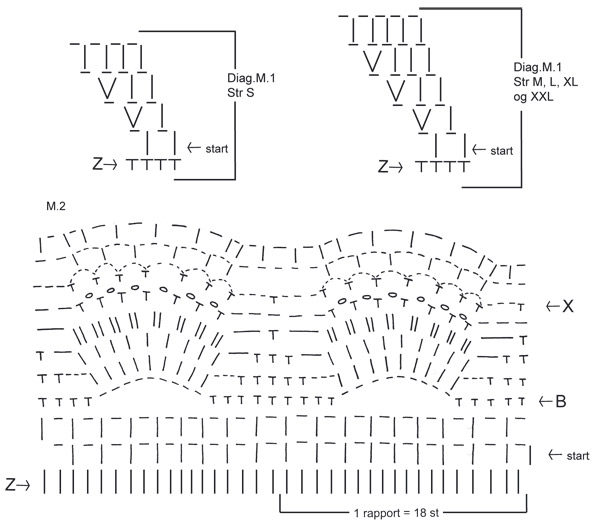
CAMPIONE: 12 m.a x 7 righe con 1 capo di Alpaca e 1 capo di Cotton Viscose o 1 capo di Bomul-Lin = 10 x 10 cm. 1 ripetizione del motivo a ventagli = ca. 12 cm di larghezza. SUGGERIMENTO PER GLI AUMENTI 1: Per aumentare 1 m.b: lavorare 2 m.b in 1 m.b. SUGGERIMENTO PER GLI AUMENTI 2: Per aumentare 1 m.a: lavorare 2 m.a in 1 m.a (senza cat tra le 2). SUGGERIMENTO PER GLI AUMENTI 3: Per aumentare 1 arco di cat: lavorare 2 archi di cat nella stessa m. SUGGERIMENTO PER IL LAVORO: All’inizio di ogni giro, sostituire la prima m.a con 3 cat; sostituire la prima m.a.d con 4 cat. Alla fine del giro, unire con 1 m.bss nella 3a/4a cat dall’inizio del giro. MOTIVO: Vedere i diagrammi M.1 e M.2. I diagrammi mostrano il motivo sul diritto del lavoro. SUGGERIMENTO PER PRENDERE LE MISURE: Per via del peso del filato, prendere le misure con il capo appeso. DAVANTI E DIETRO: Si lavora in tondo, dall’alto verso il basso. Con l’uncinetto n° 5 e 1 capo del filato Alpaca + 1 capo del filato Cotton Viscose o 1 capo di Bomull-Lin, avviare 71-75-75-79-83 cat morbide e formare un anello con 1 m.bss nella prima cat. Lavorare il giro successivo come segue: 1 m.b in ognuna delle prime 3 cat, * saltare 1 cat, 1 m.b in ognuna delle 3 cat successive *, ripetere da *-* = 54-57-57-60-63 m.b. Lavorare ora un giro di m.b; ALLO STESSO TEMPO, aumentare 22-15-19-20-21 m.b in modo uniforme – vedere il SUGGERIMENTO PER GLI AUMENTI 1 = 76-72-76-80-84 m.b. Proseguire seguendo il diagramma M.1 – vedere il SUGGERIMENTO PER IL LAVORO. Dopo aver completato il diagramma M.1, ci sono 76-90-95-100-105 archi di cat (1 arco di cat = 1 m.a + 1 cat). Proseguire lavorando m.a nelle cat e cat sulle m.a finché il lavoro non misura 10-11-12-13-14 cm. Lavorare il giro successivo come segue: Saltare 17-19-21-22-22 archi di cat del giro precedente (= manica destra), avviare 8 cat (= sotto manica), lavorare 21-26-26-28-30 archi di cat (= davanti), saltare 17-19-21-22-22 archi di cat del giro precedente (= manica sinistra), avviare 8 cat (= sotto manica), lavorare 21-26-27-28-31 archi di cat (= dietro). Inserire un segno da ciascun lato, tra le 8 cat del sotto manica. Proseguire lavorando archi di cat. NB! Nel corso del primo giro, nelle 8 cat del sotto manica lavorare come segue: 1 m.a nella prima cat, 1 cat, saltare 1 cat, 1 m.a nella cat successiva, 1 cat, 1 m.a nella stessa cat, 1 cat, saltare 1 cat, 1 m.a nella cat successiva, 1 cat, 1 m.a nella stessa cat, 1 cat, saltare 1 cat, 1 m.a nella cat successiva, 1 cat e saltare 1 cat (= 6 archi di cat per ogni sotto manica) = 54-64-65-68-73 archi di cat. Proseguire con archi di cat in tondo; ALLO STESSO TEMPO, aumentare 1 arco di cat – vedere il SUGGERIMENTO PER GLI AUMENTI 3 – da ciascun lato dei 2 segni ad ogni giro per un totale di 4-4-6-6-7 volte = 70-80-89-92-101 archi di cat. Terminati tutti gli aumenti, il lavoro misura ca. 19-20-23-24-27 cm misurati dall’avvio delle cat (avete raggiunto metà del busto; se necessario, per una migliore vestibilità, potete aggiungere dei giri di archi di cat dopo gli aumenti). Lavorare ora 1 giro di archi di cat; ALLO STESSO TEMPO, aumentare 4-2-2-14-14 m.a in modo uniforme – vedere il SUGGERIMENTO PER GLI AUMENTI 2 = 144-162-180-198-216 m.a/cat. Proseguire ora con il motivo a ventagli del diagramma M.2 (iniziare dalla riga con la freccia e la scritta start) = 8-9-10-11-12 ripetizioni in orizzontale sul giro. Lavorare 3 ripetizioni in verticale del diagramma M.2, ma iniziare la seconda e la terza ripetizione dalla freccia B nel diagramma. Dopo aver completato il diagramma M.2, lavorare 2-3-3-3-4 giri di m.a.d come segue: Giro 1: vedere il SUGGERIMENTO PER IL LAVORO ! Lavorare 1 m.a.d in ogni arco di cat con 1 cat tra ogni m.a.d e finire con 1 m.a.d nell’ultima m.a.d = 72-81-90-99-108 m.a.d. Giro 2: 1 m.a.d in ogni m.a.d del giro precedente con 2 cat tra ogni m.a.d (al posto di 1 cat). Taglia S: fermarsi qui prima dell'ultimo motivo a ventagli = 72 m.a.d. Giro 3: lavorare 1 m.a.d in ogni m.a.d del giro precedente con 3 cat tra ogni m.a.d. Taglie M, L e XL: fermarsi qui prima dell'ultimo motivo a ventagli = 81-90-99 m.a.d. Giro 4: lavorare 1 m.a.d in ogni m.a.d del giro precedente con 3 cat tra ogni m.a.d. Taglia XXL: fermarsi qui prima dell'ultimo motivo a ventagli = 108 m.a.d. Lavorare ora un giro di archi di cat come segue: 1 m.a e 1 cat (= 1 arco di cat) in ogni m.a.d del giro precedente; ALLO STESSO TEMPO, aumentare 1 arco di cat – vedere il SUGGERIMENTO PER GLI AUMENTI 3 – ogni 3-3-4-4-4 m.a.d. NB! per le taglie L e XL finire con 1 m.a e 1 cat in ognuna delle ultime 2-3 m.a.d = 96-108-112-123-135 archi di cat. Proseguire con 1 giro di archi di cat; ALLO STESSO TEMPO, aumentare 6-0-10-6-0 m.a – vedere il SUGGERIMENTO PER GLI AUMENTI 2 = 198-216-234-252-270 m.a / cat. Lavorare ora di nuovo il diagramma M.2 (iniziare dalla freccia con la scritta start nel diagramma), ma finire il motivo dopo la riga 7. |
||||||||||||||||||||||
Spiegazioni del diagramma |
||||||||||||||||||||||
|
||||||||||||||||||||||
 |
||||||||||||||||||||||
 |
||||||||||||||||||||||
Avete terminato questo modello?Allora taggate le vostre foto con #dropspattern #breathofsummertunic o inviatele alla #dropsfan gallery. Avete bisogno di aiuto con questo modello?Troverete 7 video tutorial, una sezione per i commenti/domande e molto altro guardando il modello su www.garnstudio.com © 1982-2026 DROPS Design A/S. Ci riserviamo tutti i diritti. Questo documento, compreso tutte le sue sotto-sezioni, è protetto dalle leggi sul copyright. Potete leggere quello che potete fare con i nostri modelli alla fine di ogni modello sul nostro sito. |
||||||||||||||||||||||


Con oltre 40 anni di esperienza nel design di modelli di maglia e uncinetto, DROPS Design offre la più estesa collezione di modelli gratuiti su internet - tradotti in 17 lingue. Ad oggi vi possiamo fornire 324 cataloghi e 12290 modelli - 9561 dei quali sono tradotti in Italiano.
Ci stiamo impegnando molto per darvi il meglio che vi possiamo offrire in termini di maglia e uncinetto, ispirazioni e consigli così come filati di grande qualità ad un prezzo incredibile! Volete utilizzare i nostri modelli per qualcosa d'altro oltre al vostro uso personale? Potete leggere tutto ciò che è consentito nel testo sul Copyright in basso su tutte le pagine dei nostri modelli. Buon lavoro!
Lasciare un commento sul modello DROPS 99-4
Noi saremmo felici di ricevere i tuoi commenti e opinioni su questo modello!
Se vuoi fare una domanda, fai per favore attenzione a selezionare la categoria corretta nella casella qui sotto per velocizzare il processo di risposta. I campi richiesti sono indicati da *.