
Categorie popolari
State cercando un filato?


Commenti / Domande (180)
![]() Annette ha scritto:
Annette ha scritto:
I do not understand the increasing from 101 to 216. I found this answer, but I’m still confused. “Dear Mrs Dixon, when you inc 14 tr, you only work tr (no ch in between - see Increasing tip 2), so that you have 101 tr + 101 ch + 14 tr = 216 tr/ch on this round. Happy crocheting!” Am I now crocheting in each STITCH instead of space??
04.04.2018 - 22:56DROPS Design ha risposto:
Dear Annette, when you have 101 ch-spaces, there is a total of 202 sts, ie 101 tr + 101 ch. When inc 14 tr, you will crochet in the ch-spaces as before but 2 tr instead of 1 tr evenly spaced = 216 sts (115 tr and 101 ch-spaces). Happy crocheting!
05.04.2018 - 08:55
![]() Annette ha scritto:
Annette ha scritto:
I’m just starting this pattern. I’m to where I start the M.1, and I don’t understand what “og” means for size XXL. Please help.
19.03.2018 - 01:35DROPS Design ha risposto:
Hi Annette, "og" is the Norwegian word for "and" and we have overlooked the translation here. Apologies. Happy crocheting!
19.03.2018 - 08:05
![]() Wendy Ambuhl ha scritto:
Wendy Ambuhl ha scritto:
I got it! I was counting spaces, not stitches! :)
21.07.2017 - 20:33
![]() Wendy Ambuhl ha scritto:
Wendy Ambuhl ha scritto:
Ok. So I got 198 stitches by adding 14 stitches. On the next row, do i put a dc and ch between the 2 stitches of my increase? For example, I have made two dc, with no ch between, in one ch-loop. On the next round, do I make a ch-loop between the 2 dc where there is no ch? I cannot get the numbers to come out even to go on from here!
20.07.2017 - 20:38DROPS Design ha risposto:
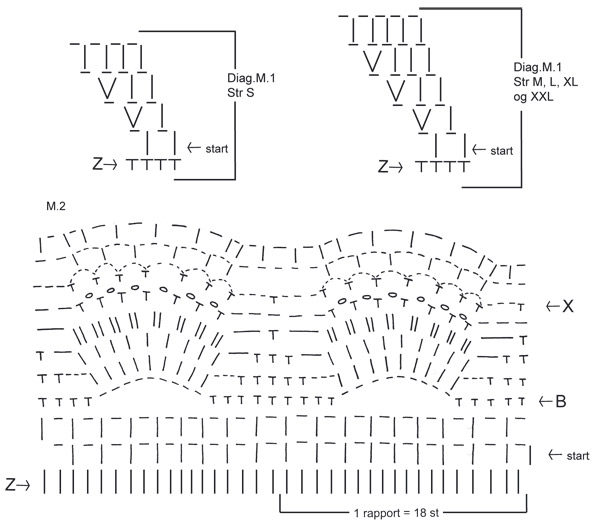
Dear Mrs Ambuhl, there are now 198 sts (= dc and chains), repeat M.2 (= 18 sts) a total of 11 times in the round so that you have 18 sts x 11 = 198 sts. On 1st row in M.2 (= row with arrow "start"), work 1 dc, 1 ch, skip 1 ch (either dc or ch), 1 dc in next st (either dc or ch). Happy crocheting!
21.07.2017 - 08:30
![]() Wendy Ambuhl ha scritto:
Wendy Ambuhl ha scritto:
I understand the part about 198 ch-loops before the mussel pattern. But what does each symbol stand for on row z? Do they stand for each ch, dc, or both? If so, do I work into every other ch-loop? I find this diagram confusing.
18.07.2017 - 16:17DROPS Design ha risposto:
Dear Mrs Ambuhl, each symbol on row Z represents 1 stitch, either 1 dc or 1 ch, M.2 is worked over 18 sts (dc and ch). Happy crocheting!
19.07.2017 - 08:24
![]() Brenda Lee ha scritto:
Brenda Lee ha scritto:
On the m.2 chart im trying to figure out what that long horizontal line means . its 2 rows under the x if im not mistaken. the rest i understand .
16.07.2017 - 22:17DROPS Design ha risposto:
Dear Brenda Lee, as explained earlier, each horizontal bar = 1 chain, the length of this bar is due to the diagram and number of sts in diagram, but either short or long, 1 bar = 1 chain. Happy crocheting!
17.07.2017 - 09:28
![]() Brenda Lee ha scritto:
Brenda Lee ha scritto:
Could you tell me what the long horizontal bar means on the 2nd row under the x . thats the only part that has me stumped on want this finished so bad to take to the beach with me in aug thank you so much.
16.07.2017 - 00:39DROPS Design ha risposto:
Dear Brenda Lee, the horizontal bar either short or long = 1 chain. Happy crocheting
17.07.2017 - 09:08
![]() NieKohle ha scritto:
NieKohle ha scritto:
Ich habe jetzt nach 8 gescheiterten Versuchen aufgegeben. Im 8. Versuch musste ich schon die Maschenanzahl erhöhen, da diese nicht annähernd auf eine XL zugeschnitten ist. Bereits der Halsausschnitt ist wesentlich enger als auf dem Bild, selbst bei sehr (!) lockeren Lm. Die Anleitung an sich ist gut. Schade nur, dass man selbst noch hin und her rechnen muss.
03.06.2017 - 21:26
![]() NieKohle ha scritto:
NieKohle ha scritto:
Hallo. Ich verzweifle an M1. ich habe jetzt 5 Mal angefangen und 5 Mal wieder alles aufgeribbelt, weil ich nach M1 nicht auf die angegebene Maschenzahl komme. Bei mir sind es jedes mal 20 maschen weniger als angegeben. Mir ist auch nicht ganz klar, wie ich von Runde zu Runde arbeiten kann, ohne eine sichtbare Kante zwischen Rundenende und Rundenanfang zu erhalten. Außerdem bin ich mir nicht sicher, wie ich M1 zu lesen habe. Von links nach recht in jeder Runde? Vielen Dank schonmal.
01.06.2017 - 13:00DROPS Design ha risposto:
Liebe NieKohle, Diagram lesen Sie von unten nach oben und jede Runde von rechts nach links, dh 1. Rd (alle Größe): *1 Stb, 1 Lm, 1 M springen, 1 Stb, 1 Lm, 1 M springen*, von *-* wiederholen. Bei 2. Rd: *1 Stb um die Lm, 1 Lm, um die nächste Lm häkeln Sie: 1 Stb, 1 Lm, 1 Stb*, von *-* wiederholen (= 1 Stb wird in jedem M.1 zugenommen). Viel Spaß beim häkeln!
01.06.2017 - 13:42
![]() Silke ha scritto:
Silke ha scritto:
Hallo, ich beziehe mich auf die Anleitung nachdem ich M1 gehäkelt haben. Ich verstehe nicht, wie ich eine Luftmasche in Stäbchen häkle? Mir ist klar, Stäbchen in Luftmasche zu häkeln, aber wie häkle ich eine Luftmasche irgendwo hinein? :-) Sorry, bin Anfängerin und vielleicht klingt die Frage etwas ungewöhnlich. Bin aber gerade etwas hilflos!
23.04.2017 - 09:33DROPS Design ha risposto:
Liebe Silke, Sie werden jetzt wie im letzten Runde in M.1 häkeln:1 Stb um jeder Luftmasche und 1 Luftmasche über jedes Stb. Viel Spaß beim häkeln!
24.04.2017 - 09:54
|
||||||||||||||||||||||
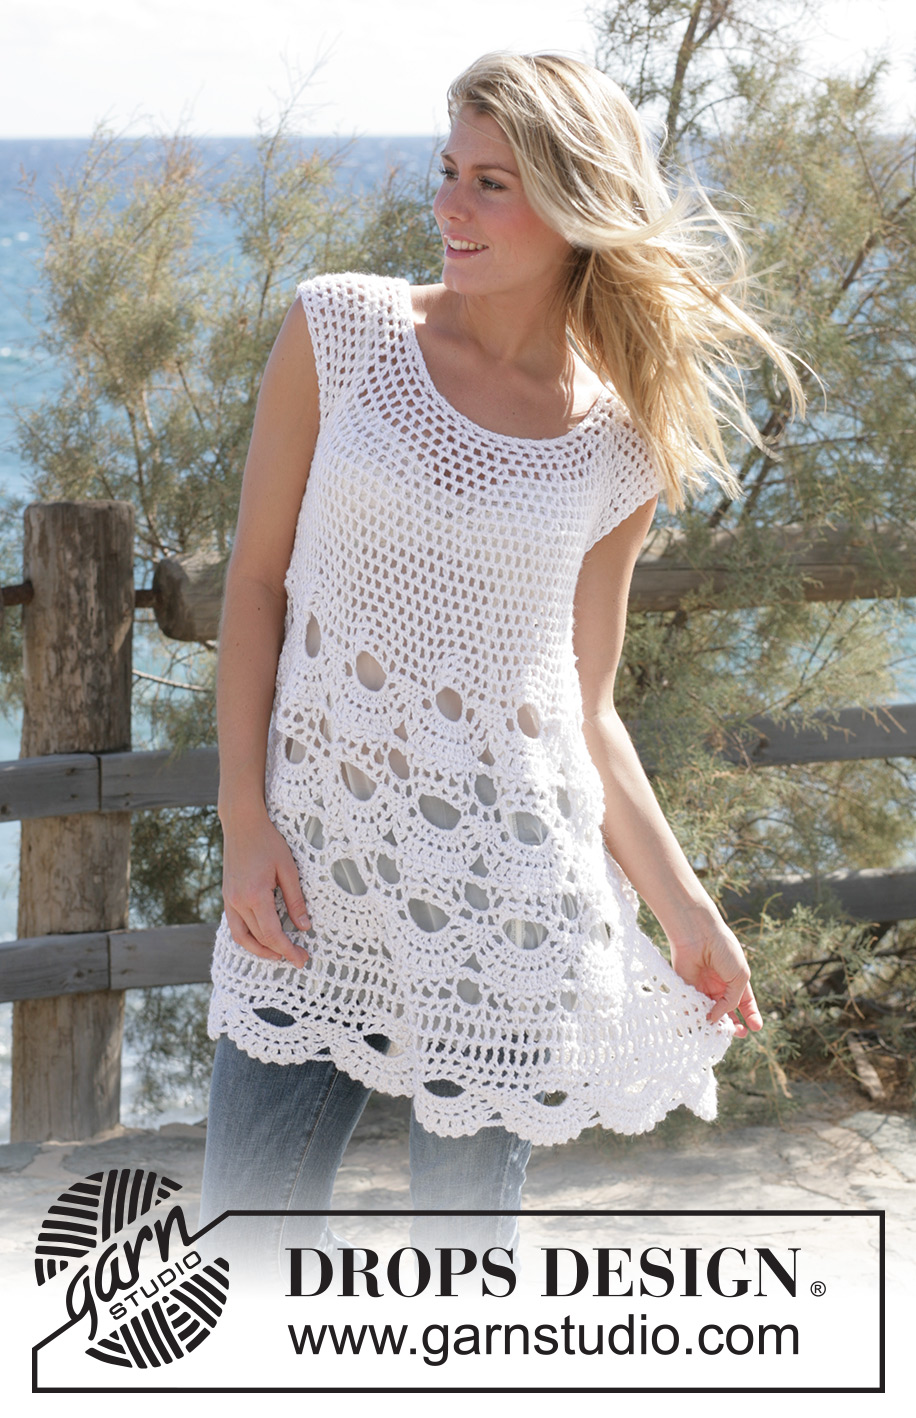
Breath of Summer#breathofsummertunic |
||||||||||||||||||||||
|
|
||||||||||||||||||||||
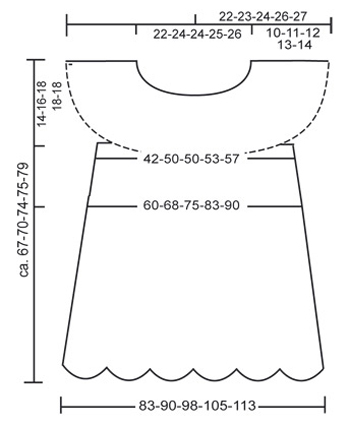
Tunica DROPS all’uncinetto, con motivo a ventagli, in Alpaca e Cotton Viscose o Bomull-Lin. Taglie: Dalla S alla XXL.
DROPS 99-4 |
||||||||||||||||||||||
|
CAMPIONE: 12 m.a x 7 righe con 1 capo di Alpaca e 1 capo di Cotton Viscose o 1 capo di Bomul-Lin = 10 x 10 cm. 1 ripetizione del motivo a ventagli = ca. 12 cm di larghezza. SUGGERIMENTO PER GLI AUMENTI 1: Per aumentare 1 m.b: lavorare 2 m.b in 1 m.b. SUGGERIMENTO PER GLI AUMENTI 2: Per aumentare 1 m.a: lavorare 2 m.a in 1 m.a (senza cat tra le 2). SUGGERIMENTO PER GLI AUMENTI 3: Per aumentare 1 arco di cat: lavorare 2 archi di cat nella stessa m. SUGGERIMENTO PER IL LAVORO: All’inizio di ogni giro, sostituire la prima m.a con 3 cat; sostituire la prima m.a.d con 4 cat. Alla fine del giro, unire con 1 m.bss nella 3a/4a cat dall’inizio del giro. MOTIVO: Vedere i diagrammi M.1 e M.2. I diagrammi mostrano il motivo sul diritto del lavoro. SUGGERIMENTO PER PRENDERE LE MISURE: Per via del peso del filato, prendere le misure con il capo appeso. DAVANTI E DIETRO: Si lavora in tondo, dall’alto verso il basso. Con l’uncinetto n° 5 e 1 capo del filato Alpaca + 1 capo del filato Cotton Viscose o 1 capo di Bomull-Lin, avviare 71-75-75-79-83 cat morbide e formare un anello con 1 m.bss nella prima cat. Lavorare il giro successivo come segue: 1 m.b in ognuna delle prime 3 cat, * saltare 1 cat, 1 m.b in ognuna delle 3 cat successive *, ripetere da *-* = 54-57-57-60-63 m.b. Lavorare ora un giro di m.b; ALLO STESSO TEMPO, aumentare 22-15-19-20-21 m.b in modo uniforme – vedere il SUGGERIMENTO PER GLI AUMENTI 1 = 76-72-76-80-84 m.b. Proseguire seguendo il diagramma M.1 – vedere il SUGGERIMENTO PER IL LAVORO. Dopo aver completato il diagramma M.1, ci sono 76-90-95-100-105 archi di cat (1 arco di cat = 1 m.a + 1 cat). Proseguire lavorando m.a nelle cat e cat sulle m.a finché il lavoro non misura 10-11-12-13-14 cm. Lavorare il giro successivo come segue: Saltare 17-19-21-22-22 archi di cat del giro precedente (= manica destra), avviare 8 cat (= sotto manica), lavorare 21-26-26-28-30 archi di cat (= davanti), saltare 17-19-21-22-22 archi di cat del giro precedente (= manica sinistra), avviare 8 cat (= sotto manica), lavorare 21-26-27-28-31 archi di cat (= dietro). Inserire un segno da ciascun lato, tra le 8 cat del sotto manica. Proseguire lavorando archi di cat. NB! Nel corso del primo giro, nelle 8 cat del sotto manica lavorare come segue: 1 m.a nella prima cat, 1 cat, saltare 1 cat, 1 m.a nella cat successiva, 1 cat, 1 m.a nella stessa cat, 1 cat, saltare 1 cat, 1 m.a nella cat successiva, 1 cat, 1 m.a nella stessa cat, 1 cat, saltare 1 cat, 1 m.a nella cat successiva, 1 cat e saltare 1 cat (= 6 archi di cat per ogni sotto manica) = 54-64-65-68-73 archi di cat. Proseguire con archi di cat in tondo; ALLO STESSO TEMPO, aumentare 1 arco di cat – vedere il SUGGERIMENTO PER GLI AUMENTI 3 – da ciascun lato dei 2 segni ad ogni giro per un totale di 4-4-6-6-7 volte = 70-80-89-92-101 archi di cat. Terminati tutti gli aumenti, il lavoro misura ca. 19-20-23-24-27 cm misurati dall’avvio delle cat (avete raggiunto metà del busto; se necessario, per una migliore vestibilità, potete aggiungere dei giri di archi di cat dopo gli aumenti). Lavorare ora 1 giro di archi di cat; ALLO STESSO TEMPO, aumentare 4-2-2-14-14 m.a in modo uniforme – vedere il SUGGERIMENTO PER GLI AUMENTI 2 = 144-162-180-198-216 m.a/cat. Proseguire ora con il motivo a ventagli del diagramma M.2 (iniziare dalla riga con la freccia e la scritta start) = 8-9-10-11-12 ripetizioni in orizzontale sul giro. Lavorare 3 ripetizioni in verticale del diagramma M.2, ma iniziare la seconda e la terza ripetizione dalla freccia B nel diagramma. Dopo aver completato il diagramma M.2, lavorare 2-3-3-3-4 giri di m.a.d come segue: Giro 1: vedere il SUGGERIMENTO PER IL LAVORO ! Lavorare 1 m.a.d in ogni arco di cat con 1 cat tra ogni m.a.d e finire con 1 m.a.d nell’ultima m.a.d = 72-81-90-99-108 m.a.d. Giro 2: 1 m.a.d in ogni m.a.d del giro precedente con 2 cat tra ogni m.a.d (al posto di 1 cat). Taglia S: fermarsi qui prima dell'ultimo motivo a ventagli = 72 m.a.d. Giro 3: lavorare 1 m.a.d in ogni m.a.d del giro precedente con 3 cat tra ogni m.a.d. Taglie M, L e XL: fermarsi qui prima dell'ultimo motivo a ventagli = 81-90-99 m.a.d. Giro 4: lavorare 1 m.a.d in ogni m.a.d del giro precedente con 3 cat tra ogni m.a.d. Taglia XXL: fermarsi qui prima dell'ultimo motivo a ventagli = 108 m.a.d. Lavorare ora un giro di archi di cat come segue: 1 m.a e 1 cat (= 1 arco di cat) in ogni m.a.d del giro precedente; ALLO STESSO TEMPO, aumentare 1 arco di cat – vedere il SUGGERIMENTO PER GLI AUMENTI 3 – ogni 3-3-4-4-4 m.a.d. NB! per le taglie L e XL finire con 1 m.a e 1 cat in ognuna delle ultime 2-3 m.a.d = 96-108-112-123-135 archi di cat. Proseguire con 1 giro di archi di cat; ALLO STESSO TEMPO, aumentare 6-0-10-6-0 m.a – vedere il SUGGERIMENTO PER GLI AUMENTI 2 = 198-216-234-252-270 m.a / cat. Lavorare ora di nuovo il diagramma M.2 (iniziare dalla freccia con la scritta start nel diagramma), ma finire il motivo dopo la riga 7. |
||||||||||||||||||||||
Spiegazioni del diagramma |
||||||||||||||||||||||
|
||||||||||||||||||||||
 |
||||||||||||||||||||||
 |
||||||||||||||||||||||
Avete terminato questo modello?Allora taggate le vostre foto con #dropspattern #breathofsummertunic o inviatele alla #dropsfan gallery. Avete bisogno di aiuto con questo modello?Troverete 7 video tutorial, una sezione per i commenti/domande e molto altro guardando il modello su www.garnstudio.com © 1982-2026 DROPS Design A/S. Ci riserviamo tutti i diritti. Questo documento, compreso tutte le sue sotto-sezioni, è protetto dalle leggi sul copyright. Potete leggere quello che potete fare con i nostri modelli alla fine di ogni modello sul nostro sito. |
||||||||||||||||||||||


Con oltre 40 anni di esperienza nel design di modelli di maglia e uncinetto, DROPS Design offre la più estesa collezione di modelli gratuiti su internet - tradotti in 17 lingue. Ad oggi vi possiamo fornire 324 cataloghi e 12290 modelli - 9561 dei quali sono tradotti in Italiano.
Ci stiamo impegnando molto per darvi il meglio che vi possiamo offrire in termini di maglia e uncinetto, ispirazioni e consigli così come filati di grande qualità ad un prezzo incredibile! Volete utilizzare i nostri modelli per qualcosa d'altro oltre al vostro uso personale? Potete leggere tutto ciò che è consentito nel testo sul Copyright in basso su tutte le pagine dei nostri modelli. Buon lavoro!
Lasciare un commento sul modello DROPS 99-4
Noi saremmo felici di ricevere i tuoi commenti e opinioni su questo modello!
Se vuoi fare una domanda, fai per favore attenzione a selezionare la categoria corretta nella casella qui sotto per velocizzare il processo di risposta. I campi richiesti sono indicati da *.