
Categorie popolari
State cercando un filato?


Commenti / Domande (68)
![]() Ruth Embery ha scritto:
Ruth Embery ha scritto:
Hi, I have just begun the sleeves on this lovely pattern, and as I read through the instructions, am noticing that there is no indication of how many stitches should be left when I have finished all the bind offs for the sleeve cap - it just says continue to bind off until it is 12cm long. I am just wondering if you can let me know how many stitches I should have left? I am doing the medium size. With thanks.
26.03.2025 - 02:27DROPS Design ha risposto:
Dear Mrs Embery, there is no number of stitches given at the end of sleeve cap because it will depend on your own tension in height, most important is here height rather than number of remaining stitches; this means you just have to make sure you have cast off the same number of stitches on each side (so that the sleeve cap is symmetrical) so that the sleeve cap will measure 9 cm and whole sleeve 13 cm in total. Happy knitting !
26.03.2025 - 08:38
![]() Tineke Geldof ha scritto:
Tineke Geldof ha scritto:
Ik loop vast in nld 29 waar de omslag en overhalen moet over 1steek ipv 2steken. Hierover staat geen uitleg. Vriendelijke groet, Tineke
05.05.2024 - 13:42
![]() Debby Van Der Ven ha scritto:
Debby Van Der Ven ha scritto:
Ik loop al vast. Ik ben bezig met dit patroon en ben nu bij de bies. Je begint natuurlijk aan 1 kant maar moet je de bies bij het einde van de naald in spiegelbeeld breien??? Nu is het 1 ribbelst. 1 R, 2 av, 1 R, 2 av en 1 R moet je dan aan het einde van de naald 1 R, 2 av, 1, R , 2 av, 1 R en als laatste 1 ribbelst. En hoe brei je op de volgende toer. Word dan de rechte een averechts en de averechtse een rechte of snap ik het nu verkeerd
20.07.2023 - 18:15DROPS Design ha risposto:
Dag Debby,
De ribbelsteek brei je zowel aan de goede als de verkeerde kant recht. Bij de anders steken van de bies geldt dat als je recht aan de goede kant hebt gebreid, deze steek averecht aan de verkeerde kant breit en vice versa.
24.07.2023 - 20:18
![]() Gabriela Ramirez ha scritto:
Gabriela Ramirez ha scritto:
No entiendo cómo será la terminación del cuello de las partes delanteras con la espalda
27.11.2022 - 20:28
![]() Theron ha scritto:
Theron ha scritto:
Bonjour ,je viens de finir M3 et je suis en train de diminuer pour l'encolure,quel diagramme dois continuer a faire ?je suis bloquée. merci de votre reponse
27.04.2022 - 17:48DROPS Design ha risposto:
Bonjour Mme Théron, on termine en répétant M.3 jusqu'à la fin. Bon tricot!
28.04.2022 - 11:34
![]() Myrna Laupland ha scritto:
Myrna Laupland ha scritto:
I have solved my previous question. Just needed to reread the instructions a few times. Sorry to trouble you. Love your patterns and yarns.
31.03.2021 - 07:35DROPS Design ha risposto:
Hi Myrna, happy to hear that. Happy knitting!
31.03.2021 - 10:03
![]() Myrna Laupland ha scritto:
Myrna Laupland ha scritto:
Seaside Affair. I made this pattern a year ago and want to make another one. I am not sure if I did the front bank correctly on the first one. Is it K1, K1, P2, K1,P2,K1 on the odd # rows, right hand and also left hand side? On the Purl, even # rows is it K1 (always 1st stitch) and K the K’s and P the P’s? This would result in 3 K, P1, K2,P2 . Thank you
31.03.2021 - 03:38DROPS Design ha risposto:
Problem solved :)
31.03.2021 - 10:03
![]() Katarina ha scritto:
Katarina ha scritto:
Måste vara fel i beskrivningen. Stickar storlek M. 8 kantmaskor, 8 maskor diagram, 153 m diagram (17m x9 gånger), 9 m diagram, 8 kantmaskor= 186 m. I beskrivningen står 193 m. Får 7 maskor "över". Står att man ska sticka diagram över 160 m, men 17 m x 9 gånger blir 153 m, så något är fel här. M1B blir 17 maskor när man stickat dom.
02.04.2020 - 09:42DROPS Design ha risposto:
Hej Katarina M1B består av 16 m så du upprepar M1B 10 gånger, dvs över 160 m. (Du ökar 4 m och minskar 4 m i M1B så maskantalet är detsamma). 8+8+160+9+8=193 m. Lycka till!
03.04.2020 - 13:26
![]() Myrna Laupland ha scritto:
Myrna Laupland ha scritto:
Drops 101-32 Size L Re: Armholes: Back Piece - Do I bind off 9 sts each side then bind off 3 sts x 1; 2 sts x 2 and 1 st x 2? This would be a total of 18 sts bound off. Or is it just the 3, 2, and 1 part? Total 9 stitches. 2nd Query - Right front piece How many sts at start of armhole? Thank You very much
30.01.2020 - 05:17DROPS Design ha risposto:
Dear Mrs Lapland, you first cast on 9 stitches on each armhole on last row of body then continue each part separately binding off at the beg of every row (from RS + from WS): 3 st 1 time + 2 sts 2 times + 1 stitch 2 times = 9 sts are bound off on each side = 81 sts remain on needle. On the front piece you will bind off the same way, but only on the armhole side = 9 sts bound off for armhole on each front piece. Happy knitting!
30.01.2020 - 09:47
![]() L J MCTAVISH ha scritto:
L J MCTAVISH ha scritto:
Thank you so much for the help!
14.11.2019 - 08:30
|
||||||||||||||||
Seaside Affair#seasideaffaircardi |
||||||||||||||||
|
|
||||||||||||||||
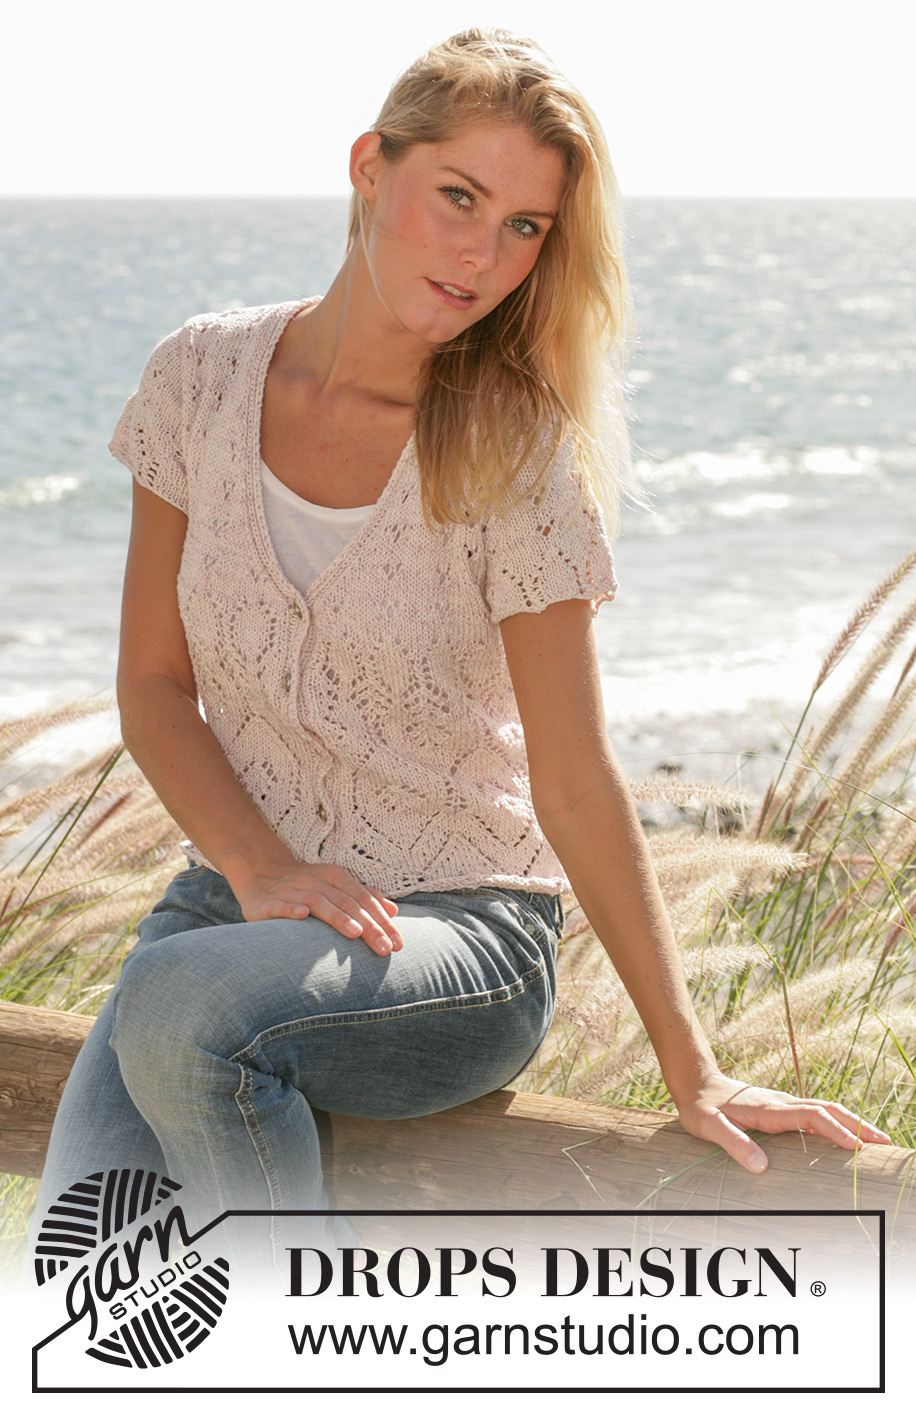
Cardigan DROPS con maniche corte, collo a V e motivo a pizzo in "Muskat". Taglie: dalla S alla XXL.
DROPS 101-32 |
||||||||||||||||
|
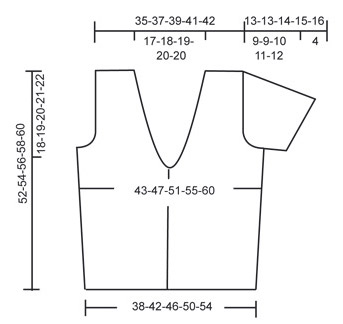
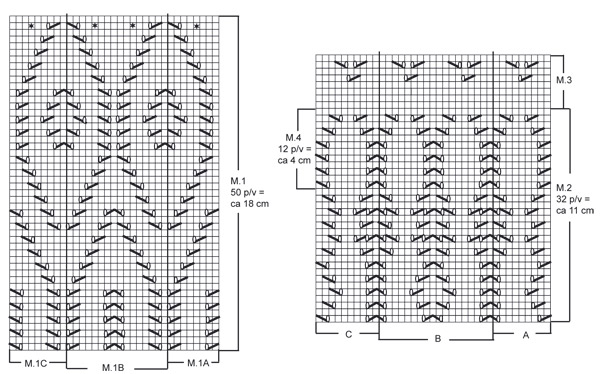
CAMPIONE: 21 m. x 28 f. con i ferri misura 4 mm con il filato Muskat a m. rasata = 10 x 10 cm BORDO DAVANTI: lavorare il bordo davanti come segue dal centro davanti (visto dal diritto del lavoro): lavorare 1 m. dir. nelle m. a m. legaccio su tutti i f., 1 m. dir., 2 m. rov., 1 m. dir., 2 m. rov., 1 m. dir. MOTIVO: Diagrammi M.1-M.4. I diagrammi sono visti dal diritto del lavoro. Suggerimento per le diminuzioni (applicato alla scollatura): Diminuire dal diritto del lavoro all’interno delle prime 7 m. del bordo da ogni lato Diminuire come segue dopo 7 m.: passare 1 m. a dir. senza lavorarla, 1 m. dir., accavallare la m. passata sopra quella appena lavorata. Diminuire come segue prima delle 7 m.: 2 m. insieme a dir. Nota: lavorare a m. rasata le m. che non possono essere incluse nel diagramma durante le diminuzioni ASOLE: intrecciare per le asole sul bordo davanti destro. 1 asola = lavorare insieme a dir. la 5° e la 6° m. dal centro davanti, fare un gettato. Intrecciare per le asole quando il lavoro misura: Taglia S: 4, 10, 16, 22 e 28 cm. Taglia M: 4, 11, 17, 23 e 29 cm. Taglia L: 4, 11, 17, 24 e 30 cm. Taglia XL: 4, 11, 18, 25 e 31 cm. Taglia XXL: 4, 11, 18, 25 e 32 cm. ___________________________________________________________________ DIETRO E DAVANTI: Lavorare avanti e indietro sui ferri circolari dal centro davanti. Avviare 187-204-221-238-255 m. senza stringere (comprese 8 m. sul bordo davanti da ogni lato) con i ferri circolari misura 4 mm e lavorare 2 f. a dir. – allo stesso tempo distribuire 10-11-12-13-14 diminuzioni in modo uniforme sul primo f. = 177-193-209-225-241 m. Continuare, lavorare il f. successivo come segue (dal diritto del lavoro): 8 m. per il bordo davanti – leggere la spiegazione sopra, M.1A (= 8 m.) M.1B su 144-160-176-192-208 m., M.1C (= 9 m.) e 8 m. per il bordo davanti. Continuare il motivo. NOTA: Ricordarsi delle asole sul bordo davanti destro – leggere la spiegazione sopra. Sul penultimo f. di M.1 aumentare 20-22-24-26-28 m. come indicato nel diagramma = 197-215-233-251-269 m. Ora lavorare M.2 come segue: 8 m. per il bordo davanti come prima, A (= 9 m.), B su 162-180-198-216-234 m., C (= 10 m.) e il bordo davanti come prima. Alla fine di M.2 il lavoro misura circa 29 cm – inserire un segnapunti nella 54esima-58esima-63esima-67esima-72esima m. all’interno di ogni lato. Leggere tutta le sezione seguente prima di cominciare a lavorare! Continuare con M.3 fino alla lunghezza finale. Scollatura: Allo stesso tempo quando il lavoro misura 29-30-31-32-33 cm diminuire per la scollatura da ogni lato al centro davanti – leggere il suggerimento per le diminuzioni: Diminuire 1 m. ogni 2 ferri 9-9-11-11-13 volte e poi ogni 4 ferri 9 volte. SCALFO: Allo stesso tempo quando il lavoro misura 34-35-36-37-38 cm intrecciare 9 m. da ogni lato per lo scalfo (= m. con i segnapunti + 4 m. a ogni lato di queste). Finire il davanti e il dietro in modo separato. DIETRO: = 81-91-99-109-117 m. Intrecciare per lo scalfo da ogni lato ogni 2 ferri: 3 m. 0-1-1-1-1 volte, 2 m. 1-1-2-3-3 volte e 1 m. 2-2-2-3-5 volte = 73-77-81-85-89 m. rimaste sul f. Continuare con M.3 – lavorare le m. che non possono essere incluse nello schema a m. rasata, ci dovrebbero essere almeno 2 m. a m. rasata fuori da 1 ripetizione del motivo da ogni lato. Quando il lavoro misura circa 49-51-53-55-57 cm – aggiustare dopo almeno 2 f. a m. rasata – intrecciare 31-33-35-37-39 m. per il collo e intrecciare 1 m. per modellare la scollatura ogni 2 ferri 2 volte = 19-20-21-22-23 m. rimaste su ogni spalla. Intrecciare quando il lavoro misura 52-54-56-58-60 cm. DAVANTI DESTRO: Continuare a diminuire per la scollatura – allo stesso tempo intrecciare per lo scalfo al lato come per il dietro. Alla fine di tutte le diminuzioni ci sono 27-28-29-30-31 m. sulla spalla. Quando il lavoro misura 52-54-56-58-60 cm intrecciare 19-20-21-22-23 m. dal lato della spalla verso il collo per modellare la scollatura. Continuare a lavorare le 8 m. rimaste per il bordo per 8-8-9-9-9 cm, trasferire le m. su un fermamaglie. Attaccare la scollatura al dietro alla fine, non lavorare più di quello indicato, da momento che il bordo si lascia andare facilmente quando viene attaccato. DAVANTI SINISTRO: Lavorare come per il davanti destro ma al contrario. MANICA: Lavorare avanti e indietro sui f. Avviare 71-81-81-91-91 m. (compresa 1 m. di vivagno da ogni lato) con i ferri misura 4 mm e lavorare 2 f. a dir. – allo stesso tempo sul 1° f. distribuire 5-6-6-7-7 diminuzioni in modo uniforme = 66-75-75-84-84 m. Continuare con M.4 come segue: 1 m. di vivagno, A (= 9 m.), B su 45-54-54-63-63 m., C (= 10 m.) e 1 m. di vivagno. Alla fine di M.4 continuare con M.3 allo stesso tempo intrecciare per modellare l’arrotondamento della manica da ogni lato ogni 2 ferri: 3 m. 1 volta, 2 m. 2 volte, 1 m. 7-7-8-9-11 volte, continuare a intrecciare 2 m. da ogni lato fino a quando il lavoro misura 12-12-13-14-15 cm, poi intrecciare 3 m. 1 volta da ogni lato. Intrecciare quando il lavoro misura 13-13-14-15-16 cm. CONFEZIONE: Cucire i 2 bordi del collo insieme sul davanti con una cucitura invisibile. Cucire il bordo in modo ordinato per la scollatura sul dietro – ricordarsi di tirarlo leggermente. Cucire i margini delle spalle e delle maniche e attaccare le maniche. Attaccare i bottoni. |
||||||||||||||||
Spiegazioni del diagramma |
||||||||||||||||
|
||||||||||||||||
 |
||||||||||||||||
 |
||||||||||||||||
Avete terminato questo modello?Allora taggate le vostre foto con #dropspattern #seasideaffaircardi o inviatele alla #dropsfan gallery. Avete bisogno di aiuto con questo modello?Troverete 14 video tutorial, una sezione per i commenti/domande e molto altro guardando il modello su www.garnstudio.com © 1982-2026 DROPS Design A/S. Ci riserviamo tutti i diritti. Questo documento, compreso tutte le sue sotto-sezioni, è protetto dalle leggi sul copyright. Potete leggere quello che potete fare con i nostri modelli alla fine di ogni modello sul nostro sito. |
||||||||||||||||


Con oltre 40 anni di esperienza nel design di modelli di maglia e uncinetto, DROPS Design offre la più estesa collezione di modelli gratuiti su internet - tradotti in 17 lingue. Ad oggi vi possiamo fornire 324 cataloghi e 12290 modelli - 9561 dei quali sono tradotti in Italiano.
Ci stiamo impegnando molto per darvi il meglio che vi possiamo offrire in termini di maglia e uncinetto, ispirazioni e consigli così come filati di grande qualità ad un prezzo incredibile! Volete utilizzare i nostri modelli per qualcosa d'altro oltre al vostro uso personale? Potete leggere tutto ciò che è consentito nel testo sul Copyright in basso su tutte le pagine dei nostri modelli. Buon lavoro!
Lasciare un commento sul modello DROPS 101-32
Noi saremmo felici di ricevere i tuoi commenti e opinioni su questo modello!
Se vuoi fare una domanda, fai per favore attenzione a selezionare la categoria corretta nella casella qui sotto per velocizzare il processo di risposta. I campi richiesti sono indicati da *.