
Categorie popolari
State cercando un filato?


Commenti / Domande (24)
![]() Lisa ha scritto:
Lisa ha scritto:
Vorrei questo schema top down Grazie
27.04.2026 - 20:14DROPS Design ha risposto:
Buonasera Lisa, purtroppo ci è impossibile riprogettare i modelli per le singole esigenze. Sul nostro sito può trovare tanti altri modelli top-down. Buon lavoro!
27.04.2026 - 21:28
![]() Rachel Wallace ha scritto:
Rachel Wallace ha scritto:
Hi, pattern says when piece measures 48 cm (22.75 inches) knit garter sts over middle. 48 cm is not 22.75 inches. Shouldn't it be just under 19 inches?
25.04.2024 - 01:44DROPS Design ha risposto:
Dear Mrs Wallace, you are right, conversion into inches sounds wrong, measurements will be checked and pattern edited asap. Thanks for noticing. Happy knitting!
25.04.2024 - 08:26
![]() Laura Roy ha scritto:
Laura Roy ha scritto:
On the BACK portion of the pattern. Where it says; "Then cast on 44-42-41-38-35 sts each side ... measures 46-48-50-52-54 cm means that from the bottom of the waves (cast on edge) to where I am now measures 46-48-50-52-54 cm, correct? Or should I be knitting the 195stitches for an additional 24-3/8" making the entire sweater 46" long? Any instruction on the sleeves? TIA
24.01.2024 - 21:00DROPS Design ha risposto:
Dear Mrs Roy, measure from the cast on edge, you will now work the neckline edge then cast off for neck. Happy knitting!
25.01.2024 - 09:15
![]() Pat Glessner ha scritto:
Pat Glessner ha scritto:
I just read the question from Laura on 2/02/15, which is the point at which I am. I have bound off the middle 27 sts. leaving the sleeves and the neck edges. Instructions say that you do this at 20 1/2 inches and continue with 5 garter sts. at neckline. The next instruction is to bind off when the piece measures 20 1/2 inches, and I am confused - what do I continue and what do I bind off and when?
26.04.2020 - 00:51DROPS Design ha risposto:
Dear Mrs Glessner, it looks like 2 measurements are missing in inches in this pattern - these will be added asap - in size M you bind off the middle 27 sts when piece measures 50 cm = 19.68" then continue with 5 sts in garter st towards neck and cast off when piece measures 52 cm = 20½''. Happy knitting!
27.04.2020 - 08:56
![]() Nevermore ha scritto:
Nevermore ha scritto:
Hello, will you please translate this into italian? thanks
30.06.2019 - 14:48DROPS Design ha risposto:
Hello Nevermore. We will translate the pattern into Italian as soon as possible. Please check the website in the next few days. Tradurremo il modello in Italiano quanto prima . Controlli il sito nei prossimi giorni. Buon lavoro!
30.06.2019 - 15:01
![]() Margaret Allison ha scritto:
Margaret Allison ha scritto:
I'm an experienced knitter but I can't make the 17 stitch wave pattern (101-5 ) fit the 70 stitches required for the back piece. I also assume that an edge stitch is 1 knit stitch at each end. Hope to hear from you soon as I want to get on with It! Thank you in advance. I have watched your videos.
12.03.2019 - 18:14DROPS Design ha risposto:
Hi Margaret Allison. You have 1 edge stitch at each end (K1- WS and RS). You work the pattern M.1 over 68 stitches, it means 4 times in row (68:17=4). How to knit a wave pattern you will find HERE. Happy knitting!
12.03.2019 - 19:33
![]() Chiqui ha scritto:
Chiqui ha scritto:
Dus ik heb de keuze welke mindering ik kies voor of na de 5 biessteken? ik hoef ze dus niet allebei toe te passen? Ik dacht nl dat ik de twee mogelijkheden om het om moest toepassen. Corrigeert u mij als ik het verkeerd begrijp.
16.04.2018 - 10:38DROPS Design ha risposto:
Hallo Chiqui, Het is de bedoeling dat je steeds vlak naast de voorbiessteken mindert. Op het rechter voorpand is dat voor de biessteken en daar brei je dus 2 steken samen. Op het linker voorpand is dat na de biessteken 1 afhalen, 1 breien, de afgehaalde steek overhalen. De manier 'liggen' de geminderde steken mooi en ziet het uitendelijke werk er mooier uit.
21.04.2018 - 13:43
![]() Chiqui ha scritto:
Chiqui ha scritto:
Moet ik bij de mindering van het voorpand afwisselend in de 2e nl 2 r samenbreien en in nld 4 na de 5 voorbiesst 1 st afh, 1r, afgh st overhalen? Ik krijg nl niet de schuine kant bij de hals.
15.04.2018 - 15:13DROPS Design ha risposto:
Hallo Chiqui, Als je de mindering vlak voor de bies doet, moet je 2 steken samenbreien. Als je hem vlak na de bies doet, 1 st. afhalen, 1 st recht en de afgehaalde steek overhalen. Dat komt er op neer dat je op het rechter voorpand alle minderingen maakt door samen te breien. In het patroon staat vervolgens hoe vaak je moet minderen, dus om de hoeveel naalden.
16.04.2018 - 09:03Anne ha scritto:
Hei Neulon jakkua, jonka koko on xl. Ihmettelen, kuinka etukappaleiden silmukkamäärän ero voi olla niin suuri kokojen l ja xl välillä. Ero on 34 silmukkaa! Onko tässä virhe?
20.06.2017 - 11:05DROPS Design ha risposto:
Hei, silmukkamäärä on aaltokuvion vuoksi aluksi suuri, mutta silmukoita kavennetaan mallineuleen jälkeen pois työstä. Halutessasi voit luoda 17 silmukkaa vähemmin, jolloin työhön tulee 1 mallikerta aaltokuvioita vähemmän.
14.08.2017 - 13:59
![]() Chiqui ha scritto:
Chiqui ha scritto:
Hoe brei ik de verkeerde kant van het telpatroon, moet ik de steken av breien? dus 2 st av samenbreien en 1 omslag 1 av? Dit wordt niet duidelijk aangegeven
08.03.2017 - 23:44DROPS Design ha risposto:
Hoi Chiqui. Als goed is, dan moet je niet het patroon op de verkeerde kant breien, alleen aan de goede kant.
09.03.2017 - 13:43
|
|||||||||||||
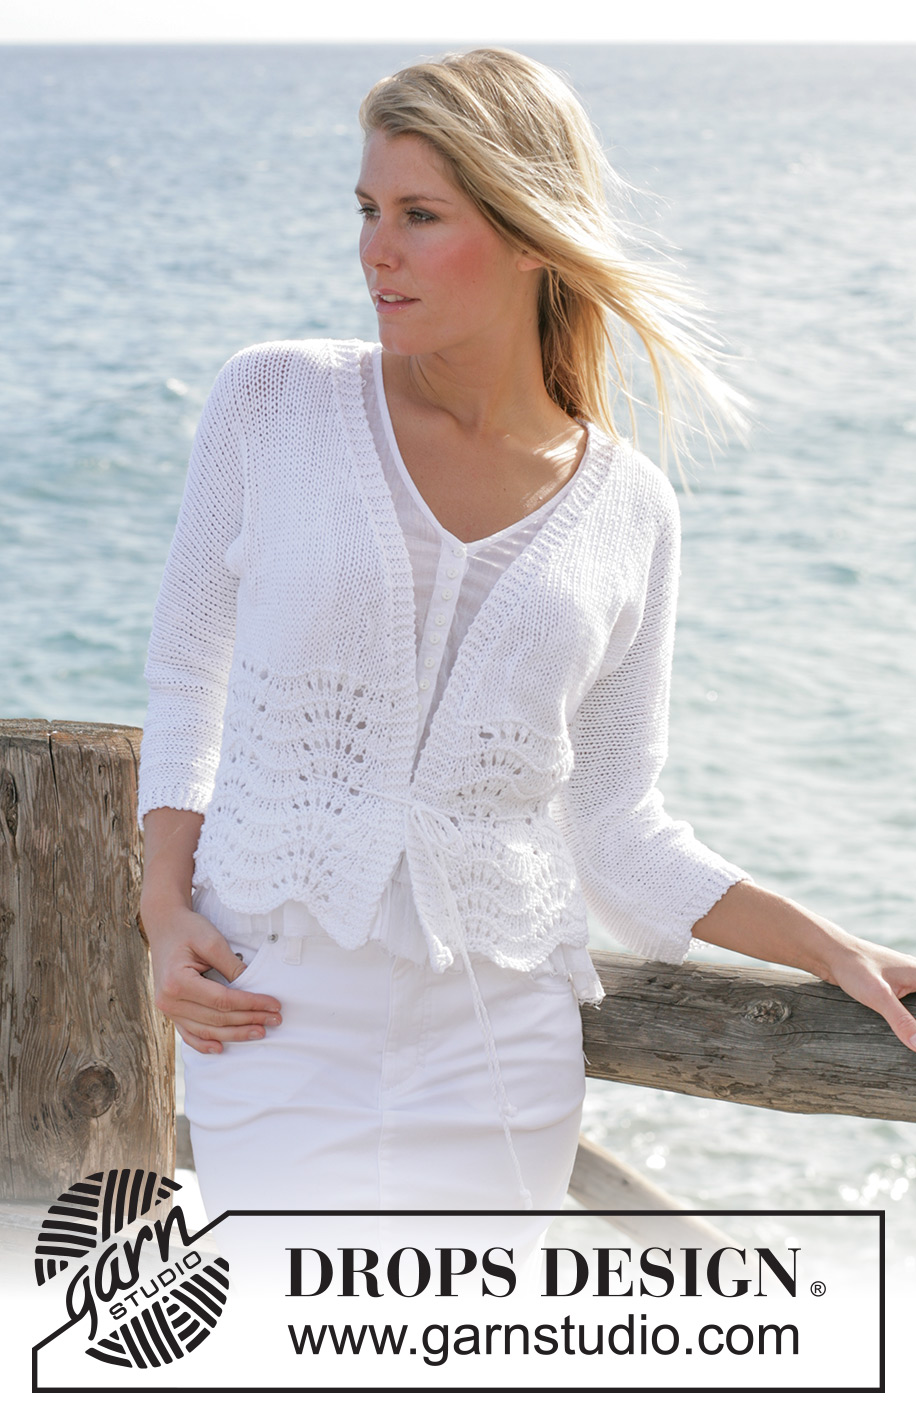
Cotton Waves#cottonwavescardigan |
|||||||||||||
|
|
|||||||||||||
Cardigan DROPS ai ferri, con motivo ondulato in Bomull-Lin. Taglie: Dalla S alla XXL.
DROPS 101-5 |
|||||||||||||
|
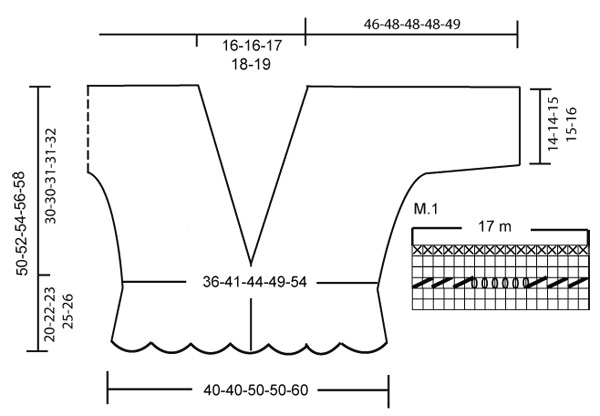
-------------------------------------------------------- CAMPIONE: 17 maglie x 22 ferri con i ferri n° 5,5 = 10 x 10 cm a maglia rasata. MOTIVO: Vedere il diagramma M.1. Il diagramma mostra tutti i ferri del motivo visti sul diritto del lavoro. PUNTO LEGACCIO (avanti e indietro sui ferri): Lavorare tutti i ferri a diritto. SUGGERIMENTO PER LE DIMINUZIONI (per lo scollo): Diminuire sempre sul diritto del lavoro: Diminuire come segue prima delle 5 maglie del bordo davanti: lavorare 2 maglie insieme a diritto. Diminuire come segue dopo le 5 maglie del bordo davanti: passare 1 maglia a diritto senza lavorarla, 1 maglia diritto, accavallare la maglia passata sulla maglia lavorata. -------------------------------------------------------- DIETRO: Avviare 70-70-87-87-104 maglie (comprese 1 maglia vivagno da ciascun lato) su 2 ferri sovrapposti (1 ferro n° 5 e 1 ferro n° 5,5) con il filato Bomull-Lin (avviare con 2 ferri consente di avere un bordo di avvio più elastico). Sfilare il ferro n° 5,5 e lavorare 4 ferri a punto legaccio con i ferri n° 5. Lavorare ora il diagramma M.1 – vedere le spiegazioni sopra con 1 maglia vivagno da ciascun lato. Quando il lavoro misura 20 cm, aggiustare il numero delle maglie a 63-71-77-85-94 maglie e proseguire a maglia rasata con i ferri n° 5,5. ALLO STESSO TEMPO, quando il lavoro misura 20-22-23-25-26 cm, aumentare 1 maglia per le maniche da ciascun lato ogni 2 ferri 17 volte in tutto = 97-105-111-119-128 maglie. Avviare ora 44-42-41-38-35 maglie da ciascun lato per le maniche = 185-189-193-195-198 maglie. Continuare a lavorare le 4 maglie vivagno da ciascun lato a punto legaccio. Quando il lavoro misura 46-48-50-52-54 cm, lavorare a punto legaccio le 37-37-39-41-42 maglie centrali (lavorare le restanti maglie a maglia rasata). Quando il lavoro misura 48-50-52-54-56 cm, intrecciare le 27-27-29-31-32 maglie centrali per lo scollo = rimangono 79-81-82-82-83 maglie per ogni spalla /manica. Proseguire con 5 maglie a punto legaccio vicino allo scollo. Intrecciare le maglie quando il lavoro misura 50-52-54-56-58 cm. DAVANTI DESTRO: Avviare 40-40-40-57-57 maglie (comprese 1 maglia vivagno sul lato e 5 maglie per il bordo davanti verso il centro) su 2 ferri sovrapposti (1 ferro n° 5 e 1 ferro n° 5,5) con Bomull-Lin. Sfilare il ferro n° 5,5 e lavorare 4 ferri a punto legaccio con i ferri n° 5. Lavorare ora il diagramma M.1 – vedere le spiegazioni sopra, con 1 maglia vivagno sul lato e 5 maglie a punto legaccio per il bordo davanti. Quando il lavoro misura 20 cm, aggiustare il numero delle maglie a 37-41-44-48-53 m; lavorare a maglia rasata con i ferri n° 5,5 e con 5 maglie a punto legaccio per il bordo davanti. ALLO STESSO TEMPO, quando il lavoro misura 20-22-23-25-26 cm, aumentare per la manica come indicato per il dietro. ALLO STESSO TEMPO, quando il lavoro misura 21 cm, diminuire per lo scollo all’interno delle 5 maglie del bordo davanti – vedere le spiegazioni sopra: diminuire 1 maglia alternativamente ogni 2 e ogni 4 ferri in tutto 19-19-20-21-22 volte. Terminati tutti gli aumenti e le diminuzioni, rimangono 79-81-82-82-83 maglie. Intrecciare le maglie quando il lavoro misura 50-52-54-56-58 cm. DAVANTI SINISTRO: Avviare le maglie e lavorare come indicato per il davanti destro ma a specchio. CONFEZIONE: Cucire le spalla/maniche a punto maglia. Montare le maniche e cucire i lati. CORDINO: Tagliare 2 capi lunghi circa 3 metri l’uno. Avvolgerli insieme finché non oppongono resistenza, piegarli in due e farli avvolgere di nuovo. Fare un nodo ad ogni estremità. Passare il cordino attraverso il motivo traforato a circa 10 - 15 cm dal bordo inferiore del cardigan. |
|||||||||||||
Spiegazioni del diagramma |
|||||||||||||
|
|||||||||||||
 |
|||||||||||||
Avete terminato questo modello?Allora taggate le vostre foto con #dropspattern #cottonwavescardigan o inviatele alla #dropsfan gallery. Avete bisogno di aiuto con questo modello?Troverete 16 video tutorial, una sezione per i commenti/domande e molto altro guardando il modello su www.garnstudio.com © 1982-2026 DROPS Design A/S. Ci riserviamo tutti i diritti. Questo documento, compreso tutte le sue sotto-sezioni, è protetto dalle leggi sul copyright. Potete leggere quello che potete fare con i nostri modelli alla fine di ogni modello sul nostro sito. |
|||||||||||||


Con oltre 40 anni di esperienza nel design di modelli di maglia e uncinetto, DROPS Design offre la più estesa collezione di modelli gratuiti su internet - tradotti in 17 lingue. Ad oggi vi possiamo fornire 324 cataloghi e 12290 modelli - 9561 dei quali sono tradotti in Italiano.
Ci stiamo impegnando molto per darvi il meglio che vi possiamo offrire in termini di maglia e uncinetto, ispirazioni e consigli così come filati di grande qualità ad un prezzo incredibile! Volete utilizzare i nostri modelli per qualcosa d'altro oltre al vostro uso personale? Potete leggere tutto ciò che è consentito nel testo sul Copyright in basso su tutte le pagine dei nostri modelli. Buon lavoro!
Lasciare un commento sul modello DROPS 101-5
Noi saremmo felici di ricevere i tuoi commenti e opinioni su questo modello!
Se vuoi fare una domanda, fai per favore attenzione a selezionare la categoria corretta nella casella qui sotto per velocizzare il processo di risposta. I campi richiesti sono indicati da *.