
Categorie popolari
State cercando un filato?


Commenti / Domande (89)
![]() Mesnier ha scritto:
Mesnier ha scritto:
Faut il faire M3 et M4 au dos ? Merci
16.05.2025 - 19:05DROPS Design ha risposto:
Bonjour Mme Mesnier, tout à fait, le point fantaisie se tricote de la même façon sur le dos que sur le devant. Bon tricot!
19.05.2025 - 07:13
![]() Mesnier ha scritto:
Mesnier ha scritto:
Toujours moi ... après les bonnes explications j’ai réussi. Merci Maintenant concernant les bretelles, 8 cm de hauteur avec les 4 mailles sont très très loin d’être suffisant , ! ! Il en faudrait le double Merci pour votre réponse
14.05.2025 - 21:16DROPS Design ha risposto:
Bonjour Mme Mesnier, vous avez rabattu les mailles de l'encolure 2 rangs après 8 cm d'emmanchures, la bordure point mousse va être ensuite tricotée séparément sur 8 cm pour correspondre à cette même hauteur, vous tricotez ensuite les 8 mailles (les 4 m en attente + les 4 m de la bordure point mousse) pendant 12 cm pour la bretelle. Autrement dit, les 8 cm point mousse doit correspondre à la hauteur tricotée au point fantaisie. Bon tricot!
15.05.2025 - 09:53
![]() Mesnier ha scritto:
Mesnier ha scritto:
Ces explications sont différentes de celles du 8 mai. Je vais essayer..merci
12.05.2025 - 13:18
![]() Mesnier ha scritto:
Mesnier ha scritto:
Non je n’y arrive pas du tout. Si je fais comme votre explication il me reste 60 mailles à la fin du rang et non 54 mailles et les vagues (où il y a les jetés) ne se trouvent pas au bon endroit..elles sont décalées. Voulez-vous regarder si vous n’avez pas oublié quelque chose...et ce signe × m’intrigue comme je vous l’expliquait auparavant. Ça veut certainement dire quelque chose ! ! ! Y a t’il une erreur de votre part ? MERCI
12.05.2025 - 09:27DROPS Design ha risposto:
Bonjour Mme Mesnier, tricotez ainsi les 22 mailles du diagramme *3 m ens à l'end, 1 m end, 1 jeté, 1 m end, 1 jeté, 1 m end, 3m ens à l'end (= il reste 7 m sur les 9 m du rang précédent), puis tricotez (2 m ens à l'end) x2, puis (1 jeté, 1 m end) x3, puis 1 jeté, et (2 m ens à l'end) x 2 (= il vous reste 11 m)*, répétez de *à* (soit 7 + 11) = il reste 18 m dans chaque diagramme à répéter en largeur, soit 3x18= 54 mailles. Mettez un marqueur entre chaque partie à répéter de *à* pour bien vérifier votre nombre de m , avant ce rang vous devez avoir *9 m (= 1er motif) + 11 m (2ème motif)* x 3 soit 60 mailles. En espérant que ceci puisse vous débloquer. Bon tricot!
12.05.2025 - 11:03
![]() Mesnier ha scritto:
Mesnier ha scritto:
Dans votre dernière réponse, vous mettez x. Dans (2 m ens. à l’end) x (1 jeté, 1 m end)....... que veux dire x ? Et à Elizabeth Maidment. quelque part vous mettez : 2 ens 2 ens 2 ens et pas dans votre réponse pour moi ??
10.05.2025 - 12:21DROPS Design ha risposto:
Bonjour Mme Mesnier, il manquait le "x2" désolée, juste une faute de frappe. Bon tricot!
12.05.2025 - 07:50
![]() Mesnier ha scritto:
Mesnier ha scritto:
J’ai l’impression que plusieurs personnes demandent ces mêmes questions pour ce rang et que vous ne répondez pas toujours là même chose... Sinon je ne termine pas mon ouvrage ! ! ,
09.05.2025 - 23:59DROPS Design ha risposto:
Dites nous si les réponses précédentes ont pu vous aider; en tricotant le 3ème rang de M.3 comme indiqué, vous diminuerez en passant de 22 mailles pour chaque diagramme en largeur (soit 66 mailles sur l'aiguille avant ce rang) à 18 mailles pour chaque diagramme en largeur (soit 54 mailles sur l'aiguille après ce rang). N'hésitez pas à mettre des marqueurs entre chaque motif à répéter si besoin. Bon tricot!
12.05.2025 - 07:34
![]() Mesnier ha scritto:
Mesnier ha scritto:
Comment faire les diminution 1 motif sur 2. Expliquez-moi de façon plus détaillée ce fameux 3e rang de M3 et merci beaucoup
09.05.2025 - 23:47DROPS Design ha risposto:
Tricotez ainsi (il manquait un x 2 à la réponse du 8 mai pour coller au diagramme): *3 m ens à l'end, 1 m end, 1 jeté, 1 m end, 1 jeté, 1 m end, 3m ens à l'end, (2 m ens à l'end) x2, (1 jeté, 1 m end) x3, 1 jeté, (2 m ens à l'end) x 2*, répétez de *à* = il reste 18 m dans chaque diagramme à répéter en largeur. Si vous tricotez la taille S, vous tricotez 3 x de *à* au total = soit 3x18= 54 mailles. Bon tricot!
12.05.2025 - 07:33
![]() Mesnier ha scritto:
Mesnier ha scritto:
Est ce que je suis obligé de faire les diminutions de M3 et M4. Car je ne comprends rien. Je n’arrive pas du tout à 54 mailles après le 3e rang de M3
09.05.2025 - 23:45DROPS Design ha risposto:
Bonjour Mme Mesnier, avez-vous essayé de tricoter comme expliqué dans la réponse du 8 mai? Ceci devrait vous aider, si vous procédez ainsi, vous arriverez au bon nombre de mailles: 18 mailles dans chaque diagramme, tricoté 3 fois en largeur = vous avez bien 54 mailles. Bon tricot!
12.05.2025 - 07:30
![]() Mesnier ha scritto:
Mesnier ha scritto:
Je suis désolée, je ne comprends toujours pas comment faire le troisième rang de M3. Pouvez-vous m’expliquer précisément comment le faire du début à la fin ? J’ai 66 mailles. Ça fait 60 ans que je tricote 🤣🤣
08.05.2025 - 09:13DROPS Design ha risposto:
Bonjour Mme Mesnier, tricotez ainsi: *3 m ens à l'end, 1 m end, 1 jeté, 1 m end, 1 jeté, 1 m end, 3m ens à l'end (= vous avez diminué 4 m mais augmenté 2 m = vous avez diminué 2 m au total dans ce motif), (2 m ens à l'end) x (1 jeté, 1 m end) x3, 1 jeté, (2 m ens à l'end) x 2*, répétez de *à* = vous avez diminué dans 1 motif du point zigzag sur 2 soit 2 mailles par motif, il reste 18 m dans chaque diagramme à répéter en largeur. Si vous tricotez la taille S, vous tricotez 3 x de *à* au total = soit 3x18= 54 mailles. Bon tricot!
08.05.2025 - 13:24
![]() Mesnier ha scritto:
Mesnier ha scritto:
Bonjour, je fais la taille S Après le 3ème rang de M3, combien de mailles me reste t'il ? Merci
06.05.2025 - 10:35DROPS Design ha risposto:
Bonjour Mme Mesnier, il doit vous rester 54 mailles - vous tricotez ensuite les 3 derniers rangs de M.3 (= autrement dit, les rangs sans diminutions, mais qui continuent le motif en fonction du nombre de mailles diminuées dans 1 motif sur 2). Quand vous aurez tricoté M.4, il vous restera 42 mailles et vous répèterez ensuite les 4 derniers rangs de M.4. Bon tricot!
06.05.2025 - 11:45
|
|||||||||||||||||||||||||||||||
Cool Vibes |
|||||||||||||||||||||||||||||||
|
|
|||||||||||||||||||||||||||||||
Top DROPS con motivo ondulato a strisce in "Safran".
DROPS 81-9 |
|||||||||||||||||||||||||||||||
|
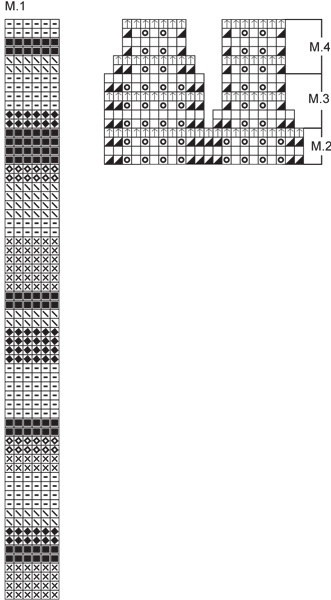
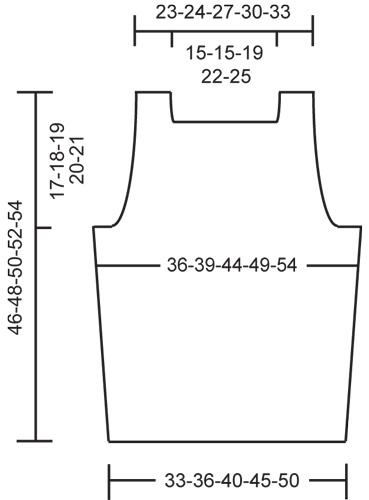
CAMPIONE: 22 m x 34 ferri seguendo il motivo = 10 x 10 cm. MOTIVO A STRISCE: Vedere il diagramma M.1. Questo diagramma mostra solo la successione dei colori. Seguire i diagramma M.2, M.3 e M.4 per il motivo ondulato. MOTIVO ONDULATO: Vedere i diagrammi M.2, M.3 e M.4. Seguire il diagramma M.1 per la successione dei colori. Ulteriori informazioni per il motivo: Durante il 3° ferro della 1a parte del diagramma M.3 e durante il 3° ferro della 2a parte del diagramma M.4, lavorare 3 m insieme a dir (al posto di 2 m insieme a dir). Ripetere poi solo gli ultimi 4 ferri dei diagrammi M.3 e M.4 come indicato nel diagramma e come spiegato nel motivo. DAVANTI: Avviare 74-80-91-100-111 m lente con il colore beige e lavorare 2 ferri a punto legaccio. Lavorare a strisce seguendo il diagramma M.1 e seguendo il motivo ondulato come indicato nel diagramma M.2 – lavorare le prime 4-7-7-6-6 m e le ultime 4-7-7-6-6 m del ferro a punto legaccio. Quando il lavoro misura 10 cm, aumentare 1 m da ciascun lato ogni 5-5-5-4-4 cm per un totale di 4-4-4-5-5 volte – lavorare le m aumentate a punto legaccio = 82-88-99-110-121 m. Quando il lavoro misura 29-30-31-32-33 cm, intrecciare 4-6-6-6-6 m da ciascun lato per gli scalfi; mettere poi in attesa su un ferma maglie le 4-5-5-5-5 m a punto legaccio da ciascun lato (queste m verranno lavorate e unite al davanti successivamente) = 66-66-77-88-99 m. Da adesso in avanti, misurare il lavoro da questo punto. Proseguire seguendo il motivo. Dopo 3 cm (assicurarsi di aver completato i 4 ferri del diagramma M.2) lavorare seguendo il diagramma M.3 = 54-54-61-72-79 m, ripetere solo gli ultimi 4 ferri del diagramma M.3 (i ferri senza le diminuzioni). Quando il lavoro misura 6 cm dagli scalfi, lavorare seguendo il diagramma M.4 = sul ferro ci sono 42-42-49-56-63 m, ripetere poi solo gli ultimi 4 ferri del diagramma M.4 (i ferri senza diminuzioni). Quando il lavoro misura ca. 8 cm dagli scalfi, lavorare 2 ferri a punto legaccio con il colore panna su tutte le m; intrecciare poi le 34-34-41-48-55 m centrali = rimangono 4 m da ciascun lato; mettere queste m in attesa sui ferma maglie. Riprendere sui ferri di lavoro le 4-5-5-5-5 m messe precedentemente in attesa su un ferma maglie al lato di uno degli scalfi. Lavorare a punto legaccio con il colore panna per ca 8 cm o finché il lavoro non combacia con il bordo davanti. Mettere sullo stesso ferro le 4 m messe in attesa = 8-9-9-9-9 m. Lavorare a punto legaccio per ca. 12-13-14-15-16 cm, intrecciare le m – la spallina verrà cucita al dietro in un secondo momento. Ripetere in modo uguale sull’altro lato. DIETRO: Avviare e lavorare come indicato per il davanti. Intrecciare per gli scalfi come indicato per il davanti. Quando il lavoro misura 14-15-16-17-18 cm dallo scalfo, lavorare 2 ferri a punto legaccio con il colore panna, poi intrecciare tutte le m. Riprendere le m messe in attesa sui fermamaglie da ciascun lato sui ferri di lavoro e lavorare a punto legaccio per ca. 14-15-16-17-18 cm, intrecciare le m. CONFEZIONE: Cucire i bordi a punto legaccio lungo gli scalfi sul davanti e dietro e cucire le spalline al dietro. Cucire i lati all’interno delle m vivagno. |
|||||||||||||||||||||||||||||||
Spiegazioni del diagramma |
|||||||||||||||||||||||||||||||
|
|||||||||||||||||||||||||||||||
 |
|||||||||||||||||||||||||||||||
 |
|||||||||||||||||||||||||||||||
Avete terminato questo modello?Allora taggate le vostre foto con #dropspattern o inviatele alla #dropsfan gallery. Avete bisogno di aiuto con questo modello?Troverete 13 video tutorial, una sezione per i commenti/domande e molto altro guardando il modello su www.garnstudio.com © 1982-2026 DROPS Design A/S. Ci riserviamo tutti i diritti. Questo documento, compreso tutte le sue sotto-sezioni, è protetto dalle leggi sul copyright. Potete leggere quello che potete fare con i nostri modelli alla fine di ogni modello sul nostro sito. |
|||||||||||||||||||||||||||||||


Con oltre 40 anni di esperienza nel design di modelli di maglia e uncinetto, DROPS Design offre la più estesa collezione di modelli gratuiti su internet - tradotti in 17 lingue. Ad oggi vi possiamo fornire 324 cataloghi e 12290 modelli - 9561 dei quali sono tradotti in Italiano.
Ci stiamo impegnando molto per darvi il meglio che vi possiamo offrire in termini di maglia e uncinetto, ispirazioni e consigli così come filati di grande qualità ad un prezzo incredibile! Volete utilizzare i nostri modelli per qualcosa d'altro oltre al vostro uso personale? Potete leggere tutto ciò che è consentito nel testo sul Copyright in basso su tutte le pagine dei nostri modelli. Buon lavoro!
Lasciare un commento sul modello DROPS 81-9
Noi saremmo felici di ricevere i tuoi commenti e opinioni su questo modello!
Se vuoi fare una domanda, fai per favore attenzione a selezionare la categoria corretta nella casella qui sotto per velocizzare il processo di risposta. I campi richiesti sono indicati da *.