
Categorie popolari
State cercando un filato?


Commenti / Domande (186)
![]() Blandine ha scritto:
Blandine ha scritto:
Bonjour. Je ne comprends pas bien comment suivre le diagramme M2 pour les augmentations des manches. Comment bien garder le diagramme ? Merci pour votre retour
30.08.2025 - 14:12DROPS Design ha risposto:
Bonjour Blandine, tant que vous n'aurez pas le bon nombre de mailles correspondant au motif, le diagramme ne se suivra pas tout le tour - au début du tour, tricotez les augmentations comme une nouveau motif en lisant le diagramme de gauche à droite et à la fin du tour, tricotez les augmentations en lisant le diagramme de droite à gauche; ainsi, vous créez un nouveau motif en début/fin de rang, mais au milieu sous la manche, le motif ne tombera pas juste. Bon tricot!
01.09.2025 - 16:26
![]() Rannveig ha scritto:
Rannveig ha scritto:
Kann ikkje finnaM4
20.07.2025 - 16:10DROPS Design ha risposto:
Hei Rannveig, M4 er siste rad i det store diagrammet. Vennlig hilsen, Drops Team.
29.07.2025 - 05:55
![]() Benedikte Havndrup ha scritto:
Benedikte Havndrup ha scritto:
Hej igen 😃 Kan I forklare det med vendestrik og at de forreste halsmaskerne skal sættes på en pind for sig? Jeg kan strikke German short rows men ikke hvis halsmakerne er isolerede På forhånd tak
19.07.2025 - 19:35DROPS Design ha risposto:
Hei Benedikte. Det settes x antall masker på en tråd og det strikkes nå frem og tilbake over de resterende maskene, samtidig som det felles masker mot halsen. Det snus ikke ikke i arbeidet for å strikke vendepinner (der man kunne ha brukt German Short Rows, men det felles 1 maske på hver 2. pinne 1 eller 2 ganger). mvh DROPS Design
11.08.2025 - 09:12
![]() Benedikte ha scritto:
Benedikte ha scritto:
Jeg strikker xxl. Jeg ved ikke hvordan jeg fordeler raglanindtagningerne? 24 gange på hveranden omgang og 6 gange på hver omgang?
28.06.2025 - 08:25DROPS Design ha risposto:
Hej Benedikte, ja det stemmer du tager ind til raglan på hver 2. omgang, det gør du 24 gange først og når du har gjort det, tager du ind til raglan på hver omgang 6 gange :)
01.07.2025 - 08:48
![]() Aud ha scritto:
Aud ha scritto:
Jeg får ikke maskeantallet til å stemme: 183 masker: Strikkes 5 rette i siden, 6vr/r, deretter 30 vr/r, 26 masker i mønster, 6r/vr, deretter 30r/vr, 5rett i siden og så 6 vr/r. Så skal det fortesettes med vrangbord over 84 neste masker - men jeg har bare 75 igjen. Er det noe feil i antallet her? 183-5-6-30-26-6-30-5= 75
07.05.2025 - 13:18DROPS Design ha risposto:
Hei Aud, I din størrelse: 5 rette, 30 masker vrangbord, M.1 =26m, 30 masker vrangbord, 5 rette, 84 masker vrangbord, 3 vrange = 183 masker. God fornøyelse!
08.05.2025 - 17:47
![]() Aud ha scritto:
Aud ha scritto:
Hei! Det står at det skal felles 2 m på bakstykket samtidig med at det økes 4 på forstykket; hvilke to masker bak skal felles av?
26.04.2025 - 10:31DROPS Design ha risposto:
Hei Aud. Du har x antall masker på bakstykket (avhengig av hvilken str. du strikker). Da skal du fell 2 masker jevnt fordelt over disse maskene. Så fra 2. merke (i siden) strikk x antall masker, fell 1 maske, strikk x antall masker, fell 1 maske, strikk frem til 1. merke (starten av omgangen). mvh DROPS Design
05.05.2025 - 08:19
![]() PERARD VALERIE ha scritto:
PERARD VALERIE ha scritto:
Bonjour quelle est la taille d’aiguille pour le col 4 ou 5 ? Merci
26.03.2025 - 16:35DROPS Design ha risposto:
Bonjour Mme Perard, on relève les mailles du col et on le tricote avec les aiguilles doubles pointes 4 (mention ajoutée, merci pour votre retour). Bon tricot!
27.03.2025 - 08:03
![]() Lone Kok Olsen ha scritto:
Lone Kok Olsen ha scritto:
Hej Jeg kan ikke få maskefordelingen til at passe i mønster M1, jeg slår 159 masker op. Kan der være en fejl i opskriften
14.03.2025 - 13:20DROPS Design ha risposto:
Hei Lone. LItt usikker på hva du mener. Du legger opp 159 masker og så strikkes det slik: 5 rett + * 3 vr, 3 r * over 24 masker + M.1 (= 26 masker) + * 3 r, 3 vr * over 24 + 5 rett + * 3 vr, 3 r * over 72 masker + 3 vr = 5+24+26+24+5+72+3= 159 masker. mvh DROPS Design
17.03.2025 - 11:49
![]() Olimpia ha scritto:
Olimpia ha scritto:
Non ho capito come eseguire l’ultima parte dello sprone, viene indicato di lasciare in sospeso la parte centrale e continuare aventi e indietro, ma quindi non posso continuare in tondo ?
11.03.2025 - 12:23DROPS Design ha risposto:
Buonasera Olimpia, da quel punto si prosegue in piano. Buon lavoro!
18.03.2025 - 22:03
![]() Jisu ha scritto:
Jisu ha scritto:
Hello, in the end of the york part it says “Join and P 1 row, then K 1 row, decreasing evenly distributed to 83-89-89-95-95 sts. ” Does that mean to decrease the stitches across 2 rows? Thank you!
26.02.2025 - 23:20DROPS Design ha risposto:
Dear Jisu, no you should decrease evenly only on the round knitting, ie on 2nd of these both rounds. Happy knitting!
27.02.2025 - 11:12
|
||||||||||||||||||||||||||||
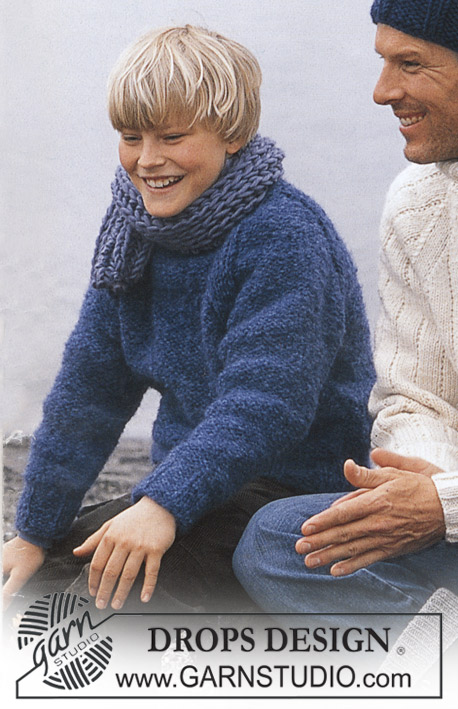
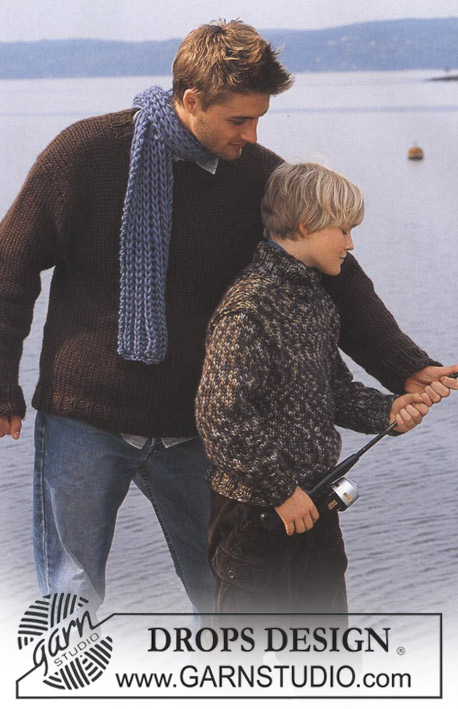
To the Sea |
||||||||||||||||||||||||||||
|
|
||||||||||||||||||||||||||||
Maglione DROPS ai ferri, in "Alaska" e berretto in "Snow"
DROPS 85-23 |
||||||||||||||||||||||||||||
|
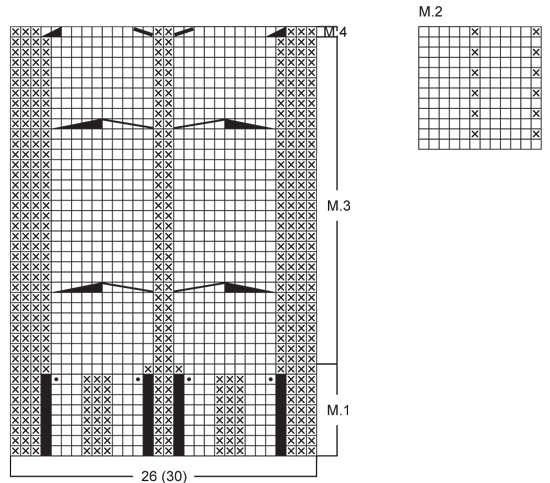
CAMPIONE: 17 m x 22 ferri = 10 x 10 cm a maglia rasata con i ferri n° 5. COSTE: * 3 m dir, 3 m rov *, ripetere da *-*. MOTIVO: Vedere i diagramma da M.1 a M. 4. I diagrammi mostrano tutti i ferri del motivo, visti sul diritto del lavoro. GRANA DI RISO: Giro 1: * 1 m dir, 1 m rov *, ripetere da *-*. Giro 2: lavorare a rov le m dir e a dir le m rov. Ripetere il giro 2. SUGGERIMENTO PER LE DIMINUZIONI (per il raglan): Diminuire come segue, sul diritto del lavoro: Iniziare 4 m prima del segno: passare 1 m dir senza lavorarla, 1 m dir, accavallare la m passata sulla m lavorata, 4 m dir (il segno si trova al centro di queste 4 m), 2 m insieme a dir. Diminuire come segue, sul rovescio del lavoro: Iniziare 4 m prima del segno: lavorare 2 m insieme a rov, 4 m rov, 2 m insieme a rov ritorto (se questo passaggio vi risulta troppo difficile, passare 2 m senza lavorarle, riportare le m sul ferro di sinistra 1 alla volta ritorte e lavorarle insieme a rov). DAVANTI E DIETRO: Avviare 155-159-179-183-203 m sui ferri circolari n° 4; unire in tondo e lavorare a coste come segue: 3-5-3-5-3 m dir (inserire un segno nella m centrale = lato), * 3 m rov, 3 m dir *, ripetere *-* sulle 24-24-30-30-36 m successive, diagramma M.1 (= 26 m), * 3 m dir, 3 m rov *, ripetere *-* sulle 24-24-30-30-36 m successive, 3-5-3-5-3 m dir (inserire un segno nella m centrale = lato), * 3 m rov, 3 m dir *, ripetere *-* sulle 72-72-84-84-96 m successive e finire con 3 m rov. Nel corso dell’ ultimo ferro del diagramma M.1 diminuire 2 m sul dietro e ALLO STESSO TEMPO aumentare 4 m sul davanti come indicato nel diagramma = 157-161-181-185-205 m. Dopo aver completato il diagramma M.1 (il lavoro misura ca.4 cm) passare ai ferri circolari n° 5 e proseguire come segue: 3-5-3-5-3 m dir, diagramma M.2 sulle 24-24-30-30-36 m successive, diagramma M.3 (= 30 m), diagramma M.2 sulle 24-24-30-30-36 m successive – leggere il diagramma in senso inverso in modo che il motivo sia uguale ai due lati del diagramma M.3, 3-5-3-5-3 m dir e diagramma M.2 sulle restanti 73-73-85-85-97 m. Quando il lavoro misura 12 cm, aumentare 1 m da ciascun lato delle m con il segno, ogni 5-4-6-4-4 cm per un totale di 4-6-4-6-6 volte – lavorare le m aumentate seguendo il diagramma M.2 = 173-185-197-209-229 m. Quando il lavoro misura 34-41-42-43-43 cm, intrecciare 7 m da ciascun lato per gli scalfi (= intrecciare quindi la m con il segno + le 3 m che precedono + le 3 m che seguono il segno) = 82-88-94-100-110 m per il davanti e 77-83-89-95-105 m per il dietro. Lasciare il lavoro in sospeso e proseguire con le maniche. MANICHE: Avviare 42-42-42-48-48 m sui ferri a doppia punta n° 4; unire in tondo ed inserire un segno all’inizio del giro. Lavorare a coste per 4 cm. Passare ora ai ferri a doppia punta n° 5 e proseguire seguendo il diagramma M. 2 (assicurarsi che le m a grana di riso, siano al centro, sotto la manica). Quando il lavoro misura 9-12-14-14-14 cm, aumentare 1 m da ciascun lato del segno ogni 3,5-2,5-2-2,5-2 cm per un totale di 11-14-17-15-20 volte (lavorare le m aumentate secondo il motivo) = 64-70-76-78-88 m. Quando il lavoro misura 50-51-53-53-54 cm, intrecciare 7 m al centro, sotto la manica (intrecciare quindi la m con il segno + le 3 m che precedono + le 3 m che seguono il segno) = 57-63-69-71-81 m. Lasciare il lavoro in sospeso e proseguire con la seconda manica. SPRONE: Trasferire le m delle maniche sullo stesso ferro circolare usato per lavorare il dietro e il davanti, nel punto in cui sono state intrecciate le m per gli scalfi = 273-297-321-337-377 m. Inserire un segno in corrispondenza di ogni passaggio tra le maniche e il davanti / dietro = 4 segni. Lavorare 2-3-0-0-0 giri prima di diminuire. Leggere tutta la sezione successiva, prima di proseguire: Diminuzioni per il RAGLAN: Diminuire 1 m da ciascun lato di ogni segno (= 8 m diminuite) – vedere il SUGGERIMENTO PER LE DIMINUZIONI sopra. Diminuire ogni 2 giri per 18-21-23-24-24 volte e poi ad ogni giro per 0-0-1-1-6 volte. MOTIVO: Quando il lavoro misura ca. 50-59-61-63-65 cm – assicurarsi di aver finito una treccia – lavorare il diagramma M.4 sulle 30 m centrali (diminuire le 4 m aumentate nel corso dell’ultimo giro del diagramma M.1 sul bordo inferiore del DAVANTI e DIETRO) – lavorare le rimanenti m come impostate. Nel corso del giro successivo, mettere in attesa su un ferma maglie le 30-30-30-34-34 m centrali per lo scollo e proseguire avanti e indietro sui ferri. Diminuire, da ciascun lato dello scollo, 1 m ogni 2 ferri per 1-2-2-2-2 volte. Terminate le diminuzioni per lo scollo e per il raglan, sui ferri rimangono 93-91-91-95-95 m ed il lavoro misura ca.56-66-68-70-72 cm fino alla spalla. COLLO: Con i ferri a doppia punta, riprendere ca.32-38 m sullo scollo, sul davanti (comprese le m messe in attesa sul ferma maglie) e trasferire le m sullo stesso ferro circolare = ca.125-133 m. Unire in tondo e lavorare 1 giro a rov e 1 giro a dir diminuendo in modo uniforme così da portare le m a 83-89-89-95-95 m. Lavorare a coste (3 m dir, 3 m rov) – ma al centro, sul davanti ci devono essere 2 m rov, in quanto si prosegue il motivo come impostato sul davanti. Quando il collo misura 18-20-20-22-22 cm, intrecciare tutte le m lavorandole a coste. Piegare il bordo del collo sul diritto del lavoro. Se preferite un maglione a girocollo, lavorare come segue: lavorare a coste finché il collo non misura ca.10-11-12-12-13 cm, intrecciare le m lavorandole come si presentano. Piegare il bordo del collo sul rovescio del lavoro e cucire. CONFEZIONE: Cucire le aperture sotto le maniche. -------------------------------------------------------- BERRETTO: Taglia: Unica Materiali: DROPS SNOW di Garnstudio 100 g colore n° 15, blu scuro. FERRI A DOPPIA PUNTA DROPS n° 9 o misura necessaria per ottenere il campione corretto. CAMPIONE: 10 m x 14 ferri = 10 x 10 cm a maglia rasata COSTE: * 5 m rov, 2 m dir *, ripetere da *-*. BERRETTO: Avviare 56 m; unire in tondo ed inserire un segno all’inizio del giro. Lavorare un giro a maglia rasata e proseguire a coste – vedere le indicazioni sopra. Quando il lavoro misura 12 cm, diminuire 1 m rov in tutti i gruppi di 5 m rov (diventano gruppi di 4 m rov) = 48 m. Quando il lavoro misura 15 cm, diminuire 1 m rov in tutti i gruppi di 4 m rov (diventano gruppi con 3 m rov) = 40 m. Diminuire in modo uguale altre 2 volte ogni 3 cm in modo che, ad ogni diminuzione, ci sia 1 m rov in meno in ogni gruppo di m lavorate a rov. Terminate le diminuzioni sui ferri ci sono 24 m. Proseguire a coste * 2 m dir, 1 m rov*. Quando il lavoro misura 22 cm, lavorare il giro successivo come segue: * 2 m insieme a dir, 1 m rov*, ripetere da *-* su tutte le m = 16 m. Tagliare il filo, passarlo attraverso le rimanenti m, stringere e fermare il filo. Il berretto misura ca. 23 cm in altezza. |
||||||||||||||||||||||||||||
Spiegazioni del diagramma |
||||||||||||||||||||||||||||
|
||||||||||||||||||||||||||||
 |
||||||||||||||||||||||||||||
 |
||||||||||||||||||||||||||||
Avete terminato questo modello?Allora taggate le vostre foto con #dropspattern o inviatele alla #dropsfan gallery. Avete bisogno di aiuto con questo modello?Troverete 26 video tutorial, una sezione per i commenti/domande e molto altro guardando il modello su www.garnstudio.com © 1982-2026 DROPS Design A/S. Ci riserviamo tutti i diritti. Questo documento, compreso tutte le sue sotto-sezioni, è protetto dalle leggi sul copyright. Potete leggere quello che potete fare con i nostri modelli alla fine di ogni modello sul nostro sito. |
||||||||||||||||||||||||||||


Con oltre 40 anni di esperienza nel design di modelli di maglia e uncinetto, DROPS Design offre la più estesa collezione di modelli gratuiti su internet - tradotti in 17 lingue. Ad oggi vi possiamo fornire 324 cataloghi e 12290 modelli - 9561 dei quali sono tradotti in Italiano.
Ci stiamo impegnando molto per darvi il meglio che vi possiamo offrire in termini di maglia e uncinetto, ispirazioni e consigli così come filati di grande qualità ad un prezzo incredibile! Volete utilizzare i nostri modelli per qualcosa d'altro oltre al vostro uso personale? Potete leggere tutto ciò che è consentito nel testo sul Copyright in basso su tutte le pagine dei nostri modelli. Buon lavoro!
Lasciare un commento sul modello DROPS 85-23
Noi saremmo felici di ricevere i tuoi commenti e opinioni su questo modello!
Se vuoi fare una domanda, fai per favore attenzione a selezionare la categoria corretta nella casella qui sotto per velocizzare il processo di risposta. I campi richiesti sono indicati da *.