
Categorie popolari
State cercando un filato?


Commenti / Domande (186)
![]() Mille ha scritto:
Mille ha scritto:
Forstår ikke erme.. «øke på hver side av perlestrikk m under ermet: 1m på hver 2,5cm totalt 15 ganger.. til arbeidet måler 53cm.. økte hver 6.-7. rad ca (2,5cm) men når jeg er ferdig med økningen måler ermet 56cm? Er det ikke meningen å øke 15 ganger hver 2,5cm oppover ermet?
11.12.2025 - 14:21DROPS Design ha risposto:
Hei Mille, Du begynner å øke når ermet måler 14 cm i din størrelse. Deretter øker du hver 2,5 cm x 14 (første økningen allerede gjort) = 35 cm. Da burde ermet måle 49 cm når økningene er ferdige. Hilsen Drops Team.
12.12.2025 - 06:53
![]() Miriam ha scritto:
Miriam ha scritto:
When you start the first row why do you put the first marker on the middle stitch at the beginning. I am just about to start this sweater and am reading through the pattern.
10.12.2025 - 03:39DROPS Design ha risposto:
Hi Miriam, Yes, the marker-thread is inserted into the middle of the first (3) 5-3-5-3 stitches on the round. Regards, Drops Team.
10.12.2025 - 06:41
![]() Astrid ha scritto:
Astrid ha scritto:
Ich bin bei der Passe angekommen. Beidseitig wird am Markierer je 1Ma abgenommen. Mich irritiert die Beschreibung zur Raglanabnahme. Es wird zwischen einer Abnahme in der "Hinreihe" und der Abnahme in der "Rückreihe" differenziert. Der Pulli wird aber in Runden gestrickt. Somit kann ich nur die Abnahme in "Hinreihe" (mit re Ma) durchführen. Oder verstehe ich das falsch?
27.11.2025 - 17:15DROPS Design ha risposto:
Liebe Astrid, die Raglanabnahmen wird man zuerst in jeder 2. Runde stricken, dann weiter in jeder Reihe (in die 3 grösseren Größe), und gleichzeitig wird man die mittleren Maschen für den Halsausschnitt vorne stilllegen und weiter in Hin- und Rück-Reihen stricken, gleichzeitig wird man Maschen für den Halsausschnitt abketten und für Raglan weiter abnehmen, so sollen Sie in den 3 grösseren Größe auch bei den Rückreihen abnehmen. Viel Spaß beim Stricken!
28.11.2025 - 07:36
![]() Astrid ha scritto:
Astrid ha scritto:
Ich bin an der Stelle angekommen, an der die Ärmel an den Rumpf kommen bzw. Amalie Maschen auf eine Nadel kommen. Bei Größe S/M sind das 297 Maschen. Welche Länge muss die Nadel haben? 120 cm oder 150 cm?
26.11.2025 - 14:51DROPS Design ha risposto:
Liebe Astrid, wir benuzten eben nur 80 cm ... die Rundnadel soll immer etwas kleiner als den fertigen Umfang sein, so je nach es Ihnen am besten passt. Viel Spaß beim Stricken!
26.11.2025 - 16:35
![]() Sara ha scritto:
Sara ha scritto:
Hello So im trying to knit this pattern but the i need to know the cable we do for 4 cm at first..the photo doesnt show how would it like to be..it would be so helpful if there is a full picture for this jumper Thank you
21.11.2025 - 17:14DROPS Design ha risposto:
Dear Sara, before the cable you will work the diagram M.1 (to set up the stitches for the cable), then when rib are done, you will work M.3 = the cables over M.1 and remaining stitches following diagram M.2. Happy knitting!
24.11.2025 - 07:33
![]() Kirsten ha scritto:
Kirsten ha scritto:
I love the look of this pattern, but it makes no sense to me. The chart doesn't follow the written part, and the written instructions talk about Part 1 being 26 stitches, which is impossible, adding up the k3, p3 section OR the 3-5-3-5-3. Would you please explain? That would really help. BTW, I am making the largest size...
13.11.2025 - 07:28
![]() Estelle ha scritto:
Estelle ha scritto:
Hi, I am currently knitting a size L, and so far the jumper looks a bit small on the knitting needles. My stitches correspond to the gauge. Will the jumper stretch to the right size during the blocking? Or should I switch up to slightly bigger needles (5.5) and do an XL? Or keep to the L with 5.5 needles? Additionally, what size jumper is your model wearing? Thank you! Kind regards, Estelle
05.11.2025 - 15:37
![]() Nina ha scritto:
Nina ha scritto:
Hej, Var ser jag måtten på storlekarna? Så jag vet vilken storlek jag ska sticka. Hälsningar Nina
04.11.2025 - 22:25DROPS Design ha risposto:
Hej Nina. Längst ner på mönstret hittar du en måttskiss med plaggets mått i cm i alla storlekar. Mvh DROPS Design
05.11.2025 - 14:18
![]() Simone ha scritto:
Simone ha scritto:
Vielen Dank für die schnelle Antwort. Werden die aufgenommen Maschen dann miteingearbeitet in das Muster, nachdem alle 12M aufgenommen wurden? V.G. So würden werden dann
21.10.2025 - 11:46DROPS Design ha risposto:
Liebe Simone, Sie meinen die 12 Zunahmen an jeder Seite des Pullovers? Die werden nach und nach ins Muster eingearbeitet.
21.10.2025 - 23:58
![]() Simone Strickrodt ha scritto:
Simone Strickrodt ha scritto:
Sollen die zugenommen Maschen in M2 integriert werden, in dem man sie im Muster mit 1links , 5rechte Masche strickt?
20.10.2025 - 15:32DROPS Design ha risposto:
Liebe Simone, genau, Sie arbeiten die Maschen nach und nach in M.2 (5 M re, 1 M li) ein. Viel Spaß beim Weiterstricken!
21.10.2025 - 11:16
|
||||||||||||||||||||||||||||
To the Sea |
||||||||||||||||||||||||||||
|
|
||||||||||||||||||||||||||||
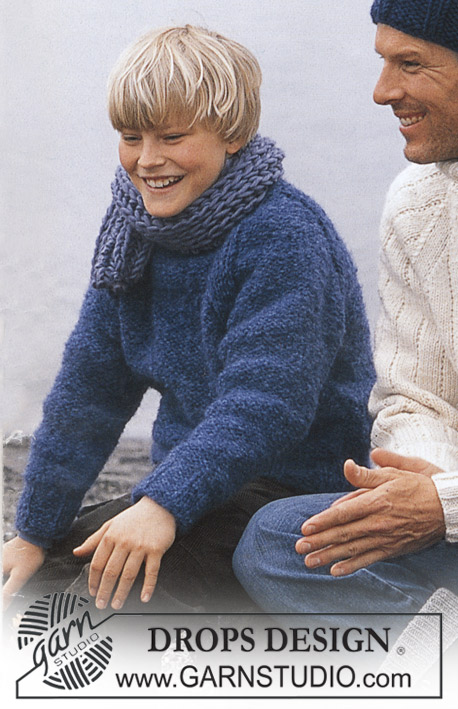
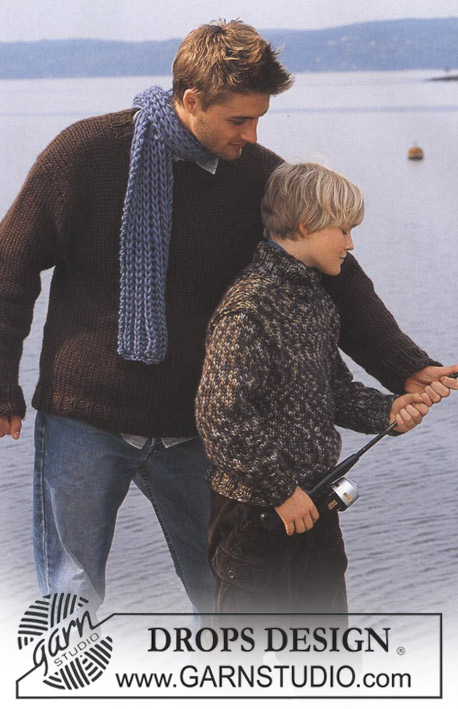
Maglione DROPS ai ferri, in "Alaska" e berretto in "Snow"
DROPS 85-23 |
||||||||||||||||||||||||||||
|
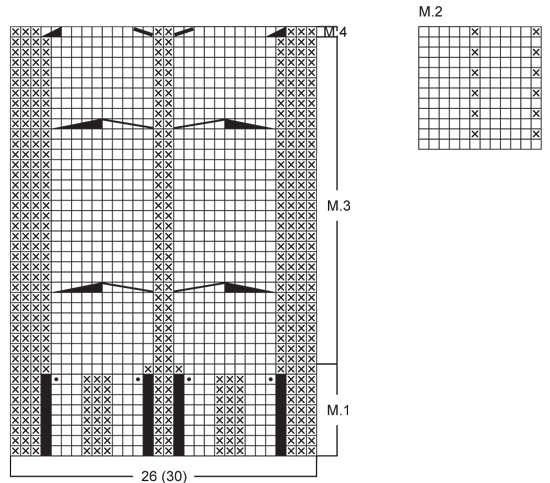
CAMPIONE: 17 m x 22 ferri = 10 x 10 cm a maglia rasata con i ferri n° 5. COSTE: * 3 m dir, 3 m rov *, ripetere da *-*. MOTIVO: Vedere i diagramma da M.1 a M. 4. I diagrammi mostrano tutti i ferri del motivo, visti sul diritto del lavoro. GRANA DI RISO: Giro 1: * 1 m dir, 1 m rov *, ripetere da *-*. Giro 2: lavorare a rov le m dir e a dir le m rov. Ripetere il giro 2. SUGGERIMENTO PER LE DIMINUZIONI (per il raglan): Diminuire come segue, sul diritto del lavoro: Iniziare 4 m prima del segno: passare 1 m dir senza lavorarla, 1 m dir, accavallare la m passata sulla m lavorata, 4 m dir (il segno si trova al centro di queste 4 m), 2 m insieme a dir. Diminuire come segue, sul rovescio del lavoro: Iniziare 4 m prima del segno: lavorare 2 m insieme a rov, 4 m rov, 2 m insieme a rov ritorto (se questo passaggio vi risulta troppo difficile, passare 2 m senza lavorarle, riportare le m sul ferro di sinistra 1 alla volta ritorte e lavorarle insieme a rov). DAVANTI E DIETRO: Avviare 155-159-179-183-203 m sui ferri circolari n° 4; unire in tondo e lavorare a coste come segue: 3-5-3-5-3 m dir (inserire un segno nella m centrale = lato), * 3 m rov, 3 m dir *, ripetere *-* sulle 24-24-30-30-36 m successive, diagramma M.1 (= 26 m), * 3 m dir, 3 m rov *, ripetere *-* sulle 24-24-30-30-36 m successive, 3-5-3-5-3 m dir (inserire un segno nella m centrale = lato), * 3 m rov, 3 m dir *, ripetere *-* sulle 72-72-84-84-96 m successive e finire con 3 m rov. Nel corso dell’ ultimo ferro del diagramma M.1 diminuire 2 m sul dietro e ALLO STESSO TEMPO aumentare 4 m sul davanti come indicato nel diagramma = 157-161-181-185-205 m. Dopo aver completato il diagramma M.1 (il lavoro misura ca.4 cm) passare ai ferri circolari n° 5 e proseguire come segue: 3-5-3-5-3 m dir, diagramma M.2 sulle 24-24-30-30-36 m successive, diagramma M.3 (= 30 m), diagramma M.2 sulle 24-24-30-30-36 m successive – leggere il diagramma in senso inverso in modo che il motivo sia uguale ai due lati del diagramma M.3, 3-5-3-5-3 m dir e diagramma M.2 sulle restanti 73-73-85-85-97 m. Quando il lavoro misura 12 cm, aumentare 1 m da ciascun lato delle m con il segno, ogni 5-4-6-4-4 cm per un totale di 4-6-4-6-6 volte – lavorare le m aumentate seguendo il diagramma M.2 = 173-185-197-209-229 m. Quando il lavoro misura 34-41-42-43-43 cm, intrecciare 7 m da ciascun lato per gli scalfi (= intrecciare quindi la m con il segno + le 3 m che precedono + le 3 m che seguono il segno) = 82-88-94-100-110 m per il davanti e 77-83-89-95-105 m per il dietro. Lasciare il lavoro in sospeso e proseguire con le maniche. MANICHE: Avviare 42-42-42-48-48 m sui ferri a doppia punta n° 4; unire in tondo ed inserire un segno all’inizio del giro. Lavorare a coste per 4 cm. Passare ora ai ferri a doppia punta n° 5 e proseguire seguendo il diagramma M. 2 (assicurarsi che le m a grana di riso, siano al centro, sotto la manica). Quando il lavoro misura 9-12-14-14-14 cm, aumentare 1 m da ciascun lato del segno ogni 3,5-2,5-2-2,5-2 cm per un totale di 11-14-17-15-20 volte (lavorare le m aumentate secondo il motivo) = 64-70-76-78-88 m. Quando il lavoro misura 50-51-53-53-54 cm, intrecciare 7 m al centro, sotto la manica (intrecciare quindi la m con il segno + le 3 m che precedono + le 3 m che seguono il segno) = 57-63-69-71-81 m. Lasciare il lavoro in sospeso e proseguire con la seconda manica. SPRONE: Trasferire le m delle maniche sullo stesso ferro circolare usato per lavorare il dietro e il davanti, nel punto in cui sono state intrecciate le m per gli scalfi = 273-297-321-337-377 m. Inserire un segno in corrispondenza di ogni passaggio tra le maniche e il davanti / dietro = 4 segni. Lavorare 2-3-0-0-0 giri prima di diminuire. Leggere tutta la sezione successiva, prima di proseguire: Diminuzioni per il RAGLAN: Diminuire 1 m da ciascun lato di ogni segno (= 8 m diminuite) – vedere il SUGGERIMENTO PER LE DIMINUZIONI sopra. Diminuire ogni 2 giri per 18-21-23-24-24 volte e poi ad ogni giro per 0-0-1-1-6 volte. MOTIVO: Quando il lavoro misura ca. 50-59-61-63-65 cm – assicurarsi di aver finito una treccia – lavorare il diagramma M.4 sulle 30 m centrali (diminuire le 4 m aumentate nel corso dell’ultimo giro del diagramma M.1 sul bordo inferiore del DAVANTI e DIETRO) – lavorare le rimanenti m come impostate. Nel corso del giro successivo, mettere in attesa su un ferma maglie le 30-30-30-34-34 m centrali per lo scollo e proseguire avanti e indietro sui ferri. Diminuire, da ciascun lato dello scollo, 1 m ogni 2 ferri per 1-2-2-2-2 volte. Terminate le diminuzioni per lo scollo e per il raglan, sui ferri rimangono 93-91-91-95-95 m ed il lavoro misura ca.56-66-68-70-72 cm fino alla spalla. COLLO: Con i ferri a doppia punta, riprendere ca.32-38 m sullo scollo, sul davanti (comprese le m messe in attesa sul ferma maglie) e trasferire le m sullo stesso ferro circolare = ca.125-133 m. Unire in tondo e lavorare 1 giro a rov e 1 giro a dir diminuendo in modo uniforme così da portare le m a 83-89-89-95-95 m. Lavorare a coste (3 m dir, 3 m rov) – ma al centro, sul davanti ci devono essere 2 m rov, in quanto si prosegue il motivo come impostato sul davanti. Quando il collo misura 18-20-20-22-22 cm, intrecciare tutte le m lavorandole a coste. Piegare il bordo del collo sul diritto del lavoro. Se preferite un maglione a girocollo, lavorare come segue: lavorare a coste finché il collo non misura ca.10-11-12-12-13 cm, intrecciare le m lavorandole come si presentano. Piegare il bordo del collo sul rovescio del lavoro e cucire. CONFEZIONE: Cucire le aperture sotto le maniche. -------------------------------------------------------- BERRETTO: Taglia: Unica Materiali: DROPS SNOW di Garnstudio 100 g colore n° 15, blu scuro. FERRI A DOPPIA PUNTA DROPS n° 9 o misura necessaria per ottenere il campione corretto. CAMPIONE: 10 m x 14 ferri = 10 x 10 cm a maglia rasata COSTE: * 5 m rov, 2 m dir *, ripetere da *-*. BERRETTO: Avviare 56 m; unire in tondo ed inserire un segno all’inizio del giro. Lavorare un giro a maglia rasata e proseguire a coste – vedere le indicazioni sopra. Quando il lavoro misura 12 cm, diminuire 1 m rov in tutti i gruppi di 5 m rov (diventano gruppi di 4 m rov) = 48 m. Quando il lavoro misura 15 cm, diminuire 1 m rov in tutti i gruppi di 4 m rov (diventano gruppi con 3 m rov) = 40 m. Diminuire in modo uguale altre 2 volte ogni 3 cm in modo che, ad ogni diminuzione, ci sia 1 m rov in meno in ogni gruppo di m lavorate a rov. Terminate le diminuzioni sui ferri ci sono 24 m. Proseguire a coste * 2 m dir, 1 m rov*. Quando il lavoro misura 22 cm, lavorare il giro successivo come segue: * 2 m insieme a dir, 1 m rov*, ripetere da *-* su tutte le m = 16 m. Tagliare il filo, passarlo attraverso le rimanenti m, stringere e fermare il filo. Il berretto misura ca. 23 cm in altezza. |
||||||||||||||||||||||||||||
Spiegazioni del diagramma |
||||||||||||||||||||||||||||
|
||||||||||||||||||||||||||||
 |
||||||||||||||||||||||||||||
 |
||||||||||||||||||||||||||||
Avete terminato questo modello?Allora taggate le vostre foto con #dropspattern o inviatele alla #dropsfan gallery. Avete bisogno di aiuto con questo modello?Troverete 26 video tutorial, una sezione per i commenti/domande e molto altro guardando il modello su www.garnstudio.com © 1982-2026 DROPS Design A/S. Ci riserviamo tutti i diritti. Questo documento, compreso tutte le sue sotto-sezioni, è protetto dalle leggi sul copyright. Potete leggere quello che potete fare con i nostri modelli alla fine di ogni modello sul nostro sito. |
||||||||||||||||||||||||||||


Con oltre 40 anni di esperienza nel design di modelli di maglia e uncinetto, DROPS Design offre la più estesa collezione di modelli gratuiti su internet - tradotti in 17 lingue. Ad oggi vi possiamo fornire 324 cataloghi e 12290 modelli - 9561 dei quali sono tradotti in Italiano.
Ci stiamo impegnando molto per darvi il meglio che vi possiamo offrire in termini di maglia e uncinetto, ispirazioni e consigli così come filati di grande qualità ad un prezzo incredibile! Volete utilizzare i nostri modelli per qualcosa d'altro oltre al vostro uso personale? Potete leggere tutto ciò che è consentito nel testo sul Copyright in basso su tutte le pagine dei nostri modelli. Buon lavoro!
Lasciare un commento sul modello DROPS 85-23
Noi saremmo felici di ricevere i tuoi commenti e opinioni su questo modello!
Se vuoi fare una domanda, fai per favore attenzione a selezionare la categoria corretta nella casella qui sotto per velocizzare il processo di risposta. I campi richiesti sono indicati da *.