
Categorie popolari
State cercando un filato?


Commenti / Domande (58)
![]() Albouy ha scritto:
Albouy ha scritto:
Bonjour, faut’il mettre 5 mailles en attente 6 fois sur un arrêt de maille quand on est au milieu du boléro. Je vous remercie
03.04.2018 - 19:44DROPS Design ha risposto:
Bonjour Mme Albouy, tout à fait, tricotez comme avant en laissant 6 fois 5 m non tricotées côté encolure (= 30 m sur l'arrêt de mailles quand toutes les mailles ont été mises en attente). Bon tricot!
04.04.2018 - 08:44
![]() Unni ha scritto:
Unni ha scritto:
Hei, Ønsker meg denne boleroen. Ser at garnet Symphony er utgått, men er det mulig å bruke Brushed Alpaca Silk eller BabyAlpaca Silk? Er det i så fall noe spesielt jeg må være oppmerksom på, eller kan oppskriften følges som den er?
17.01.2018 - 18:42DROPS Design ha risposto:
Hei Unni. DROPS Symphony tilhører garngruppe D. I denne garngruppe har vi garnet DROPS Melody som skal passe med Symphonys strikkefasthet, bare husk å sjekke din strikkefasthet at den stemmer med det som er oppgitt i oppskriften. God Fornøyelse.
18.01.2018 - 08:34
![]() Carolyn Van Dijk ha scritto:
Carolyn Van Dijk ha scritto:
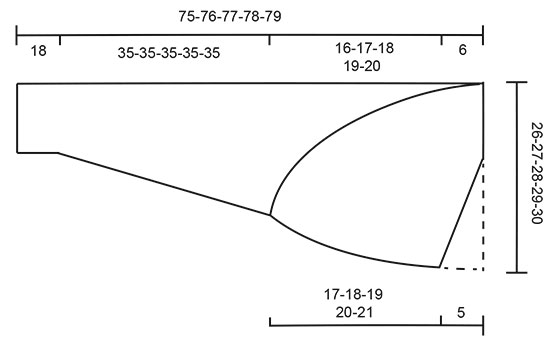
I am still confused on the sizing. The drawing at the bottom of the pattern doesn't seem to make sense. Does it mean the back middle measure is 26cm for a size small?
05.01.2018 - 20:25DROPS Design ha risposto:
Dear Carolyn, yes, you are right, it does mean that the back of a small sized bolero is 26 cm long. Happy Knitting!
06.01.2018 - 13:26
![]() Gaelle ha scritto:
Gaelle ha scritto:
Bonjour, je suis arrivée a 17 cm de hauteur du marqueur des manches, je dois mettre en attente 6x5 mailles côté encolure, pourriez vous me dire si c'est le côté dos ou devant ? Merci, cordialement Gaëlle
13.11.2017 - 12:55DROPS Design ha risposto:
Bonjour Gaelle, ces mailles sont mises en attente côté encolure, donc côté devant, on continue à tricoter côté dos (l'ouvrage sera un peu plus long en bas du dos une fois porté), les rangs raccourcis correspondent à la partie en pointillé sur le schéma. Bon tricot!
13.11.2017 - 13:32
![]() Xaja Mykil ha scritto:
Xaja Mykil ha scritto:
What measurements (in inches) do the sizes mean?
23.07.2017 - 15:24DROPS Design ha risposto:
Dear Xaja, the exact sizing always depend on the style of each piece, therefore please refer the shcematics for the actual measurements of any given pattern. I hope this helps. Happy Knitting!
23.07.2017 - 16:40
![]() Elisabeth S ha scritto:
Elisabeth S ha scritto:
Hei igjen, Hvis det er som du sier at "Som jeg laeser det saa bliver underkanten breddere (nederst ryggen) og nakken smallere." Hva betyr det da når oppskriften sier "(dvs det måles ikke nederst i ryggen ettersom plagget er smalere nederst) "
13.10.2016 - 22:08DROPS Design ha risposto:
Hei Elisabeth. Ja, jeg har misforstaaet dit förste spörgsmaal. Jeg kiggede paa udtagningerne/indtagningerne. Ja, der saettes m paa en pind nedefra ryggen og op - saa kanten överst vil blive 5 cm breddere ca - som ogsaa er at se paa tegningen. Den stiplede linie er mellemrummet mellem underkant og overkant - ikke plaget. Haaber det er tydeligt nu :)
14.10.2016 - 18:03
![]() Elisabeth S ha scritto:
Elisabeth S ha scritto:
Hei, Jeg lurer på den delen av oppskriften som beskriver "kilen" som strikkes inn midt i ryggen bak. På figuren kan det se ut som man skal strikke den bredes nederst (altså sette maskene på tråden fra nakken og ned mot ryggen), men i oppskriften leser jeg det som om maskene skal settes på tråden fra ryggen opp mot nakken (altså slik at kilen blir bredest øverst). Hva er rett? Er det ekstra bredde i nakken eller nederst i ryggen man forsøker å lage?
13.10.2016 - 07:52DROPS Design ha risposto:
Hei Elisabeth. Som jeg laeser det saa bliver underkanten breddere (nederst ryggen) og nakken smallere.
13.10.2016 - 15:25
![]() Maxine ha scritto:
Maxine ha scritto:
Hi and thanks-- but I should have been clearer. This is the section I meant. I can't envision, and the diagram doesn't help: Now bind off at the front of piece and cast on new sts at the back of piece. [BIND OFF ALL, CAST ON AND THEN BIND OFF IN THE FOLLOWING WAY?] The next few lines beginning with "At front: Bind off..." are to long to post, but confusing as well. Thanks!
20.07.2016 - 17:26DROPS Design ha risposto:
Dear Maxine, if you have dec/bind off for front piece at beg of row from RS on 1st part, you will now inc new sts for front piece at beg of row from RS = cast on new sts for front piece at end of row from WS. If you inc/cast on new sts on 1st half piece at end of row from RS, you will now dec at end of row from RS and cast off the sts at beg of row from WS. YOu will now work reversed all inc/dec done. Happy knitting!
21.07.2016 - 08:54
![]() Maxine ha scritto:
Maxine ha scritto:
Hi there, I just complete the first 53 cm of this piece, and after reading the directions that follow three time, I am completely flummoxed! I have no idea how to proceed, and I'm afraid the pattern drawing is of no help either. Can you please provide me with more detail...I don't want to abandon this project. It looks like a beautiful design. Thanks!
16.07.2016 - 17:57DROPS Design ha risposto:
Dear Maxine, after you have worked the first half of the bolero contiue as explained: work 1 row and now work 5 more sts from the st holder every other row a total of 6 times (all sts are now back on needle). Then inc towards neck (where you bound off in the first side) and dec at back (where you inc before), ie you will work the 2nd half reversed. Happy knitting!
18.07.2016 - 09:04Dawn ha scritto:
In the pattern , it says to knit 53cm and them do quite a bit of complicated decreasing and increasing which I have worked out. The pattern then says that there should be 39-40-42-43-45 st. The next instruction is "when the piece measures 17- 18...." etc cm. My question is, where do I measure these cm from. How do you define "the piece"?
13.06.2016 - 08:51DROPS Design ha risposto:
Dear Dawn, when piece measured 53 cm you had to insert a marker, next measurements are done from this marker, ie when piece measures 17-18... cm you have to measure from this marker. Happy knitting!
13.06.2016 - 09:47
|
|
Night at the Opera |
|
|
|
|
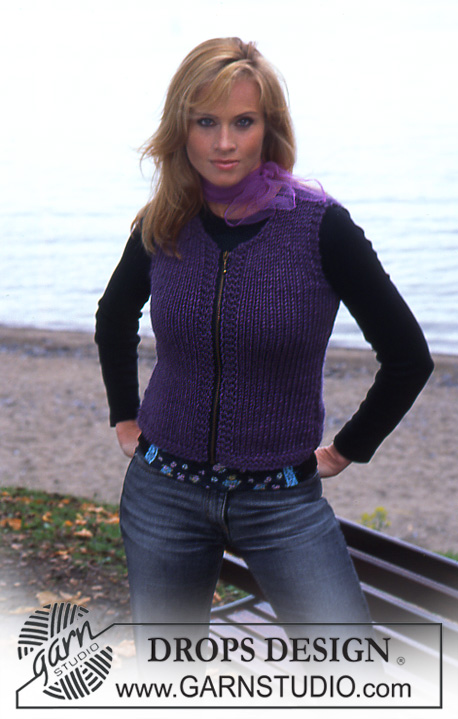
Bolero DROPS a maniche lunghe in "Symphony".
DROPS 86-31 |
|
|
CAMPIONE 15 m x 20 ferri a maglia rasata con i ferri n° 6 = 10 x 10 cm. COSTE: * 3 m dir, 2 m rov *, ripetere *-*. BOLERO: Avviare, senza stringere troppo il filo, 46-48-50-50-52 m sui ferri n° 5 e lavorare 4 ferri a punto legaccio. Proseguire a maglia rasata, diminuendo 8 m in modo uniforme nel corso del primo ferro = 38-40-42-42-44 m. Quando il lavoro misura 18 cm, aumentare 1 m da ciascun lato ogni 3-3-3-2,5-2,5 cm per un totale di 11-11-12-13-14 volte = 60-62-66-68-72 m. Quando il lavoro misura 53 cm, inserire un segno da ciascun lato – misurare il lavoro da questo punto – e leggere tutte le istruzioni successive prima di proseguire: Intrecciare ora per il davanti e avviare nuove m per il dietro del bolero. Per il davanti: intrecciare 2-2-3-3-3 m, intrecciare poi ogni 2 ferri, come segue: 1 m 9-10-11-12-12 volte, 2 m 3-3-3-3-4 volte, 3 m 3 volte e 4 m 1 volta. Per il dietro: aumentare ogni 2 ferri, come segue: 3 m 1 volta e 1 m 2 volte; poi ogni 4 ferri: 1 m 4 volte. Terminati tutti gli aumenti e tutte le diminuzioni, sul ferro ci sono: 39-40-42-43-45 m. Quando il lavoro misura 17-18-19-20-21 cm dal segno, mettere in attesa su un ferma maglie 5 m partendo dal bordo inferiore del dietro e risalendo verso il collo; ripetere ogni 2 ferri per 6 volte = sul ferro rimangono 9-10-12-13-15 m. Ci si trova ora al centro, sul dietro. Inserire un nuovo segno al centro, sul dietro, per il collo. Lavorare ora la seconda parte, in senso inverso: dopo aver messo le ultime 5 m in attesa, lavorare 1 ferro a maglia rasata, riportare poi sui ferri di lavoro 5 m ogni 2 ferri per 6 volte = 39-40-42-43-45 m. Quando si riportano le m dal ferma maglie ai ferri di lavoro, sollevare il filo della riga precedente, tra l’ultima maglia sul ferro di lavoro e la prima m sul ferma maglie; lavorare questa m a dir insieme alla prima m sul ferma maglie. Questo serve per evitare che si formi un buco. Quando il lavoro misura 6 cm dal segno per il collo, aumentare per il davanti (= nella prima parte, corrisponde al lato dove sono state fatte le diminuzioni) ogni 2 ferri, come segue: 4 m 1 volta, 3 m 3 volte, 2 m 3-3-3-3-4 volte, 1 m 9-10-11-12-12 volte e 2-2-3-3-3 m 1 volta. Quando il lavoro misura 12-13-14-15-16 cm dal segno per il collo, diminuire per il dietro (= nella prima parte, corrisponde al lato dove sono stati fatti gli aumenti) ogni 4 ferri come segue: 1 m 4 volte, poi ogni 2 ferri: 1 m 2 volte; intrecciare poi 3 m 1 volta. Terminati tutti gli aumenti e tutte le diminuzioni, sul ferro ci sono 60-62-66-68-72 m. Inserire un segno da ciascun lato – misurare il lavoro da questo punto. Quando il lavoro misura 5-5-2-5-2,5 cm dal segno, diminuire 1 m da ciascun lato ogni 3-3-3-2,5-2,5 cm per un totale di 11-11-12-13-14 volte = 38-40-42-42-44 m. Quando il lavoro misura 51 cm dal segno, aumentare 8 m in modo uniforme = 46-48-50-50-52 m. Lavorare 4 ferri a punto legaccio; intrecciare tutte le m. CONFEZIONE: Cucire le maniche all’interno delle m vivagno, fino ai segni. Con i ferri circolari, riprendere le m tutto intorno al bordo del bolero – quindi lungo il davanti destro, intorno al collo, lungo il davanti sinistro e sul bordo inferiore del dietro = ca.175-230 m (il n° delle m deve essere divisibile per 5). Unire e lavorare come segue sul diritto del lavoro: 1 ferro a rov, 1 ferro a dir; proseguire a coste – vedere le indicazioni sopra. Quando il bordo misura 6 cm, aumentare 1 m rov in ogni gruppo di 2 m lavorate a rov (diventano quindi gruppi di 3 m rov) = ca. 210-276 m. Quando il bordo misura 12 cm, aumentare 1 m dir in ogni gruppo di 3 m lavorate a dir (diventano quindi gruppi di 4 m dir) = ca.245-322 m. Quando il bordo misura 16-17-18-19-20 cm, aumentare 1 m rov in ogni gruppo di 3 m lavorate a rov (diventano quindi gruppi di 4 m rov); al ferro successivo, intrecciare tutte le m lavorandole a coste. |
|
 |
|
Avete terminato questo modello?Allora taggate le vostre foto con #dropspattern o inviatele alla #dropsfan gallery. Avete bisogno di aiuto con questo modello?Troverete 25 video tutorial, una sezione per i commenti/domande e molto altro guardando il modello su www.garnstudio.com © 1982-2026 DROPS Design A/S. Ci riserviamo tutti i diritti. Questo documento, compreso tutte le sue sotto-sezioni, è protetto dalle leggi sul copyright. Potete leggere quello che potete fare con i nostri modelli alla fine di ogni modello sul nostro sito. |


Con oltre 40 anni di esperienza nel design di modelli di maglia e uncinetto, DROPS Design offre la più estesa collezione di modelli gratuiti su internet - tradotti in 17 lingue. Ad oggi vi possiamo fornire 324 cataloghi e 12290 modelli - 9561 dei quali sono tradotti in Italiano.
Ci stiamo impegnando molto per darvi il meglio che vi possiamo offrire in termini di maglia e uncinetto, ispirazioni e consigli così come filati di grande qualità ad un prezzo incredibile! Volete utilizzare i nostri modelli per qualcosa d'altro oltre al vostro uso personale? Potete leggere tutto ciò che è consentito nel testo sul Copyright in basso su tutte le pagine dei nostri modelli. Buon lavoro!
Lasciare un commento sul modello DROPS 86-31
Noi saremmo felici di ricevere i tuoi commenti e opinioni su questo modello!
Se vuoi fare una domanda, fai per favore attenzione a selezionare la categoria corretta nella casella qui sotto per velocizzare il processo di risposta. I campi richiesti sono indicati da *.