
Categorie popolari
State cercando un filato?


Commenti / Domande (97)
![]() Maria Renato ha scritto:
Maria Renato ha scritto:
Ho fatto la sciarpa a coste inglese ora alla fine devi fare un giro al diritto e poi chiudere?
27.11.2025 - 22:29DROPS Design ha risposto:
Buonasera Maria, quando raggiunge la lunghezza indicata può chiudere il lavoro. Buon lavoro!
28.11.2025 - 21:51
![]() Monique HARION ha scritto:
Monique HARION ha scritto:
Bonjour, je ne suis pas très à l'aise avec des aiguilles circulaires. Et pour pouvoir bien interpréter vos explications ce serait bien de me dire si je dois tout diviser par 2 et lorsque je dois diminuer aux emmanchures et faire l'encolure, c'est un peu compliqué lorsque j'ai 2 aiguilles séparées. Merci pour votre retour rapide.
30.12.2024 - 15:39DROPS Design ha risposto:
Bonjour Mme Harion, dans cette leçon, nous donnons quelques astuces pour adapter un modèle sur aiguilles droites, pensez bien recalculer chaque partie pour que tout tombe juste si besoin. Bon tricot!
02.01.2025 - 14:58
![]() Christina ha scritto:
Christina ha scritto:
Vilket kroppsmått i cm passar til XXL?
03.10.2024 - 23:27DROPS Design ha risposto:
Hej Christina. Längst ner på mönstret har du en måttskiss med plaggets mått i cm i alla storlekar. Mvh DROPS Design
09.10.2024 - 08:35
![]() Sally ha scritto:
Sally ha scritto:
Hi could I pls get some clarification on the raglan shaping? I’m doing the 3rd size, so I’m decreasing 20 times and then 10 while also checking the measurement. Im at 61cm right after finishing the last decrease and confused on what to do next. I’ve put 20 stitches on a holder. The pattern says to continue knitting and bind off every other row. Can you explain what we’re knitting back and forth, the 20 stitches or the remaining stitches on the needle? And how do i bind off?
14.08.2024 - 23:01DROPS Design ha risposto:
Hi Sally, You are continuing back and forth, working all the stitches apart from the neck-stitches which are on the thread/stitch holder. You bind off every 2nd row to shape the neckline upwards, 2 stitches x 1 on each side (both beginning and end of row), then 1 stitch x 2 on each side. Hope this helps and happy knitting!
15.08.2024 - 06:37
![]() Abrian ha scritto:
Abrian ha scritto:
Hi. For the raglan shaping decreases, do I decrease each row 10 times first or do the 20 rows of every other row decrease first? Hope that makes sense. Thanks!
27.07.2024 - 03:00DROPS Design ha risposto:
Dear Abrian, decrease in the order indicated in the pattern. So first you decrease less often, every other row, 20 times. Then you will start decreasing more steeply, so you decrease every row 10 times. Happy knitting!
28.07.2024 - 17:27
![]() Willy Van Ommen ha scritto:
Willy Van Ommen ha scritto:
Ik ben met de mouw begonnen en moet meerderen. Ik begrijp niet hoe de te meerderen steken gebreid worden. Heb tot nu toe 3 recht 3 averecht gebreid. Hoe kom ik tot 6 steken in dit gedeelte als ik alleen vanuit de markering meerder?
25.07.2024 - 09:41DROPS Design ha risposto:
Dag Willy,
Helaas verspringt het patroon als je meerdert onder de arm en daar is niets aan te doen. Je breit het patroon tot zo ver mogelijk onder de mouw en na de markeerdraad pak je het patroon op aan de andere kant van de mouw.
31.07.2024 - 20:04
![]() Abrian ha scritto:
Abrian ha scritto:
I’m not understanding how to put the sleeves onto the needles. Could I get some further explanation please? And where do the 4 stitch markers go? Thanks!
15.04.2024 - 01:46DROPS Design ha risposto:
Hi Abrian, The sleeves go where the stitches have been cast off on each side of the body for the armholes. If it makes it easier, work as far as the first set of cast-off stitches, insert a marker, place the sleeve stitches onto the circular needle, starting after the cast-off stitches mid-under the sleeve, work the sleeve, insert a marker, work to the second armhole on the body (to the cast-off stitches), insert a marker, place the second sleeve on the needle, work the sleeve then insert the fourth marker. Work to beginning of round. Happy knitting!
15.04.2024 - 06:47
![]() Cindy Van Reck ha scritto:
Cindy Van Reck ha scritto:
Ik begrijp niet wat men bedoeld met "zet de middelste 20 steken van de middenvoor op een hulpnaald....wat is de middenvoor voor in het patroon?
16.12.2023 - 16:49DROPS Design ha risposto:
Dag Cindy,
Midden voor zijn de steken die tussen de 2 raglanlijnen aan de voorkant zitten. Op dat moment zijn het voor- en achterpand nog hetzelfde. Als je de toer steeds op een pand begint en eindigt, dan zou ik dat aanhouden als de achterkant en op het andere pand de middelste steken op een hulpdraad zetten.
17.12.2023 - 17:27
![]() Els Schellekens ha scritto:
Els Schellekens ha scritto:
Ik heb een vraag over de raglanminderingen. Moet je eerst de raglanminderingen om de twee naalden doen en dan pas die om de naald, of moet je die twee tegelijkertijd combineren? Bedankt!
30.11.2023 - 07:01DROPS Design ha risposto:
Dag Els,
Nee, je doet het niet tegelijkertijd. Je mindert eerst een x aantal (afhankelijk van je maat) in elke 2e naald. Als je dat gedaan hebt, dan minder je een x aantal op elke naald.
02.12.2023 - 17:32
![]() Cindy Van Reck ha scritto:
Cindy Van Reck ha scritto:
Meerder bij de mouw 12 keer 1 steek aan weerszijden van de 6 av met de merkdraad... begin in dan juist naast de merknaam of in de r steken ervoor en ernaast...vind ik niet duidelijk eigenlijk.. of ik zie het niet?
30.10.2023 - 15:45
|
|
Of The Sea |
|
 |
 |
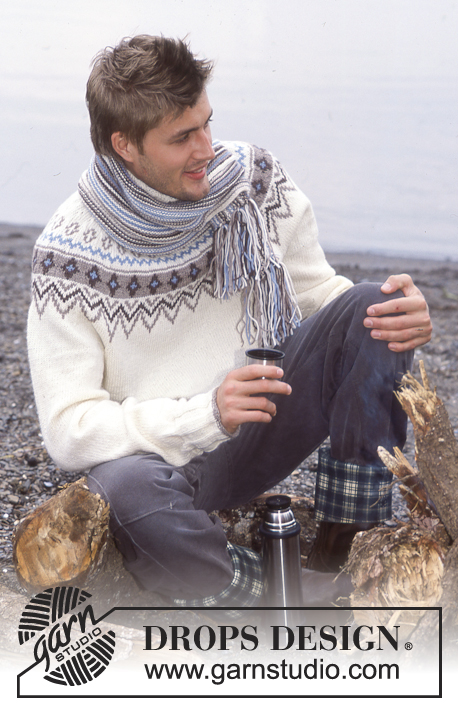
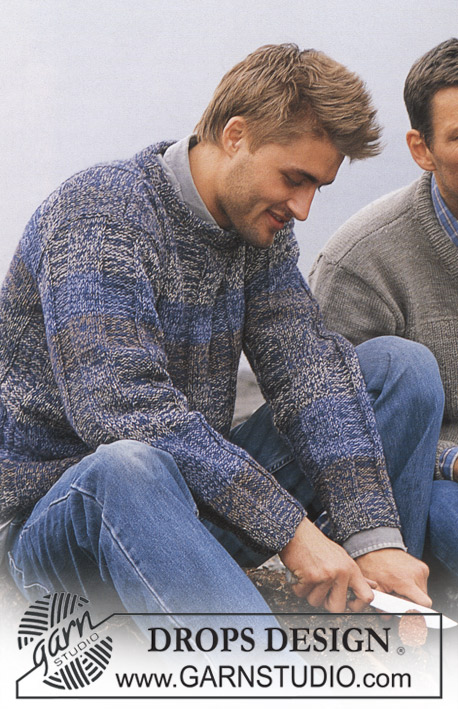
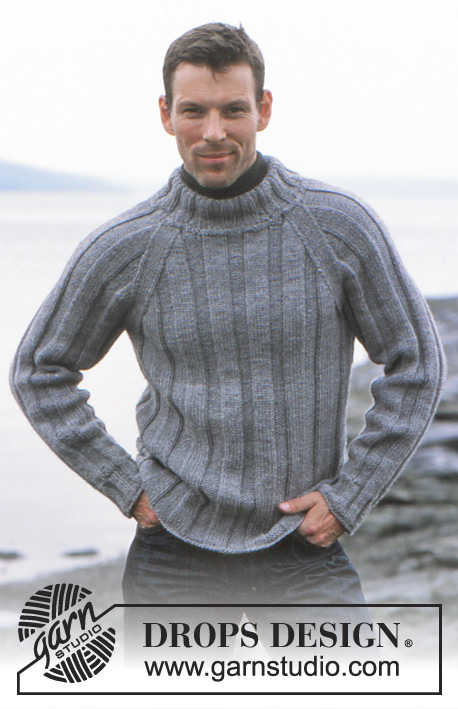
Maglione da uomo lavorato ai ferri con raglan e coste in DROPS Alaska, e sciarpa a coste inglesi in DROPS Snow. Taglie: 12 anni - XXL.
DROPS 85-2 |
|
|
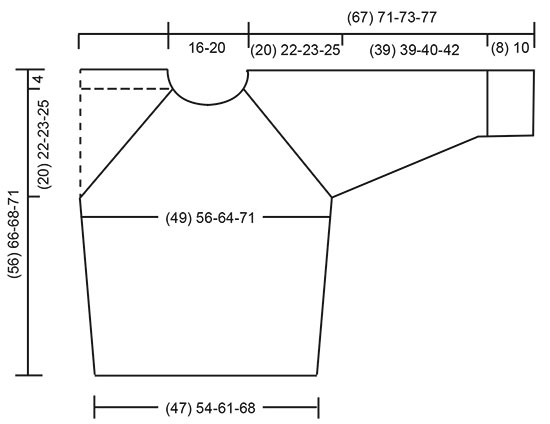
MAGLIONE: SUGGERIMENTO PER LE DIMINUZIONI (per il raglan): Diminuire come segue dal diritto del lavoro: Iniziare 4 m prima del segnapunti: 2 m insieme a dir, 4 m dir (il segnapunti è al centro di queste 4 m), passare 1 m a dir senza lavorarla, 1 m dir, accavallare la m passata sopra quella appena lavorata. Diminuire come segue dal rovescio del lavoro: Iniziare 4 m prima del segnapunti: 2 m insieme a rov ritorto, 4 m rov (il segnapunti è al centro di queste 4 m), 2 m insieme a rov. (Se è troppo difficile lavorarle a rov, passarle, riportarle sul f sinistro 1 a 1, a ritorto e poi lavorarle insieme a rov). CORPO: Avviare 160-184-208-232 m con i f circolari; unire e mettere un segnapunti nel punto di unione. Lavorare 2 f a m rasata, poi stabilire le coste come segue: 1 m rov, *6 m dir, 6 m rov*, ripetere *-* su 72-84-96-108 m, 6 m dir, 1 m rov, mettere un segnapunti (= lato), 1 m rov, *6 m dir, 6 m rov*, ripetere *-* su 72-84-96-108 m, 6 m dir, 1 m rov. Continuare le coste come stabilito. Quando il lavoro misura 10-15-15-15 cm e 20-30-30-30 cm aumentare 1 m a ogni lato di ogni segnapunti – lavorare a rov gli aumenti = 168-192-216-240 m. Quando il lavoro misura 32-40-41-42 cm intrecciare 12 m a ogni lato per lo scalfo (= 3 m dir, 6 m rov, 3 m dir) = 72-84-96-108 m rimaste sul davanti e sul dietro. Mettere il lavoro da parte e lavorare le maniche. MANICA: Avviare 48-48-60-60 m con i f a doppia punta; unire e mettere un segnapunti nel punto di unione. Lavorare 2 f a m rasata, poi lavorare a coste (3 m rov, 3 m dir) su tutte le m. Quando il lavoro misura 8-10-10-10 cm, passare alle coste * 6 m dir, 6 m rov * come sul corpo – iniziare all’altezza del segnapunti con 3 m rov in modo che il segnapunti sia centrato su 6 m rov. Quando il lavoro misura 10-13-13-11 cm aumentare 1 m a entrambi i lati delle 6 m rov che contengono il segnapunti ogni 3-3-3-3,5 cm per un totale di 12 volte (lavorare gli aumenti a coste durante il lavoro, cioè lavorare a rov le prime 6 m aumentate, lavorare a dir le 6 m successive) = 72-72-84-84 m. Quando il lavoro misura 47-49-50-52 cm intrecciare 6 m a ogni lato del segnapunti = 60-60-72-72 m rimaste. Mettere il lavoro da parte e lavorare la 2° manica. SPRONE: Mettere le maniche sullo stesso f circolare del corpo dove sono state intrecciate le m per gli scalfi = 264-288-336-360 m. Mettere un segnapunti in ogni punto di passaggio tra il davanti, il dietro e le maniche = 4 segnapunti. Lavorare 0-1-1-1 f prima che inizi il raglan. RAGLAN: Diminuire 1 m ogni lato di tutti i segnapunti (= 8 diminuzioni) – leggere i SUGGERIMENTI PER LE DIMINUZIONI sopra. Diminuire a f alterni 21-24-20-25 volte e su ogni f 3-0-10-5 volte. Allo stesso tempo quando il lavoro misura 49-59-61-64 cm mettere le 8-20-20-32 m al centro davanti su un fermamaglie per il collo e lavorare avanti e indietro. Intrecciare a ogni bordo del collo a f alterni: 2 m 1 volta e 1 m 2 volte. Alla fine del e del collo rimangono 56-68-68-80 m sul f e il lavoro misura circa 56-66-68-71 cm fino alla spalla. BORDO DEL COLLO: Riprendere circa 16 m per la taglia più piccola, 28-40 m per le altre taglie sul collo davanti (comprese le m sul fermamaglie) = 72 m per la taglia più piccola, 96-120 m per le altre taglie; unire e mettere un segnapunti nel punto di unione. Lavorare 1 f rov, 1 f dir e 1 f rov, poi lavorare 1 f dir, diminuendo in modo uniforme a 72-84-90-96 m. Poi lavorare a coste (3 m dir, 3 m rov) fino a quando il colletto misura 10-10-12-12 cm. Intrecciare a coste. Piegare le coste a metà verso il rovescio del lavoro e affrancare. CONFEZIONE: Cucire le aperture sotto le maniche. -------------------------------------------------------- SCIARPA: COSTE INGLESI: 1° f (rovescio del lavoro): 1 m dir (m di vivagno a m legaccio), *1 m dir, 1 gettato, passare 1 m a rov*, ripetere *-* fino alle ultime 2 m, 2 m dir. 2° f (diritto del lavoro): 1 m dir (m di vivagno a m legaccio), *1 gettato, passare 1 m a rov senza lavorarla, lavorare insieme a dir la m successiva e il gettato del f precedente*, ripetere *-* fino alle ultime 2 m, 1 gettato, passare 1 m a rov senza lavorarla, 1 m dir (m di vivagno lavorata a m legaccio). 3° f (rovescio del lavoro): 1 m dir (m di vivagno), *lavorare insieme a dir la m successiva e il gettato dal f precedente, 1 gettato, passare 1 m a rov senza lavorarla*, ripetere *-* fino alle ultime 2 m + gettato del f precedente, lavorare insieme a dir la m successiva e il gettato, 1 m dir. Ripetere i f 2 e 3 su tutte le m. SCIARPA: Avviare senza stringere 13 m e lavorare a coste inglesi – leggere le spiegazioni sopra. Intrecciare quando il lavoro misura circa 150 cm. |
|
 |
|
Avete terminato questo modello?Allora taggate le vostre foto con #dropspattern o inviatele alla #dropsfan gallery. Avete bisogno di aiuto con questo modello?Troverete 31 video tutorial, una sezione per i commenti/domande e molto altro guardando il modello su www.garnstudio.com © 1982-2026 DROPS Design A/S. Ci riserviamo tutti i diritti. Questo documento, compreso tutte le sue sotto-sezioni, è protetto dalle leggi sul copyright. Potete leggere quello che potete fare con i nostri modelli alla fine di ogni modello sul nostro sito. |
|


Con oltre 40 anni di esperienza nel design di modelli di maglia e uncinetto, DROPS Design offre la più estesa collezione di modelli gratuiti su internet - tradotti in 17 lingue. Ad oggi vi possiamo fornire 324 cataloghi e 12290 modelli - 9561 dei quali sono tradotti in Italiano.
Ci stiamo impegnando molto per darvi il meglio che vi possiamo offrire in termini di maglia e uncinetto, ispirazioni e consigli così come filati di grande qualità ad un prezzo incredibile! Volete utilizzare i nostri modelli per qualcosa d'altro oltre al vostro uso personale? Potete leggere tutto ciò che è consentito nel testo sul Copyright in basso su tutte le pagine dei nostri modelli. Buon lavoro!
Lasciare un commento sul modello DROPS 85-2
Noi saremmo felici di ricevere i tuoi commenti e opinioni su questo modello!
Se vuoi fare una domanda, fai per favore attenzione a selezionare la categoria corretta nella casella qui sotto per velocizzare il processo di risposta. I campi richiesti sono indicati da *.