
Categorie popolari
State cercando un filato?


Commenti / Domande (68)
![]() Catherine ha scritto:
Catherine ha scritto:
Je ne comprends pas comment augmenter une maille de chaque côté du raglan et en même temps faire le point fantaisie A1 Ça ne vas jamais tomber juste…
06.04.2026 - 17:15DROPS Design ha risposto:
Bonjour Catherine, effectivement, en augmentant 1 maille, le motif ne sera pas "complet", mais il faut simplement intégrer les nouvelles mailles au point fantaisie; après les mailles du raglan, tricotez la nouvelle maille comme la maille qui précède celles qui sont sur l'aiguille gauche (lisez le motif de gauche à droite) et avant les mailles du raglan, tricotez les nouvelles mailles comme un nouveau motif (lisez le motif de droite à gauche). Ainsi, le point fantaisie va s'élargir de chaque côté. Bon tricot!
08.04.2026 - 12:21
![]() Kate ha scritto:
Kate ha scritto:
I am a bit mystified by this pattern. Everything was going well on the neck ribbing. However, as I begin the yarn over increases, the video tutorial suggests this creates a hole. The instructions further suggest that continuing the A1 pattern will somehow twist the hole to close it, however the closure has not materialized for me. What am I missing? How do you close the hole created by the yarn over method, or are there supposed to be holes?
10.03.2026 - 00:53DROPS Design ha risposto:
Hi Kate, The yarn overs are worked twisted on the next round (by working through the back stitch-loop of the yarn over). There should not be holes. Here is a link to our video showing you how to knit through the back loop: https://www.garnstudio.com/video.php?id=1886&lang=us Regards, Drops Team.
10.03.2026 - 06:49
![]() OUDIN ha scritto:
OUDIN ha scritto:
Bonjour, combien de pelotes de drops merino extra fine faut-il commander pour un pull taille 3/4 et la référence exacte ? je ne trouve pas l'information. merci pour votre réponse
21.02.2026 - 13:50DROPS Design ha risposto:
Bonjour Mme Oudin, vous trouverez la quantité nécessaire pour chaque taille dans l'onglet "Explications" en haut de page, en taille 3/4 ans par exemple, il vous faudra 300 g DROPS Merino Extra Fine / 50 g la pelote = 6 pelotes. Bon tricot!
23.02.2026 - 08:07
![]() Isabelle ha scritto:
Isabelle ha scritto:
Moet ik de raglan lijn aan houden als ik klaar ben met meerderen? ik moet nu gewoon verder met het lijf, maar dit is mij net niet helemaal duidelijk
11.02.2026 - 21:30DROPS Design ha risposto:
Dag Isabelle,
Als het goed is heb je aan het begin van de naald een markeerdraad geplaatst en als je klaar bent met de meerderingen voor de raglan en het werk moet verdelen voor het lijf en de mouwen, verdeel je de steken zoals aangegeven in het patroon. Ik weet niet uit mijn hoofd of de raglanlijnen dan bij het lijf komen of bij de mouwen, maar als je het aantal aangegeven steken aanhoudt, dan komt het goed.
12.02.2026 - 19:25
![]() Siv ha scritto:
Siv ha scritto:
Nei, for maske tall til str 5/6 år (88m) er uten om de 2 rette maskene x4 i raglanmønsteret. 14 m til ermene, 2 raglan masker x 4, 30 m til for og bakstykke inkl økning av 4 masker før raglan. 14x2 + 30 x2 =88 m. Pluss 2 x 4 raglan masker = 94 m. Etter første raglan er det 168 m på pinnen + 8 raglan masker. Etter siste raglan økning ( 12 på for og bakstykket 48 m, og 6 på skulder/ermer 24 m ) er maskeantallet 240 + 8 raglan masker.
06.02.2026 - 12:03
![]() Siv ha scritto:
Siv ha scritto:
Jeg er ferdig med raglan og skal dele arbeidet i ermer og for- og bakstykke. Men de to x 4 rett-maskene til raglan er ikke med i tellingen på total antall masker før delingen til ermer. Hva gjør man med de 8 maskene? Jeg har 248 masker på pinnen ikke 240. Så delingen blir ikke riktig på antall masker.
05.02.2026 - 11:22DROPS Design ha risposto:
Hei Siv, Det høres ut som om du har økt 1 gang for mange til raglan. Hvis du ikke har lyst til å strikke opp, kan du bare dele til bol og ermer med 1 ekstra maske på begynnelsen og slutten av hvert erme og begynnelsen og slutten av både for- og bakstykket. Hilsen Drops Team.
06.02.2026 - 07:10
![]() Linda ha scritto:
Linda ha scritto:
When continuing to increase every 2nd round on front/back and 4th on sleeves, I am confused which markers I should be using and if it is only 1 side of specific markers when it's an increase of only 4.
20.01.2026 - 19:22DROPS Design ha risposto:
Hi Linda, Yes, when only increasing on the front and back pieces you increase AFTER the 2 knitted stitches with markers 2 and 4 (at the beginning of the front and back pieces) and BEFORE the 2 knitted stitches with markers 3 and 1 (the end of the front and back pieces). When increasing on both the body and sleeves you increase before and after all sets of 2 knitted stitches. Regards, Drops Team.
21.01.2026 - 08:05
![]() Francoise Bezencon Nguyen ha scritto:
Francoise Bezencon Nguyen ha scritto:
Bonjour j ai terminé le pull 3 ans ,je veux faire le modèle 2 ans, je ne suis pas satisfaite des diminutions sous les manches. Ma question : est ce que je dois garder les 2 mailles endroits tout au long de la manche de chaque côté du fil marqueur, et cela fait une bande, comme pour le raglan? Merci
24.12.2025 - 10:02DROPS Design ha risposto:
Bonjour Mme Bezencon Nguyen, tout à fait, sous la manche, on va avoir 2 mailles endroit et on diminue de chaque côté de ces 2 mailles endroit; vous pouvez - si vous le préférez, tricoter ces mailles en point fantaisie et adapter les diminutions en conséquence. Bon tricot!
02.01.2026 - 12:09
![]() Pernilla ha scritto:
Pernilla ha scritto:
Ska mönstret vara dubbel mosstickning eller blir den förskjuten? Får inte till det, har repat upp massa gånger.
22.12.2025 - 08:28DROPS Design ha risposto:
Hei Pernilla. Ja, genseren strikkes i typ dubbel mosstickning, men med 1 omgang med rettmasker mellom (se diagram A.1). mvh DROPS Design
22.12.2025 - 11:37
![]() Kulic Snjezana ha scritto:
Kulic Snjezana ha scritto:
Sind die zwei re.Maschen die Raglanlienie oder muss ich zwischen den 2 re. Ma eine Raglan Ma schtricken
13.12.2025 - 15:15DROPS Design ha risposto:
Liebe Frau Kulik, die 2 rechten Maschen sind die Raglanlinien. Viel Spaß beim Stricken!
15.12.2025 - 11:53
|
|||||||
Winter Weekend#winterweekendsweater |
|||||||
 |
 |
||||||
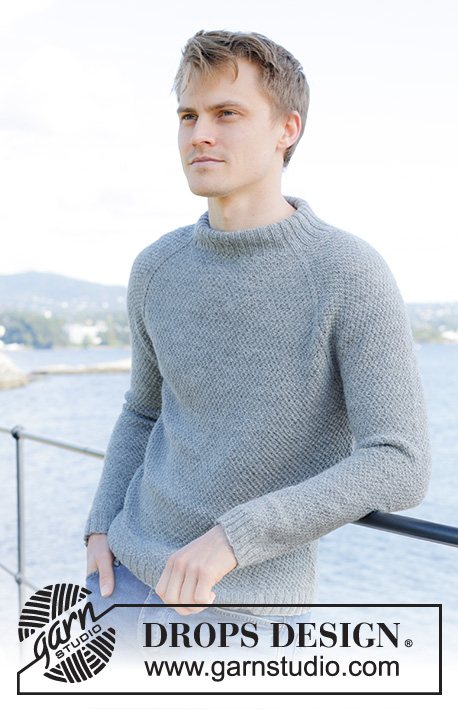
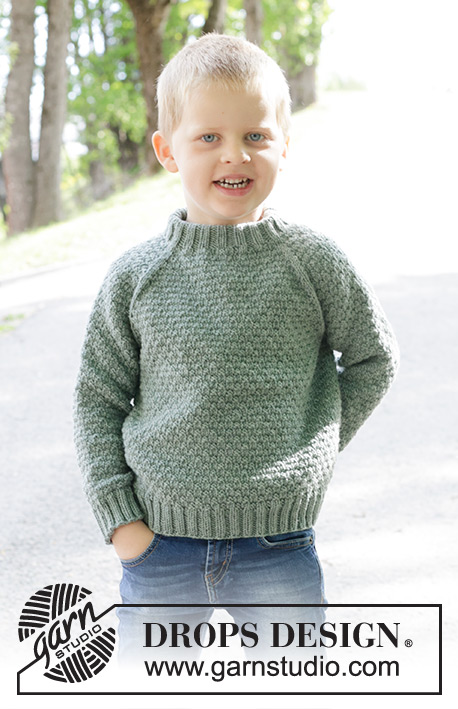
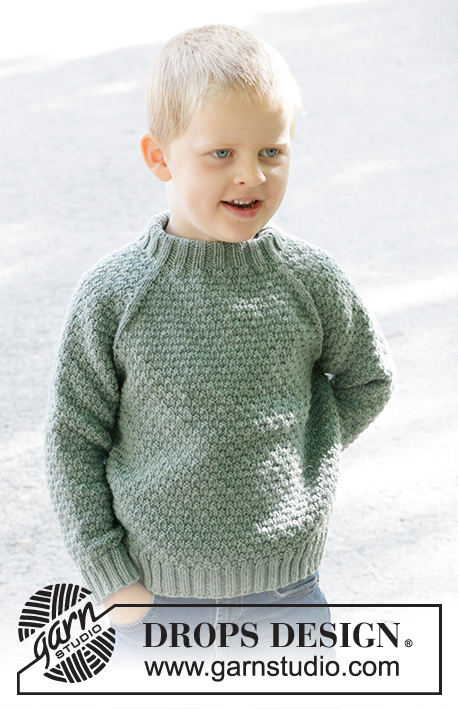
Maglione per bambini lavorato ai ferri in DROPS Merino Extra Fine o DROPS Fiesta. Lavorato dall’alto in basso con motivo in rilievo, collo doppio e raglan. Taglie: 2 – 12 anni.
DROPS Children 47-33 |
|||||||
|
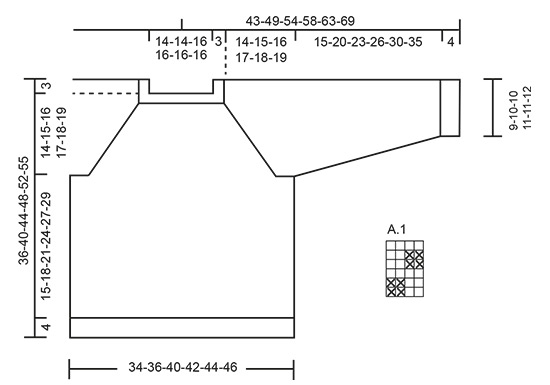
------------------------------------------------------- TECNICHE IMPIEGATE: ------------------------------------------------------- SUGGERIMENTO PER GLI AUMENTI: Aumentare 1 maglia facendo 1 gettato, che viene lavorato a ritorto sul giro successivo per evitare buchi. MOTIVO: Vedere il diagramma A.1. RAGLAN: Aumentare 1 maglia prima/dopo 2 maglie diritto in ogni punto di passaggio tra il corpo e le maniche, i segnapunti sono tra queste 2 maglie (8 aumenti sul giro). Aumentare 1 maglia facendo 1 gettato, che viene lavorato a diritto/rovescio in A.1 sul giro successivo per evitare buchi. SUGGERIMENTO PER LE DIMINUZIONI (applicato alle maniche): Diminuire 1 maglia a ogni lato del segnapunti come segue: Lavorare fino a quando rimangono 3 maglie prima del segnapunti, 2 maglie insieme a diritto, 2 maglie diritto (il segnapunti è al centro di queste 2 maglie), passare 1 maglia a diritto senza lavorarla, 1 maglia diritto, accavallare la maglia passata sopra quella appena lavorata. ------------------------------------------------------- INIZIO DEL LAVORO: ------------------------------------------------------- MAGLIONE – BREVE RIASSUNTO DEL LAVORO: Lavorare il collo e lo sprone in piano con i ferri circolari, dall’alto in basso. Dividere lo sprone per il corpo e le maniche e continuare il corpo in tondo con i ferri circolari. Lavorare le maniche in tondo con i ferri circolari corti/ferri a doppia punta. COLLO DOPPIO: Avviare 80-80-88-88-88-88 maglie con DROPS Merino Extra Fine o DROPS Fiesta, usando i ferri circolari corti n° 3 e 4 mm tenuti insieme. Eliminare i ferri n° 4 mm (questo vi conferisce un bordo di avvio elastico). Lavorare a coste in tondo come segue: 1 maglia diritto, * 2 maglie rovescio, 2 maglie diritto *, lavorare *-* fino a quando rimangono 3 maglie, 2 maglie rovescio, 1 maglia diritto. Lavorare queste coste per 6 cm. SPRONE: Passare ai ferri circolari n° 4 mm. Inserire 4 segnapunti e aumentare in modo uniforme come segue: NOTA: inserire i segnapunti tra 2 maglie diritto e indicano le linee del raglan. L’inizio del giro è tra il dietro e la manica destra. Inserire il segnapunti 1 all’inizio del giro, 1 maglia diritto, 14 maglie diritto (manica destra), 2 maglie diritto e inserire il segnapunti 2 tra queste 2 maglie, lavorare 22-22-26-26-26-26 maglie diritto e aumentare 4-4-4-4-8-8 maglie in modo uniforme su queste maglie – leggere il SUGGERIMENTO PER GLI AUMENTI (= 26-26-30-30-34-34 maglie sul davanti), 2 maglie diritto e inserire il segnapunti 3 tra queste 2 maglie, 14 maglie diritto (manica sinistra), 2 maglie diritto e inserire il segnapunti 4 tra queste 2 maglie, 22-22-26-26-26-26 maglie diritto e aumentare 4-4-4-4-8-8 maglie in modo uniforme su queste maglie (= 26-26-30-30-34-34 maglie sul dietro), 1 maglia diritto = 88-88-96-96-104-104 maglie. Lavorare A.1 in tondo con 2 maglie diritto in ogni linea del raglan e aumentare per il raglan. FARE ATTENZIONE ALLA TENSIONE DEL LAVORO! Aumentare per il RAGLAN a ogni lato di tutti e 4 gli aumenti – leggere la descrizione sopra, ogni 2 giri 9-9-9-9-9-7 volte = 160-160-168-168-176-160 maglie. Continuare ad aumentare ogni 2 giri ma a giri alterni lavorare gli aumenti solo sul dietro e davanti (4 aumenti), cioè aumentare sul davanti e dietro ogni 2 giri e sulle maniche ogni 4 giri. Aumentare in questo modo 10-12-12-14-14-18 volte sul davanti e dietro (5-6-6-7-7-9 volte sulle maniche) = un totale di 19-21-21-23-23-25 volte sul davanti e dietro e 14-15-15-16-16-16 volte sulle maniche. Dopo l’aumento finale, ci sono 220-232-240-252-260-268 maglie. Continuare il motivo ma senza ulteriori aumenti fino a quando lo sprone misura 14-15-16-17-18-19 cm dal collo. Sul giro successivo dividere il lavoro per il corpo e le maniche: mettere le prime 44-46-46-48-48-48 maglie successive in sospeso senza lavorarle (manica), avviare 6-6-10-10-10-10 maglie sotto la manica, lavorare 66-70-74-78-82-86 maglie come prima (davanti), mettere le 44-46-46-48-48-48 maglie successive in sospeso senza lavorarle (manica), avviare 6-6-10-10-10-10 maglie sotto la manica, lavorare le ultime 66-70-74-78-82-86 maglie come prima (dietro). Finire il corpo e le maniche in modo separato. Ora misurare il lavoro da qui! CORPO: = 144-152-168-176-184-192 maglie. Continuare in tondo per altri 15-18-21-24-27-29 cm. Lavorare 1 giro diritto e aumentare 20-24-24-28-28-28 maglie in modo uniforme – ricordarsi del SUGGERIMENTO PER GLI AUMENTI = 164-176-192-204-212-220 maglie. Passare ai ferri circolari n° 3 mm. Lavorare a coste (2 maglie diritto, 2 maglie rovescio per 4 cm. Intrecciare senza stringere. Il maglione misura circa 36-40-44-48-52-55 cm dalla spalla. MANICHE: Riportare le 44-46-46-48-48-48 maglie in sospeso a un lato del lavoro sui ferri a doppia punta n° 4 mm e riprendere 1 maglia in ognuna delle 6-6-10-10-10-10 maglie avviate sotto la manica = 50-52-56-58-58-58 maglie. Inserire un segnapunti al centro delle nuove maglie e lasciare che segua il lavoro. Iniziare all’altezza del segnapunti e continuare il motivo in tondo. Quando la manica misura 2-2-2-3-3-3 cm, diminuire 1 maglia a ogni lato del segnapunti - leggere il SUGGERIMENTO PER LE DIMINUZIONI. Diminuire in questo modo ogni 2-3-3½-4-6-9 cm per un totale di 6-6-6-6-5-4 volte = 38-40-44-46-48-50 maglie. Continuare a lavorare fino a quando la manica misura 15-20-23-26-30-35 cm dalla divisione (o fino alla lunghezza desiderata. Mancano circa 4 cm). Lavorare 1 giro diritto e aumentare 10-8-8-6-8-6 maglie in modo uniforme = 48-48-52-52-56-56 maglie. Passare ai ferri a doppia punta n° 3 mm e lavorare a coste (2 maglie diritto, 2 maglie rovescio) per 4 cm. Intrecciare. La manica misura circa 19-24-27-30-34-39 cm dalla divisione. Lavorare l’altra manica nello stesso modo. CONFEZIONE: Cucire il collo a metà verso l’interno e affrancare con un paio di punti. |
|||||||
Spiegazioni del diagramma |
|||||||
|
|||||||
 |
|||||||
Avete terminato questo modello?Allora taggate le vostre foto con #dropspattern #winterweekendsweater o inviatele alla #dropsfan gallery. Avete bisogno di aiuto con questo modello?Troverete 29 video tutorial, una sezione per i commenti/domande e molto altro guardando il modello su www.garnstudio.com © 1982-2026 DROPS Design A/S. Ci riserviamo tutti i diritti. Questo documento, compreso tutte le sue sotto-sezioni, è protetto dalle leggi sul copyright. Potete leggere quello che potete fare con i nostri modelli alla fine di ogni modello sul nostro sito. |
|||||||


Con oltre 40 anni di esperienza nel design di modelli di maglia e uncinetto, DROPS Design offre la più estesa collezione di modelli gratuiti su internet - tradotti in 17 lingue. Ad oggi vi possiamo fornire 324 cataloghi e 12290 modelli - 9561 dei quali sono tradotti in Italiano.
Ci stiamo impegnando molto per darvi il meglio che vi possiamo offrire in termini di maglia e uncinetto, ispirazioni e consigli così come filati di grande qualità ad un prezzo incredibile! Volete utilizzare i nostri modelli per qualcosa d'altro oltre al vostro uso personale? Potete leggere tutto ciò che è consentito nel testo sul Copyright in basso su tutte le pagine dei nostri modelli. Buon lavoro!
Lasciare un commento sul modello DROPS Children 47-33
Noi saremmo felici di ricevere i tuoi commenti e opinioni su questo modello!
Se vuoi fare una domanda, fai per favore attenzione a selezionare la categoria corretta nella casella qui sotto per velocizzare il processo di risposta. I campi richiesti sono indicati da *.