
Categorie popolari
State cercando un filato?


Commenti / Domande (7)
![]() Lena ha scritto:
Lena ha scritto:
Fattar inte, strl S, lägg upp 250 m, sen minska 9 m och senare minska 11 m. Jag får det till 230 m och inte 194 m som det står i mönstret. Vad är det jag gör fel?
19.07.2025 - 21:31DROPS Design ha risposto:
Hei Lena. Du skal felle 9 masker når arbeidet måler 15 cm, 9 masker når arbeidet måler 20 cm, 9 masker når arbeidet måler 25 cm, 9 masker når arbeidet måler 30 cm og 9 masker når arbeidet måler 35 cm = 45 feltemasker og når arbeidet måler 40 cm felles det 11 masker. Så da er det felt 56 masker etter siste fellingen = 250 masker - 56 felte masker = 194 masker. mvh DROPS Design
11.08.2025 - 09:55
![]() Breige McShane ha scritto:
Breige McShane ha scritto:
I need clarification on the pattern for the sleeve decrease. For size L decrease 2 sts 9 times and 4 sts 3 times. Is it 2 sts on each side or 1 sts each side. It would be extremely helpful if you would give me the number of stitches left before bind off and then I would know.
26.04.2021 - 16:59DROPS Design ha risposto:
Dear Breige, the decreases for the armholes for each side. (So it is 2 stitch, 9 times on each side, etc.) HappyKnitting!
26.04.2021 - 17:58
![]() Breige McShane ha scritto:
Breige McShane ha scritto:
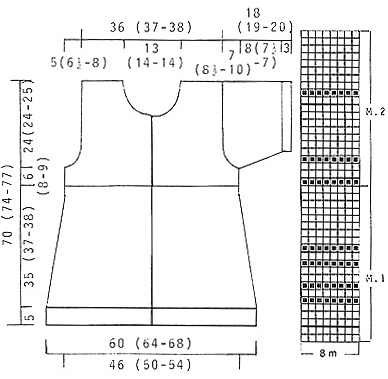
Hello, I am confused with the chart and the picture. They do not look the same! Does the chart begin with 5 knit rows or 1k, 1p, 1k, 1p, 1k. The diagram indicates that the clear box is knit and the box with a dot is pearl. I do not see that matching the garment picture.
12.03.2021 - 07:36DROPS Design ha risposto:
Dear Mrs McShane, the diagram shows the pattern seen from RS, ie all white squares will be worked in stocking stitch (= knit seen from RS but purl seen from WS) and the black squares should be worked in reversed stocking stitch (= either purl if this is a row to work from RS or knit if this is a row to work from WS). Happy knitting!
12.03.2021 - 08:44
![]() Sheila Fish ha scritto:
Sheila Fish ha scritto:
I love the look of this pattern but is the finished length correct? I was planning to make the Large size as I am a UK 16-18 but 136 cm is nearly as tall as I am! How tall is that model ?? Regards Sheila
27.04.2020 - 16:41DROPS Design ha risposto:
Dear Mrs Fish, in size L these jacket measures 77 cm from shoulder to bottom edge: 5 cm edge + 38+9 cm to armholes + 25 cm armholes. Happy knitting!
28.04.2020 - 09:58
![]() Evi ha scritto:
Evi ha scritto:
I am not sure about my size I am 163 cm tall and I weigh 62 kilos. My bra size is UK 36C Please help me decide the correct size for this garment
08.02.2020 - 06:25DROPS Design ha risposto:
Dear Evi, please check the measurements on the schematic drawings and compare them to your measurements.. Also, you can take a similar style sweater that fits you comfortably, and compare its measurements to those given at the drawing. Happy Crafting!
10.02.2020 - 04:23
![]() Monniek Leendertse ha scritto:
Monniek Leendertse ha scritto:
Bij dit patroon is geen teltekening afgebeeld. Kunt u dat alstublieft plaatsen? Ik wil het vest graag voor de zomer breien. Dank u!
03.01.2018 - 17:27DROPS Design ha risposto:
Hallo Monniek, Bedankt voor het doorgeven. Het telpatroon is nu geplaatst. Veel brei plezier!
05.01.2018 - 11:52
![]() Karin H ha scritto:
Karin H ha scritto:
"fortsätt med ränder" står det i beskrivning, så jag fortsatte med mönstret som bestod av ränder. Nu när allt är klart ser jag på bilden att det skulle ha varit RÄTSTICKNING. Otydligt!
13.04.2014 - 20:57DROPS Design ha risposto:
Hej Karin. Du har ret, det er desvaerre en fejl i oversaettelsen. Vi skal faa det rettet hurtigst muligt. Tak for meldingen.
16.04.2014 - 13:14
|
|||||||
Southern Holidays |
|||||||
|
|
|||||||
Cardigan lungo DROPS ai ferri, con maniche corte, in Muskat
DROPS 50-15 |
|||||||
|
MOTIVO: Vedere i diagrammi M1 e M2. I diagrammi mostrano il motivo, visto sul diritto del lavoro. PUNTO LEGACCIO (avanti e indietro sui ferri) Lavorare tutte le m a dir. PUNTO LEGACCIO (in tondo): Giro 1: lavorare tutte le m a dir. Giro 2: lavorare tutte le m a rovescio. Ripetere questi due giri. ASOLE: Quando il lavoro misura 40 (42-43) cm e quando si inizia lo sprone a punto legaccio, aprire la prima asola sul bordo davanti destro. Aprire poi le asole successive sul bordo davanti destro quando lo sprone misura 4,5 (5-5) cm, 8,5 (9,5 - 10) cm, 12,5 (14-15) cm, 16,5 (18,5-20) cm, e 21 (23-25) cm, come segue: Intrecciare la 3a e la 4a m dal bordo; al ferro successivo avviare 2 m sopra le maglie intrecciate. ------------------------------------------------------- DAVANTI e DIETRO: Si lavorano avanti e indietro sui ferri circolari. Avviare 250 (266-282) m. Lavorare a punto legaccio per 5 cm. Lavorare le prime e le ultime 5 m a punto legaccio per i bordi davanti. Lavorare il diagramma M1 una volta in verticale e poi lavorare il diagramma M2; ripetere il diagramma M2 fino alla fine del lavoro. ALLO STESSO TEMPO, quando il lavoro misura: 15,20,25,30 e 35 cm, diminuire 9 (9-9) m a intervalli regolari sul ferro; quando il lavoro misura 40 (42-43) cm diminuire 11 (11-11) m a intervalli regolari sul ferro: rimangono 194 (210-226) m. Da adesso in avanti, proseguire a punto legaccio per lo sprone e aprire le asole sul bordo davanti destro (vedere le spiegazioni sopra). Quando il lavoro misura 46 (50-52) cm, lavorare il ferro successivo come segue: 49 (53-57) m per il davanti, intrecciare le 4 m successive per lo scalfo, 88 (96-104) m per il dietro, intrecciare le 4 m successive per lo scalfo, 49 (53-57) m per il davanti. Finire ogni parte separatamente. DAVANTI: 49 (53-57) m. Intrecciare per lo scalfo ogni 2 ferri, come segue: 2 m 2 (3-4) volte, 1 m 4 (5-6) volte = 41 (42-43) m. Quando il lavoro misura 62 (66-69) cm, intrecciare per lo scollo ogni 2 ferri, come segue: 9 (10-10) m 1 volta, 2 m 3 volte, 1 m 2 volte; poi ogni 4 ferri: 1 m 1 volta. Intrecciare le restanti m quando il lavoro misura 70 (74-77) cm. DIETRO: 88 (96-104) m. Intrecciare per gli scalfi come indicato per il davanti = 72 (74-76) m. Quando il lavoro misura 68 (72-75) cm, intrecciare le 22 (24-24) m centrali per lo scollo. Al ferro successivo, intrecciare 2 m da ciascun lato per lo scollo. Intrecciare le restanti m quando il lavoro misura 70 (74-77) cm. MANICHE: Avviare 78 (78-82) m sui ferri a doppia punta. Unire in tondo ponendo attenzione a non attorcigliare le maglie. Inserire un segno all’inizio del giro e lavorare a punto legaccio per 3 cm. Proseguire a maglia rasata e, ALLO STESSO TEMPO, aumentare 1 m da ciascun lato del segno 9 (9-9) volte ogni 2 ferri = 96 (96-100) m. Quando il lavoro misura 11 (10,5-11) cm, intrecciare 2 m da ciascun lato del segno; proseguire avanti e indietro sul ferro. Intrecciare ora per l’arrotondamento della manica da ciascun lato ogni 2 ferri, come segue. Taglia S: 3 m 6 volte, 5 m 2 volte. Taglia M: 3 m 8 volte, 4 m 2 volte. Taglia L: 2 m 9 volte, 4 m 3 volte. Intrecciare tutte le m. Il lavoro misura ca. 18 (19-20) cm. CONFEZIONE: Cucire le spalle. Con i ferri a doppia punta, riprendere ca. 90-100 m intorno allo scollo e sui bordi davanti e lavorare 2 ferri a punto legaccio avanti e indietro. Intrecciare tutte le m. Montare le maniche e attaccare i bottoni. |
|||||||
Spiegazioni del diagramma |
|||||||
|
|||||||
 |
|||||||
Avete terminato questo modello?Allora taggate le vostre foto con #dropspattern o inviatele alla #dropsfan gallery. Avete bisogno di aiuto con questo modello?Troverete 21 video tutorial, una sezione per i commenti/domande e molto altro guardando il modello su www.garnstudio.com © 1982-2026 DROPS Design A/S. Ci riserviamo tutti i diritti. Questo documento, compreso tutte le sue sotto-sezioni, è protetto dalle leggi sul copyright. Potete leggere quello che potete fare con i nostri modelli alla fine di ogni modello sul nostro sito. |
|||||||


Con oltre 40 anni di esperienza nel design di modelli di maglia e uncinetto, DROPS Design offre la più estesa collezione di modelli gratuiti su internet - tradotti in 17 lingue. Ad oggi vi possiamo fornire 324 cataloghi e 12290 modelli - 9561 dei quali sono tradotti in Italiano.
Ci stiamo impegnando molto per darvi il meglio che vi possiamo offrire in termini di maglia e uncinetto, ispirazioni e consigli così come filati di grande qualità ad un prezzo incredibile! Volete utilizzare i nostri modelli per qualcosa d'altro oltre al vostro uso personale? Potete leggere tutto ciò che è consentito nel testo sul Copyright in basso su tutte le pagine dei nostri modelli. Buon lavoro!
Lasciare un commento sul modello DROPS 50-15
Noi saremmo felici di ricevere i tuoi commenti e opinioni su questo modello!
Se vuoi fare una domanda, fai per favore attenzione a selezionare la categoria corretta nella casella qui sotto per velocizzare il processo di risposta. I campi richiesti sono indicati da *.