
Categorie popolari
State cercando un filato?


Commenti / Domande (49)
![]() Fina ha scritto:
Fina ha scritto:
Por un problema en mis manos no puedo tejer con aguja circular como se podría convertir este patrón para dos agujas? Gracias
13.01.2026 - 10:38DROPS Design ha risposto:
Hola Fina, puedes leer esta lección para transformar este patrón. Pero el raglán tendría que trabajarse en circular, mientras que el delantero y la espalda se pueden trabajar con agujas rectas. El raglán solo podría trabajarse con agujas rectas si trabajas de abajo arriba la labor, con una abertura en una de las líneas de raglán en la espalda, pero el número de puntos para trabajar en el raglán sería muy elevado para las agujas rectas.
23.02.2026 - 01:27
![]() Cate ha scritto:
Cate ha scritto:
Hello. I love this pattern. I'm at the bottom bavk (ribbing) and don't understand something on row 1. It says "... on the wrong side... work 1 garter stitch, stocking stitch..." Is a wrong side garter stitch a purl and the stocking stitch a knit?? Or the other way around?
13.12.2025 - 02:14DROPS Design ha risposto:
Hi Cate, Garter stitch is knitted from both the right and wrong side, stocking stitch is knitted from the right side and purled from the wrong side. So from the wrong side you knit the garter stitch and purl the stocking stitches. Regards, Drops Team.
15.12.2025 - 07:43
![]() Elisa ha scritto:
Elisa ha scritto:
Sono riuscita a proseguire nel lavoro,sono a 3 cm dopo aver diviso il corpo dalle maniche :) ma ho ancora un dubbio: quando dovrò fare gli ultimi 6 cm con i ferri 3,x separare il lavoro devo lavorare con i ferri dritti? ( Sto lavorando con i circolari) Grazie
17.10.2025 - 16:39DROPS Design ha risposto:
Buonasera Elisa, dopo aver diviso le parti si prosegue in piano in ferri di andata e ritorno. Può utilizzare sia i ferri dritti che quelli circolari. Buon lavoro!
17.10.2025 - 23:37
![]() Elisa ha scritto:
Elisa ha scritto:
Ho letto la vostra risposta,sí lo so che ai margini di A2 ci sono due maglie a rov e che i gettati vanno fatti prima e dopo queste maglie a rov ma ho provato a lavorare i gettati come indicato e quello prima di A2 non viene =a quello dopo A2 (viene perfetto) ho anche provato a lavorarli entrambi a drt ritorto ,vengono meglio ma non = ,quello prima di A2 viene sempre + molle di quello dopo A2,Se prima e dopo A2 facessi una sola maglia a rov e i gettati prima e dopo il rov potrebbe venir?
12.10.2025 - 13:05
![]() Elisa ha scritto:
Elisa ha scritto:
Ho letto le risposte fornite riguardo ai gettati ma io sto lavorando in circolare,per me il rovescio non esiste. Ho fatto molti tentativi,ho provato a lavorare il gettato prima di A1 facendo un aumento intercalare,poi preso a rov e lavorato a dritto e invece il gettato dopo A2 normalmente a dritto ritorto ma non veniva bene così ho provato a lavorare entrambi con aumento intercalare e poi a dr ritorto e viene meglio ma non bene. Il gettato dopo A2 è perfetto, l' altro ancora un po' mollo :(
11.10.2025 - 23:41DROPS Design ha risposto:
Buongiorno Elisa, gli aumenti per il raglan si lavorano prima del diagramma A.2 e le prime maglie dei due ferri di A.2 sono lavorate a rovescio. Buon lavoro!
12.10.2025 - 09:35
![]() Daniela ha scritto:
Daniela ha scritto:
Ho provato a lavorare i gettati come indicato ma quelli prima di A2 seppur io li passo sul ferro destro,poi li metto ritorti sul ferro sinistro per poi lavorarli a dritto con il ferro di destra,non vengono bene come quelli dopo A2( perfetti) ma mi viene un buchino più grande e come una riga in diagonale che copre il buco sotto.Ho provato anche a fare un aumento intercalare prima di A2 (poi lavorato come indicato nel pattern),viene un po' meglio ma il problema resta cosa fare?
10.10.2025 - 23:56DROPS Design ha risposto:
Buonasera Elisa, provi a vedere se questo videole può essere di aiuto per lavorare i gettati prima di una maglia a rovescio. Buon lavoro!
11.10.2025 - 19:36
![]() Elisa ha scritto:
Elisa ha scritto:
Mi dica se ho capito bene: dal primo giro di aumenti subito dopo aver finito il collo a coste,si lavora il giro dopo con i gettati ritorti ,poi si ripetono gli 8 aumenti,nel giro dopo si fanno ritorti,si continua così fino a 16 volte in cui si è aumentato e poi si alternano 4 e 8 au ogni tot ferri giusto? Posso lavorare i gettati con aumenti intercalari ?iniziando da una maglia prima del marker (prima di A3) e una maglia dopo il marker ( dopo A3)?
10.10.2025 - 01:10DROPS Design ha risposto:
Buonasera Elisa, si, gli aumenti sono corretti. Buon lavoro!
11.10.2025 - 19:34
![]() Elisa ha scritto:
Elisa ha scritto:
Non riesco a fare i gettati prima di A2,li ho fatti come indicato eppure vengono buchi non capisco perché. Non è che essendo nel punto in cui la maglia successiva va lavorata a rov ci sono delle modifiche? Prendo il gettato ritorto e lo lavoro a dritto poi 2 rov poi A2 ma viene con i buchi,invece i gettati dopo A2 mi vengono bene,precisi come devo fare? Attento risposta
09.10.2025 - 23:20DROPS Design ha risposto:
Buonasera Elisa, provi a vedere se questo video la può aiutare a lavorare i gettati prima della maglia rovescio. Buon lavoro!
11.10.2025 - 19:32
![]() Elisa ha scritto:
Elisa ha scritto:
Ho ancora un dubbio sugli aumenti: c'è scritto che si devono fare gli aumenti prima sul davanti e sul dietro (+4) e poi dopo tot ferri altri 4 aumenti nelle linee raglan delle maniche (+4) ho capito bene? Poi non mi è chiaro come alternare gli aumenti, dopo aver fatto il 1 giro di au (+8 tutti insieme nei raglan),il ferro dopo è con i gettati ritorti senza su e ok,quello dopo si devono ripetere gli au nel davanti e nel dietro (+4) e nel ferro dopo ancora si fanno gli altri 4 nelle maniche?
09.10.2025 - 02:10DROPS Design ha risposto:
Buonasera Elisa, deve continuare con gli aumenti indicati fino al numero di maglie riportato nel modello, poi continuare con gli aumenti diversificati tra corpo e maniche. Buon lavoro!
09.10.2025 - 23:49
![]() Daniela ha scritto:
Daniela ha scritto:
Non mi è chiaro il diagramma A1,se lo seguo a me viene una lavorazione a grana di riso su quelle 11 maglie,ho provato e mi vengono 4 sezioni di 11 maglie a grana di riso intervallate dal resto delle maglie tutte a 2 a 2 ma così non credo abbia senso. Dopo aver avviato le maglie,dovrei iniziare il ferro sul dritto del lavoro giusto? Può dirmi come dovrebbero essere lavorate sul dritto le 11 maglie di A1? Io ho fatto 2 rov,3d,1r,3dr,2rov ma credo di aver sbagliato, attendo risposta
07.10.2025 - 21:41DROPS Design ha risposto:
Buonasera Daniela, il modello è lavorato in tondo, per cui non c'è diritto e rovescio del lavoro. Il primo giro è: 2 maglie rovescio, 3 maglie diritto, 1 maglia rovescio, 3 maglie diritto, 2 maglie rovescio. Buon lavoro!
09.10.2025 - 23:46
|
||||||||||||||||
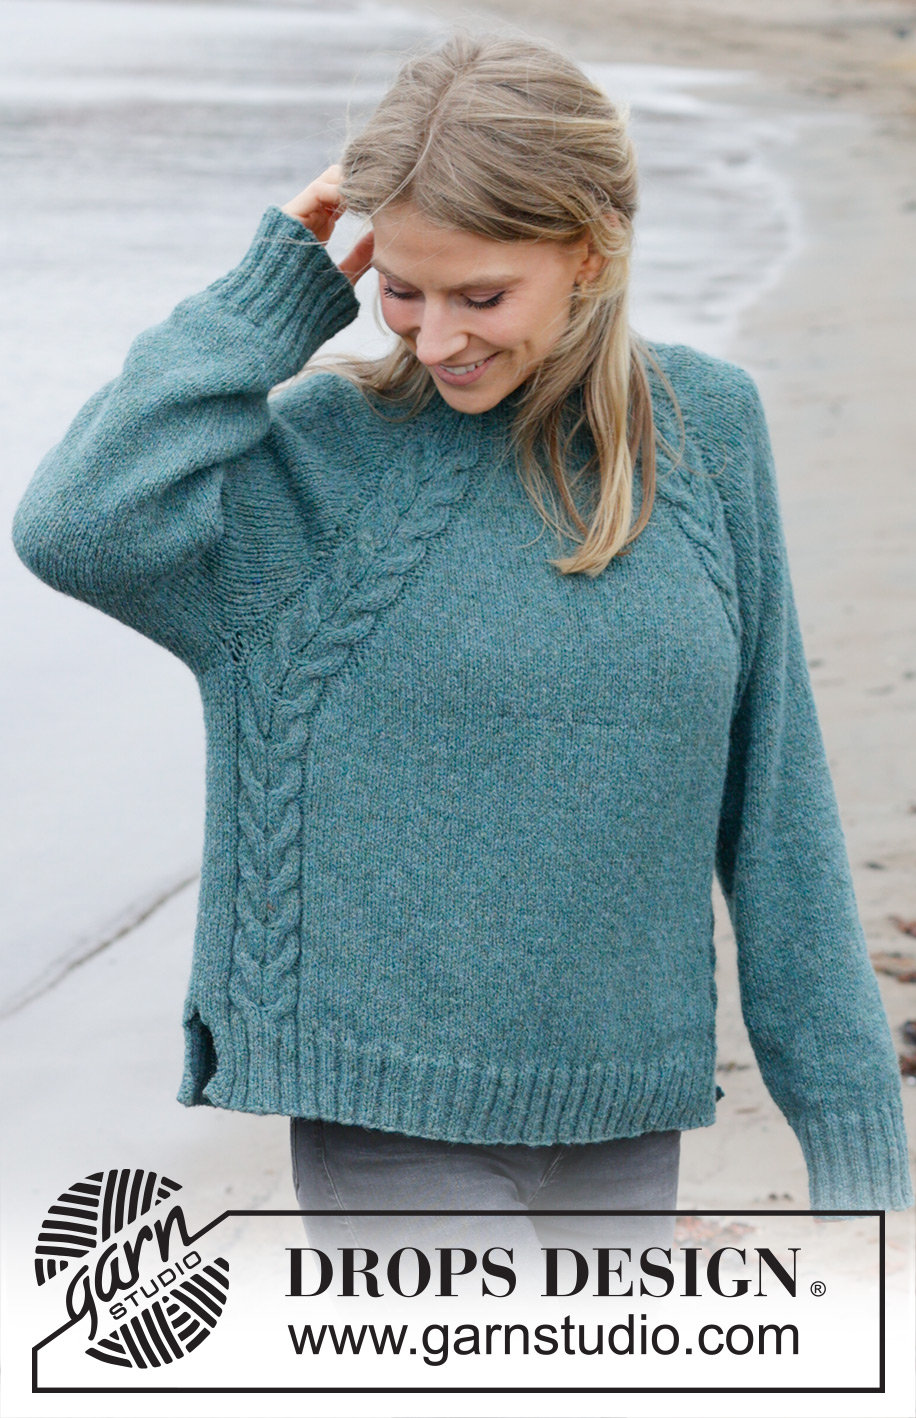
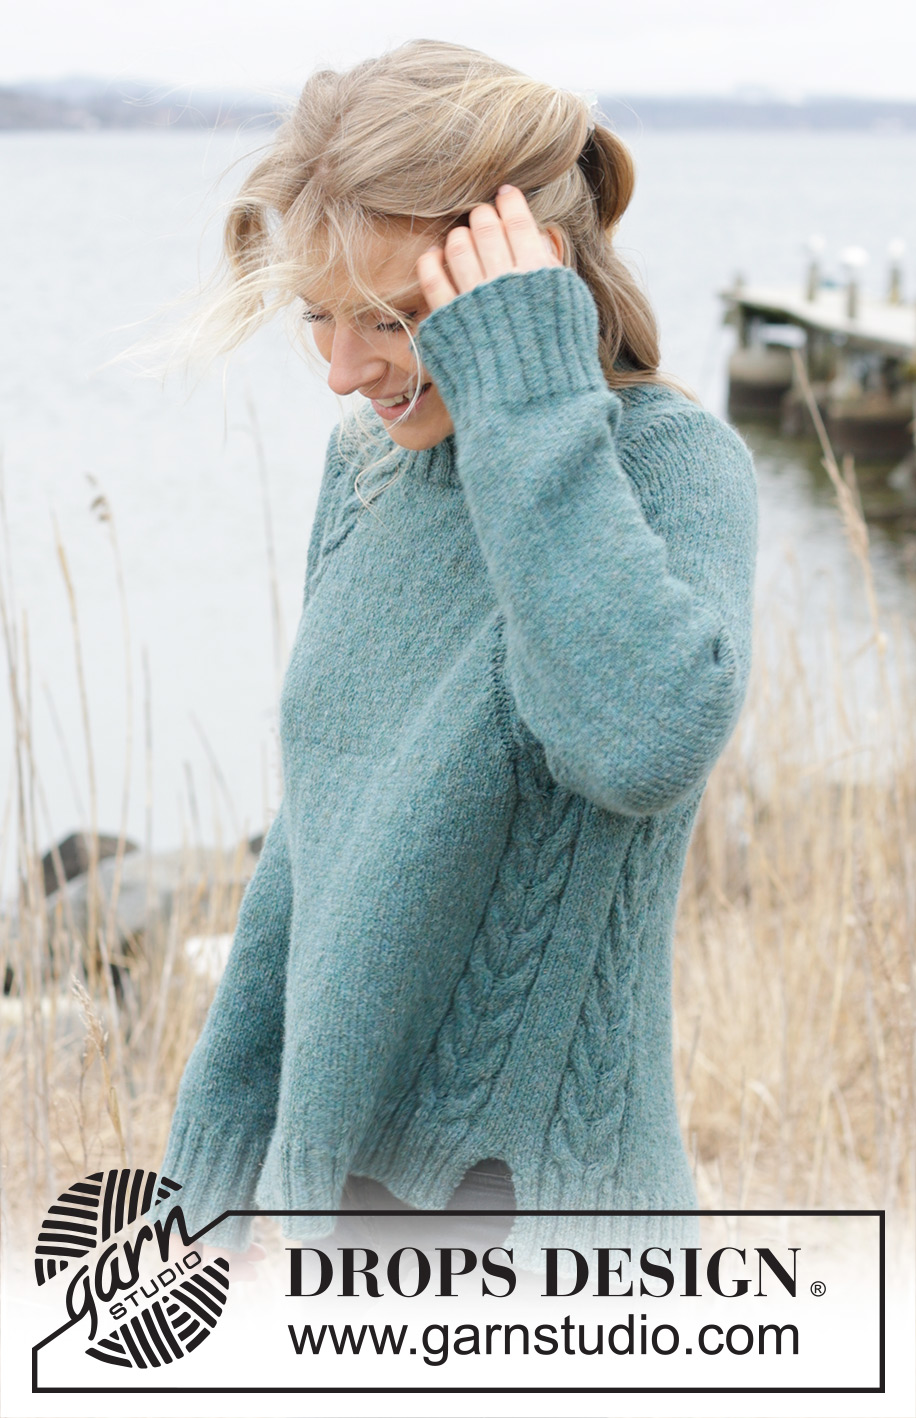
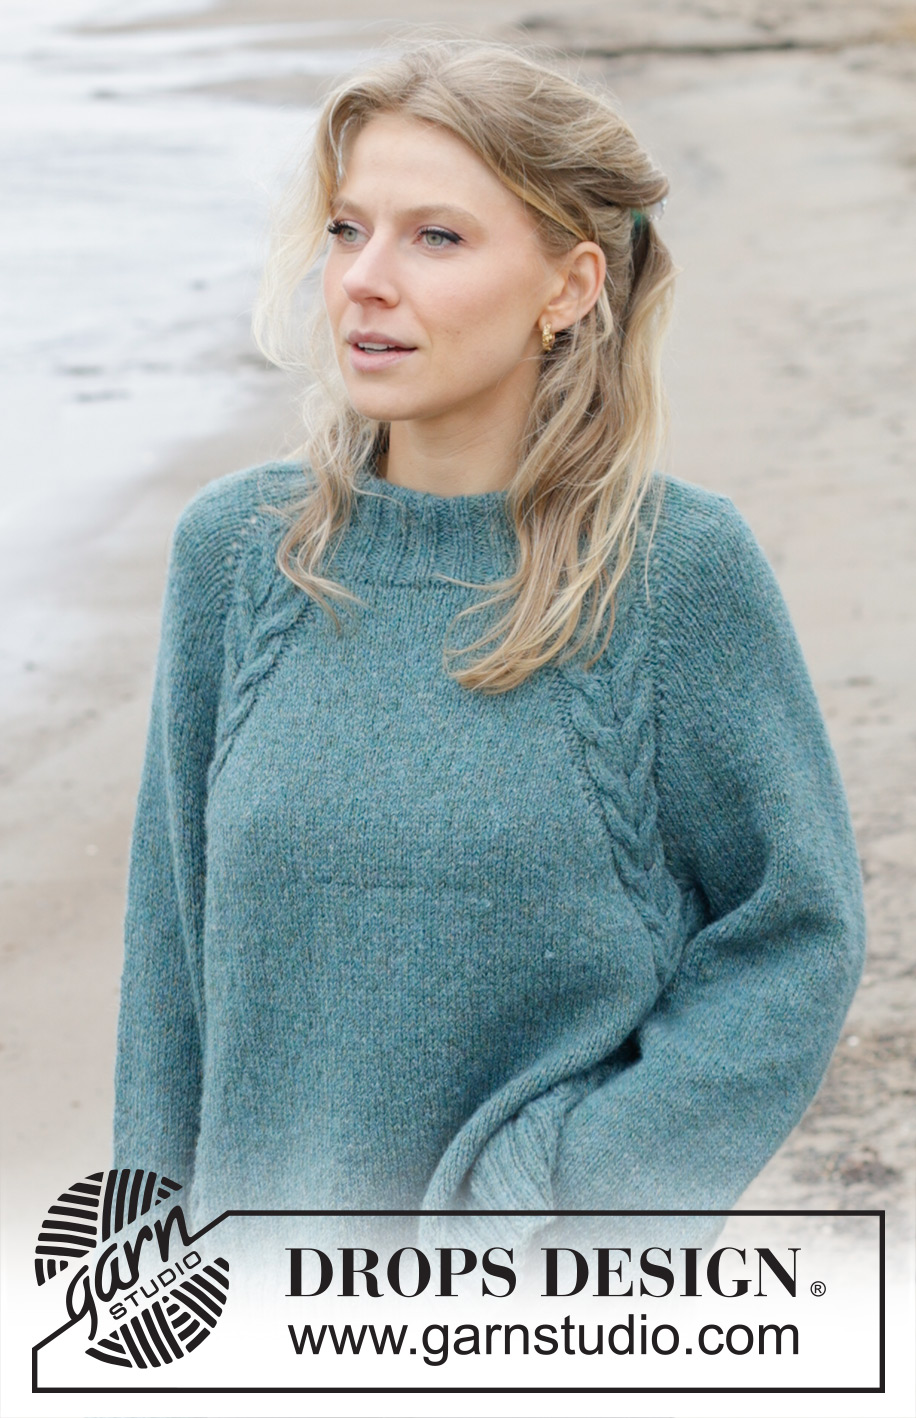
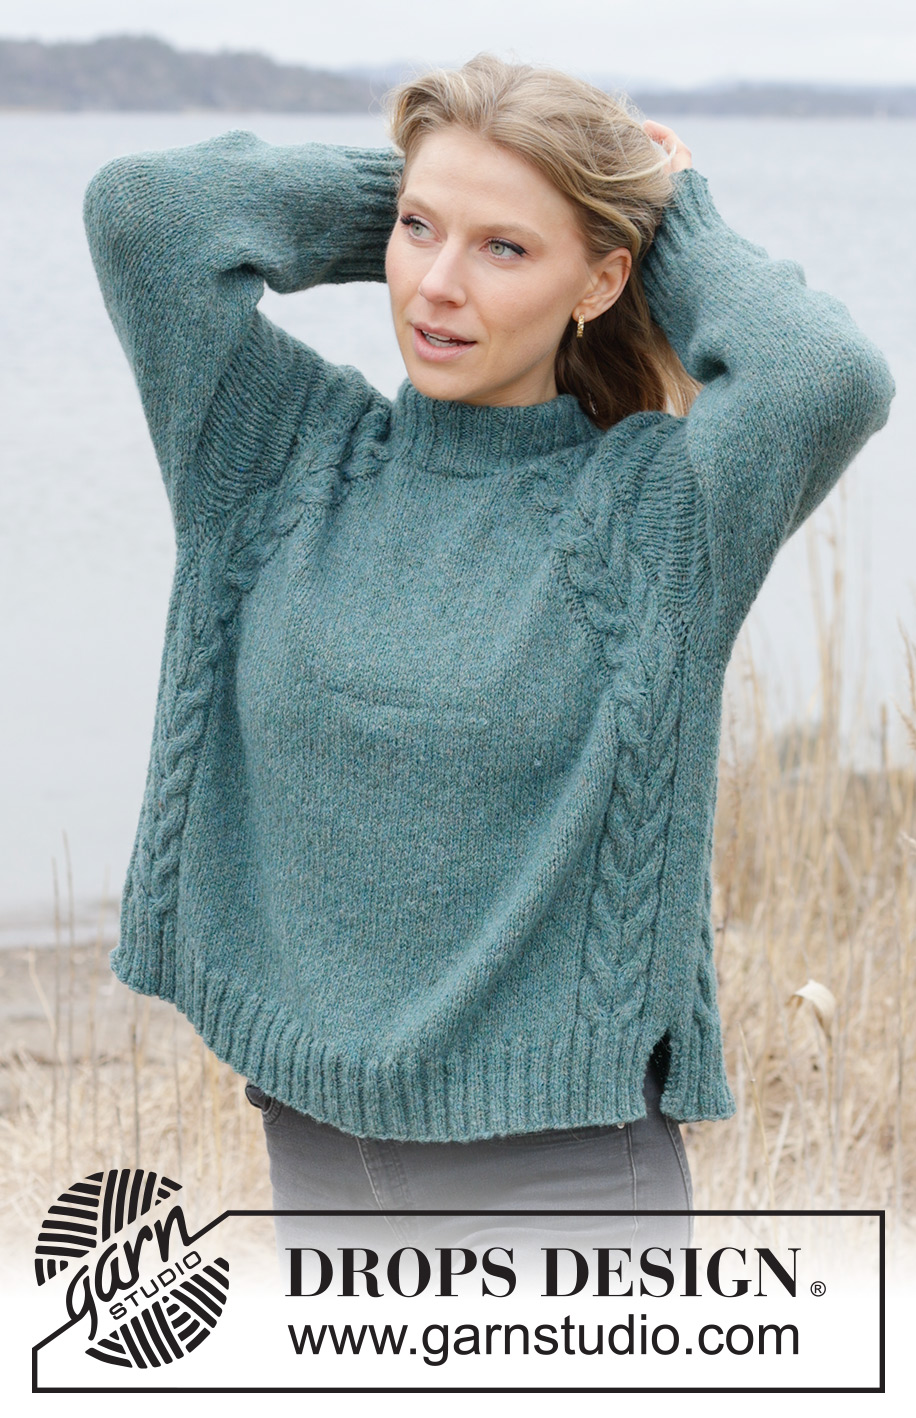
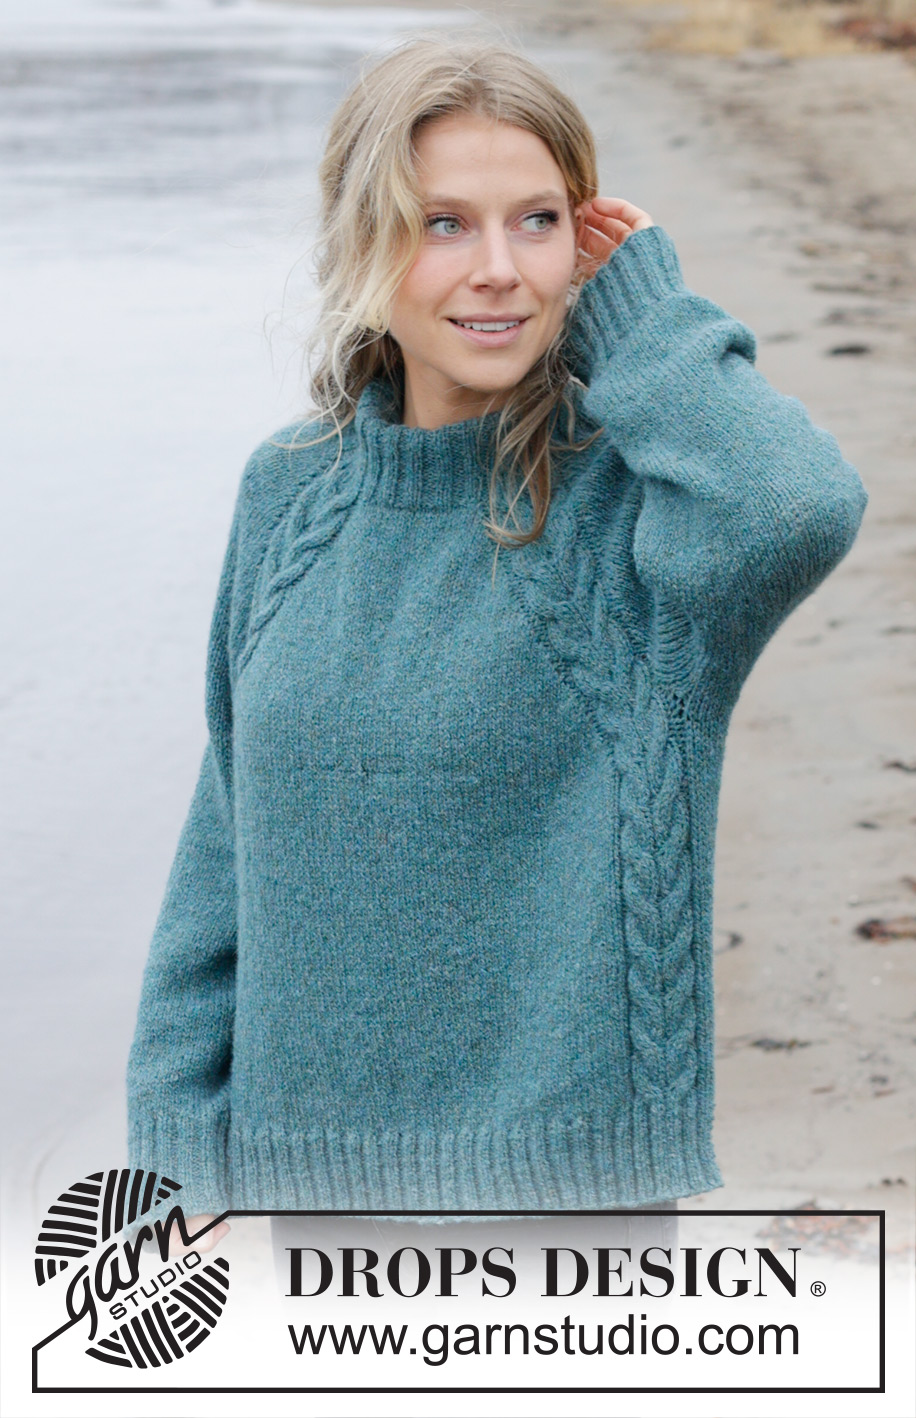
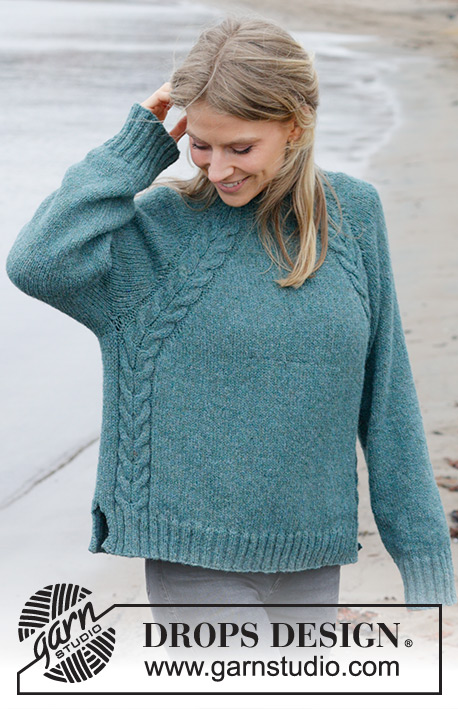
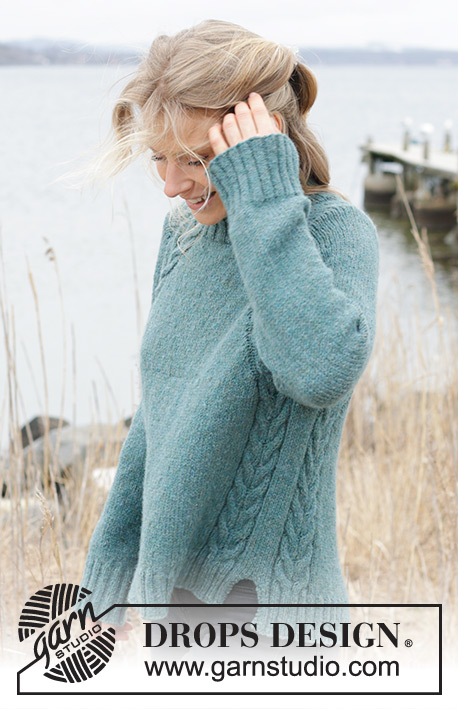
Emerald Lake Sweater#emeraldlakesweater |
||||||||||||||||
 |
 |
|||||||||||||||
Maglione lavorato ai ferri in DROPS Sky. Lavorato dall’alto in basso con collo alto, trecce e spacchi laterali. Taglie: XS - XXL.
DROPS 244-12 |
||||||||||||||||
|
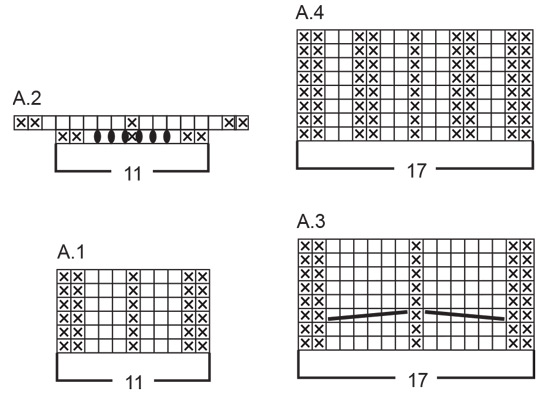
------------------------------------------------------- TECNICHE IMPIEGATE: ------------------------------------------------------- COSTA/MAGLIA LEGACCIO (avanti e indietro): Lavorare tutti i ferri a diritto. 1 costa in altezza = 2 ferri diritto. MODELLO: Vedere i diagrammi A.1 - A.4. RAGLAN: Aumentare 1 maglia dopo/prima di A.2/A.3. Aumentare 1 maglia facendo 1 gettato. Lavorare poi i gettati come segue sul giro successivo: DOPO A.2/A.3: Lavorare il gettato a diritto ritorto – nessun buco. PRIMA DI A.2/A.3: Passare il gettato a diritto, inserire il ferro sinistro e mettere il gettato a ritorto sul ferro sinistro, lavorare il gettato a diritto – nessun buco. SUGGERIMENTO PER GLI AUMENTI: Aumentare 1 maglia facendo 1 gettato, che viene lavorato a rovescio sul ferro/giro successivo per evitare un buco. SUGGERIMENTO PER LE DIMINUZIONI (applicato alle maniche): Diminuire 1 maglia a ogni lato del segnapunti come segue: Lavorare fino a quando rimangono 3 maglie prima del segnapunti, 2 maglie insieme a diritto, 2 maglie diritto (il segnapunti è al centro di queste 2 maglie), passare 1 maglia a diritto senza lavorarla, 1 maglia diritto, accavallare la maglia passata sopra quella appena lavorata. ------------------------------------------------------- INIZIO DEL LAVORO: ------------------------------------------------------- MAGLIONE – BREVE RIASSUNTO DEL LAVORO: Lavorare il collo e lo sprone in tondo con i ferri circolari, dal dietro della spalla destra, dall’alto in basso. Dividere lo sprone per il corpo e le maniche e continuare il corpo in tondo con i ferri circolari fino allo spacco laterale. Finire il davanti e il dietro in piano con i ferri circolari, in modo separato. Lavorare le maniche in tondo con i ferri circolari corti/ferri a doppia punta. COLLO ALTO: Avviare 116-116-116-124-124-124 maglie con i ferri circolari n° 4,5 mm e DROPS Sky. Passare ai ferri circolari n° 3 mm e lavorare il 1° giro come segue: * 2 maglie diritto, 2 maglie rovescio *, lavorare *-* altre 4 volte, 2 maglie diritto, lavorare A.1, * 2 maglie diritto, 2 maglie rovescio *, lavorare *-* altre 2-2-2-3-3-3 volte, 2 maglie diritto, A.1, * 2 maglie diritto, 2 maglie rovescio *, lavorare *-* altre 4 volte, 2 maglie diritto, lavorare A.1, * 2 maglie diritto, 2 maglie rovescio *, lavorare *-* altre 2-2-2-3-3-3 volte, 2 maglie diritto, lavorare A.1. Continuare queste coste in tondo per 10-10-10-11-11-11 cm. SPRONE: Passare ai ferri circolari n° 4,5 mm. Inserire 1 segnapunti sul giro, da cui misurare lo sprone. Lavorare il giro successivo come segue: aumentare 1 maglia per il RAGLAN – leggere la descrizione sopra, 22 maglie diritto e diminuire 2 maglie in modo uniforme su queste maglie (manica), aumentare 1 maglia per il raglan, lavorare A.2 su A.1, aumentare 1 maglia per il raglan, 14-14-14-18-18-18 maglie diritto e diminuire 2-0-0-2-0-0 maglie in modo uniforme (davanti), aumentare 1 maglia per il raglan, lavorare A.2 su A.1, aumentare 1 maglia per il raglan, 22 maglie diritto e diminuire 2 maglie in modo uniforme (manica), aumentare 1 maglia per il raglan, work A.2 over A.1, aumentare 1 maglia per il raglan, 14-14-14-18-18-18 maglie diritto e diminuire 2-0-0-2-0-0 maglie in modo uniforme (dietro), aumentare 1 maglia per il raglan, lavorare A.2 su A.1. Sono state aumentate 8 maglie per il raglan e ci sono 140-144-144-148-152-152 maglie sui ferri. Sul giro successivo lavorare a maglia rasata (senza aumenti per il raglan) e lavorare l’ultimo giro di A.2 in ogni punto di passaggio tra il corpo e le maniche – ricordarsi di lavorare i gettati come descritto sopra. Continuare a maglia rasata ma ora con A.3 su ogni A.2 in ogni punto di passaggio tra il corpo e le maniche. Ripetere A.3 in altezza. FARE ATTENZIONE ALLA TENSIONE DEL LAVORO! Inoltre, continuare ad aumentare per il RAGLAN ogni 2 giri per un totale di 9-13-16-16-14-10 volte (compresi gli aumenti sul 1° giro dopo le coste) = 204-240-264-268-256-224 maglie. Continuare ad aumentare per il raglan ogni 2 giri ma lavorare ogni 2° aumento solo sul davanti e dietro, cioè aumentare sul davanti e dietro ogni 2 giri e sulle maniche ogni 4 giri (in modo alternato 4 e 8 aumenti). Aumentare in questo modo 18-16-16-16-20-28 volte sul davanti e dietro, 9-8-8-8-10-14 volte sulle maniche. Gli aumenti per le maniche ora sono finiti. Per le taglie XS, S e M anche gli aumenti per il davanti e dietro sono finiti. Per le taglie L, XL and XXL, aumentare per il davanti e dietro ancora una volta. TUTTE LE TAGLIE: Ci sono 312-336-360-368-380-396 maglie e il lavoro misura circa 21-22-25-25-27-30 cm dal segnapunti dopo il collo. Dividere il lavoro per il corpo e le maniche sul giro successivo come segue: mettere le prime 56-62-68-68-68-68 maglie in sospeso per la manica, avviare 8-10-12-16-20-24 maglie (a lato sotto la manica), lavorare le 100-106-112-116-122-130 maglie successive come prima (A.3 + 66-72-78-82-88-96 maglie a maglia rasata + A.3 = davanti), mettere le 56-62-68-68-68-68 maglie successive in sospeso per la manica, avviare 8-10-12-16-20-24 maglie (a lato sotto la manica) e lavorare le ultime 100-106-112-116-122-130 maglie (A.3 + 66-72-78-82-88-96 maglie a maglia rasata + A.3 = dietro). Finire il corpo e le maniche in modo separato. Ora misurare il lavoro da qui! CORPO: = 216-232-248-264-284-308 maglie. Inserire 1 segnapunti a ogni lato, al centro delle 8-10-12-16-20-24 maglie avviate sotto ogni manica. Lasciare che i segnapunti seguano il lavoro – verranno usati durante la lavorazione dello spacco laterale. Continuare in tondo a maglia rasata e A.3 (lavorare a maglia rasata le 8-10-12-16-20-24 maglie avviate sotto ogni manica). Quando il corpo misura 22-23-22-24-24-23 cm dalla divisione, e sono stati lavorati 2 o 4 giri dopo un giro di trecce in A.3, dividere il lavoro all’altezza dei segnapunti e finire ogni parte in modo separato. DIETRO: = 108-116-124-132-142-154 maglie. Lavorare 1 ferro dal rovescio del lavoro e aumentare - leggere il SUGGERIMENTO PER GLI AUMENTI come segue: lavorare 1 maglia a maglia legaccio, maglia rasata sulle 3-4-5-7-9-11 maglie successive e aumentare 0-3-2-4-2-4 maglie in modo uniforme su queste maglie, lavorare A.4 su A.3, maglia rasata sulle 66-72-78-82-88-96 maglie successive e aumentare 8-10-12-12-14-14 maglie in modo uniforme su queste maglie, lavorare A.4 su A.3, maglia rasata sulle 3-4-5-7-9-11 maglie successive e aumentare 0-3-2-4-2-4 maglie in modo uniforme su queste maglie, 1 maglia a maglia legaccio = 116-132-140-152-160-176 maglie. Passare ai ferri circolari n° 3 mm e lavorare come segue dal diritto del lavoro: TAGLIE XS: 2 maglie a maglia legaccio, 2 maglie diritto, lavorare A.4, * 2 maglie diritto, 2 maglie rovescio *, lavorare *-* per un totale di 18 volte, 2 maglie diritto, lavorare A.4, 2 maglie diritto e 2 maglie a maglia legaccio. Continuare queste coste in piano per 6 cm. Intrecciare senza stringere. Il maglione misura circa 54 cm dalla spalla. TAGLIE S, M, L, XL e XXL: 2 maglie a maglia legaccio, * 2 maglie diritto, 2 maglie rovescio *, lavorare *-* per un totale di 1-1-2-2-3 volte, 2 maglie diritto, lavorare A.4, * 2 maglie diritto, 2 maglie rovescio *, lavorare *-* per un totale di 20-22-23-25-27 volte, 2 maglie diritto, lavorare A.4, * 2 maglie diritto, 2 maglie rovescio *, lavorare *-* per un totale di 1-1-2-2-3 volte, 2 maglie diritto e 2 maglie a maglia legaccio. Continuare queste coste in piano per 6 cm. Intrecciare senza stringere. Il maglione misura circa 54-56-58-60-62-64 cm dalla spalla. DAVANTI: Lavorare nello stesso modo del dietro. MANICHE: Rimettere le 56-62-68-68-68-68 maglie in sospeso a un lato del lavoro sui ferri circolari corti/ferri a doppia punta n° 4,5 mm e riprendere 1 maglia in ognuna delle nuove maglie avviate sotto la manica = 64-72-80-84-88-92 maglie. Inserire un segnapunti al centro delle nuove maglie sotto la manica. Iniziare all’altezza del segnapunti e lavorare a maglia rasata in tondo. Quando la manica misura 4-4-3-3-2-2 cm, diminuire 1 maglia a ogni lato del segnapunti – leggere il SUGGERIMENTO PER LE DIMINUZIONI. Diminuire in questo modo ogni 8½-4½-3-2½-2½-2 cm per un totale di 4-7-10-11-12-13 volte = 56-58-60-62-64-66 maglie. Continuare a lavorare fino a quando la manica misura 35-35-33-33-32-30 cm dalla divisione. Lavorare 1 giro diritto e aumentare 12-14-16-18-16-18 maglie in modo uniforme - ricordarsi del SUGGERIMENTO PER GLI AUMENTI = 68-72-76-80-80-84 maglie. Passare ai ferri a doppia punta n° 3 mm e lavorare a coste (2 maglie diritto, 2 maglie rovescio) per 8 cm. Intrecciare senza stringere. La manica misura circa 43-43-41-41-40-38 cm dalla divisione. Lavorare l’altra manica nello stesso modo. CONFEZIONE: Se desiderate un collo doppio, piegare il collo verso l’interno e affrancare con un paio di punti in ogni linea del raglan. |
||||||||||||||||
Spiegazioni del diagramma |
||||||||||||||||
|
||||||||||||||||
 |
||||||||||||||||
 |
||||||||||||||||
Avete terminato questo modello?Allora taggate le vostre foto con #dropspattern #emeraldlakesweater o inviatele alla #dropsfan gallery. Avete bisogno di aiuto con questo modello?Troverete 32 video tutorial, una sezione per i commenti/domande e molto altro guardando il modello su www.garnstudio.com © 1982-2026 DROPS Design A/S. Ci riserviamo tutti i diritti. Questo documento, compreso tutte le sue sotto-sezioni, è protetto dalle leggi sul copyright. Potete leggere quello che potete fare con i nostri modelli alla fine di ogni modello sul nostro sito. |
||||||||||||||||


Con oltre 40 anni di esperienza nel design di modelli di maglia e uncinetto, DROPS Design offre la più estesa collezione di modelli gratuiti su internet - tradotti in 17 lingue. Ad oggi vi possiamo fornire 325 cataloghi e 12298 modelli - 9569 dei quali sono tradotti in Italiano.
Ci stiamo impegnando molto per darvi il meglio che vi possiamo offrire in termini di maglia e uncinetto, ispirazioni e consigli così come filati di grande qualità ad un prezzo incredibile! Volete utilizzare i nostri modelli per qualcosa d'altro oltre al vostro uso personale? Potete leggere tutto ciò che è consentito nel testo sul Copyright in basso su tutte le pagine dei nostri modelli. Buon lavoro!
Lasciare un commento sul modello DROPS 244-12
Noi saremmo felici di ricevere i tuoi commenti e opinioni su questo modello!
Se vuoi fare una domanda, fai per favore attenzione a selezionare la categoria corretta nella casella qui sotto per velocizzare il processo di risposta. I campi richiesti sono indicati da *.