
Categorie popolari
State cercando un filato?


Commenti / Domande (76)
![]() Anne Marie ha scritto:
Anne Marie ha scritto:
In the Double Neck part of pattern it states" At the end of the next 2 rows cast on 7 stitches in garter stitch for the bands. Does this mean that I work a row of 89 stitches on the right side in rib and then cast on 7 stitches in knit. When I start the next row those 7 stitches are the beginning of the row. Do I knit these 7 stitches before starting the 89 stitches in rib and then cast on 7 more?
25.09.2025 - 13:47DROPS Design ha risposto:
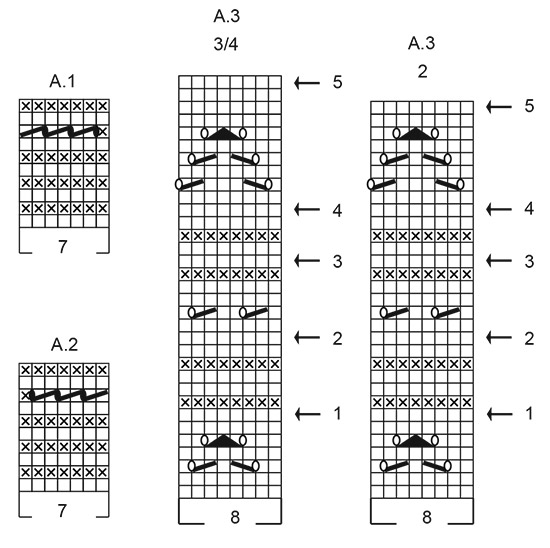
Hi Anne Marie, you work a row of 89 stitches on the right side in rib and then cast on 7 stitches. You turn (you are on the wrong side now), knit the first 7 sts, then you continue the rib and cast on 7 sts at the end on this row. On the next row from the right side work as follows: A.1 over the 7 band stitches, continue the rib as before until there are 7 stitches left, A.2 over the 7 band stitches. Continue this pattern until the rib measures 6½ cm from the cast-on edge and the next row is from the right side. Happy knitting!
25.09.2025 - 17:27
![]() Agneta Kruuse ha scritto:
Agneta Kruuse ha scritto:
Jag tycker det fattas en förklaring på en symbol i koftans kanter. Hur gör jag de sneda sträcken?
25.09.2025 - 08:46DROPS Design ha risposto:
Hi Aneta, what lines are you referring to?
25.09.2025 - 09:23
![]() NadineR ha scritto:
NadineR ha scritto:
Bonjour, 1 maille envers sur l’endroit endroit sur l’envers: c est l explication du diagramme pour le symbole de la croix. Me confirmez vous cela ??? Merci pour votre réponse du point mousse.
25.09.2025 - 08:36DROPS Design ha risposto:
Bonjour Nadine, lorsque cette maille est tricotée à l'endroit sur l'endroit au tour suivant, vous obtiendrez effectivement du point mousse (A.1 et A.2 par ex). Bon tricot!
30.09.2025 - 16:46
![]() NadineR ha scritto:
NadineR ha scritto:
Bonjour, Il est souvent répété dans les explications que les 7 mailles de bordure sont au point mousse,alors que les explications de A1 et A2 donnent les X : envers sur l endroit et endroit sur l envers. Le point mousse c est ts les rangs sont tricotés à l endroit . Vos diagrammes semblent être du jersey inversé,non??? L'image du modele semble être bien en mousse. Est ce une erreur ,pourtant personne n en parle?? Merci pour votre réponse
24.09.2025 - 18:54DROPS Design ha risposto:
Bonjour Nadine, dans le diagram vous avez: 1er rang: 1 maille endroit sur l’endroit; 2me rang: endroit sur l’envers > le point mousse. Bon tricot!
24.09.2025 - 21:26
![]() Monique Defferrard ha scritto:
Monique Defferrard ha scritto:
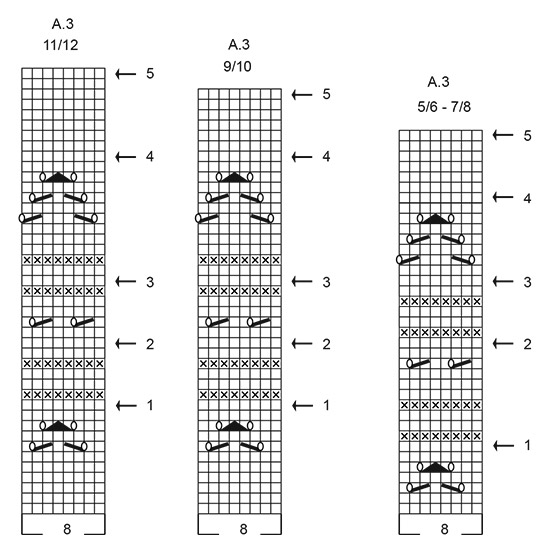
Bonjour , grrr 3 fois que je démonte mon travail. J'ai bien mes 6 cm et demi de côtes et 79 mailles ,je remonte 7 mailles de chaque côté 14+79 =97+18aug=111 . Quand je fais A3sur les 8 mailles de motif ,il me reste 1 maille +7 de bordure .Cela fais un décalage de motif . Ce qui donne 7 (12fois 8m) +1 +7 =111. C'est il normal pour les prochains tour
11.09.2025 - 13:40DROPS Design ha risposto:
Bonjour Monique, c'est correct, la derniere maille est tricotee comme la premiere maille de A.3. De cette facon le motif est symmetrique de 2 cotes du gilet. Regardez aussi la lecon drops ICI, 'Si on doit répéter plusieurs fois le même diagramme (c'est-à-dire tricoter le même diagramme plusieurs fois en largeur), on va le tricoter jusqu'à la fin du rang, et commencer le motif suivant par la première maille de nouveau'. Bon tricot!
12.09.2025 - 09:43
![]() Isabelle ha scritto:
Isabelle ha scritto:
Bonjour. Je fais ce gilet en taille 11/12 ans. Après les 20 augmentations, j'arrive à 113 mailles centrales +7+7 de bordure donc 127 mailles. Or, le diagramme fantaisie est sur 8 mailles. 113 :8 ne fait pas un compte rond.Il faudrait 112 mailles pour que ça tombe juste. Je ne comprends pas. Pouvez-vous m'éclairer s'il vous plaît. Bonne journée.
23.08.2025 - 15:44
![]() Isabelle ha scritto:
Isabelle ha scritto:
Bonjour. Je fais ce gilet en taille 11/12 ans. Après les 20 augmentations, j'arrive à 113 mailles centrales +7+7 de bordure donc 127 mailles. Or, le diagramme fantaisie est sur 8 mailles. 113 :8 ne fait pas un compte rond.Il faudrait 112 mailles pour que ça tombe juste. Je ne comprends pas. Pouvez-vous m'éclairer s'il vous plaît. Bonne journée.
23.08.2025 - 15:43DROPS Design ha risposto:
Bonjour Isabelle, tricotez ainsi: 7 m point mousse, répétez 14 fois les 8 mailles de A.3 , terminez par 1 m comme la 1ère maille de A.3 (ainsi le motif est symétrique) et 7 m point mousse = 7+(14x8)+1+7=127. Bon tricot!
25.08.2025 - 09:30
![]() Defferrard Monique ha scritto:
Defferrard Monique ha scritto:
Bonjour , pourriez_ vous m'expliquer, pour les manches du modèle Drops Children 47-7 si je dois prendre en une seule fois les 6 mailles ou en plusieurs fois ? Je suis perdue dans ce montage de manche. Merci de votre réponse .Cordialement
22.08.2025 - 12:55DROPS Design ha risposto:
Bonjour Mme Defferrard, retrouvez cette étape de la manche dans cette leçon, à partir de la photo 18B (où on relève les mailles, les photos suivantes montre cette étape version A18A = en montant de nouvelles mailles qui seront cousues à celles montées pour le bas du vêtement). Bon tricot!
22.08.2025 - 15:09
![]() Johanna Meier ha scritto:
Johanna Meier ha scritto:
Werden da 3x2 Maschen zusammengestrickt und jeweils ein Umschlag dazwischen?
08.08.2025 - 07:56DROPS Design ha risposto:
Liebe Frau Meier, in jeder 8. Reihe ja genauso wie in den Diagrammen A.1 (linke Blende) und A.2 (rechte Blende) gezeigt. Viel Spaß beim Stricken!
08.08.2025 - 08:11
![]() Meier Johanna ha scritto:
Meier Johanna ha scritto:
Bei den Knopflöchern ist nicht beschrieben, wie si abgenommen werden?
07.08.2025 - 17:39DROPS Design ha risposto:
Liebe Johanna, es sind keine Extra Knopflöcher gestrickt, die Knöpfe werden durch die Löcher der rechten Blende zugeknöpft. Viel Spaß beim Stricken!
08.08.2025 - 07:40
|
|||||||||||||||||||||||||
Running Circles Cardigan#runningcirclescardigan |
|||||||||||||||||||||||||
 |
 |
||||||||||||||||||||||||
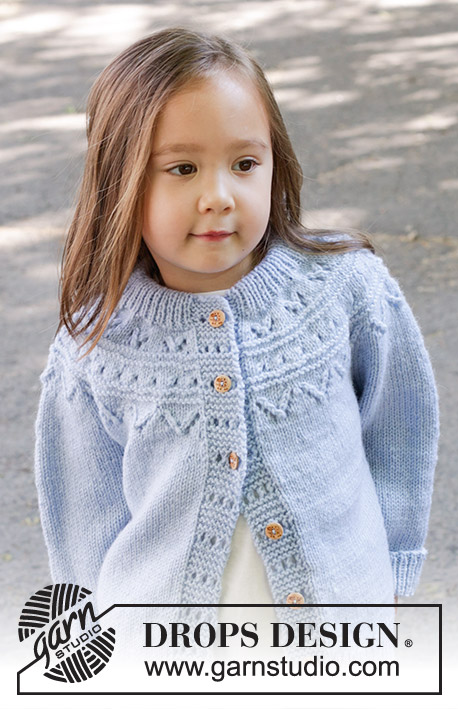
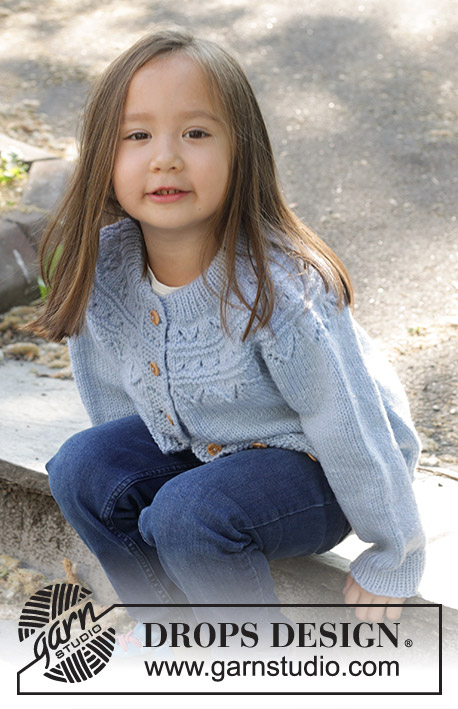
Cardigan per bambini lavorato ai ferri in DROPS Karisma. Lavorato dall’alto in basso con sprone rotondo e motivo traforato e collo doppio, Taglie: 2 – 12 anni.
DROPS Children 47-7 |
|||||||||||||||||||||||||
|
------------------------------------------------------- TECNICHE IMPIEGATE: ------------------------------------------------------- COSTA/MAGLIA LEGACCIO (avanti e indietro): Lavorare tutti i ferri a diritto. 1 costa in altezza = 2 ferri diritto. MOTIVO: Vedere i diagrammi A.1 - A.3. Scegliere il diagramma per la vostra taglia (applicato ad A.3). I diagrammi mostrano tutti i ferri del motivo visti dal diritto del lavoro. Durante la lavorazione di A.3, lavorare l’ultima maglia prima del bordo come la 1° maglia di A.3 in modo che il motivo sia simmetrico. SUGGERIMENTO PER GLI AUMENTI: Aumentare 1 maglia facendo 1 gettato che viene lavorato a ritorto sul ferro successivo per evitare buchi. SUGGERIMENTO PER LE DIMINUZIONI (per le maniche): Diminuire 1 maglia a ogni lato del segnapunti come segue: lavorare fino a quando rimangono 3 maglie prima della maglia con il segnapunti, 2 maglie insieme a diritto, 2 maglie diritto (il segnapunti è tra queste 2 maglie), passare 1 maglia a diritto senza lavorarla, 1 maglia diritto e accavallare la maglia passata sopra quella appena lavorata. ------------------------------------------------------- INIZIO DEL LAVORO: ------------------------------------------------------- CARDIGAN – BREVE RIASSUNTO DEL LAVORO: Lavorare il collo e lo sprone in piano con i ferri circolari, dal centro davanti e dall’alto in basso fino agli scalfi, poi finire il corpo e le maniche in modo separato. Finire il corpo in piano con i ferri circolari. Lavorare le maniche in tondo con i ferri a doppia punta. Non lavorare le asole, dal momento che i bottoni vengono allacciati nel motivo traforato sul bordo. COLLO DOPPIO: Avviare 75-79-85-87-89-93 maglie con i ferri circolari n° 4 mm e DROPS Karisma. Passare ai ferri circolari n° 3 mm. Lavorare 1 ferro rovescio dal rovescio del lavoro. Lavorare a coste (1 maglia diritto, 1 maglia rovescio) fino a quando rimane 1 maglia, 1 maglia diritto. Lavorare queste coste in piano per 3 cm. Alla fine dei 2 ferri successive avviare 7 maglie a maglia legaccio per i bordi = 89-93-99-101-103-107 maglie. Sul ferro successivo dal diritto del lavoro lavorare come segue: A.1 sulle 7 maglie del bordo, continuare le coste come prima fino a quando rimangono 7 maglie, A.2 sulle 7 maglie per il bordo. Continuare questo motivo fino a quando le coste misurano 6½ cm dal bordo di avvio e il ferro successivo è dal diritto del lavoro. SPRONE: Lavorare le 7 maglie del bordo come prima, lavorare a diritto fino a quando rimangono 7 maglie, aumentando 14-18-20-18-24-20 maglie in modo uniforme su queste maglie – leggere il SUGGERIMENTO PER GLI AUMENTI, lavorare le 7 maglie del bordo come prima = 103-111-119-119-127-127 maglie. Inserire un segnapunti; misurare lo sprone da qui. Passare ai ferri circolari n° 4 mm. Lavorare 1 ferro rovescio dal rovescio del lavoro (lavorare i bordi come prima). Ora lavorare A.3 – leggere MOTIVO nelle spiegazioni sopra, e allo stesso tempo aumentare su ogni ferro indicato con una freccia in A.3 come segue (lavorare i bordi come prima): FRECCIA 1: aumentare 24 maglie in modo uniforme = 127-135-143-143-151-151 maglie. FARE ATTENZIONE ALLA TENSIONE DEL LAVORO! FRECCIA 2: aumentare 24-24-28-28-32-32 maglie in modo uniforme = 151-159-171-171-183-183 maglie. FRECCIA 3: aumentare 24-24-28-28-32-32 maglie in modo uniforme =175-183-199-199-215-215 maglie. FRECCIA 4: aumentare 24-24-26-32-28-36 maglie in modo uniforme = 199-207-225-231-243-251 maglie. FRECCIA 5: aumentare 26-30-26-32-32-36 maglie in modo uniforme = 225-237-251-263-275-287 maglie. Continuare a maglia rasata (lavorare i bordi come prima) fino a quando lo sprone misura 13-14-15-16-17-18 cm dal segnapunti. Ora dividere il lavoro per il corpo e le maniche come segue dal diritto del lavoro: lavorare le prime 37-39-42-44-46-48 maglie come prima (davanti sinistro), mettere in sospeso le 44-46-48-50-52-54 maglie successive, senza lavorarle (manica), avviare 6 maglie sotto la manica, lavorare 63-67-71-75-79-83 maglie diritto (dietro), mettere in sospeso le 44-46-48-50-52-54 maglie successive, senza lavorarle (manica), avviare 6 maglie sotto la manica, lavorare le ultime 37-39-42-44-46-48 maglie come prima (davanti destro). Ora misurare il lavoro da qui! CORPO: = 149-157-167-175-183-191 maglie. Continuare in piano come prima per altri 13-15-18-21-24-25 cm, con il ferro successivo dal diritto del lavoro (mancano circa 4 cm; provare il cardigan e lavorare fino alla lunghezza desiderata). Lavorare i bordi a MAGLIA LEGACCIO – leggere la spiegazione sopra, e a maglia rasata sulle altre maglie, aumentando 28-30-30-32-33-36 maglie in modo uniforme sulle maglie a maglia rasata = 177-187-197-207-216-227 maglie. Lavorare a rovescio dal rovescio del lavoro (lavorare i bordi a maglia legaccio). Passare ai ferri circolari n° 3 mm e lavorare a coste come segue dal diritto del lavoro: 7 maglie per il bordo a maglia legaccio, coste (1 maglia diritto, 1 maglia rovescio) fino a quando rimangono 8 maglie, 1 maglia diritto, lavorare 7 maglie per il bordo a maglia legaccio. Continuare queste coste per 4 cm. Intrecciare senza stringere con diritto su diritto e rovescio su rovescio. Il cardigan misura circa 33-36-40-44-48-50 cm dalla spalla. MANICHE: Riportare le 44-46-48-50-52-54 maglie in sospeso a un lato del lavoro sui ferri a doppia punta n° 4 mm e riprendere 1 maglia in ognuna delle 6 maglie avviate sotto la manica = 50-52-54-56-58-60 maglie. Inserire un segnapunti al centro delle nuove maglie sotto la manica e lasciare che segua il lavoro. Lavorare a maglia rasata in tondo. Quando la manica misura 4 cm, diminuire 1 maglia a ogni lato del segnapunti – leggere il SUGGERIMENTO PER LE DIMINUZIONI. Diminuire in questo modo ogni 2½-3½-4½-5-6-7 cm per un totale di 5 volte = 40-42-44-46-48-50 maglie. Lavorare fino a quando la manica misura 16-20-24-28-31-35 cm dalla divisione (o fino alla lunghezza desiderata. Mancano circa 4 cm). Lavorare 1 giro diritto e aumentare 4 maglie in modo uniforme = 44-46-48-50-52-54 maglie. Passare ai ferri a doppia punta n° 3 mm e lavorare a coste (1 maglia diritto, 1 maglia rovescio) per 4 cm. Intrecciare con diritto su diritto e rovescio su rovescio. Lavorare l’altra manica nello stesso modo. CONFEZIONE: Piegare il collo a metà verso l’interno e cucire. Per evitare che il collo risulti tirato e si arrotoli verso l’esterno, è importante che la cucitura sia elastica. Cucire le aperture al centro davanti con piccoli punti. Attaccare i bottoni sul bordo sinistro; il bottone superior è posizionato tra il 1° ferro del motivo traforato sul bordo e gli altri bottoni sono posizionati in modo uniforme sul bordo. |
|||||||||||||||||||||||||
Spiegazioni del diagramma |
|||||||||||||||||||||||||
|
|||||||||||||||||||||||||
 |
|||||||||||||||||||||||||
 |
|||||||||||||||||||||||||
 |
|||||||||||||||||||||||||
Avete terminato questo modello?Allora taggate le vostre foto con #dropspattern #runningcirclescardigan o inviatele alla #dropsfan gallery. Avete bisogno di aiuto con questo modello?Troverete 30 video tutorial, una sezione per i commenti/domande e molto altro guardando il modello su www.garnstudio.com © 1982-2026 DROPS Design A/S. Ci riserviamo tutti i diritti. Questo documento, compreso tutte le sue sotto-sezioni, è protetto dalle leggi sul copyright. Potete leggere quello che potete fare con i nostri modelli alla fine di ogni modello sul nostro sito. |
|||||||||||||||||||||||||


Con oltre 40 anni di esperienza nel design di modelli di maglia e uncinetto, DROPS Design offre la più estesa collezione di modelli gratuiti su internet - tradotti in 17 lingue. Ad oggi vi possiamo fornire 324 cataloghi e 12239 modelli - 9507 dei quali sono tradotti in Italiano.
Ci stiamo impegnando molto per darvi il meglio che vi possiamo offrire in termini di maglia e uncinetto, ispirazioni e consigli così come filati di grande qualità ad un prezzo incredibile! Volete utilizzare i nostri modelli per qualcosa d'altro oltre al vostro uso personale? Potete leggere tutto ciò che è consentito nel testo sul Copyright in basso su tutte le pagine dei nostri modelli. Buon lavoro!
Lasciare un commento sul modello DROPS Children 47-7
Noi saremmo felici di ricevere i tuoi commenti e opinioni su questo modello!
Se vuoi fare una domanda, fai per favore attenzione a selezionare la categoria corretta nella casella qui sotto per velocizzare il processo di risposta. I campi richiesti sono indicati da *.