
Categorie popolari
State cercando un filato?


Commenti / Domande (46)
![]() Blanca ha scritto:
Blanca ha scritto:
Cuando en A-1 dice:deslizar 1 punto como de dcho. ,1dcho. y pasar el punto deslizado sobre el punto trabajado. Deberia decir, deslizar 1 punto como de dcho."retorcido", 1 dcho.,y pasar el punto deslizado sobre el punto trabajado.
06.05.2026 - 12:00
![]() Vilmantė ha scritto:
Vilmantė ha scritto:
Hello, what size should i choose for 98cm size L or XL?
06.05.2026 - 09:36DROPS Design ha risposto:
Dear Mrs Vilmantè, read more on sizing and ease here - this will help you choosing the best appropriate size. Happy knitting!
06.05.2026 - 16:40
![]() Sharon Hunt ha scritto:
Sharon Hunt ha scritto:
Hello, the pattern says 17 sts per inch. I am a bit confused by the response that it is “quite an unusual tension for Paris” when that is the tension given in the pattern. I got that gauge, as in “spi. What I did not achieve is the rows per inch so maybe that is what is unusual. Is it possible for one of your test knitters to take a look at this or do a test swatch again? Thank you.
24.04.2026 - 16:00DROPS Design ha risposto:
Dear Mrs Hunt, 17 sts is a usual tension for Paris - see shadecard, not an "unusual" for the width, about height, you might have to adjust if you get more/less rows, this can happen and can be easily adjusted working more/less row (but right you might need more yarn if you need to work more rows than 22 rows), but with the tension recommanded you will get the finished measurements. Feel free to ask your DROPS Store even per mail or telephone, they might have some tipps to help you further. Hope it can help. Happy knitting!
24.04.2026 - 16:51
![]() Sharon Hunt ha scritto:
Sharon Hunt ha scritto:
Made this and did not get rows per inch on either 5 or 5,5 so I had to purchase more yarn. I am making it again and decided to work swatch on 6 mm. Am getting 4,5 sts per inch and very lose sts. Which means I have to knit this with a 5,5 needle to get sts per inch and not rpi. The first sweater is ok but rpi is 3.5. Why is that?
24.04.2026 - 07:34DROPS Design ha risposto:
Dear Mrs Hunt, you should get 17 sts for 4" in width, this means approx. 4,25 stitches per inch; this is quite a usual tension for DROPS Paris; but note that the needle size has to be fixed depending on your own knitting tension (read more here) as long as you get the correct number of stitches in width for 4" then you will get the correct finished measurements using same tension. Happy knitting!
24.04.2026 - 09:29
![]() Donna Rosander ha scritto:
Donna Rosander ha scritto:
How do you do? “Slip 1 stitch as if to knit {I know how to do this), slip the next stitch and place it back twisted on the left needle (this what I do not understand)
25.02.2026 - 20:52DROPS Design ha risposto:
Hi Donna, This second stitch is knitted twisted (so you can either turn it around on the left needle, which is what this instruction is describing) and knit it as usual through the front, or you can knit through the back stitch loop (without slipping it off and turning it) if this is easier for you. Regards, Drops Team.
26.02.2026 - 06:05
![]() Agnieszka ha scritto:
Agnieszka ha scritto:
Dzień dobry, Czy gdzieś znajdę tutorial video do tej bluzeczki ? Oczywiście może być płatny. Pozdrawiam
26.10.2025 - 10:08DROPS Design ha risposto:
Witaj Agnieszko, niestety nie mamy na naszej stronie video na cały ten wzór, tylko na wykonanie poszczególnych oczek/ściegów/technik. Wpisz na YT Echo Mountain Top i wydaje mi się, że był wykonywany na kanale Anny Cierniak. Pozdrawiamy!
27.10.2025 - 15:33
![]() Merete Petersen ha scritto:
Merete Petersen ha scritto:
Jeg mangler målskema for de enkelte størrelser
03.09.2025 - 07:54DROPS Design ha risposto:
Hej Merete. Du hittar en målskisse längst ned på opskriften , med plaggets mål i cm i alla storlekar. Mvh DROPS Design
03.09.2025 - 09:33
![]() Mirka ha scritto:
Mirka ha scritto:
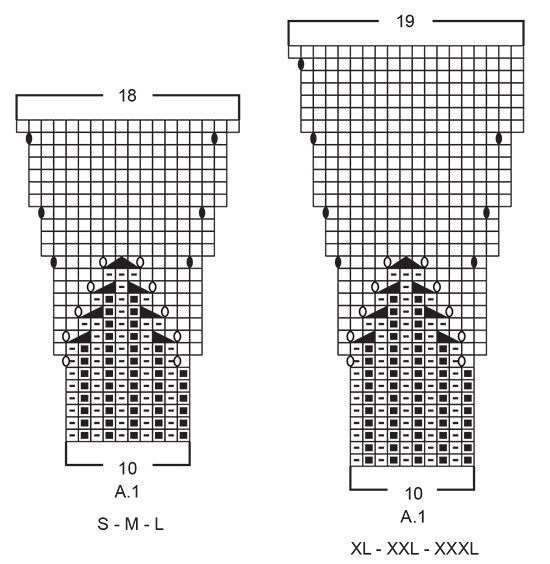
Hi, bij breien van patroon A.1. voor maat M is er meerdering in rij 7 aan het begin en einde van het herhaalen patroon. Ik snap niet waar ik moet de omslag plaatsen, want in de rij 6 begin je met averechtse steek en in rij 7 met recht, omslag en ga je door met gedraaid rechts. Moet ik gewoon de averechtse steek als recht breien, omslag doen en dan verder in het patroon? Alvast bedankt voor de antwoord.
03.08.2025 - 08:35DROPS Design ha risposto:
Dag Mieke,
In rij 7 begin je inderdaad met een rechte steek (dus een rechte steek boven een averechte steek van de vorige naald) en dan een omslag. Aan het eind maak je ook weer een omslag. Op de naald 8 brei je de eerste 2 steken van de herhaling recht en de laatste steek ook.
03.08.2025 - 09:40
![]() Anne Dahlgren ha scritto:
Anne Dahlgren ha scritto:
Efter A1 har jeg strikket 12 x19 masker det giver 228, men i opskriften står 216, hvilket er forkert. Når jeg del til for og bagstykke samt ærmer fordeler jeg så 2 x 66 og 2 x 48 i stedet for 62 og 46? Og skal jeg stadig slå 6 masker ekstra op efter at have sat 46 til side til hvert ærme?
19.05.2025 - 18:50DROPS Design ha risposto:
Hej Anne, i størrelse small skal du kun have 18 masker (ikke 19) når du er færdig med diagrammet. 12 x 18 = 216 masker :)
22.05.2025 - 11:38
![]() Rebecca ha scritto:
Rebecca ha scritto:
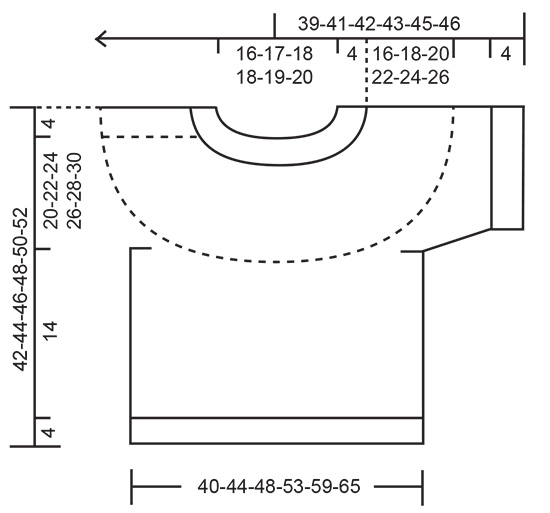
In the instructions for the body, it says “Continue with stocking stitch for 14 cm.” (for all sizes) and then the 4cm rib before casting off. This would mean that the underarm to cast off measurement would be 18cm for all sizes from small all the way up to xxxl. Shouldn’t the length increase with each size? Is that correct or a mistake in the pattern?
13.04.2025 - 21:49DROPS Design ha risposto:
Dear Rebecca, you can check the measurements schematic at the bottom. The difference in length of the top will be due to the yoke, while the body section will be 18 cm in all sizes. The top is not very long. But you can lengthen it if you think it's too short; simply work in stocking stitch more cm and finish with the 4cm rib when there are 4cm remaining for your desired measurements. Happy knitting!
13.04.2025 - 23:39
|
|||||||||||||||||||||||||
Echo Mountain Top#echomountaintop |
|||||||||||||||||||||||||
 |
 |
||||||||||||||||||||||||
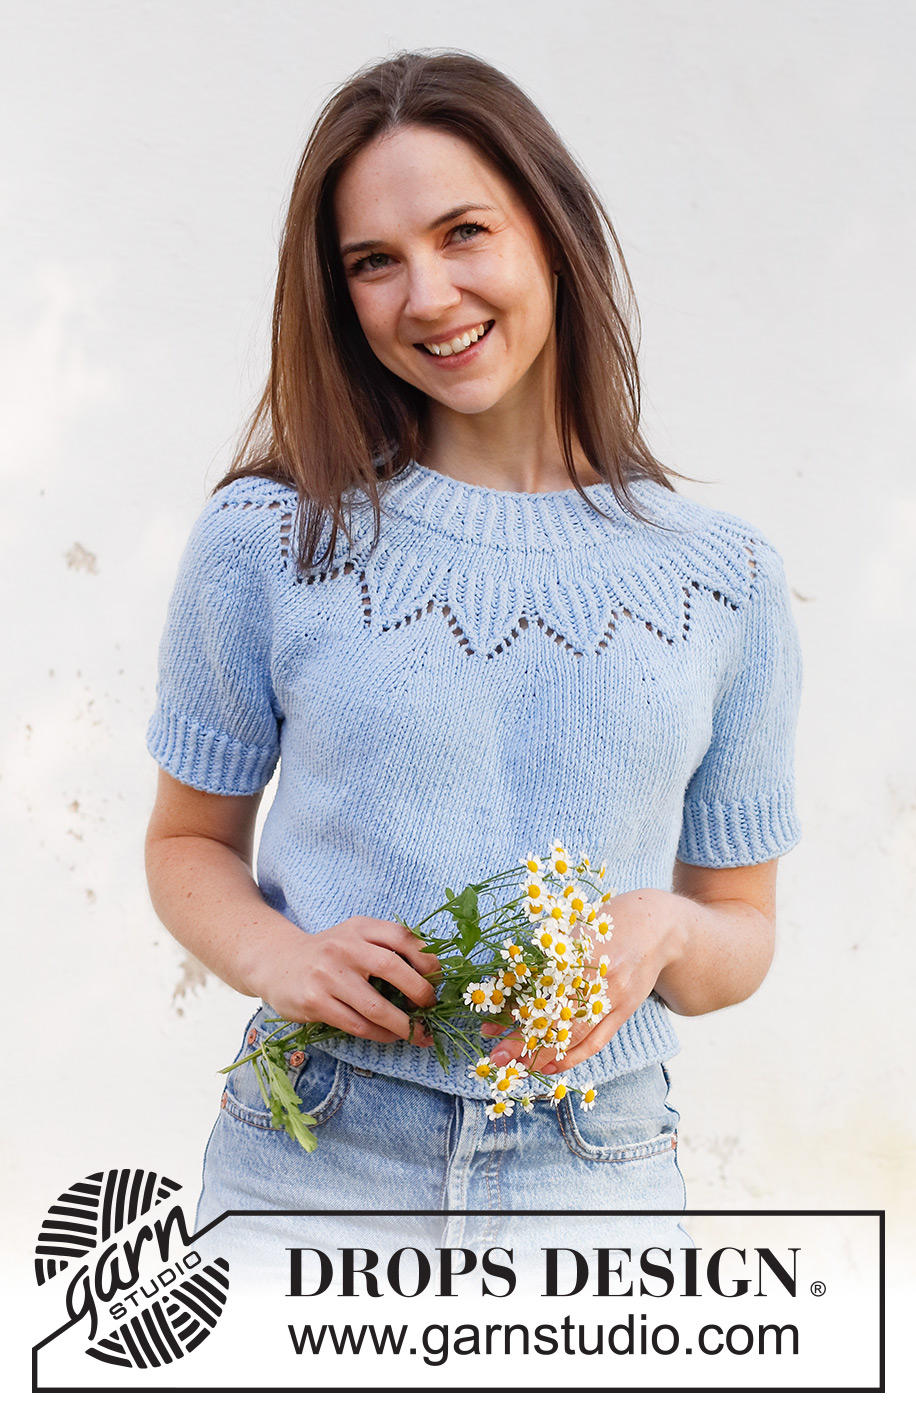
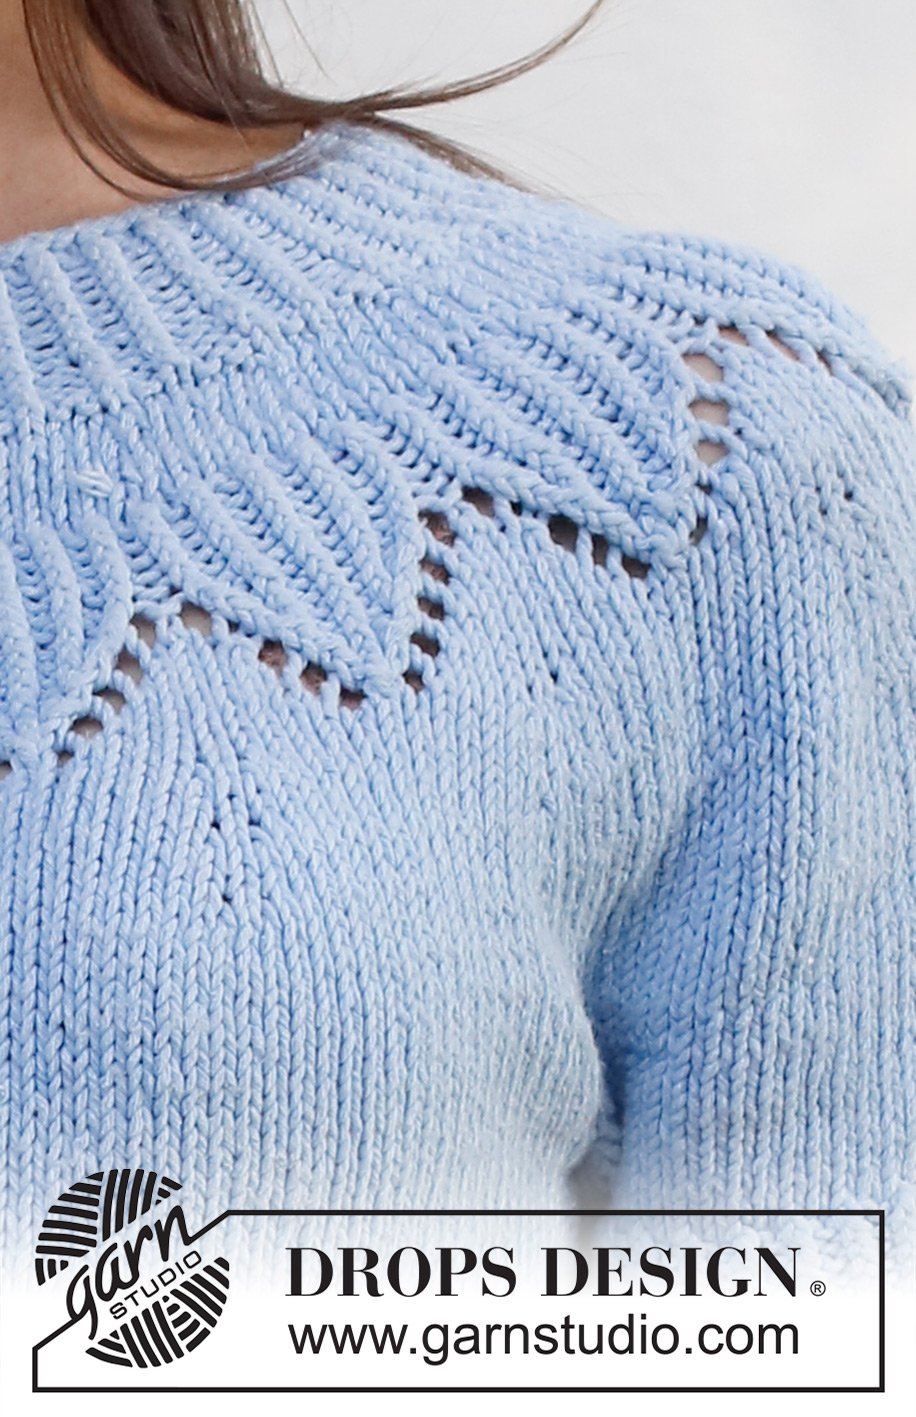
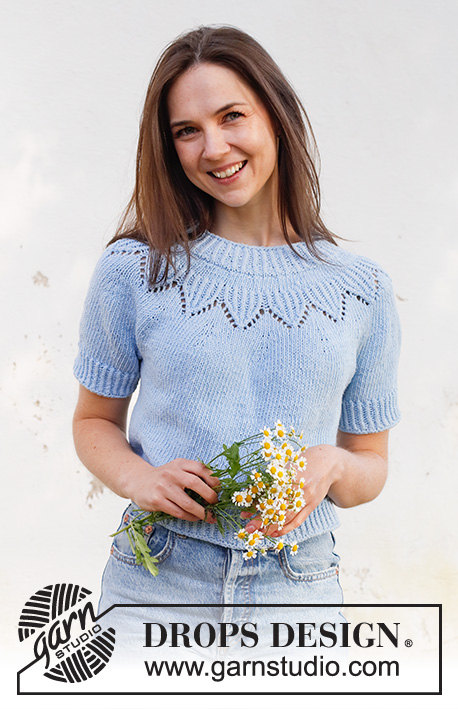
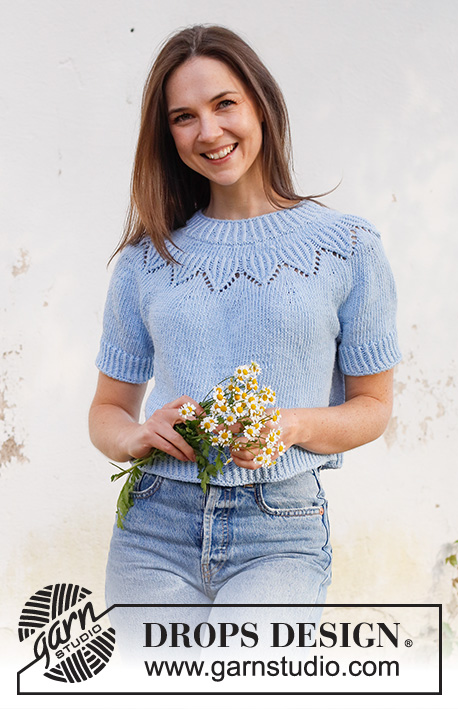
Maglione lavorato ai ferri in DROPS Paris. Lavorato dall’alto in basso, con sprone rotondo, motivo traforato e maniche corte. Taglie: S - XXXL.
DROPS 230-19 |
|||||||||||||||||||||||||
|
------------------------------------------------------- TECNICHE IMPIEGATE: ------------------------------------------------------- MOTIVO: Vedere il diagramma A.1. Scegliere il diagramma per la vostra taglia. SUGGERIMENTO PER LE DIMINUZIONI (applicato alle maniche): Diminuire 1 maglia a ogni lato del segnapunti come segue: Lavorare fino a quando rimangono 3 maglie prima del segnapunti, 2 maglie insieme a diritto, 2 maglie diritto (il segnapunti è al centro di queste 2 maglie), passare 1 maglia a diritto senza lavorarla, 1 maglia diritto, accavallare la maglia passata sopra quella appena lavorata (2 diminuzioni). ------------------------------------------------------- INIZIO DEL LAVORO: ------------------------------------------------------- MAGLIONE – BREVE RIASSUNTO DEL LAVORO: Lavorare il collo e lo sprone in tondo con i ferri circolari, dal centro dietro e dall’alto in basso. Dividere lo sprone per il corpo e le maniche e continuare il corpo in tondo con i ferri circolari. Lavorare le maniche in tondo con i ferri a doppia punta/ferri circolari corti. COLLO: Avviare 80-84-88-88-92-96 maglie con i ferri circolari corti n° 4 mm e DROPS Paris. Lavorare 1 giro diritto, poi lavorare a coste (1 maglia a diritto ritorto, 1 maglia rovescio) in tondo per 3 cm. Sul giro successivo aumentare nelle sezioni con 1 maglia rovescio a 2 maglie rovescio a sezioni alterne facendo 1 gettato dopo ogni 2° maglia rovescio = 100-105-110-110-115-120 maglie. Continuare queste coste. NOTA: Sul 1° giro lavorare i gettati a rovescio ritorto per evitare buchi. Quando le coste misurano 4 cm, lavorare 1 giro diritto in cui aumentare 8-9-10-14-17-20 maglie in modo uniforme = 108-114-120-124-132-140 maglie. SPRONE: Passare ai ferri circolari n° 5 mm. Lavorare a maglia rasata per 2-3-3-4-4-5 cm – ALLO STESSO TEMPO sull’ultimo giro aumentare 12-16-20-26-28-30 maglie in modo uniforme = 120-130-140-150-160-170 maglie. FARE ATTENZIONE ALLA TENSIONE DEL LAVORO! Lavorare A.1, 12-13-14-15-16-17 volte sul giro e aumentare come mostrato nel diagramma. Alla fine di A.1 ci sono 216-234-252-285-304-323 maglie. Continuare a maglia rasata – ALLO STESSO TEMPO sul 1° giro aumentare 0-2-8-3-4-1 maglie in modo uniforme = 216-236-260-288-308-324 maglie. Lavorare fino a quando il lavoro misura 20-22-24-26-28-30 cm dal bordo di avvio. Ora dividere il lavoro per il corpo e le maniche come segue: lavorare 31-34-37-41-45-49 maglie (½ dietro), mettere in sospeso le 46-50-56-62-64-64 maglie successive per la mania, avviare 6-6-8-8-10-12 maglie (a lato sotto la manica), lavorare 62-68-74-82-90-98 maglie (davanti), mettere in sospeso le 46-50-56-62-64-64 maglie successive per la mania, avviare 6-6-8-8-10-12 maglie (a lato sotto la manica), lavorare 31-34-37-41-45-49 maglie (½ dietro). Finire il corpo e le maniche in modo separato. ORA MISURARE IL LAVORO DA QUI! CORPO: = 136-148-164-180-200-220 maglie. Continuare a maglia rasata per 14 cm. Lavorare 1 giro diritto in cui aumentare 14-14-16-18-20-22 maglie in modo uniforme = 150-162-180-198-220-242 maglie. Passare ai ferri circolari n° 4 mm. Lavorare a coste (1 maglia diritto ritorto, 1 maglia rovescio) per 4 cm. Intrecciare a diritto, senza stringere. Il maglione misura circa 42-44-46-48-50-52 cm dalla spalla in giù. MANICHE: Riportare le 46-50-56-62-64-64 maglie in sospeso a un lato del lavoro sui ferri circolari corti/ferri a doppia punta n° 5 mm e riprendere 1 maglia in ognuna delle 6-6-8-8-10-12 maglie avviate sotto la manica = 52-56-64-70-74-76 maglie. Inserire un segnapunti al centro delle 6-6-8-8-10-12 maglie sotto la manica. Lasciare che il segnapunti segua il lavoro; verrà usata durante le diminuzioni sotto la manica. Iniziare all’altezza del segnapunti e lavorare a maglia rasata in tondo per 3 cm. Ora diminuire 2-2-2-2-0-0 maglie sotto la manica – leggere il SUGGERIMENTO PER LE DIMINUZIONI = 50-54-62-68-74-76 maglie. Continuare a lavorare fino a quando la manica misura 7-6-5-4-3-2 cm dalla divisione. Passare ai ferri a doppia punta n° 4 mm e lavorare a coste (1 maglia diritto ritorto, 1 maglia rovescio) per 4 cm. Intrecciare a diritto, senza stringere. La manica misura circa 11-10-9-8-7-6 cm. Lavorare l’altra manica nello stesso modo. |
|||||||||||||||||||||||||
Spiegazioni del diagramma |
|||||||||||||||||||||||||
|
|||||||||||||||||||||||||
 |
|||||||||||||||||||||||||
 |
|||||||||||||||||||||||||
Avete terminato questo modello?Allora taggate le vostre foto con #dropspattern #echomountaintop o inviatele alla #dropsfan gallery. Avete bisogno di aiuto con questo modello?Troverete 31 video tutorial, una sezione per i commenti/domande e molto altro guardando il modello su www.garnstudio.com © 1982-2026 DROPS Design A/S. Ci riserviamo tutti i diritti. Questo documento, compreso tutte le sue sotto-sezioni, è protetto dalle leggi sul copyright. Potete leggere quello che potete fare con i nostri modelli alla fine di ogni modello sul nostro sito. |
|||||||||||||||||||||||||


Con oltre 40 anni di esperienza nel design di modelli di maglia e uncinetto, DROPS Design offre la più estesa collezione di modelli gratuiti su internet - tradotti in 17 lingue. Ad oggi vi possiamo fornire 325 cataloghi e 12298 modelli - 9569 dei quali sono tradotti in Italiano.
Ci stiamo impegnando molto per darvi il meglio che vi possiamo offrire in termini di maglia e uncinetto, ispirazioni e consigli così come filati di grande qualità ad un prezzo incredibile! Volete utilizzare i nostri modelli per qualcosa d'altro oltre al vostro uso personale? Potete leggere tutto ciò che è consentito nel testo sul Copyright in basso su tutte le pagine dei nostri modelli. Buon lavoro!
Lasciare un commento sul modello DROPS 230-19
Noi saremmo felici di ricevere i tuoi commenti e opinioni su questo modello!
Se vuoi fare una domanda, fai per favore attenzione a selezionare la categoria corretta nella casella qui sotto per velocizzare il processo di risposta. I campi richiesti sono indicati da *.