
Categorie popolari
State cercando un filato?


Commenti / Domande (77)
![]() Ryann ha scritto:
Ryann ha scritto:
Would it ruin the pattern if i did not do decreases on the stockinette? or would it just make it wider?
14.01.2025 - 00:00DROPS Design ha risposto:
Dear Ryann, you mean after rib? Piece will be then wider as you need more stitches for rib with smaller needles than for stocking stitch with larger needles, reasion why you need to decrease after rib, on first row pattern. Happy knitting!
14.01.2025 - 10:36
![]() Susie ha scritto:
Susie ha scritto:
To insert sleeve leaves a gap in the armhole. How are you supposed to make a recess with the cast off stitches on the body. Would it be easier to put a few increase stitches in the sleeve before attaching it to body.
10.12.2024 - 22:01DROPS Design ha risposto:
Dear Susie, the shape of the sleeve and this armhole (which isn't too wide) don't require extra increases or cast off stitches. So both adapt to each other perfectly. Happy knitting!
15.12.2024 - 19:04
![]() Monika ha scritto:
Monika ha scritto:
Która wloczka została użyta do swetra na zdjęciu? Wish czy air?
03.11.2024 - 08:39DROPS Design ha risposto:
Witaj Moniko, sweter został wykonany z włóczki DROPS Wish. Pozdrawiamy!
04.11.2024 - 08:20
![]() Morgane ha scritto:
Morgane ha scritto:
Hello, can you explain how to decrease the shoulder? I'm having trouble understanding “Decrease as follows on each row from the right side by the neck: 2 stitches 4 times” do I have to decrease 4 times on the same row? Thank you
19.10.2024 - 15:51DROPS Design ha risposto:
Dear Morgane, you should decrease on each right side row, 2 stitches at once. Then the next time you get to a right side row, 2 stitches again, etc, until you decreased 4 times. Happy Knitting!
20.10.2024 - 10:39
![]() Renneke Visee ha scritto:
Renneke Visee ha scritto:
Er staat dat voor en achterpand apart gebreid worden op een rondbreinaald. Waarom niet op gewone breinaalden? een rondbreinaald gebruik je toch om iets rond te breien, als één geheel.
14.10.2024 - 13:07
![]() Morgane Bahier ha scritto:
Morgane Bahier ha scritto:
Hi, for the body, we are told to decrease evenly, does that mean that we have to decrease on A.2 and A.3 ? Because for the size XL, by following the lesson, I had to decrease after 20 stitches, and then after 21... Then the diagram will not match (instead of 12 stitches, I have 11 stitches).
06.10.2024 - 18:53DROPS Design ha risposto:
Dear Morgane, you decrease evenly over the stitches in stocking stitch. Start with stocking stitch over 19 stitches. You must decrease 4 stitches evenly over these 19 stitches, so you will have to alternate your decreases by knitting together every 4th and 5th stitch and every 3rd and 4th stitch alternately. You do the same at the end, over the final stitches in stocking stitch. So the charts remain the same, you simply reduce the length of the stocking stitch sections on the sides. Happy knitting!
06.10.2024 - 23:38
![]() Vicky Butterfield ha scritto:
Vicky Butterfield ha scritto:
After the first purl from wrong side then right side are you going to purn again on wrong side cause stitch not line up at all
16.09.2024 - 23:42DROPS Design ha risposto:
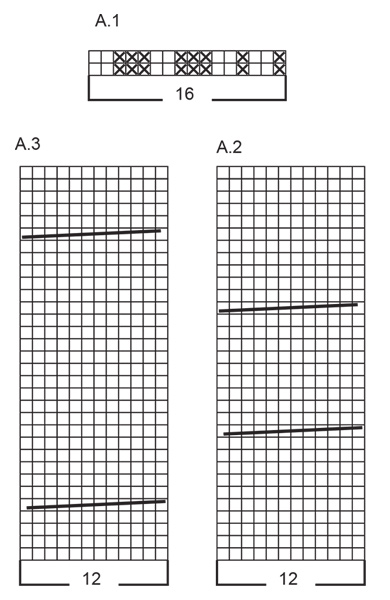
Dear Mrs Butterfield, at the very bottom of front piece, you first purl all stitches (wrong side row) then work in rib from RS with 1edge st in garter stitch on each side, then work rib with K over K and P over P. ReadA.1 from the right towards the left from RS and from the left towards the right from WS. Happy knitting!
19.09.2024 - 16:18
![]() Peta ha scritto:
Peta ha scritto:
Hi, Could you please confirm when it says. Repeat pattern on the 68 stitches until you reach the desired size length. The cable patterns have 32 rows. Do you just repeat these 32 rows until you reach your size length?
12.08.2024 - 13:14DROPS Design ha risposto:
Dear Peta, correct, work the remaining stitches on each side as before. Happy knitting!
12.08.2024 - 15:29
![]() Kasia ha scritto:
Kasia ha scritto:
How do you decrease for size s? n11,p4,A2,p4,A3,p4,A2,p4,11=74 nDo you decrease from the 11 stitches?
29.07.2024 - 12:37DROPS Design ha risposto:
Dear Kasia, decrease evenly as explained in this lesson over the 11 sts, this means you will have 11 sts - 3 sts decreased = 8 sts left on each side of piece. Happy knitting!
01.08.2024 - 09:09
![]() Kasia ha scritto:
Kasia ha scritto:
Is it possible to get this pattern with full detail - row by row instructions cs abbreviated version . Thank you
28.07.2024 - 12:41DROPS Design ha risposto:
Witaj Kasiu, niestety ten wzór jest dostępny w takiej formie. Możesz skorzystać z naszych instrukcji video, kursów, a jeśli w dalszym ciągu masz jakieś wątpliwości, proszę zadaj pytanie przez formularz kontaktowy na dole strony. Postaramy się pomóc. Pozdrawiamy!
28.07.2024 - 15:52
|
||||||||||
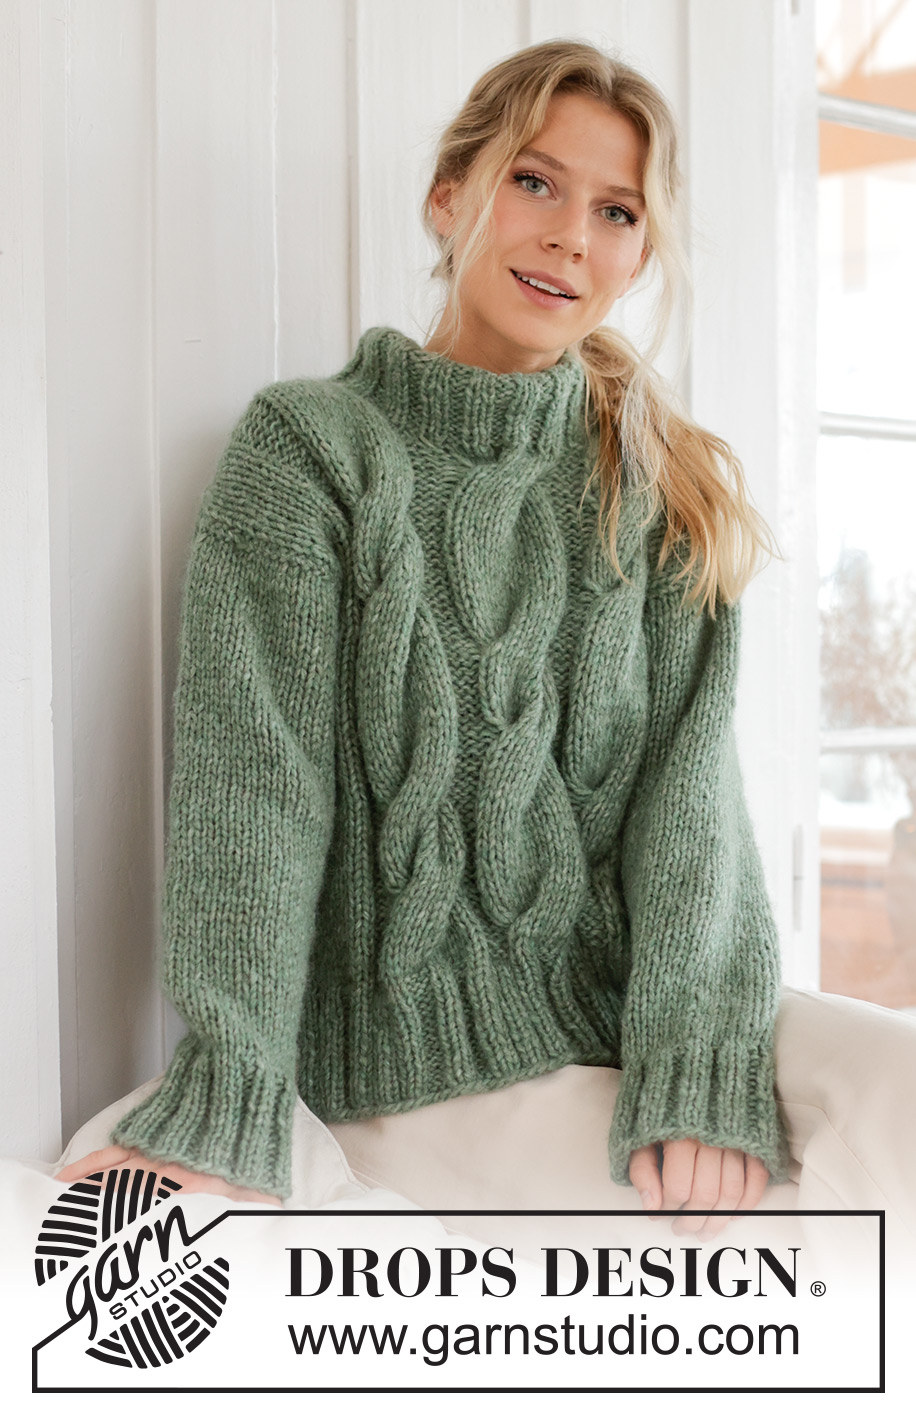
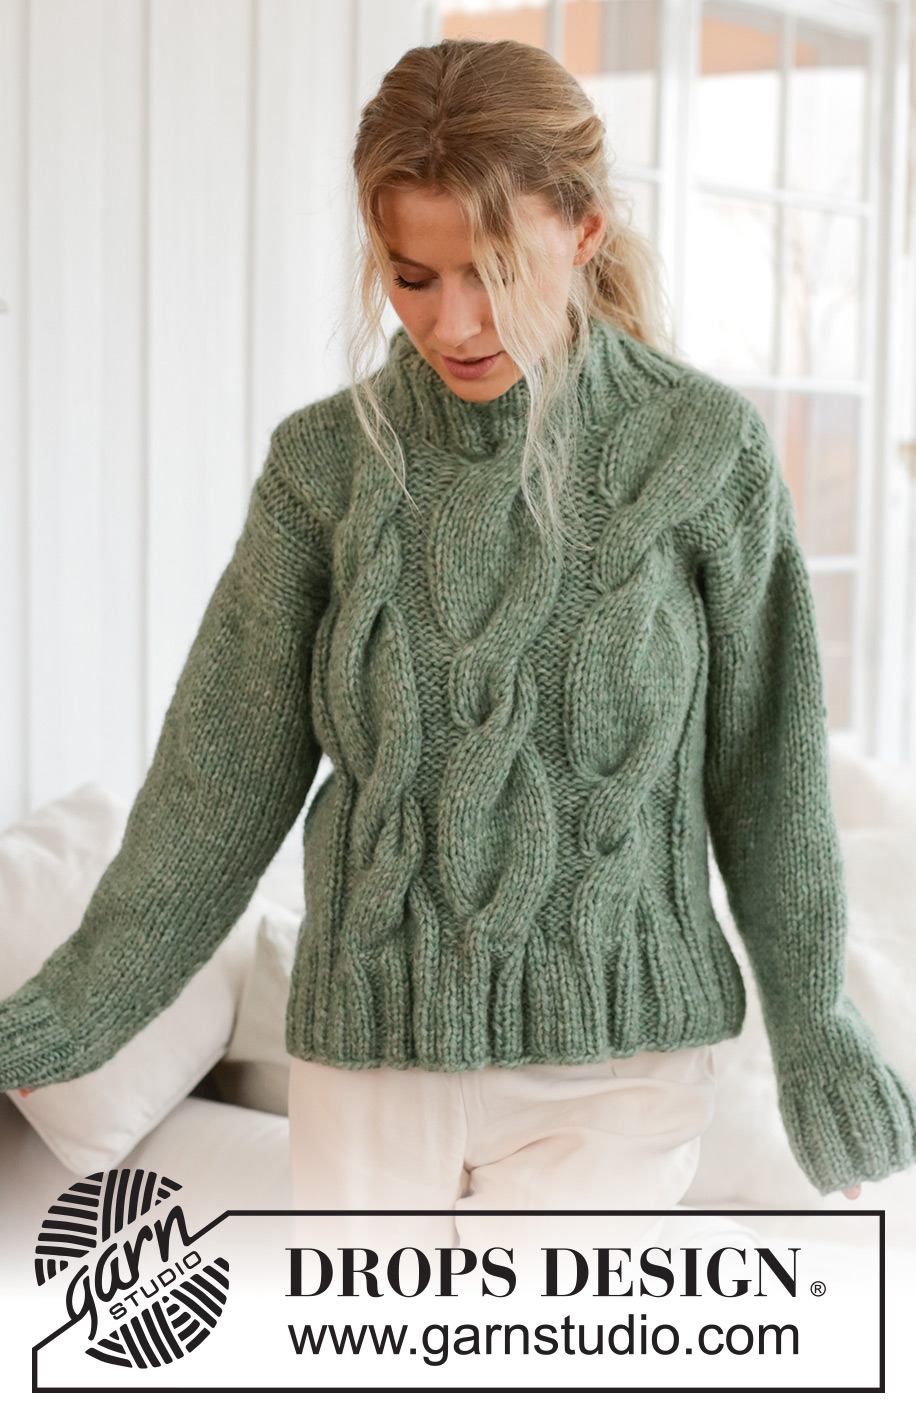
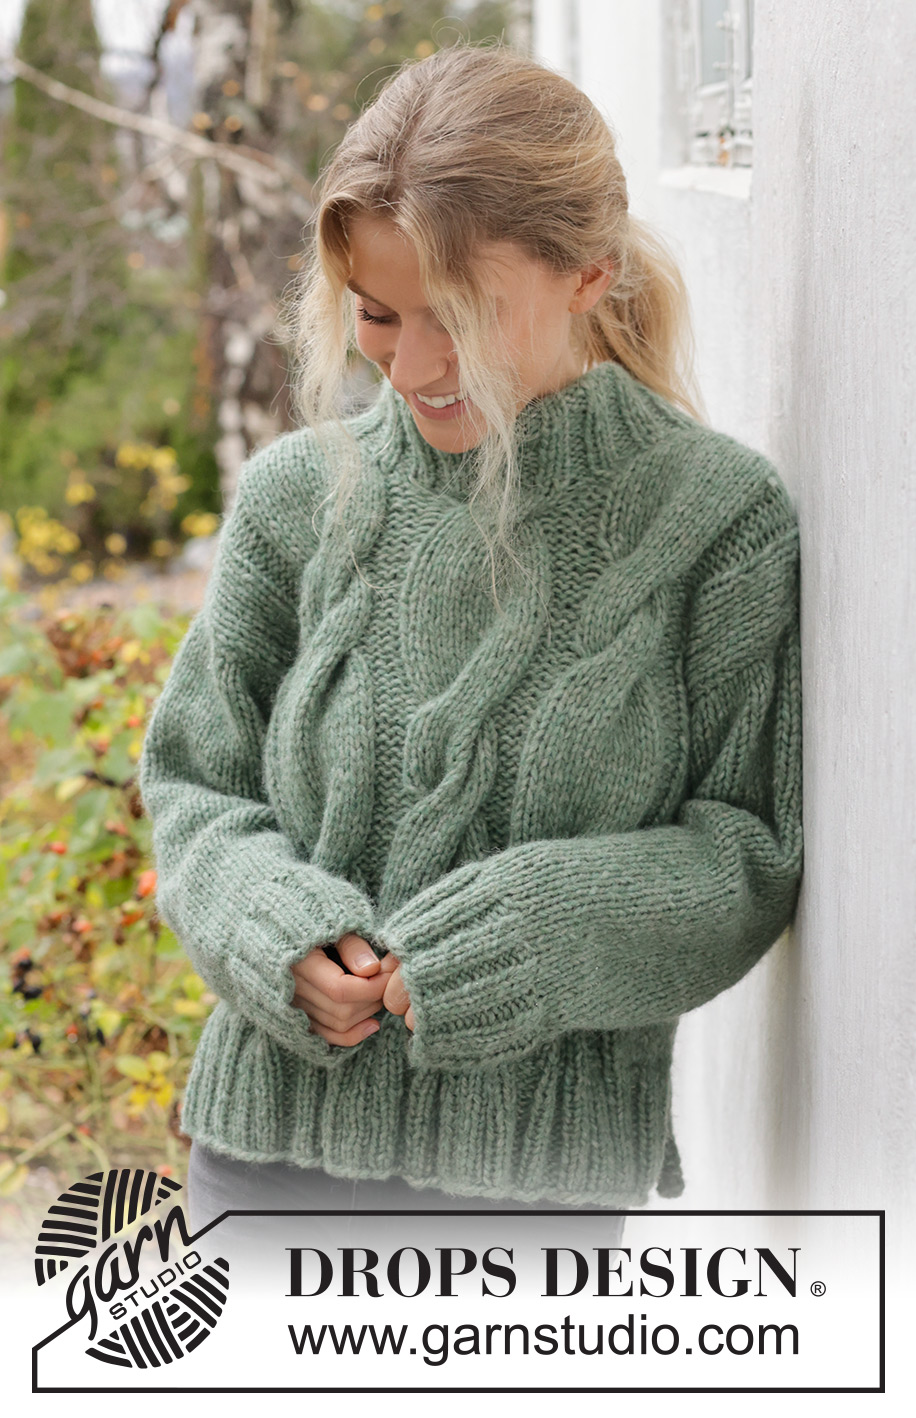
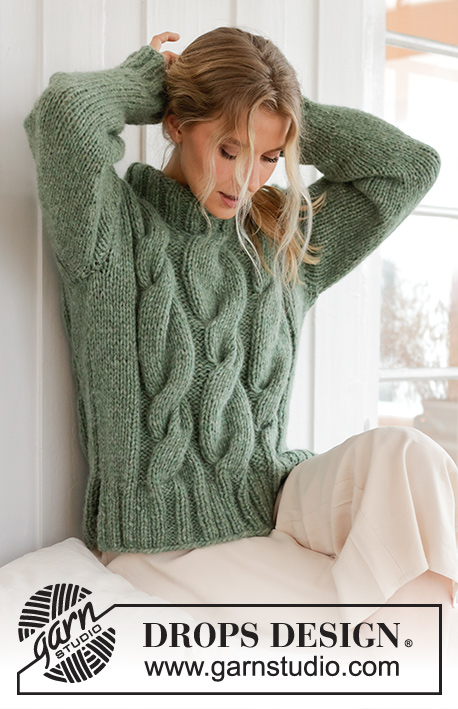
Scent of Sage#scentofsagesweater |
||||||||||
 |
 |
|||||||||
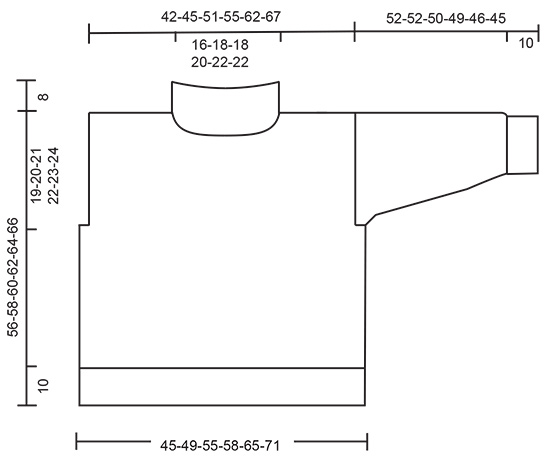
Maglione lavorato ai ferri con 1 capo di DROPS Wish o 2 capi di DROPS Air. Lavorato con trecce e collo doppio. Taglie: S - XXXL.
DROPS 226-62 |
||||||||||
|
------------------------------------------------------- TECNICHE IMPIEGATE: ------------------------------------------------------- COSTA/MAGLIA LEGACCIO (avanti e indietro): Lavorare tutti i ferri a diritto. 1 costa in altezza = 2 ferri diritto. MOTIVO: Vedere i diagrammi A.1 - A.3. I diagrammi mostrano tutti i ferri del motivo visti dal diritto del lavoro. SUGGERIMENTO PER LE DIMINUZIONI (collo): Diminuire all’inizio del ferro (spalla destra): 1 maglia diritto, passare 1 maglia a diritto senza lavorarla, 2 maglie insieme a diritto, accavallare la maglia passata sopra quelle appena lavorate insieme. Diminuire alla fine del ferro (spalla sinistra): Lavorare fino a quando rimangono 4 maglie, 3 maglie insieme a diritto, 1 maglia diritto. SUGGERIMENTO PER GLI AUMENTI (applicato alle maniche): Lavorare fino a quando rimane 1 maglia prima del segnapunti, 1 gettato, 2 maglie diritto (il segnapunti è al centro di queste 2 maglie), 1 gettato. Sul giro successivo lavorare i gettati a diritto ritorto per evitare buchi. Poi lavorare le nuove maglie a maglia rasata. ------------------------------------------------------- INIZIO DEL LAVORO: ------------------------------------------------------- MAGLIONE – BREVE RIASSUNTO DEL LAVORO: Lavorare il davanti e il dietro in modo separato in piano e dal basso verso l’alto con i ferri circolari. Lavorare le maniche in tondo con i ferri a doppia punta/ferri circolari corti. Unire le sezioni e lavorare il collo alla fine. DAVANTI: Avviare 74-74-82-90-98-98 maglie con i ferri circolari n° 7 mm con 1 capo di DROPS Wish o 2 capi di DROPS Air. Lavorare 1 ferro rovescio dal rovescio del lavoro. Poi lavorare come segue dal diritto del lavoro: 1 maglia di vivagno a MAGLIA LEGACCIO – leggere la descrizione sopra, 2 maglie diritto, * 2 maglie rovescio, 2 maglie diritto *, lavorare *-* 2-2-3-4-5-5 volte, lavorare A.1 3 volte, poi le prime 4 maglie di A.1, 2 maglie diritto, * 2 maglie rovescio, 2 maglie diritto *, lavorare *-* 2-2-3-4-5-5 volte, 1 maglia di vivagno a maglia legaccio. Continuare queste coste per 10 cm. Passare ai ferri circolari n° 8 mm e lavorare come segue dal diritto del lavoro: lavorare a maglia rasata sulle prime 11-11-15-19-23-23 maglie, ALLO STESSO TEMPO diminuire 3-1-2-4-4-1 maglie in modo uniforme, 4 maglie rovescio, A.2, 4 maglie rovescio, A.3, 4 maglie rovescio, A.2, 4 maglie rovescio, maglia rasata sulle ultime 11-11-15-19-23-23 maglie, ALLO STESSO TEMPO diminuire 3-1-2-4-4-1 maglie in modo uniforme = 68-72-78-82-90-96 maglie. Continuare questo motivo. FARE ATTENZIONE ALLA TENSIONE DEL LAVORO! Quando il lavoro misura 37-38-39-40-41-42 cm, intrecciare 2 maglie all’inizio dei 2 ferri successivi per gli scalfi = 64-68-74-78-86-92 maglie. Continuare il motivo fino a quando il lavoro misura 50-52-53-55-56-58 cm. Sul ferro successivo mettere in sospeso le 20-22-22-24-26-26 maglie centrali per il collo e finire ogni spalla in modo separato. Diminuire come segue su ogni ferro dal diritto del lavoro all’altezza del collo: 2 maglie 4 volte – leggere il SUGGERIMENTO PER LE DIMINUZIONI = 14-15-18-19-22-25 maglie sulla spalla. Lavorare a maglia rasata sulle trecce quando non c’è più spazio per le trecce. Lavorare fino a quando il lavoro misura 56-58-60-62-64-66 cm, intrecciare. Lavorare l’altra spalla nello stesso modo. DIETRO: Avviare 56-60-68-72-80-88 maglie con i ferri circolari n° 7 mm con 1 capo di DROPS Wish o 2 capi di DROPS Air. Lavorare 1 ferro rovescio dal rovescio del lavoro. Poi lavorare come segue dal diritto del lavoro: 1 maglia di vivagno a maglia legaccio, 2 maglie diritto, * 2 maglie rovescio, 2 maglie diritto *, lavorare *-* fino a quando rimane 1 maglia, 1 maglia di vivagno a maglia legaccio. Continuare queste coste per 10 cm. Passare ai ferri circolari n° 8 mm. Lavorare 1 ferro in cui diminuire 6-6-8-8-8-10 maglie in modo uniforme = 50-54-60-64-72-78 maglie. Lavorare a maglia rasata su tutte le maglie. Quando il lavoro misura 37-38-39-40-41-42 cm, intrecciare 2 maglie all’inizio dei 2 ferri successivi per gli scalfi = 46-50-56-60-68-74 maglie. Continuare a maglia rasata fino a quando il lavoro misura 54-56-58-60-62-64 cm. Sul ferro successivo intrecciare le 16-18-18-20-22-22 maglie centrali per il collo e finire ogni spalla in modo separato. Poi intrecciare 1 maglia sul ferro successivo dal collo = 14-15-18-19-22-25 maglie per la spalla. Lavorare fino a quando il lavoro misura 56-58-60-62-64-66 cm, intrecciare. Lavorare l’altra spalla nello stesso modo. MANICHE: Avviare 36-40-40-44-44-48 maglie con i ferri a doppia punta/ferri circolari corti n° 7 mm con 1 capo di DROPS Wish o 2 capi di DROPS Air. Lavorare 1 giro diritto, poi lavorare a coste (2 maglie diritto, 2 maglie rovescio) in tondo per 10 cm. Passare ai ferri a doppia punta n° 8 mm. Lavorare 1 giro diritto in cui diminuire 4-6-4-6-4-6 maglie in modo uniforme = 32-34-36-38-40-42 maglie. Inserire un segnapunti all’inizio del giro = centro sotto la manica. Lavorare a maglia rasata fino a quando il lavoro misura 11 cm. Ora aumentare 1 maglia a entrambi i lati del segnapunti – leggere il SUGGERIMENTO PER GLI AUMENTI. Aumentare in questo modo ogni 9½-9½-9-9-8½-8 cm per un totale di 5 volte = 42-44-46-48-50-52 maglie. Intrecciare quando la manica misura 52-52-50-49-46-45 cm. Lavorare l’altra manica nello stesso modo. CONFEZIONE: Cucire i margini delle spalle. Cucire i margini laterali nel filo più esterno della maglia più esterna, fino alle coste (10 cm di spacco in basso). Attaccare le maniche. COLLO DOPPIO: Iniziare dal diritto del lavoro all’altezza di una spalla e riprendere 60 - 76 maglie attorno al collo (comprese le maglie in sospeso), con i ferri circolari corti n° 7 mm e 1 capo di DROPS Wish o 2 capi di DROPS Air. Il n° di maglie dev’essere divisibile per 4. Lavorare a coste (2 maglie diritto, 2 maglie rovescio) in tondo per 16 cm. Intrecciare. Piegare il collo a metà verso l’interno e cucire. Per evitare che il collo risulti tirato e si arrotoli all’esterno, è importante che la cucitura sia elastica. |
||||||||||
Spiegazioni del diagramma |
||||||||||
|
||||||||||
 |
||||||||||
 |
||||||||||
Avete terminato questo modello?Allora taggate le vostre foto con #dropspattern #scentofsagesweater o inviatele alla #dropsfan gallery. Avete bisogno di aiuto con questo modello?Troverete 34 video tutorial, una sezione per i commenti/domande e molto altro guardando il modello su www.garnstudio.com © 1982-2026 DROPS Design A/S. Ci riserviamo tutti i diritti. Questo documento, compreso tutte le sue sotto-sezioni, è protetto dalle leggi sul copyright. Potete leggere quello che potete fare con i nostri modelli alla fine di ogni modello sul nostro sito. |
||||||||||


Con oltre 40 anni di esperienza nel design di modelli di maglia e uncinetto, DROPS Design offre la più estesa collezione di modelli gratuiti su internet - tradotti in 17 lingue. Ad oggi vi possiamo fornire 324 cataloghi e 12290 modelli - 9561 dei quali sono tradotti in Italiano.
Ci stiamo impegnando molto per darvi il meglio che vi possiamo offrire in termini di maglia e uncinetto, ispirazioni e consigli così come filati di grande qualità ad un prezzo incredibile! Volete utilizzare i nostri modelli per qualcosa d'altro oltre al vostro uso personale? Potete leggere tutto ciò che è consentito nel testo sul Copyright in basso su tutte le pagine dei nostri modelli. Buon lavoro!
Lasciare un commento sul modello DROPS 226-62
Noi saremmo felici di ricevere i tuoi commenti e opinioni su questo modello!
Se vuoi fare una domanda, fai per favore attenzione a selezionare la categoria corretta nella casella qui sotto per velocizzare il processo di risposta. I campi richiesti sono indicati da *.