
Categorie popolari
State cercando un filato?


Commenti / Domande (17)
![]() Ingela ha scritto:
Ingela ha scritto:
Om jag vill byta 5 nystan á 50 gram av Drops Air till Drops Big Merino, hur många nystan behöver jag då?
23.02.2026 - 09:01DROPS Design ha risposto:
Hei Ingela. 1 nøste / 50 gram DROPS Air har en løpelengde på 150 meter x 5 nøster = 750 meter. DROPS Big Merino har en løpelengde på 75 meter pr 50 gram. Ta da løpelengden til Air (på 5 nøster) = 750 meter og dele det på Big Merinos løpelengde = 750m / 75m = 10. Du trenger da 10 nøster a 50 gram av Big Merino for å få samme løpelengde som 5 nøster Air. mvh DROPS Design
23.02.2026 - 09:29
![]() Floriana ha scritto:
Floriana ha scritto:
Hello, I started knitting this jumper but I already did the sleeve twice first with 40 stitches then 34 but it looks massive, then I realized that I use 40 stitches for my jumpers but here I am knitting for a 9 years old, how can it be possible? Drops Air and needle 5. Can you help?
29.12.2025 - 17:02
![]() Natalia ha scritto:
Natalia ha scritto:
Bardzo fajny wzor. Jestem na etapie dekoltu. Robię rozmiar 152. Według opisu mam nabrać 74 oczka, ale na samych nickach pozostało 60 oczek. Zostaje tylko 14 oczek na boki dekoltu, podczas gdy tworzy je około 14 rzędów, zatem oczek do nabrania będzie w sumie 88. A może powinnam nabrać 74 oczka, ale nie patrząc na to co mam, tylko optycznie zwaężając dekoltu?
12.12.2025 - 21:28DROPS Design ha risposto:
Witaj Natalio, na nitkach powinnaś mieć 28 o. (na tyle) i 22 o. (na przodzie) = 50 o. Zostaje 24 oczka do nabrania. Pozdrawiamy!
13.12.2025 - 12:23
![]() Ilda Bessa ha scritto:
Ilda Bessa ha scritto:
Boa Tarde. Por favor podem me explicar se no inicio trabalham 148 pontos em círculo? Esses 148 pontos são frente e costas juntos?
31.10.2025 - 16:15DROPS Design ha risposto:
Bom dia, Sim, esses 148 pontos se tricotam em circular e constituem o corpo do pulôver, ou seja, costas e frente juntas. Bons tricôs!
05.11.2025 - 10:41
![]() Ana Ramirez ha scritto:
Ana Ramirez ha scritto:
Jeg strikker størrelse 134, det står at ermet skal strikkes til 39 cm. Men i diagrammet man kan beregne 35 cm. Hvordan måler man?
08.06.2025 - 20:48DROPS Design ha risposto:
Hei Ana, I din størrelse skal ermet måle 46 cm når det er strikket ferdig. Du strikker rundt til ermet måler 39 cm (med vrangbord inkludert), deretter strikker ermetopp frem og tilbake som beskrevet i teksten til ferdig mål. Hilsen Drops team.
09.06.2025 - 06:17
![]() Ana Ramirez ha scritto:
Ana Ramirez ha scritto:
Jeg strikker størrelse 134, det står at ermet skal strikkes til 39 cm. Men i diagrammet man kan beregne 35 cm. Hvordan måler man?
08.06.2025 - 20:27DROPS Design ha risposto:
Hej Ana, du strikker ærmet til det måler 39 cm, så strikker du ærmekuppel til det måler 45 cm og til strikker du yderligere 2 pinde og lukker af når ærmet måler 46 cm. Det er det samme som står i måleskitsen :)
12.06.2025 - 08:45
![]() Julie MCALEER ha scritto:
Julie MCALEER ha scritto:
Bonjour, pour les manches "Rabattre ensuite 2 mailles de chaque côté jusqu'à ce que la manche mesure ..." : cela veut-il dire qu'on doit rabattre 2 mailles de chaque côté à chaque rang jusqu'à la longueur voulue? Ou bien, on rabat 2 mailles de chaque côté une fois et puis on continue avec toutes les mailles restantes jusqu'à la dernière diminution (3 mailles 1 fois de chaque côté)? Dans l'image et le diagramme on a l'impression que c'est la deuxième interprétation...
05.06.2025 - 15:44DROPS Design ha risposto:
Bonjour Mme Mcaleer, on va rabattre 2 mailles au début de chaque rang de chaque côté = aussi bien en début de rang sur l'endroit qu'au début du rang suivant sur l'envers et ainsi jusqu'à la hauteur indiquée, veillez juste à bien avoir rabattu le même nombre de fois 2 mailles sur l'endroit et sur l'envers pour que la manche soit symétrique, puis rabattez 3 mailles au début des 2 rangs suivants. Bon tricot!
05.06.2025 - 16:03
![]() Gretel ha scritto:
Gretel ha scritto:
Cast off for the armholes at the beginning of each row: 2 stitches 1 time and 1 stitch 1 time on each side” I don’t understand that part and I’m a beginner and I’m hesitant i might not be able to do it
06.04.2025 - 02:46DROPS Design ha risposto:
Dear Gretel, in the back piece you cast off for both armholes, one is at the beginning of the row and one is at the end of the row. The first time you cast off 2 stitches at the beginning of one row (for the first armhole), continue working the row and get to the end of the row. Now, turn the piece, cast off the first 2 stitches (for the 2nd armhole) and work until the end of the row. Turn the piece, cast off 1 stitch (1st armhole) and continue until the end of the row. Turn the piece, cast off 1 stitch (2nd armhole) and work until the end of the row. You should have cast off on each side (for each armhole) 2 stitches 1 time and 1 stitch 1 time. Happy knitting!
06.04.2025 - 22:23
![]() Camille Bertet ha scritto:
Camille Bertet ha scritto:
Bonjour, je n'ai pas bien compris les explications pour faire le col. Je vous remercie d'avance pour votre réponse.
22.08.2024 - 00:18DROPS Design ha risposto:
Bonjour Mme Bertet, relevez les mailles du col en commençant soit au milieu dos soit à la couture de l'une des épaules et relevez les mailles tout autour de l'encolure y compris les mailles en attente au milieu devant, et tricotez en rond, en côtes 1 m end, 1 m env pendant 8 cm. Rabattez les mailles, pliez le col en double sur l'envers et cousez-le pour le maintenir (f vidéo). Bon tricot!
22.08.2024 - 08:39
![]() Isabelle Poinsot ha scritto:
Isabelle Poinsot ha scritto:
Le diagramme me semble de taille adulte car les mensurations ne correspondent pas à celles indiquées dans le texte.
08.02.2024 - 22:54DROPS Design ha risposto:
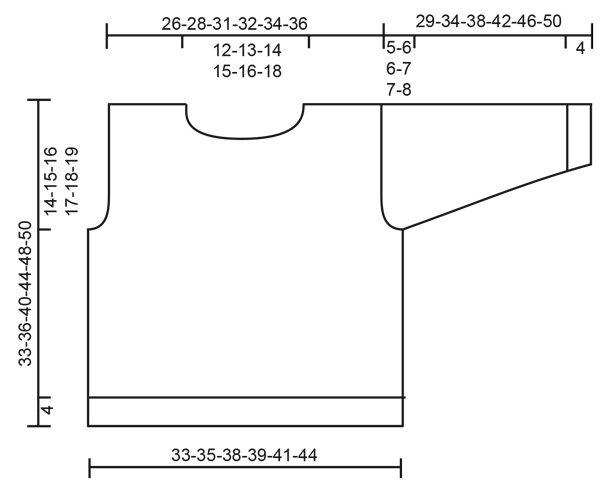
Bonjour Mme Poinsot, les mesures sont les mêmes dans les explications et dans le schéma, vous avez bien 4 cm de côtes au début, 19-21-24-27-30-31 cm avant les emmanchures et 33-36-40-44-48-50 cm de hauteur totale, soit 14-15-16-17-18-19 cm de hauteur d'emmanchures. Bon tricot!
20.02.2024 - 09:35
|
|
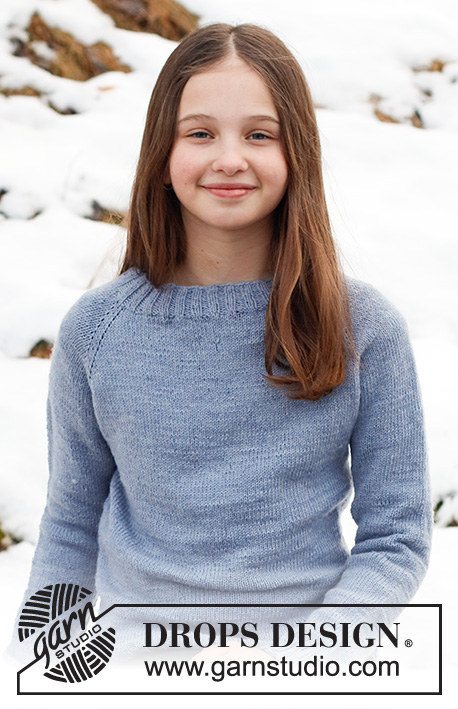
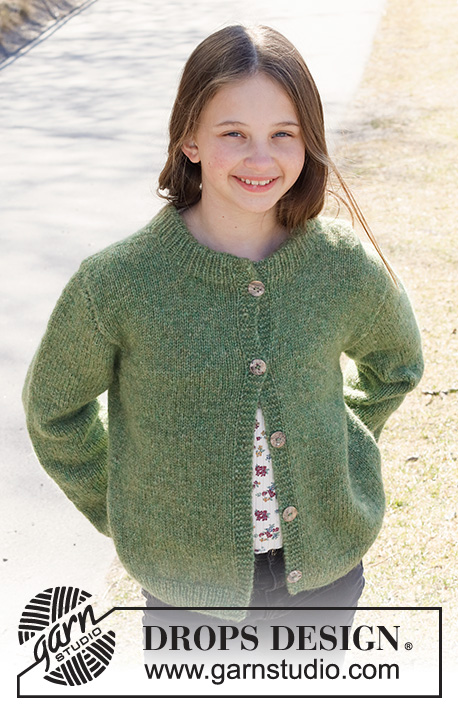
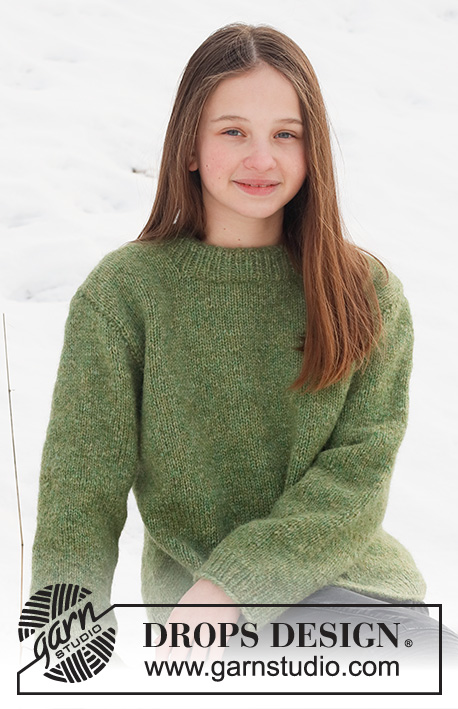
Fresh Lime#freshlimesweater |
|
 |
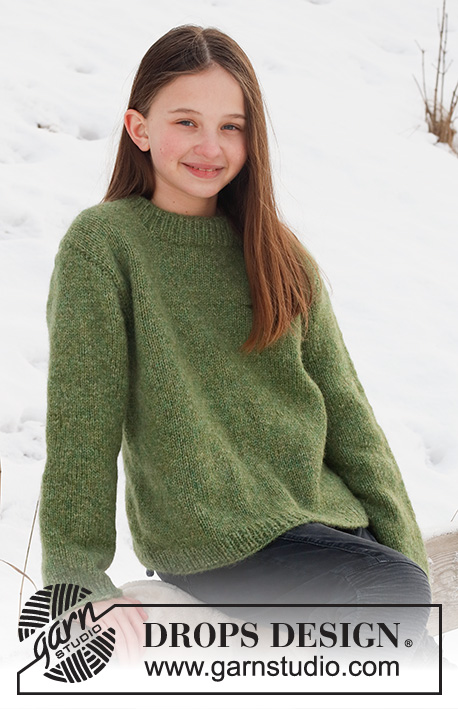 |
Maglione lavorato ai ferri in DROPS Air. Lavorato con collo doppio. Taglie: 2 – 12 anni.
DROPS Children 41-12 |
|
|
------------------------------------------------------- TECNICHE IMPIEGATE: ------------------------------------------------------- SUGGERIMENTO PER GLI AUMENTI: Lavorare fino a quando rimangono 2 maglie prima del segnapunti, 1 gettato, 4 maglie diritto (il segnapunti è al centro di queste 4 maglie), 1 gettato. Sul giro successivo lavorare il gettato a diritto ritorto per evitare buchi (= 2 aumenti). SUGGERIMENTO PER LA CHIUSURA: Per evitare che il bordo di chiusura sia tirato potete intrecciare con un ferro di una misura più grande. Se il bordo risulta ancora tirato, fare 1 gettato dopo circa 4 maglie durante la chiusura e intrecciare i gettati come maglie normali. ------------------------------------------------------- INIZIO DEL LAVORO: ------------------------------------------------------- MAGLIONE – BREVE RIASSUNTO DEL LAVORO: Lavorare in tondo con i ferri circolari, dal basso fino agli scalfi, poi dividere il lavoro e finire il davanti e dietro in modo separato. Lavorare le maniche in tondo con i ferri a doppia punta, dal basso verso l’alto fino all’arrotondamento della manica, poi in piano. Lavorare il collo alla fine. CORPO: Avviare 112-120-128-132-140-148 maglie con i ferri circolari n° 4 mm e DROPS Air. Lavorare 1 giro diritto. Poi lavorare a coste (1 maglia diritto, 1 maglia rovescio) per 4 cm. Passare ai ferri circolari n° 5 mm. Lavorare a maglia rasata. FARE ATTENZIONE ALLA TENSIONE DEL LAVORO! Quando il lavoro misura 19-21-24-27-30-31 cm, intrecciare per gli scalfi sul giro successivo come segue: Intrecciare le prime 6 maglie, lavorare 50-54-58-60-64-68 maglie (= davanti), intrecciare 6 maglie, lavorare le ultime 50-54-58-60-64-68 maglie (= dietro). Finire il davanti e dietro in modo separato. DIETRO: Continuare a maglia rasata, ALLO STESSO TEMPO intrecciare per gli scalfi all’inizio di ogni ferro: 2 maglie 1 volta e 1 maglia 1 volta a ogni lato = 44-48-52-54-58-62 maglie. Quando il lavoro misura 31-34-38-42-46-48 cm, intrecciare le 18-20-22-24-26-28 maglie centrali per il collo e finire ogni spalla in modo separato (= 13-14-15-15-16-17 maglie su ogni spalla). Intrecciare 1 maglia sul ferro successivo dal collo = 12-13-14-14-15-16 maglie. Continuare a maglia rasata fino a quando il lavoro misura 33-36-40-44-48-50 cm (= 14-15-16-17-18-19 cm dalla parte inferiore dello scalfo), intrecciare. Lavorare l’altra spalla nello stesso modo. DAVANTI: Lavorare nello stesso modo del dietro fino a quando il lavoro misura 29-31-35-38-42-43 cm = 44-48-52-54-58-62 maglie. Mettere in sospeso le 14-16-18-18-20-22 maglie centrali per il collo e finire ogni spalla in modo separato (= 15-16-17-18-19-20 maglie su ogni spalla). Intrecciare su ogni ferro dal collo come segue: 2 maglie 1 volta e 1 maglia 1-1-1-2-2-2 volte = 12-13-14-14-15-16 maglie sulla spalla. Continuare a lavorare fino a quando il lavoro misura 33-36-40-44-48-50 cm (= 14-15-16-17-18-19 cm dalla parte inferiore dello scalfo), intrecciare. Lavorare l’altra spalla nello stesso modo. MANICHE: Avviare 32-34-36-38-40-42 maglie con i ferri a doppia punta n° 4 mm e DROPS Air. Lavorare 1 giro diritto poi lavorare a coste (1 maglia diritto, 1 maglia rovescio) per 4 cm. Passare ai ferri a doppia punta n° 5 mm e lavorare a maglia rasata. Inserire un segnapunti all’inizio del giro = centro sotto la manica. Quando la manica misura 8 cm, aumentare 1 maglia a ogni lato del segnapunti – leggere il SUGGERIMENTO PER GLI AUMENTI. Aumentare in questo modo ogni 2-3-3½-4-4-4½ cm per un totale di 7-7-7-7-8-8 volte = 46-48-50-52-56-58 maglie. Quando la manica misura 24-28-32-35-39-42 cm, intrecciare 3 maglie a ogni lato del segnapunti e lavorare la manica in piano. Intrecciare all’inizio di ogni ferro come segue: 2 maglie 2 volte e 1 maglia 1-1-2-2-2-2 volte a ogni lato. Poi intrecciare 2 maglie a ogni lato fino a quando la manica misura 28-33-37-41-45-49 cm, 3 maglie 1 volta a ogni lato, poi intrecciare le maglie rimaste. La manica misura circa 29-34-38-42-46-50 cm. Lavorare l’altra manica nello stesso modo. CONFEZIONE: Cucire i margini delle spalle. Attaccare le maniche. COLLO: Iniziare all’altezza della cucitura di una spalla e riprendere 48 - 74 maglie (comprese le maglie in sospeso e il n° delle maglie dev’essere divisibile per 2) attorno al collo, con i ferri circolari n° 4 mm. Lavorare a coste in tondo (1 maglia diritto, 1 maglia rovescio) per 8 cm. Intrecciare con diritto su diritto e rovescio su rovescio – leggere il SUGGERIMENTO PER LA CHIUSURA. CONFEZIONE: Piegare il collo e metà verso l’interno e cucire. Per evitare che il collo risulti tirato e si arrotoli verso l’esterno, è importante che la cucitura sia elastica. |
|
 |
|
Avete terminato questo modello?Allora taggate le vostre foto con #dropspattern #freshlimesweater o inviatele alla #dropsfan gallery. Avete bisogno di aiuto con questo modello?Troverete 29 video tutorial, una sezione per i commenti/domande e molto altro guardando il modello su www.garnstudio.com © 1982-2026 DROPS Design A/S. Ci riserviamo tutti i diritti. Questo documento, compreso tutte le sue sotto-sezioni, è protetto dalle leggi sul copyright. Potete leggere quello che potete fare con i nostri modelli alla fine di ogni modello sul nostro sito. |
|


Con oltre 40 anni di esperienza nel design di modelli di maglia e uncinetto, DROPS Design offre la più estesa collezione di modelli gratuiti su internet - tradotti in 17 lingue. Ad oggi vi possiamo fornire 324 cataloghi e 12290 modelli - 9561 dei quali sono tradotti in Italiano.
Ci stiamo impegnando molto per darvi il meglio che vi possiamo offrire in termini di maglia e uncinetto, ispirazioni e consigli così come filati di grande qualità ad un prezzo incredibile! Volete utilizzare i nostri modelli per qualcosa d'altro oltre al vostro uso personale? Potete leggere tutto ciò che è consentito nel testo sul Copyright in basso su tutte le pagine dei nostri modelli. Buon lavoro!
Lasciare un commento sul modello DROPS Children 41-12
Noi saremmo felici di ricevere i tuoi commenti e opinioni su questo modello!
Se vuoi fare una domanda, fai per favore attenzione a selezionare la categoria corretta nella casella qui sotto per velocizzare il processo di risposta. I campi richiesti sono indicati da *.