
Categorie popolari
State cercando un filato?


Commenti / Domande (41)
![]() Tina ha scritto:
Tina ha scritto:
Hei, Jeg skal begynne å strikke halsen, men forstår ikke hvordan dette skal gjøres. Jeg har lagt opp 12 nye masker midt foran, og klippet tråden. Det står nå at jeg skal begynne å strikke rundt midt bak der jeg har satt maskemarkøren. Hvordan i alle dager starter jeg midt bak? Savner dette i oppskriften. Hilsen Tina
24.11.2025 - 11:30DROPS Design ha risposto:
Hei Tine. Om du har satt et merke ca midt bak i en patent maske, kan du nå flytte maskene du har på din venste side over til høyre side (ikke strikke maskene, bare løft de over). Flytt over alle maskene til du kommer til merket du satte ca midt bak. Nå kan du begynne å strikke rundt og det fortsettes med A.1 over alle maskene. Pass på at mønsteret går opp hele veien rundt. Når arbeidet måler 8 cm fra merket midt bak, starter økningene. mvh DROPS Design
24.11.2025 - 13:49
![]() Doreen George ha scritto:
Doreen George ha scritto:
Hello Looking for an adult balaclava using 2 straight needles please
06.10.2025 - 11:52
![]() LyseRichard ha scritto:
LyseRichard ha scritto:
Comment je repars mon tricot une fois que j’ai coupé le fil après l’ajout des 12 mailles pour faire le bas de la cagoule Je n’ai pas trouvé de vidéo à ce sujet
10.05.2025 - 02:52DROPS Design ha risposto:
Bonjour Mme Richard, glissez les mailles de l'aiguille circulaire de gauche sur celle de droite jusqu'à ce que vous arriviez au milieu du dos, puis joignez le fil et continuez A.1 en rond à partir de là. Bon tricot!
12.05.2025 - 07:37
![]() Fay ha scritto:
Fay ha scritto:
På mittpartiet står det När arbetet mäter 13-14 cm och nästa varv stickas från avigsidan, maskas det av 1 kantmaska i varje sida = 22-22 maskor på varvet. Men jag har nu maska av första kantmaskan och fortsatte mönster a.1 på 22 maskor men nu fattar jag inte hur jag ska maska av Endast sista kantmaskan? Om jag maskar av som jag vet så blir ju kantmaskan kvar och i stället försvinner sista maska på mönstret a.1
20.01.2025 - 10:17DROPS Design ha risposto:
Hej Fay, kantmasken i den anden side masker du av når du har vendt arbejdet og strikker tilbage :)
22.01.2025 - 14:01
![]() Deborah Laxague ha scritto:
Deborah Laxague ha scritto:
Thanks for this fun pattern. I wish I could read the questions in other languages because maybe this has already been asked. It looks to me like you've done some decreases at the corner where the final ribbing that circles the face shifts from the part under the chin to the horizontal parts up the side of the face? I don't see that mentioned in the pattern instructions, do you think it's important?
24.10.2024 - 19:09DROPS Design ha risposto:
Dear Mrs Laxague, we are working here from top down, so that there won't be any decreases after face opening when piece is worked in the round but increases that are worked as explained in A.3 under paragraph NECK. Happy knitting!
25.10.2024 - 07:51
![]() Barbara ha scritto:
Barbara ha scritto:
Neck: Started the round at the marker mid-back and continued A1 knit 1 in the stitch below and purl 2 stitches all the way round to the marker. Row 2 for A1 which is purl 2 knit 1 , do I turn my work around and go back in the opposite direction? That will leave a hole, the work will not be joined. Or do I continue A1 as knit 1 in the stitch below and the purl 2 stitches for every row from now on. When do I turn my work to complete the pattern? Is there a video or lesson I can follow?
08.10.2024 - 21:35DROPS Design ha risposto:
See below :)
09.10.2024 - 08:19
![]() Barbara ha scritto:
Barbara ha scritto:
Neck: Started the round at the marker mid-back and continued A1 knit 1 in the stitch below and purl 2 stitches all the way round to the marker. Row 2 for A1 which is purl 2 knit 1 , do I turn my work around and go back in the opposite direction? That will leave a hole, the work will not be joined. Or do I continue A1 as knit 1 in the stitch below and the purl 2 stitches for every row from now on. When do I turn my work to complete the pattern? Is there a video or lesson I can follow?
08.10.2024 - 21:32DROPS Design ha risposto:
Dear Barbara, you now work in the round, this means you read all rows in A.1 from the right towards the left; on 2nd row work (K1, P2), on 3rd row work as 1st row (K1 below, P2). Happy knitting!
09.10.2024 - 08:18
![]() Marta ha scritto:
Marta ha scritto:
Hello, I was wondering ehat the final dimensions are for the pieces. I would like to block them before assembly, but I am not sure how to. Thanks for the help!
03.10.2024 - 12:38DROPS Design ha risposto:
Dear Marta, the whole piece is worked together; it's not separate parts sewn together. You work one piece and knit up stitches to work the next one. So it's difficult to block this. As you can see, there is no assembly section or sewing section in this pattern. Happy knitting!
06.10.2024 - 14:37
![]() Michele Ragusa ha scritto:
Michele Ragusa ha scritto:
I’m wanting to buy yarn for this pattern but don’t seem to see how many yards the pattern calls for. (I’m in the US). I see grams. Can you advise?
28.06.2024 - 17:56DROPS Design ha risposto:
Dear Michele, these patterns are written to support the sales of DROPS yarns, that is why DROPS yarns are listed for materials. You can find how many meters/balls for each yarn under our "yarns" tab. Happy Knitting!
30.06.2024 - 15:28
![]() Jorun ha scritto:
Jorun ha scritto:
Hei! Jeg får ikke A1 til å stemme med videoene som viser hvordan strikke patentmaske. Som jeg forstår det, starter A1 på rettsida, men da strikker man patent i en rettmaske, ikke en vrangmaske, som i videoene. Ikke minst i videoen "Hvordan strikke i masken under og hvordan øke 4 masker i 1 maske" vises et diagram som alternerer med tre rette på vrangsida, ikke en rett og to vrange, som i denne oppskrifta. Kan dere forklare?
18.02.2024 - 10:29DROPS Design ha risposto:
Hei Jorun. I videoen strikkes det i masken under forrige omgang og den er en rettmaske (se diagram A.1 og tidspunkt: 0:36, 1:08, 1:42 og 1:56). Første diagramikon i diagram A.1 i videoen og første diagramikon i diagram A.1 i 214-73 strikkes likt selv om forrige omgang i videoen er vrang, så er det i omgangen under det skal strikkes i og den er rett, både i videoen og i 214-37. Videoen viser øketeknikken (4 økte masker) i A.2. I oppskrift 214-73 gjør du samme øketeknikk, men du må følge forklaringen hvordan maskene skal strikkes i 214-73 på neste omgang (i A.3). mvh DROPS Design
26.02.2024 - 11:08
|
|||||||||||||||||||
Wrapped in Wonder#wrappedinwonderbalaclava |
|||||||||||||||||||
 |
 |
||||||||||||||||||
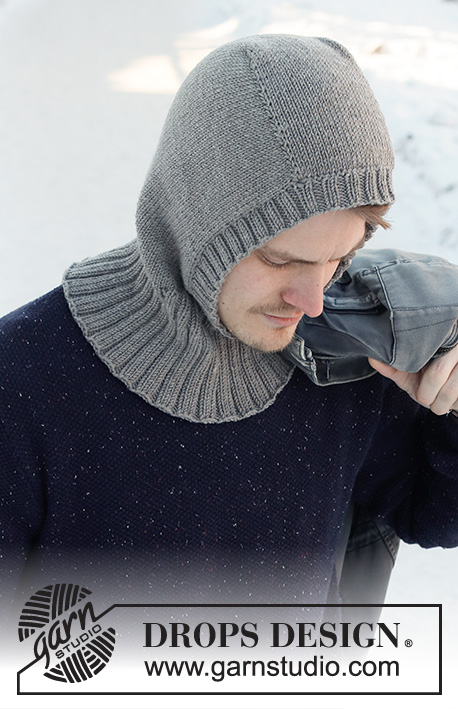
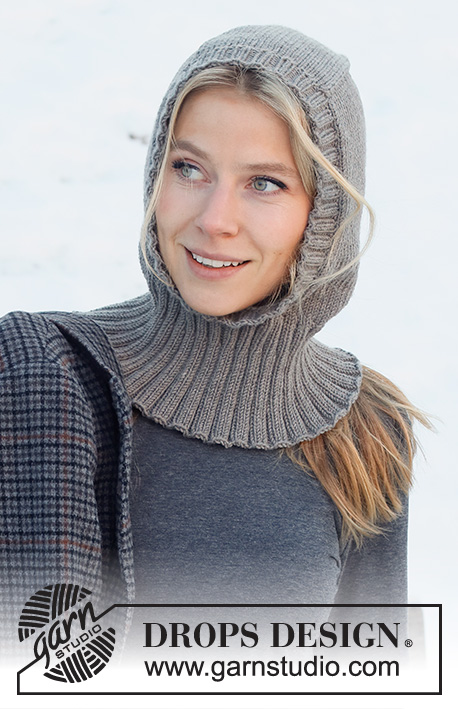
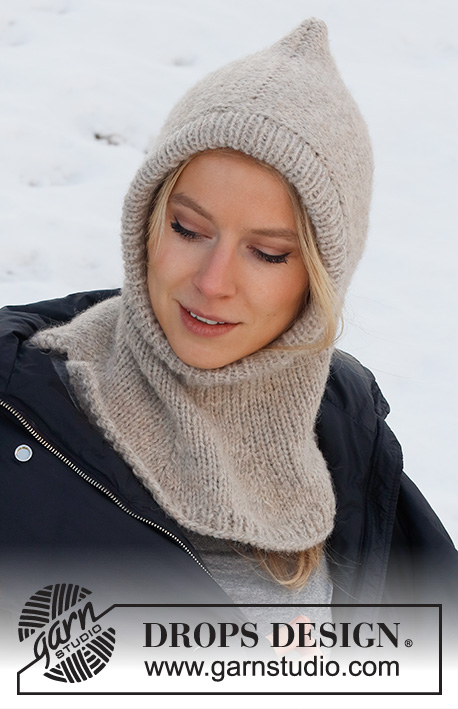
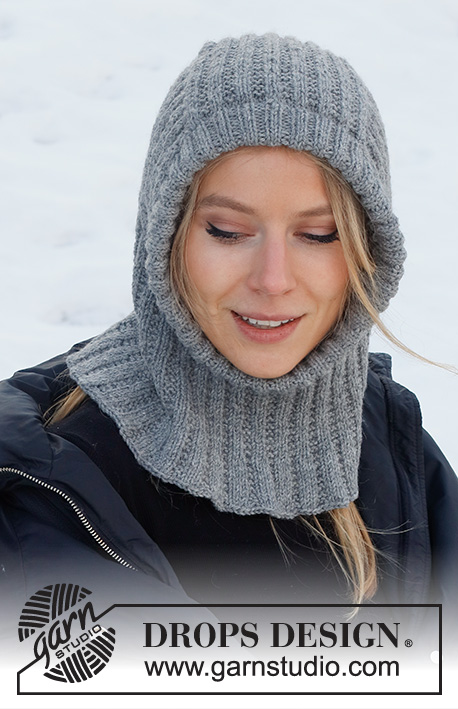
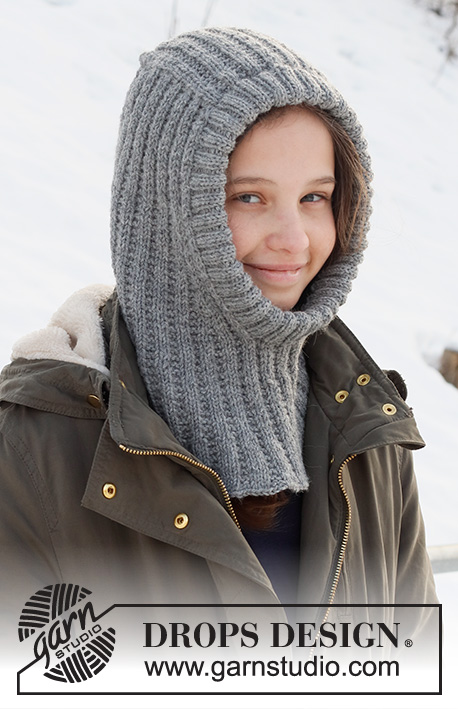
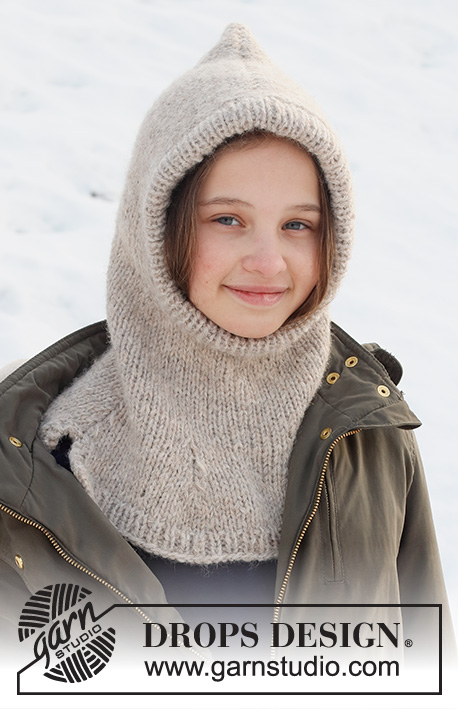
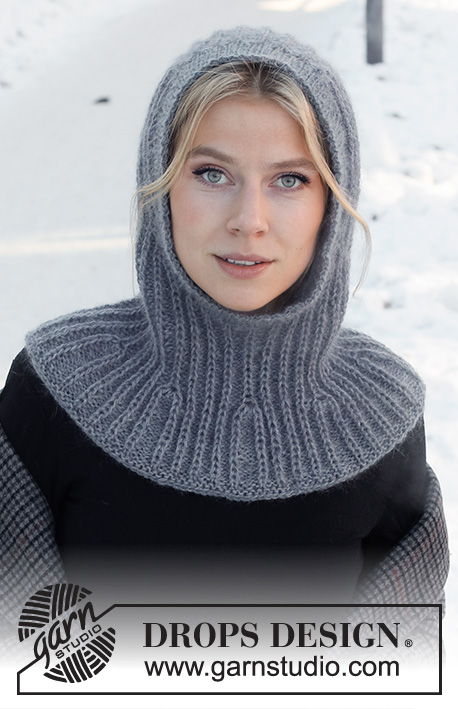
Cappello / passamontagna lavorato ai ferri in DROPS Alpaca e DROPS Kid-Silk. Lavorato dall’alto in basso con Fisherman’s rib e bordo a coste.
DROPS 214-73 |
|||||||||||||||||||
|
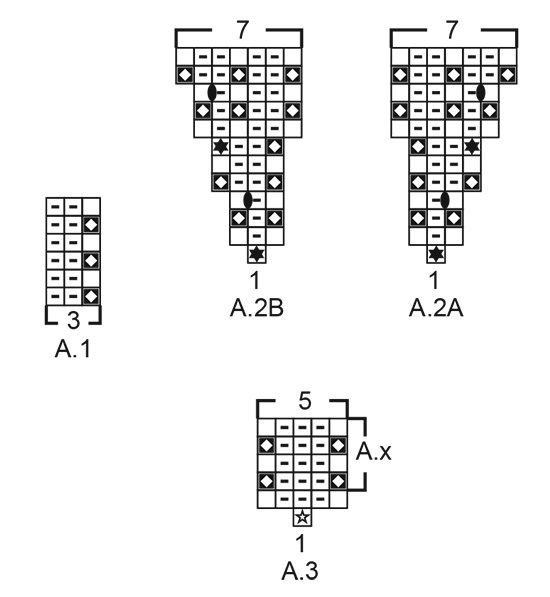
------------------------------------------------------- TECNICHE IMPIEGATE: ------------------------------------------------------- COSTA/MAGLIA LEGACCIO (avanti e indietro): Lavorare tutti i ferri a diritto. 1 costa in altezza = 2 ferri diritto. MOTIVO: Vedere i diagrammi A.1 - A.3. I diagrammi mostrano tutti i ferri del motivo visti dal diritto del lavoro. SUGGERIMENTO PER LA CHIUSURA: Per evitare che il bordo di chiusura sia tirato potete intrecciare con un ferro di una misura più grande. Se il bordo risulta ancora tirato, fare 1 gettato dopo circa 6 maglie durante la chiusura e intrecciare i gettati come maglie normali. ------------------------------------------------------- INIZIO DEL LAVORO: ------------------------------------------------------- PASSAMONTAGNA – BREVE RIASSUNTO DEL LAVORO: Lavorare la sezione centrale in piano con i ferri circolari, dal centro davanti verso il dietro. Riprendere le maglie a ogni lato di questa sezione centrale e continuare il lavoro in piano prima di avviare le maglie per il collo. Finire il resto in tondo. Alla fine lavorare un bordo a coste attorno all’apertura della faccia. SEZIONE CENTRALE: Avviare 24-24 maglie (compresa 1 maglia di vivagno a ogni lato) con i ferri circolari n° 4 mm e 1 capo di Alpaca e 1 capo di Kid-Silk (2 capi). Lavorare 1 ferro rovescio dal rovescio del lavoro. Poi continuare come segue dal diritto del lavoro: 1 maglia di vivagno a MAGLIA LEGACCIO a ogni lato – leggere la descrizione sopra, lavorare A.1 fino a quando rimangono 2 maglie (7-7 ripetizioni di 3 maglie), lavorare la 1° maglia di A.1 (in modo che il motivo inizi e finisca nello stesso modo) e 1 maglia di vivagno a maglia legaccio. Continuare questo motivo in piano. FARE ATTENZIONE ALLA TENSIONE DEL LAVORO! Quando il lavoro misura 13-14 cm e il ferro successivo è dal rovescio del lavoro, intrecciare la maglia di vivagno a ogni lato = 22-22 maglie. Tagliare il filo, poi lavorare il cappuccio come descritto sotto. CAPPUCCIO: Ora riprendere le maglie a ogni lato della sezione centrale dal diritto del lavoro come segue: riprendere 25-28 maglie lungo un lato all’interno della maglia di vivagno, continuare A.1 come prima sulle 22-22 maglie sul ferro e riprendere 25-28 maglie lungo l’altro lato all’interno della maglia di vivagno = 72-78 maglie. Inserire 1 segnapunti al centro del ferro. ORA MISURARE IL LAVORO DA PUNTO IN CUI E’ STATO INSERITO IL SEGNAPUNTI! Continuare A.1 in piano su tutte le maglie con 1 maglia di vivagno a maglia legaccio a ogni lato verso il centro davanti – il motivo deve combaciare con il motivo sulla sezione centrale. Quando il lavoro misura 16-18 cm dal segnapunti e il ferro successivo è dal diritto del lavoro, aumentare a ogni lato verso il centro davanti come segue: 1 maglia di vivagno a maglia legaccio, lavorare A.1 sulle prime 3 maglie, A.2A (= 1 maglia), A.1 come prima fino a quando rimangono 5 maglie, A.2B (= 1 maglia), A.1 sulle 3 maglie successive e finire con 1 maglia di vivagno a maglia legaccio. Continuare questo motivo e con gli aumenti a ogni lato come mostrato nei diagrammi. Alla fine di A.2 ci sono 84-90 maglie. Continuare a lavorare fino a quando il lavoro misura 22-24 cm dal segnapunti – il cappello misura circa 28-30 cm dal centro della sezione centrale in giù. Ora avviare le maglie per il collo (provare il passamontagna e lavorare fino alla lunghezza desiderata prima di avviare le maglie). Avviare 12-18 maglie alla fine del ferro successivo dal diritto del lavoro = 96-108 maglie. Tagliare il filo e togliere il segnapunti. Inserire un nuovo segnapunti nel lavoro, circa al centro dietro, inserito nella maglia a Fisherman’s rib. ORA MISURARE IL LAVORO DA QUESTO SEGNAPUNTI. Continuare a lavorare il collo come descritto sotto. COLLO: Iniziare il giro all’altezza del segnapunti al centro dietro e continuare con A.1 in tondo su tutte le maglie – fare in modo che il motivo combaci su tutto il giro. Quando il lavoro misura 8-8 cm dal segnapunti al centro dietro, aumentare come segue: lavorare A.3 nella maglia con il segnapunti, * A.1 come prima sulle 11 maglie successive, A.3 nella maglia a Fisherman’s rib *, lavorare *-* per un totale di 7-8 volte e A.1 come prima sulle ultime 11 maglie = 128-144 maglie. Continuare a lavorare fino a quando il lavoro misura 15-15 cm dal segnapunti. Lavorare 1 giro diritto e 1 giro rovescio. Poi intrecciare a diritto senza stringere – leggere il SUGGERIMENTO PER LA CHIUSURA! Il cappello misura circa 43-45 cm dal centro della sezione centrale in giù. BORDO ATTORNO ALL’APERTURA DELLA FACCIA: Iniziare dal diritto del lavoro sulla parte inferiore, dove sono state avviate le maglie per il collo. Riprendere 140 - 160 maglie attorno all’apertura, all’interno della maglia di vivagno usando i ferri circolari corti n° 3 mm e 1 capo di Alpaca e 1 capo di Kid-Silk (2 capi). Il n° di maglie dev’essere divisibile per 2. NOTA: Sulla sezione centrale e lungo le maglie avviate per il collo, riprendere 1 maglia in ogni maglia a Fisherman’s rib e 3 maglie tra ogni maglia a Fisherman’s rib. Lavorare a coste in tondo (1 maglia diritto, 1 maglia rovescio) per 3-3 cm – fare in modo che le coste combacino in modo ordinato sulla sezione centrale e sulle maglie avviate. Intrecciare senza stringere con diritto su diritto e rovescio su rovescio – leggere il SUGGERIMENTO PER LA CHIUSURA. |
|||||||||||||||||||
Spiegazioni del diagramma |
|||||||||||||||||||
|
|||||||||||||||||||
 |
|||||||||||||||||||
Avete terminato questo modello?Allora taggate le vostre foto con #dropspattern #wrappedinwonderbalaclava o inviatele alla #dropsfan gallery. Avete bisogno di aiuto con questo modello?Troverete 22 video tutorial, una sezione per i commenti/domande e molto altro guardando il modello su www.garnstudio.com © 1982-2026 DROPS Design A/S. Ci riserviamo tutti i diritti. Questo documento, compreso tutte le sue sotto-sezioni, è protetto dalle leggi sul copyright. Potete leggere quello che potete fare con i nostri modelli alla fine di ogni modello sul nostro sito. |
|||||||||||||||||||


Con oltre 40 anni di esperienza nel design di modelli di maglia e uncinetto, DROPS Design offre la più estesa collezione di modelli gratuiti su internet - tradotti in 17 lingue. Ad oggi vi possiamo fornire 325 cataloghi e 12298 modelli - 9569 dei quali sono tradotti in Italiano.
Ci stiamo impegnando molto per darvi il meglio che vi possiamo offrire in termini di maglia e uncinetto, ispirazioni e consigli così come filati di grande qualità ad un prezzo incredibile! Volete utilizzare i nostri modelli per qualcosa d'altro oltre al vostro uso personale? Potete leggere tutto ciò che è consentito nel testo sul Copyright in basso su tutte le pagine dei nostri modelli. Buon lavoro!
Lasciare un commento sul modello DROPS 214-73
Noi saremmo felici di ricevere i tuoi commenti e opinioni su questo modello!
Se vuoi fare una domanda, fai per favore attenzione a selezionare la categoria corretta nella casella qui sotto per velocizzare il processo di risposta. I campi richiesti sono indicati da *.