
Categorie popolari
State cercando un filato?


Commenti / Domande (18)
![]() Ellen ha scritto:
Ellen ha scritto:
Jeg er usikker på hva dere mener med størrelsene når det står: STØRRELSE: 2 - 3/5 - 6/9 - 10/12 år Betyr det størrelse 2-3 år, 5-6 år, 9-10 år og 12 år. Eller betyr det 2 år, 3/5 år, 6/9 år og 10/12 år. Jeg oppfattet det første, så jeg tenker å strikke 5-6 år. Blir det riktig?
16.03.2026 - 15:23DROPS Design ha risposto:
Hei Ellen, Minste størrelse er til 2 år, neste størrelse 3-5 år, så 6-9 år og største størrelse 10-12 år. Vennlig hilsen, Drops Team.
17.03.2026 - 06:40
![]() Birgit ha scritto:
Birgit ha scritto:
Udtagning, er det 7 masker på hver side af midten
18.10.2025 - 10:11DROPS Design ha risposto:
Hei Birgit. Det økes på innsiden av de ytterste 7 maskene mot midt foran. Når arbeidet måler 8-8-9-9 cm fra der merketråden ble satt, økes det 1 maske i hver side mot midt foran – les ØKETIPS (= 2 masker økt). Øk slik på hver 4.pinne (dvs på annenhver pinne fra retten) totalt 8 ganger i hver side = 8 masker i hver side = 16 økte masker. mvh DROPS Design
20.10.2025 - 14:34
![]() Alicia ha scritto:
Alicia ha scritto:
Fabulous pattern but I am struggling with the increases. My first yo is between p stitches - p, yo, p On the next knit row how do I manage these? I’ve read the comments and I’m still not getting it. At some point there has to be 3 p and 3 k stitches to maintain the pattern. Is that right? Or is the whole pattern moved over by 1 stitch ? thanks for your help.
01.08.2025 - 01:35DROPS Design ha risposto:
Dear Alicia, you are working the pattern with 1 edge stitch on each side, so that increasing inside 7 sts will be between the 3rd and 4th stitch in A.1; the new stitches will be worked as en extension of the pattern to the right at the beg of the row and to the left at the end of the row, so that the first 2 sts increased will be worked as 2nd then 1st stitch at the beg of row / 1st and 2nd stitch at the end of the row, and the 6 sts in pattern after/before the edge stitch continue as before. Happy knitting!
01.08.2025 - 08:18
![]() Deni ha scritto:
Deni ha scritto:
Hi,In regards to increasing,is it done right after the first(garter)stitch at the beginning of the row and right before the garter stitch at the end of the row? Thank you.
23.05.2025 - 07:45DROPS Design ha risposto:
Dear Deni, the increases are worked inside the first and last 7 sts - see INCREASE TIP. So work the first 7 sts as before, increase 1 stitch, work remaining sts as before until 7 sts remain, increase 1 stitch, work the last 7 sts as before. Happy knitting!
23.05.2025 - 09:12
![]() K And K ha scritto:
K And K ha scritto:
Hi. Thanks for answering. I noticed that I had wrong cast on. I'm trying again. Another question. At INCREASES ON EACH SIDE TOWARDS MID FRONT, should I yarn over at the very first stitch? I'm making size-4 so I have 88 stitches(29 at right side, 30 at mid, 29 at left side) now. Do I have to yarn over at the stitch 1, or stitch 30(first stitch of MID-SECTION)? And, if I yarn over 1st stitch, do I have to yarn over the same stitch? Or at 3rd stitch(knit the 1st and new stitch).
07.02.2025 - 05:33DROPS Design ha risposto:
Dear K and K, increase as explained under INCREASE TIP (for sides of face-opening): at the beg of the pattern, this means increase from RS after the first 7 sts and before the last 7 sts and incorporate the new stitches in pattern as explained. Happy knitting!
07.02.2025 - 15:48
![]() K And K ha scritto:
K And K ha scritto:
Hi again. If the first row(the purl row) is not included in pattern, should I skip the first row when I knit up the stitches? And I knitted over 40 rows, 9cm. But if I have to knit up the stitches only 25, should I skip some rows?
23.01.2025 - 12:21DROPS Design ha risposto:
Dear K and K, we don't pick up stitches in every row, since the opening will be too tight then. If you have 40 rows in 9 cm you are working very tight (since the gauge is 30 rows = 10cm) so you will need to adjust the number of stitches to knit up accordingly. So pick up in approx. 3 of every 4 rows or something similar, so that the number of stitches is correct for working A.1 later on. You don't need to skip the first row. Happy knitting!
25.01.2025 - 20:20
![]() Peppi ha scritto:
Peppi ha scritto:
En ymmärrä, miten lisäykset neulotaan mukaan kuvioon?
22.01.2025 - 20:47DROPS Design ha risposto:
Hei, lisätyillä silmukoilla neulotaan piirroksen A.1 mallineuletta seuraavasti: Neulo 2 ensimmäisellä lisätyllä silmukalla sileää neuletta, neulo seuraavilla 2 lisätyllä silmukalla ainaoikeaa, neulo seuraavilla 2 lisätyllä silmukalla sileää neuletta jne.
24.01.2025 - 18:33
![]() K And K ha scritto:
K And K ha scritto:
Hi. Thanks for the nice pattern. I have a few questions. 1. At the beginning, is the very first row not included in pattern? Should I purl all stitches including the edge? 2. For the 1 edge stitch in GARTER STITCH - do I have to knit all the edge stitches? 3. When I knit the edges, knit rows have holes but purl rows don\'t. Should I knit up stitches only odd rows(except the first purl row)? 4. When should I knit up stitches? At the right side, or the wrong side?
21.01.2025 - 07:48DROPS Design ha risposto:
Dear K And K, the very first row purled from WS is worked before starting pattern ie not included in diagram and worked extra. When working 1 edge stitch in garter stitch, knit this stitch from both right and wrong side. Pattern A.1 is like broken rib, ie, seen from RS, 2 sts in stocking stitch (first 2 sts A.1), 2 sts in garter stitch (last 2 sts A.1). Happy knitting!
21.01.2025 - 16:21
![]() Ouahida ha scritto:
Ouahida ha scritto:
Hi please I don’t understand how to do the increases 😴
28.12.2024 - 10:23DROPS Design ha risposto:
Dear Ouahida, as you work back and forth, you should see the edges that form the opening of the balaclava. The stitches closest to this face opening (or mid-front) would be the outermost stitches (from the mid back of the piece). So before /after the last and first 7 stitches in the row, you will increase 1 stitch (= 2 in total in the row). This increase is worked 8 times in total on alternate right side rows (you never increase on the wrong side and only increase in one of every two right side rows). The yarn overs are worked twisted and then worked in the pattern: alternating between stocking stitch or garter stitch depending on the stitches before/after them. Happy knitting!
30.12.2024 - 01:29
![]() Argene Revelant ha scritto:
Argene Revelant ha scritto:
Bonjour, j'aime beaucoup vos modèles, mais, pour celui-ci, je ne vois pas le diagramme. Merci
28.01.2024 - 15:32DROPS Design ha risposto:
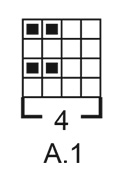
Bonjour Mme Revelant et merci. Le diagramme A.1 se trouve tout à la fin des explications, il se tricote sur 4 mailes et 4 rangs. Bon tricot!
29.01.2024 - 12:14
|
|||||||
Northern Spirit Kids#northernspiritbalaclava |
|||||||
 |
 |
||||||
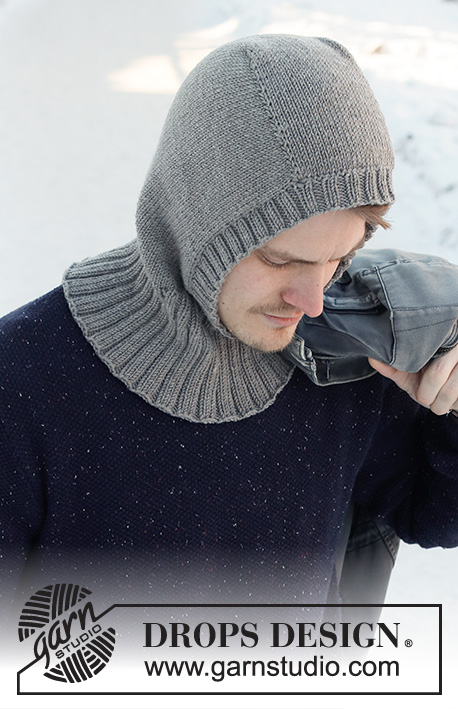
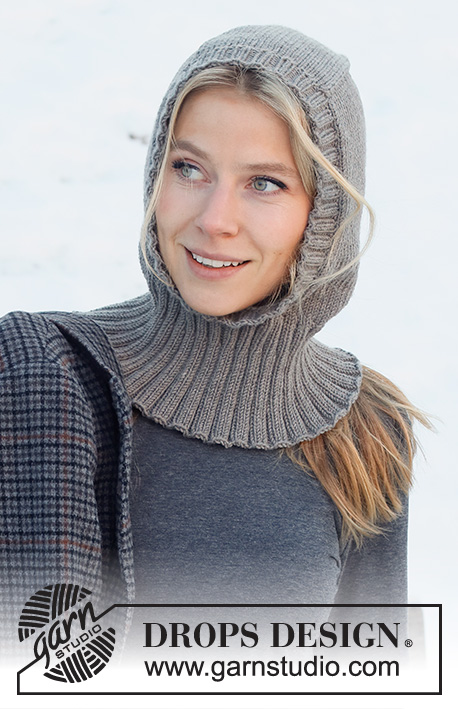
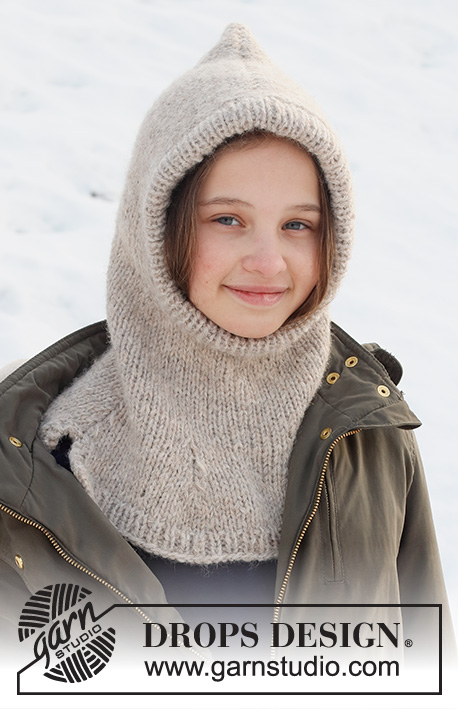
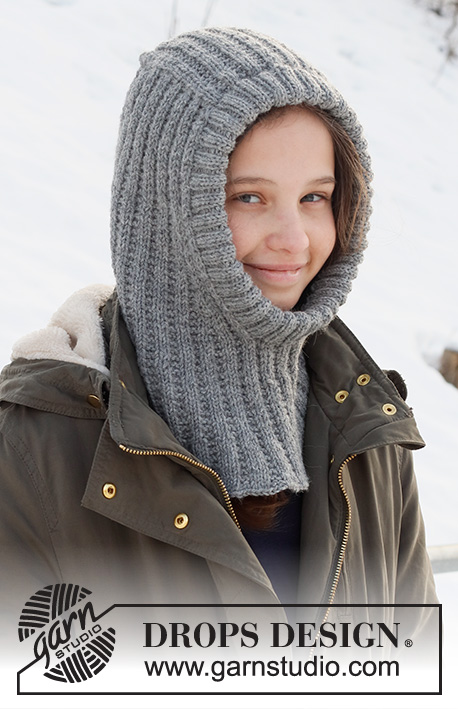
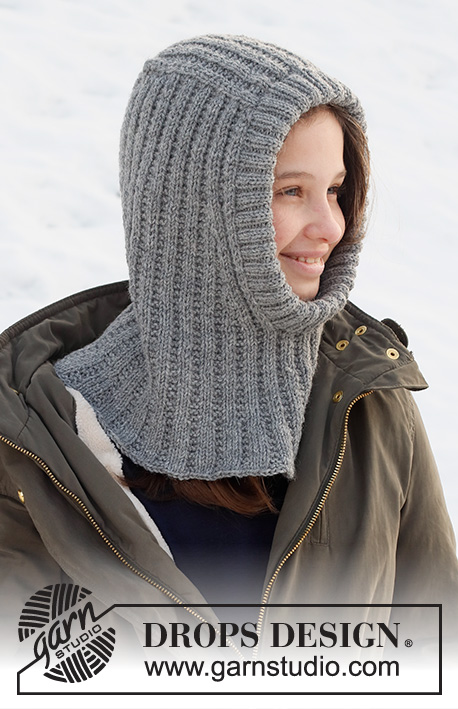
Cappello / passamontagna per bambini lavorato ai ferri in DROPS Lima. Lavorato con motivo a punto fantasia e bordo a coste. Taglie 2-12 anni.
DROPS Children 37-28 |
|||||||
|
------------------------------------------------------- TECNICHE IMPIEGATE: ------------------------------------------------------- COSTA/MAGLIA LEGACCIO (avanti e indietro): Lavorare tutti i ferri a diritto. 1 costa in altezza = 2 ferri diritto. MOTIVO: Vedere il diagramma A.1. Il diagramma mostra tutti i ferri del motivo visti dal diritto del lavoro. SUGGERIMENTO PER GLI AUMENTI (per i lati dell’apertura per la faccia): Aumentare all’interno delle 7 maglie più esterne a ogni lato. Lavorare tutti gli aumenti dal diritto del lavoro! Aumentare 1 maglia con 1 gettato. Sul ferro successivo (rovescio del lavoro) lavorare i gettati a ritorto per evitare buchi. Lavorare gli aumenti in A.1, cioè lavorare le prime 2 maglie a maglia rasata, le 2 successive a maglia legaccio, le 2 successive a maglia rasata, etc.. SUGGERIMENTO PER LE DIMINUZIONI (applicato al centro dietro): Lavorare tutti gli aumenti dal diritto del lavoro! Iniziare 4 maglie prima del segnapunti al centro dietro, 2 maglie insieme a diritto, 4 maglie diritto (il segnapunti è al centro di queste 4 maglie), passare 1 maglia a diritto senza lavorarla, 1 maglia diritto, accavallare la maglia passata sopra quella appena lavorata (= 2 diminuzioni). SUGGERIMENTO PER LA CHIUSURA: Per evitare che il bordo di chiusura sia tirato potete intrecciare con un ferro di una misura più grande. Se il bordo risulta ancora tirato, fare 1 gettato dopo circa 8 maglie durante la chiusura e intrecciare i gettati come maglie normali. ------------------------------------------------------- INIZIO DEL LAVORO: ------------------------------------------------------- PASSAMONTAGNA – BREVE RIASSUNTO DEL LAVORO: Lavorare la sezione centrale in piano con i ferri circolari, dal centro davanti verso il dietro. Riprendere le maglie a ogni lato di questa sezione. Continuare il lavoro in piano prima di avviare le maglie per il collo al centro davanti. Finire il resto del passamontagna in tondo con i ferri circolari. Alla fine lavorare un bordo a coste attorno all’apertura della faccia. SEZIONE CENTRALE: Avviare 24-28-32-32 maglie (compresa 1 maglia di vivagno a ogni lato) con i ferri circolari n° 3,5 mm e Lima. Lavorare 1 ferro rovescio dal rovescio del lavoro. Lavorare il ferro successivo come segue dal diritto del lavoro: 1 maglia di vivagno a MAGLIA LEGACCIO – leggere la descrizione sopra, lavorare A.1 fino a quando rimangono 3 maglie, lavorare le prime 2 maglie in A.1 (in modo che il motivo inizi e finisca nello stesso modo) e finire con 1 maglia di vivagno a maglia legaccio. Continuare questo motivo. FARE ATTENZIONE ALLA TENSIONE DEL LAVORO! Quando il lavoro misura 9-11-11-13 cm, intrecciare la maglia di vivagno a ogni lato = 22-26-30-30 maglie. Tagliare il filo. Poi lavorare il cappuccio come descritto sotto. CAPPUCCIO: Ora riprendere le maglie a ogni lato della sezione centrale sul ferro successivo dal diritto del lavoro come segue: riprendere 21-25-25-29 maglie lungo il lato della sezione centrale all’interno della maglia di vivagno, continuare A.1 come prima sulle 22-26-30-30 maglie sul ferro e riprendere 21-25-25-29 maglie lungo l’altro lato della sezione centrale all’interno della maglia di vivagno = 64-76-80-88 maglie. Inserire 1 segnapunti al centro del ferro (= centro dietro). Lasciare che il segnapunti segue il lavoro; verrà usato durante le diminuzioni al centro dietro. ORA MISURARE IL LAVORO DA PUNTO IN CUI E’ STATO INSERITO IL SEGNAPUNTI! Continuare A.1 in piano con 1 maglia di vivagno a maglia legaccio a ogni lato verso il centro davanti – il motivo deve combaciare con il motivo sulla sezione centrale. Poi aumentare a ogni lato verso il centro davanti e diminuire al centro dietro come descritto sotto – leggere le sezioni sugli aumenti e diminuzioni prima di continuare! AUMENTI A OGNI LATO VERSO IL CENTRO DAVANTI: Quando il lavoro misura 8-8-9-9 cm dal punto in cui è stato inserito il segnapunti, aumentare 1 maglia a ogni lato verso il centro davanti – leggere il SUGGERIMENTO PER GLI AUMENTI (= 2 aumenti). Aumentare in questo modo ogni 4 ferri (cioè ogni 2 ferri dal diritto del lavoro) per un totale di 8 volte a ogni lato. DIMINUZIONI AL CENTRO DIETRO: ALLO STESSO TEMPO in procinto del 5° aumento, diminuire 2 maglie al centro dietro – leggere il SUGGERIMENTO PER LE DIMINUZIONI. Diminuire in questo modo ogni 4 ferri per un totale di 4 volte (gli aumenti e le diminuzioni finiscono nello stesso momento). Alla fine di tutti gli aumenti e diminuzioni ci sono 72-84-88-96 maglie. Quando il lavoro misura 18-18-19-19 cm dal punto in cui è stato inserito il segnapunti, avviare le maglie al centro davanti per il collo; potete provare il passamontagna e lavorare fino alla lunghezza desiderata. Avviare 12-12-16-16 maglie alla fine del ferro successivo dal diritto del lavoro = 184-96-104-112 maglie. Togliere il segnapunti e inserire 1 segnapunti sul ferro. ORA MISURARE IL LAVORO DA QUESTO SEGNAPUNTI. Lavorare il collo come descritto sotto. COLLO: Continuare a lavorare in tondo con A.1 su tutte le maglie – fare in modo che il motivo combaci per tutto il giro. Quando il lavoro misura 5-6-7-8 cm dal segnapunti sul collo, aumentare tutte le sezioni con 2 maglie diritto a 3 maglie diritto facendo 1 gettato dopo ogni sezione con 2 maglie diritto (lavorare i gettati a diritto ritorto sul giro successivo) = 105-120-130-140 maglie. Continuare a lavorare fino a quando il lavoro misura 8-9-10-11 cm dal segnapunti. Ora aumentare tutte le sezioni con 2 maglie a maglia legaccio a 3 maglie a maglia legaccio facendo 1 gettato dopo tutte le sezioni con 2 maglie a maglia legaccio = 126-144-156-168 maglie. Lavorare 1 giro con 3 maglie diritto, 3 maglie a maglia legaccio (lavorare i gettati a ritorto per evitare buchi). Lavorare 1 giro rovescio, poi intrecciare senza stringere a diritto – leggere il SUGGERIMENTO PER LA CHIUSURA. Il lavoro misura circa 32-34-36-38 cm dal centro della sezione centrale in giù. BORDO ATTORNO ALL’APERTURA DELLA FACCIA: Iniziare dal diritto del lavoro sulla parte inferiore, dove sono state avviate le maglie per il collo, e riprendere 136-140-148-152 maglie attorno all’apertura, all’interno della maglia di vivagno usando i ferri circolari corti n° 3 mm e Lima. Il n° di maglie dev’essere divisibile per 4. Lavorare a coste in tondo (2 maglie diritto, 2 maglie rovescio) per 5-6-6-6 cm – fare in modo che le coste combacino con le maglie sulla sezione centrale e con le maglie di avvio sul collo. Intrecciare senza stringere con diritto su diritto e rovescio su rovescio – leggere il SUGGERIMENTO PER LA CHIUSURA. Piegare le coste a metà verso l’interno e cucire. Per evitare che il bordo risulti tirato e si arrotoli verso l’esterno, è importante che la cucitura sia elastica. |
|||||||
Spiegazioni del diagramma |
|||||||
|
|||||||
 |
|||||||
Avete terminato questo modello?Allora taggate le vostre foto con #dropspattern #northernspiritbalaclava o inviatele alla #dropsfan gallery. Avete bisogno di aiuto con questo modello?Troverete 25 video tutorial, una sezione per i commenti/domande e molto altro guardando il modello su www.garnstudio.com © 1982-2026 DROPS Design A/S. Ci riserviamo tutti i diritti. Questo documento, compreso tutte le sue sotto-sezioni, è protetto dalle leggi sul copyright. Potete leggere quello che potete fare con i nostri modelli alla fine di ogni modello sul nostro sito. |
|||||||


Con oltre 40 anni di esperienza nel design di modelli di maglia e uncinetto, DROPS Design offre la più estesa collezione di modelli gratuiti su internet - tradotti in 17 lingue. Ad oggi vi possiamo fornire 324 cataloghi e 12290 modelli - 9561 dei quali sono tradotti in Italiano.
Ci stiamo impegnando molto per darvi il meglio che vi possiamo offrire in termini di maglia e uncinetto, ispirazioni e consigli così come filati di grande qualità ad un prezzo incredibile! Volete utilizzare i nostri modelli per qualcosa d'altro oltre al vostro uso personale? Potete leggere tutto ciò che è consentito nel testo sul Copyright in basso su tutte le pagine dei nostri modelli. Buon lavoro!
Lasciare un commento sul modello DROPS Children 37-28
Noi saremmo felici di ricevere i tuoi commenti e opinioni su questo modello!
Se vuoi fare una domanda, fai per favore attenzione a selezionare la categoria corretta nella casella qui sotto per velocizzare il processo di risposta. I campi richiesti sono indicati da *.