
Popular categories
Looking for a yarn?


Comments / Questions (36)
![]() Lise wrote:
Lise wrote:
A1 udfordring…menes der? Pind 1: 24m Pind 2: slå 1m om og 2 ret sammen 12 gange Pind 3. 24m ret Pind 4: 1 løs af, 1 ret, løft den løse af over ret, slå om 12 gange Bekræft venligst, eller beskriv hvordan der så skal være. PFT
04.11.2025 - 09:55DROPS Design answered:
Hei Lise. Nei, man leser et strikkediagram motsatt av slik man normalt leser: Fra høyre mot venstre, nedenfra og opp. Du begynner altså nederst i det høyre hjørnet, og jobber deg mot venstre og oppover. Altså, A.1 strikkes slik: 1.pinne: 1 kast - ta 1 m løs av p som om den skulle strikkes rett, 1 rett, løft den løse m over, gjenta dette over det maskeantallet det står i oppskriften. 2. pinne: Strikk vrang fra vrangen, gjenta dette over det maskeantallet det står i oppskriften. Pinne 3: 2 rett sammen, 1 kast, gjenta dette over det maskeantallet det står i oppskriften. Pinne 4, strikk vrang fra vrangen, gjenta dette over det maskeantallet det står i oppskriften. mvh DROPS Design
17.11.2025 - 11:25
![]() Béatrice wrote:
Béatrice wrote:
Bonjour, ce modèle se tricote-t-il avec un seul fil ou faut-il doubler (ou tripler) le fil ? Merci d'avance pour votre réponse.
23.10.2025 - 11:18DROPS Design answered:
Bonjour Béatrice, ce modèle se tricote avec 1 seul fil DROPS Brushed Alpaca Silk. Bon tricot!
28.10.2025 - 19:09
![]() Mai wrote:
Mai wrote:
Hvor er hulmønsteret i diagram A1 vist
25.08.2025 - 23:28DROPS Design answered:
Hej Mai. Du finder A.1 nederst i opskriften, til højre for måleskitsen. Mvh DROPS Design
26.08.2025 - 11:09
![]() Laila wrote:
Laila wrote:
Takk jeg fant den
22.06.2025 - 13:38
![]() Laila wrote:
Laila wrote:
Det er jo ikke noe diagram
22.06.2025 - 13:34
![]() Ann Marie wrote:
Ann Marie wrote:
Please give me an idea of what the different sizes mean in centimetres. Thank you.
21.04.2025 - 14:12DROPS Design answered:
Hi Ann Marie, You will find a size chart at the bottom of the pattern, with all measurements for the different sizes. Regards, Drops Team.
22.04.2025 - 07:05
![]() Maria S wrote:
Maria S wrote:
Hallo, Sollte es nicht möglich sein, diese Anleitung mit zwei Fäden Alpaca oder einem faden Alpaca + einem Faden Kid Silk zu stricken? Das wäre beides ja A+A=C! Es kommt nur im Garnumrechner nicht als Vorschlag...
14.11.2024 - 14:04DROPS Design answered:
Liebe Maria, ja genau, so was können Sie gerne machen; hier können Sie dann die neue passende Garnmenge kalkulieren. Viel Spaß beim Stricken!
15.11.2024 - 08:42
![]() Elizabeth wrote:
Elizabeth wrote:
Would this be worked using two skeins of brushed alpaca silk together (two strands)? If so, is the listed quantity of yarn enough for doubling?
09.05.2024 - 06:01DROPS Design answered:
Dear Elizabeth, no, this would be made with ONE strand of Brushed Alpaca Silk. You would need two strands ONLY if you would make it from another yarn that is within the A yarngroup. Happy Knitting!
09.05.2024 - 23:21
![]() Saskia wrote:
Saskia wrote:
Wat is de functie van het lijf en wordt dit gebruikt bij de afwerking van het vest?
24.04.2024 - 22:39DROPS Design answered:
Dag Saskia,
Het lijf is bij dit patroon het gedeelte vanaf de onderkant tot het begin van de armsgaten. Dit gedeelte brei je heen en weer van middenvoor tot midden voor. Vanaf de armsgaten brei je eerst het achterpand terwijl je de steken van de voorpanden laat rusten. Als het achterpand klaar is, dan brei je de voorpanden.
30.04.2024 - 21:08
![]() Heidi Kragh Mortensen wrote:
Heidi Kragh Mortensen wrote:
Jamen jeg forstår ikke A1 selvom I skriver der er en forklaring oven over🤗 Kan I prøve at forklare hvordan jeg skal læse A1?
13.03.2024 - 15:14DROPS Design answered:
Hei Heidi. A.1: Gjør et kast om pinnen, ta 1.maske på venstre pinne løst av pinnen som om den skulle strikkes rett (bruk høyre pinne), strikk neste maske rett, løft den løse masken over den masken som ble strikket. Dette gjentas over så mange masker det står i oppskriften. Når du skal strikke fra vrangen. (2. rad i diagrammet), strikkes alle maskene vrang. Neste pinne (3. pinne) strikkes slik: strikk 2 masker rett sammen, gjør et kast. Gjenta dette så mange ganger det står i oppskriften. Når du skal strikke 4. rad i diagrammet (vrangen), strikkes alle maskene vrang. mvh DROPS Design
18.03.2024 - 14:30
|
|||||||||||||
Saltwater#saltwaterjacket |
|||||||||||||
|
|
|||||||||||||
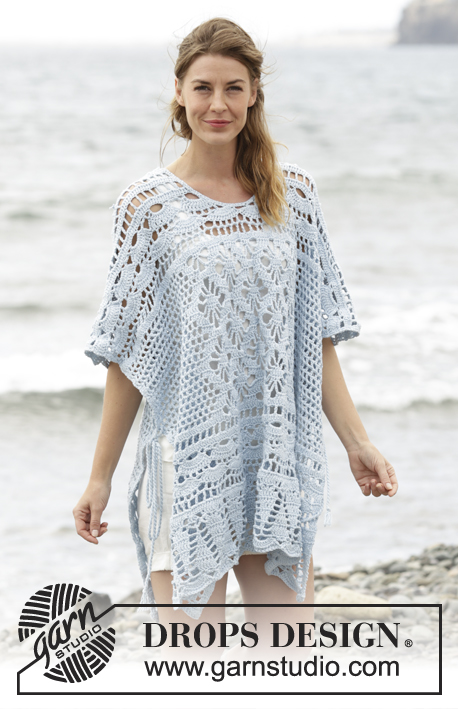
Knitted DROPS jacket with lace pattern and band collar in ”Brushed Alpaca Silk”. Size: S - XXXL.
DROPS 168-32 |
|||||||||||||
|
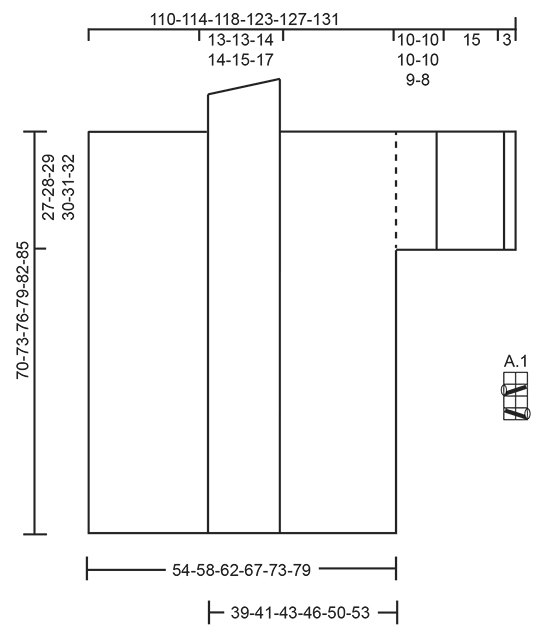
GARTER ST (back and forth on needle): K all rows. 1 ridge = 2 rows K. PATTERN: See diagram A.1. The diagram shows all rows in pattern seen from RS. ---------------------------------------------------------- JACKET: Worked back and forth on circular needle from mid front up to armhole, then cast on new sts for sleeve and work front and back piece separately. BODY: LOOSELY cast on 191-203-217-233-251-269 sts on circular needle size 6 mm with Brushed Alpaca Silk. Work 2 ridges in GARTER ST - see explanation above. Work next row as follows from RS: 2 edge sts in garter st, work pattern according to diagram A.1 over the next 22-22-24-24-26-26 sts, work 31-34-36-40-43-47 sts in stocking st, insert 1 marker (marks the side), work 81-87-93-101-109-119 sts in stocking st (= back piece), insert 1 marker (marks the side), work 31-34-36-40-43-47 sts in stocking st, A.1 over the next 22-22-24-24-26-26 sts and finish with 2 edge sts in garter st. Continue the pattern like this and move the markers upwards when working. REMEMBER THE KNITTING TENSION When piece measures 43-45-47-49-51-53 cm, adjust so that last row is worked from WS, divide the piece at the markers and finish each front piece and back piece separately. BACK PIECE: = 81-87-93-101-109-119 sts. Work 2 rows in stocking st and cast on 39-39-39-39-38-36 new sts for sleeves at the end of these 2 rows = 159-165-171-179-185-191 sts on needle. Work next row as follows from RS: 4 edge sts in garter st, A.1 over the next 20 sts, work in stocking st until 24 sts remain on needle, work A.1 over the next 20 sts and finish with 4 edge sts in garter st. Continue pattern like this. When piece measures 68-71-74-77-80-83 cm, cast off the middle 17-17-19-19-21-23 sts for neck and finish each shoulder separately. Continue to cast off 1 st on next row from neck = 70-73-75-79-81-83 sts remain on the shoulder. When piece measures approx. 69-72-75-78-81-84 cm - adjust so that next row is worked from RS - K 2 rows over all sts before LOOSELY casting off with K from RS. Jacket measures approx. 70-73-76-79-82-85 cm from shoulder and down. RIGHT FRONT PIECE: = 55-58-62-66-71-75 sts. Work 1 row from RS as before and cast on 39-39-39-39-38-36 new sts for sleeve at the end of this row = 94-97-101-105-109-111 sts on needle. P 1 row from WS but K the first 4 sts (= sleeve edge) and work the last 24-24-26-26-28-28 sts towards mid front as before. Work next row as follows from RS: 2 edge sts in garter st, A.1 over band as before, work in stocking st until 24 sts remain on needle, work A.1 over the next 20 sts and finish with 4 edge sts in garter st (= sleeve edge). Continue the pattern like this until piece measures approx. 69-72-75-78-81-84 cm (adjust so that next row is worked from WS). K 2 rows but work the outermost 24-24-26-26-28-28 sts in towards mid front as before. On next row from WS, cast off the first 70-73-75-79-81-83 sts on shoulder = 24-24-26-26-28-28 sts on needle for collar. Insert 1 marker, NOW MEASURE PIECE FROM HERE! Continue A.1 with 2 edge sts in garter st in each side until collar measures 9-9-9-9-10-11 cm from marker. At beg of the next 3 rows from WS cast off the first 6-6-6-6-7-7 sts = 6-6-8-8-7-7 sts remain on needle. Cast off these sts on next row from WS. LEFT FRONT PIECE: Work as right but reversed. I.e. work first row from RS as before. On next row (= WS), cast on new sts for sleeve at the end of row. Continue to work next row from RS as follows: Work 4 edge sts in garter st (= sleeve edge), A.1 over the next 20 sts, work in stocking st until 24-24-26-26-28-28 sts remain on needle, continue with A.1 over the next 22-22-24-24-26-26 sts and finish with 2 edge sts in garter st. When piece measures approx. 69-72-75-78-81-84 cm - adjust so that next row is worked from RS, K 2 rows over the first 70-73-75-79-81-83 sts on shoulder (work the other sts as before). On next row from RS, cast off the first 70-73-75-79-81-83 sts = 24-24-26-26-28-28 collar sts remain on needle. When casting off collar sts, cast off at beg of every row from RS (instead of beg of every row from WS). ASSEMBLY: Sew shoulder seam inside cast-off edge with 1 stitch in every st so that 2 ridges are placed towards each other on shoulder - make sure to avoid a tight seam. Sew collar tog mid back - sew WS against WS and sew collar to neck line in the back of neck (the seam should be in towards WS). Sew underarm seams inside 1 edge st. CROCHET EDGE: Work a finishing edge from RS up along right front piece, around the collar in the back of neck and down along left front piece on hook size 5 mm with Brushed Alpaca Silk as follows: Work 1 dc in first st, * 4 ch, skip 2 sts, 1 dc in next st *, repeat from *-*. Work the same edge at the bottom of both sleeves but now finish round with 1 sl st in first dc at beg of round (instead of 1 dc in next st). |
|||||||||||||
Diagram explanations |
|||||||||||||
|
|||||||||||||
 |
|||||||||||||
Have you finished this pattern?Tag your pictures with #dropspattern #saltwaterjacket or submit them to the #dropsfan gallery. Do you need help with this pattern?You'll find 20 tutorial videos, a Comments/Questions area and more by visiting the pattern on garnstudio.com. © 1982-2026 DROPS Design A/S. We reserve all rights. This document, including all its sub-sections, has copyrights. Read more about what you can do with our patterns at the bottom of each pattern on our site. |
|||||||||||||


With over 40 years in knitting and crochet design, DROPS Design offers one of the most extensive collections of free patterns on the internet - translated to 17 languages. As of today we count 324 catalogues and 12290 patterns translated into English (UK/cm). 12290
We work hard to bring you the best knitting and crochet have to offer, inspiration and advice as well as great quality yarns at incredible prices! Would you like to use our patterns for other than personal use? You can read what you are allowed to do in the Copyright text at the bottom of all our patterns. Happy crafting!
Post a comment to pattern DROPS 168-32
We would love to hear what you have to say about this pattern!
If you want to leave a question, please make sure you select the correct category in the form below, to speed up the answering process. Required fields are marked *.