
Popular categories
Looking for a yarn?


Comments / Questions (60)
![]() Alessandra Spallanzani wrote:
Alessandra Spallanzani wrote:
Buonasera, sono autodidatta e spero mi perdonerete se faccio delle domande banali... Ho appena messo su i punti e sono già in difficoltà... Mi potete spiegare meglio questa parte ? Lavorare tutti i f a dir. 1 “costa” a m legaccio = 2 f dir. ?
28.05.2021 - 21:06DROPS Design answered:
Buongiorno Alessandra, 3 coste a maglia legaccio sono 6 ferri a diritto. Buon lavoro!
29.05.2021 - 14:39
![]() Alessandra Spallanzani wrote:
Alessandra Spallanzani wrote:
È possibile realizzare questo modello con i ferri dritti?
11.05.2021 - 22:51DROPS Design answered:
Buonasera Alessandra, il modello è lavorato in piano, per cui può utilizzare anche i ferri dritti. Buon lavoro!
11.05.2021 - 23:31
![]() Pernille wrote:
Pernille wrote:
Hejsa Jeg har brug for yderligere forklaring... Hvordan i alverden kan jeg spejlvende mønsteret?? Jeg kan da ikke smide omslag på rækken, inden jeg har lavet omslagene... omslagene burde jo først laves på den efterfølgende række, hvis det skal spejlvendes. Jeg forstår det altså ikke...
25.02.2021 - 17:22DROPS Design answered:
Hej Pernille, du skal altid starte nederst i diagrammet. Her starter du med omslag på første række, som slippes af pinden på næste ifølge diagrammet. God fornøjelse!
26.02.2021 - 08:01
![]() Francine D'Amour wrote:
Francine D'Amour wrote:
Bonjour, merci pour ce très beau modèle. C'est mon premier chandail à vie. Je tricote la grandeur petit. Ma question concerne l'encolure qu'il faut fermer dans le dos. Je comprends qu'il faut monter 32 mailles et réunir le tout. Comment fait- on pour que ce soit joli sans vilaine démarcation? Merci à l'avance.
23.02.2021 - 05:18DROPS Design answered:
Bonjour Mme D'Amour, cette vidéo montre comment monter les mailles sur le côté, au rang après avoir tricoté les mailles de l'autre épaule/manche, vous pouvez relever le fil entre la dernière maille sur l'aiguille et la 1ère des mailles montées et de même à la fin de l'encolure entre la dernière des mailles montées et la 1ère des mailes sur l'aiguille; placez ce fil relevé torse sur l'aiguille gauche et tricotez-le avec la maille suivante. Quelques éventuelles irrégularités complémentaires peuvent être ensuite fixées avec quelques points si besoin. Bon tricot!
23.02.2021 - 08:57
![]() Carla wrote:
Carla wrote:
Ik ben nu klaar met het voorpand, zet ik nu weer 32 steken op voor de achterhals? En hoe moet ik nu verder, direct weer de kussen breien? Want aan de voorhals eindig ik met vier naalden recht dat zou dan achter ook moeten?
17.02.2021 - 21:21DROPS Design answered:
Dag Carla,
Ja, klopt; waar je op het voorpand steken hebt afgekant voor de hals, zet je bij het achterpand steken op. Dus alles omkeren. Veel breiplezier!
18.02.2021 - 09:25
![]() Britt-Marie Eriksson wrote:
Britt-Marie Eriksson wrote:
Hur får jag en snygg halsringning när jag maskat av mitt fram och sedan ska fortsätta ytterligare 5cm med sidorna i tappade maskor innan de kopplas samman med bakstycket? Så ser det inte ut på bilden.
04.02.2021 - 11:47DROPS Design answered:
Hei Britt-Marie. Har du, når arbeidet målte ca 54-56-58-60-62-64 cm, avpasset å avsluttet etter 4 pinne rett i diagrammet og deretter strikket 1 rille (=2 rader)? Da skal du få en hals som du ser på bildet. mvh DROPS design
12.02.2021 - 11:32
![]() Nida Kamran wrote:
Nida Kamran wrote:
Can you please explain me this( 18 sts x 1 repetition of diagram A.1 vertically = 10x12.5 cm.) When I used 4.5 mm needle it become 10 cm in width but in length it far more then 12.5 cm but when I used 4 mm it become 9.5x17 cm . Can you please help me.
16.11.2020 - 15:10DROPS Design answered:
Dear Mrs Kamran, you will read more about tension here - you can watch and let your swatch dry flat before checking measurements one more time - should the height be still not exacthly right, you could keep the needles with the right width and adjust length to the given indications in cm. Happy knitting!
16.11.2020 - 16:32
![]() Nadine wrote:
Nadine wrote:
Bonjour. Comment tricoter une manche à la fois lorsqu’on utilise une aiguille circulaire?
07.04.2020 - 00:30DROPS Design answered:
Bonjour Nadine, quand vous tricotez la première épaule/manche, vous pouvez mettre la deuxième épaule/manche en attente sur un arrêt de mailles ou sur un fil ou simplement les laisser sur l'aiguille, sans les tricoter. Bon tricot!
14.04.2020 - 15:14
![]() Gianni D'aniello wrote:
Gianni D'aniello wrote:
Salve, dopo aver lavorato gli aumenti, chiuso le maglie dello scollo (53 cm) e i 4 ferri a diritto per "aggiustare il lavoro il mio corpo misura in altezza 58cm (polsino10cm) ma il mio polsino non misura 23 cm e pure lavorando gli altri 5 cm extra per lo scollo non misurerebbe così tanto come faccio ad arrivare a 23 cm?
26.03.2020 - 20:07DROPS Design answered:
Buongiorno Gianni. Quando ha lavorato anche i 5 cm per lo scollo, è arrivato a metà del lavoro. Quindi proseguendo con il dietro, quindi la misura del polsino che ha fino ad adesso è la metà della misura finale. Lavorando anche il dietro, la misura attuale del polsino si raddoppia. Buon lavoro!
27.03.2020 - 16:09
![]() Sara wrote:
Sara wrote:
Buon giorno,sono arrivata ai 53 cm di lunghezza come previsto dalla mia taglia prima di chiudere le maglie dello scollo,ma non capisco cosa significa nelle istruzioni la dicitura dopo 4 ferri a dir??? che arrivata ai 53 cm devo fare 4 ferri a diritto senza seguire lo schema?
13.09.2019 - 12:10DROPS Design answered:
Buongiorno Sara. Deve lavorare fino a 53 cm, verificando però che gli ultimi quattro ferri lavorati siano i 4 ferri a diritto del diagramma. Se per.es. a 53 cm, gli ultimi 4 ferri lavorati sono i due con le maglie gettate e 2 ferri a diritto, lavora altri 2 ferri a diritto (così gli ultimi 4 ferri sono ferri a diritto) e poi intreccia le maglie. Buon lavoro!
13.09.2019 - 13:37
|
||||||||||||||||
Mistral#mistralsweater |
||||||||||||||||
|
|
||||||||||||||||
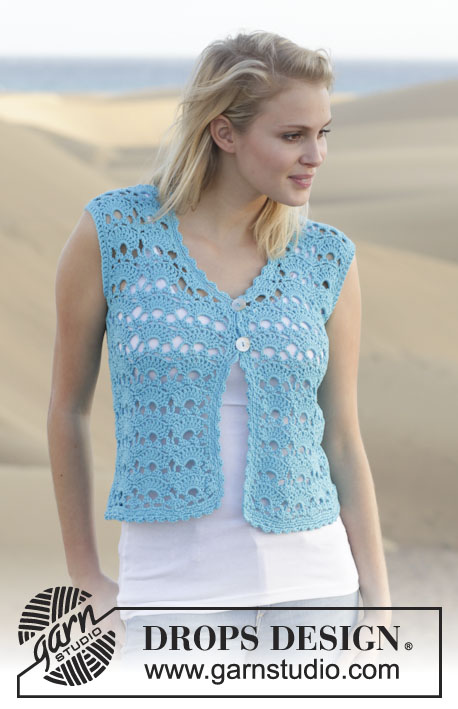
Knitted DROPS jumper in garter st with dropped sts in ”Cotton Light”. Size: S - XXXL.
DROPS 153-22 |
||||||||||||||||
|
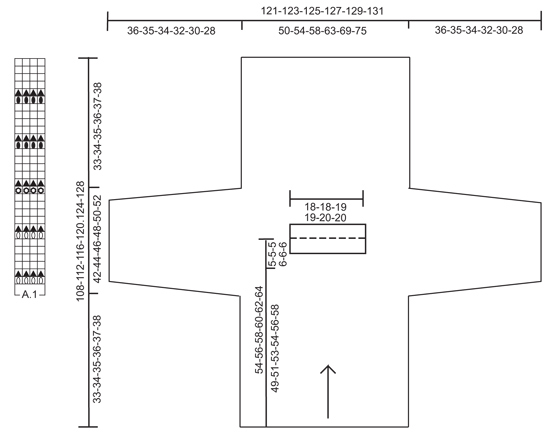
GARTER ST (back and forth on needle): K all rows. 1 ridge = 2 rows K. PATTERN: See diagram A.1 - repeated over all sts. To avoid a tight edge in the sides, on the sleeves and in the neck work every row with YO as follows: First and last st are worked with one extra YO in addition to YO/YOs, i.e. when 1 YO is explained work 2 yos, where 2 YOs are explained work 3 YOs and so on. INCREASE TIP: To make the transition between inc more even, work row with YO as follows before inc: Work the last 2 sts with YO before inc beg with only 1 YO, i.e. where 3 YOs are explained work 1 YO. ---------------------------------------------------------- JUMPER: Worked in one - beg at bottom of front piece, cast on sts for sleeve, cast off for neck and finish at the bottom of back piece. Worked back and forth on a circular needle to make room for all the sts. FRONT PIECE: Cast on 90-98-104-114-124-136 sts on circular needle size 4.5 mm with Cotton Light and work 3 ridges in GARTER ST - see explanation above. Then work PATTERN A.1 over all sts - see explanation above. REMEMBER THE KNITTING TENSION! When piece measures approx. 33-34-35-36-37-38 cm, adjust after 1 row K where YO is dropped off, insert 1 marker in the side. Now inc for sleeves as follows: READ INCREASE TIP! Loosely cast on new sts at the end of every row in each side: 6-6-5-5-4-4 sts 9-9-10-10-12-11 times in total, 10-8-10-8-6-6 sts 1 time in total in each side = 218-222-224-230-232-236 sts on needle. When piece measures approx. 49-51-53-54-56-58 cm - adjust after 4 rows K, cast off the middle 32-32-34-34-36-36 sts for neck and finish each shoulder/sleeve separately = 93-95-95-98-98-100 sts remain on shoulder/sleeve. Continue with pattern. When piece measures approx. 54-56-58-60-62-64 cm, adjust after 4 rows K, work 1 ridge. Insert a marker (= end of front piece). Work back piece from here. BACK PIECE: Front and back piece have the same measurements - see chart. Back piece is worked top down - adjust according to measurements on front piece - AT THE SAME TIME work pattern reversed. ASSEMBLY: Sew side and underarm seams in one - NOTE: To avoid a tight edge sew in outer loops of edge sts in ridges - fasten in ridges, pull yarn as long as YO, fasten along the edge the same way. |
||||||||||||||||
Diagram explanations |
||||||||||||||||
|
||||||||||||||||
 |
||||||||||||||||
Have you finished this pattern?Tag your pictures with #dropspattern #mistralsweater or submit them to the #dropsfan gallery. Do you need help with this pattern?You'll find 12 tutorial videos, a Comments/Questions area and more by visiting the pattern on garnstudio.com. © 1982-2026 DROPS Design A/S. We reserve all rights. This document, including all its sub-sections, has copyrights. Read more about what you can do with our patterns at the bottom of each pattern on our site. |
||||||||||||||||


With over 40 years in knitting and crochet design, DROPS Design offers one of the most extensive collections of free patterns on the internet - translated to 17 languages. As of today we count 324 catalogues and 12290 patterns translated into English (UK/cm). 12290
We work hard to bring you the best knitting and crochet have to offer, inspiration and advice as well as great quality yarns at incredible prices! Would you like to use our patterns for other than personal use? You can read what you are allowed to do in the Copyright text at the bottom of all our patterns. Happy crafting!
Post a comment to pattern DROPS 153-22
We would love to hear what you have to say about this pattern!
If you want to leave a question, please make sure you select the correct category in the form below, to speed up the answering process. Required fields are marked *.