
Popular categories
Looking for a yarn?


Comments / Questions (47)
Cheryl wrote:
Hi thank you do i increase and how many sts? and how many times do i repeat?
24.04.2012 - 03:45DROPS Design answered:
You inc 1 st each time. When inc not is specified you can chose preferred method (like M1 (make 1) or increase in front and back). Inc til you have the number of sts given in pattern.
25.04.2012 - 00:08Cheryl wrote:
. I do not understand this paragrath can you help meAT THE SAME TIME as beg M.1 also work shortened rows on the garter sts each side. Work back and forth 1 time on the garter sts at beg of every row from RS. And work back and forth 1 time on the garter sts at beg of every other row from WS (these rows each side are additional and not included with respect to the inc).
20.04.2012 - 05:48DROPS Design answered:
You work short rows each side over 4 K sts and M.1 on rem sts when working over all sts like this, starting from RS: *K4 turn K4, turn and from RS work all sts on row, turn and from WS work all sts on row, K4 turn K4, turn and from RS work all sts on row, turn K4 turn K4, turn and from WS work all sts on row, turn* - repeat *-*.
23.04.2012 - 19:56Cheryl Ford wrote:
Hi i like the scraf is it cable? if it is cable how many row inbetween cable
03.04.2012 - 06:29DROPS Design answered:
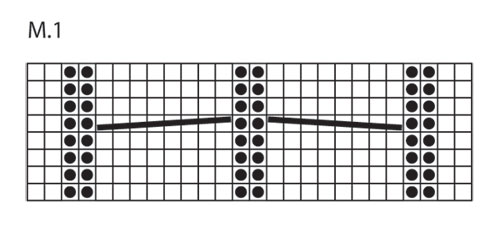
Yes, it's cables on the scarf. There is a chart below, showing the cables are done on every 8th row.
10.04.2012 - 00:07
![]() DROPS Design NL wrote:
DROPS Design NL wrote:
U zegt, aan het einde, maar waar u precies bedoelt is niet duidelijk. In de regel breit u door in de stekensoort totdat aangegeven staat dat u iets anders moet doen. Dus als u in ribbelst breit, gaat u daarmee verder tot er bijv staat dat u verder moet gaan in tricotst. In het hele patroon staat of vermeld hoeveel centimeter u moet breien of hoeveel naalden u moet breien (bijvoorbeeld, meerder 4 keer elke 6e nld, dan breit u dus tot de meerderingen klaar zijn.)
24.01.2012 - 16:27
![]() Carla wrote:
Carla wrote:
Hallo, dit weekend enthousiast begonnen maar vast gelopen. Mijn vraag is: aan het eind is mij niet duidelijk in wat voor steek ik verder moet breien en hoeveel centimeter er dan nog gebreid moet worden. Er zit ook geen schema bij van de sjaal. Kan iemand mij helpen!!!!
23.01.2012 - 13:58
![]() Aase wrote:
Aase wrote:
I den danske opskrift er forklaringen til sort prik i diagrammet forkert. Skal være lige som den norske udgave. hilsen Aase
02.10.2010 - 23:09
![]() Jytte wrote:
Jytte wrote:
Fejl i diagram oversættelsen... I sidste linie skal der stå ... 4 m. på hj pinden BAG arb....
06.09.2010 - 10:41
![]() Brigitte wrote:
Brigitte wrote:
Habe es gestrickt, suprer. wer wills noch haben? ich stricke es für sie
05.09.2010 - 14:13
![]() Merja wrote:
Merja wrote:
Heti kun ohje tulee niin tämän teen
03.08.2010 - 18:07
![]() Lucia wrote:
Lucia wrote:
Esta muy lindo podrian traducirlo al español Cariños lucia
18.07.2010 - 01:43
|
|||||||||||||
DROPS 125-19 |
|||||||||||||
|
|
|||||||||||||
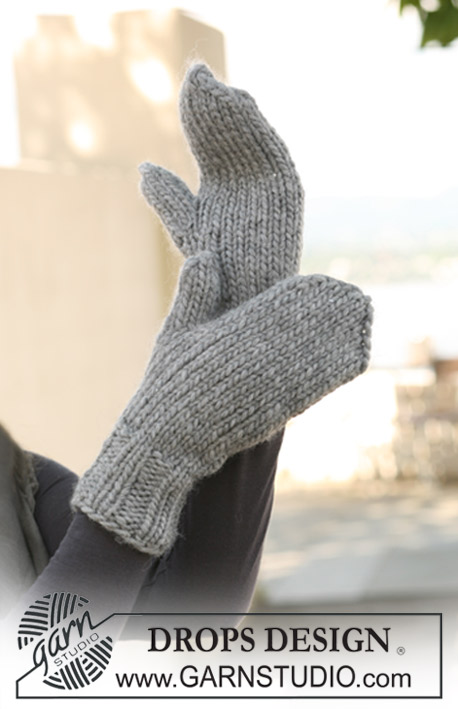
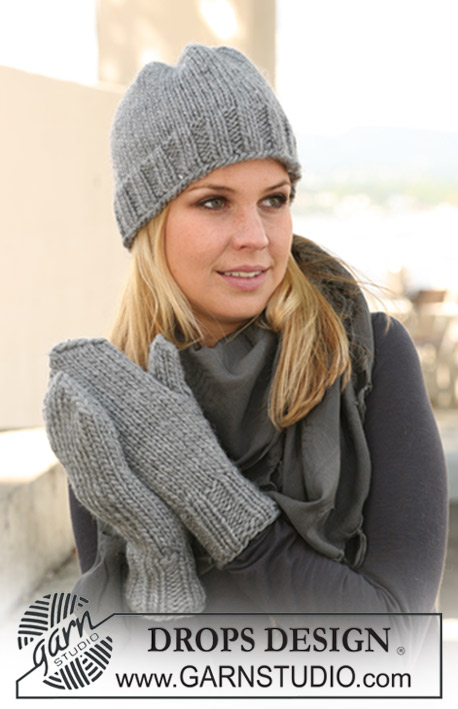
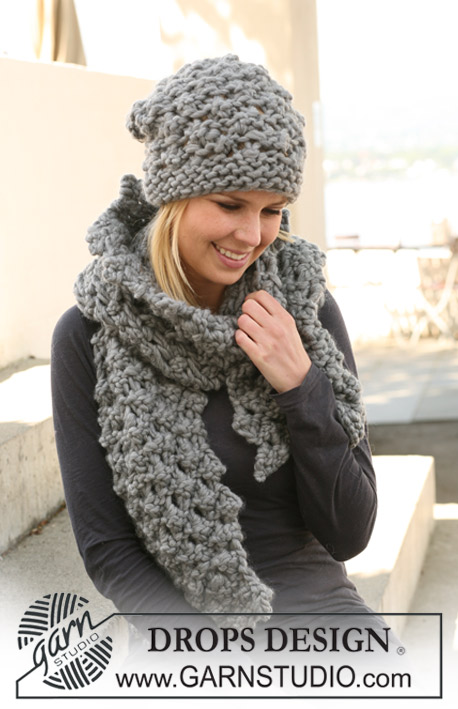
DROPS scarf with cables in ”Snow”.
DROPS 125-19 |
|||||||||||||
|
PATTERN: See diagram M.1. Diagram shows the pattern from RS. GARTER ST (back and forth on needle): K all rows. -------------------------------------------------------- SCARF: Cast on 26 sts on needle size 8 mm with Snow. Work GARTER ST - see above - back and forth on needle for approx 12 cm. Change to needle size 7 mm. Continue in rib as follows (from RS): 2 garter sts, * K2, P2 *, repeat from *-* and finish with K2 and 2 garter sts until rib measures approx 15 cm. Change back to needle size 8 mm and work next row from RS as follows: 1 Garter st, 1 YO, 1 Garter st, 1 YO, K2, P2, K2, 1 YO, K2, 1 YO, K2, P2, K2, 1 YO, K2, 1 YO, K2, P2, K2, 1 YO, 1 Garter st, 1 YO and 1 Garter st = 34 sts. Work next row from WS as follows: 4 Garter sts, P2, K2, P8, K2, P8, K2, P2, 4 Garter sts. NOTE! Work YO into back of loop on return row. READ ALL OF THE FOLLOWING SECTION BEFORE CONTINUING! Insert a marker 4 sts in from each side and continue in M.1 between markers with garter st each side. AT THE SAME TIME inc the garter sts each side as follows (from RS): inc 1 st before the first marker on every 4th row and 1 st after the second marker on every 8th row. Continue like this until there are 17 sts before the first marker and 10 sts after the second marker (= a total of 53 sts). AT THE SAME TIME as beg M.1 also work shortened rows on the garter sts each side. Work back and forth 1 time on the garter sts at beg of every row from RS. And work back and forth 1 time on the garter sts at beg of every other row from WS (these rows each side are additional and not included with respect to the inc). When all inc are complete work 1 row from WS with K over K and P over P. Then K 1 row from RS on all sts, AT THE SAME TIME dec 2 sts on each cable (= 4 dec sts) = 49 sts. K 1 row from WS on all sts. Cast off 17 garter sts (= collar) at beg of row, work remaining sts on rows = 32 sts. Work garter st on the remaining sts with shortened rows as follows (row 1 = from WS): Work row until 3 sts remain on needle, turn piece, tighten thread and work return row. Work row until 6 sts remain on needle, turn piece, tighten thread and work return row. Continue like this with 3 sts more before each turn until you have worked back and forth on 2 sts only. Now work back and forth on all sts and cast off. Knit 1 more piece in the same way, but mirrored. ASSEMBLY: Sew the 2 pieces tog mid back, sew edge to edge in outer loops of sts to avoid a chunky seam. Pick up 26 sts on needle size 7 mm with Snow behind the rib on the right side. Continue as follows: 2 garter sts, * K2, P2 *, repeat from *-* and finish with K2 and 2 garter sts until rib measures approx 15 cm (adjust to the rib in front). Cast off with K over K and P over P. Sew the rib to the back of scarf. |
|||||||||||||
Diagram explanations |
|||||||||||||
|
|||||||||||||
 |
|||||||||||||
Have you finished this pattern?Tag your pictures with #dropspattern or submit them to the #dropsfan gallery. Do you need help with this pattern?You'll find 14 tutorial videos, a Comments/Questions area and more by visiting the pattern on garnstudio.com. © 1982-2026 DROPS Design A/S. We reserve all rights. This document, including all its sub-sections, has copyrights. Read more about what you can do with our patterns at the bottom of each pattern on our site. |
|||||||||||||


With over 40 years in knitting and crochet design, DROPS Design offers one of the most extensive collections of free patterns on the internet - translated to 17 languages. As of today we count 324 catalogues and 12290 patterns translated into English (UK/cm). 12290
We work hard to bring you the best knitting and crochet have to offer, inspiration and advice as well as great quality yarns at incredible prices! Would you like to use our patterns for other than personal use? You can read what you are allowed to do in the Copyright text at the bottom of all our patterns. Happy crafting!
Post a comment to pattern DROPS 125-19
We would love to hear what you have to say about this pattern!
If you want to leave a question, please make sure you select the correct category in the form below, to speed up the answering process. Required fields are marked *.