
Popular categories
Looking for a yarn?


Comments / Questions (88)
![]() Odile A wrote:
Odile A wrote:
Bonsoir, Je ne comprends pas bien ce que l'on doit faire apres le rang d'augmentations faut il faire le jeté, glisser une maille etc ...2 fois au total ou tout le long du tour ? Merci
14.02.2022 - 21:42DROPS Design answered:
Bonjour Odile, pouvez-vous préciser votre question? De quel rang d'augmentations parlez-vous? De celui où on augmente 4 mailles à chaque marqueur, alors cette vidéo vous montre comment tricoter les augmentations au tour suivant: augmentations à 0:47 et on tricote les augmentations à 2:25. Si j'ai mal compris votre question, n'hésitez pas à nous l'indiquer. Merci. Bon tricot!
15.02.2022 - 09:12
![]() Lelletta wrote:
Lelletta wrote:
Buonasera! Mi piace molto questo maglione, tranne il collo che preferirei a giro. Me ne potete suggerire uno con questa caratteristica? O, ancora meglio, un consiglio su come posso modificare questo? Grazie mille e buona serata!
11.02.2022 - 17:02DROPS Design answered:
Buonasera Lelletta, può partire lavorando il collo con meno maglie. Buon lavoro!
13.02.2022 - 15:12
![]() Irina wrote:
Irina wrote:
Got it! May fault. Thank you so much for your help. It is unique web site, I love it and I love your yarn. Only I have to buy it through the amazon because even there are links to the web stores in USA when I open them, all prices for the yarn are in Euro or British pounds. Couldn't make a transaction like that. Thank you again.
10.02.2022 - 06:21
![]() Irina wrote:
Irina wrote:
Thank you for the quick response but still don't get it, sorry. One more time how to decrease after neck. According to description all increase /decrease should be on rnd1 (knit) 1. Make a neck - rnd1(knit), rnd2(purl) finish after round 2 - which means we a on rnd1 (we have to KNIT) 2The next round is decrease and PURl: ...slip 1 stitch as if to purl, purl 2 together ... 3. Then yoke which starts with rnd1 (knit) How come we do purl for decreasing instead of knitting?
09.02.2022 - 01:04DROPS Design answered:
Dear Irina, neck is worked working repeating the 2 rounds under RIB at the beg of the pattern, ie *1 stitch in English rib (= round 1 = YO, slip this st as if to P / round 2 = K tog YO and st), Purl 2* - After 12 cm and a round like round 2, work next round as follows: *YO, slip 1 as if to P, P2 tog* = the st in English rib is worked as on round 1 rib before, but now you will purl the 2 purled sts together. You now decrease the number of sts and should now have 52 sts. Can this help?
09.02.2022 - 08:54
![]() Irina wrote:
Irina wrote:
Hello! I really like this sweater and decided to knit it in two color. Stuck with first decreasing when we make 52 stitches from 78: * Make 1 yarn over, slip 1 stitch as if to purl, purl 2 together *, work from *-* to end of round = 52-52- If coming pattern looks: knit stitch with YO then purl stitch, where this decreasing should start? Before knit stitch or before purl? Why decreasing applied before yoke? Is it possible to do it in brioche knitting with two colors?
08.02.2022 - 06:57DROPS Design answered:
Dear Irina, you first work in rib with (1 stitch in English rib, P2), then you have to decrease these P2 to P1 to continue in English rib in the round, reason why you decrease the P2 by P2 together = 52 sts remain. Can this help?
08.02.2022 - 09:36
![]() Odile A wrote:
Odile A wrote:
Bonjour , au tour 2 des côtes anglaises , est ce que la maille glissée est la maille endroit de tour precedent ? Desolee mais je suis assez perplexe devant c emodele.Merci de votre aide ,
24.01.2022 - 20:31DROPS Design answered:
Bonjour Odile A, tout à fait, au 1er tour, vous tricotez la 1ère mailles ensemble à l'endroit avec son jeté, et au 2ème tour, vous glissez cette maille en faisant 1 jeté; (la 2ème maille sera l'inverse: au 1er tour, vous faites 1 jeté et la glissez à l'envers, au 2ème tour vous la tricotez ensemble à l'envers avec son jeté). Bon tricot!
25.01.2022 - 09:33
![]() Odile A wrote:
Odile A wrote:
Merci beaucoup, j'ai enfin reussi . Mais pourquoi dans ce le schema pout le tour 1 est : faire un jete , glisser une maille a l'envers. ? Pour moi du coup c'est plutôt glisser la maille d'abord et faire le jeté ensuite ,non ? Je suppose que c'est pareil pour la suite pour les cotes anglaises ?
07.01.2022 - 13:01DROPS Design answered:
Bonjour Odile, la façon d'expliquer correspond à la façon de tricoter, avec le fil dans la main gauche, mais la technique reste la même, ce n'est qu'une question de subtilité. Et tout à fait, c'est pareil pour les côtes anglaises. Bonne continuation!
07.01.2022 - 16:05
![]() Odile A wrote:
Odile A wrote:
, Bonjour, je ne parviens pas à démarrer le pull, voilà 5 fois que je recommence et le résultat n\'est pas satisfaisant. Je pense que le problème vient du jeté au tour1 qui est suivi d\'une maille glissée et de deux maille envers. Je dois mal placer mon fils .J ai regardé la vidéo mais elle ne montre pas exactement le même schéma. Que puis-je faire ? Merci de votre aide
05.01.2022 - 22:15DROPS Design answered:
Bonjour Odile A., si vous tricotez avec le fil dans la main droite, procédez ainsi au 1er tour des côtes: placez le fil devant l'ouvrage (entre les 2 aiguilles) et glissez la m suivante de l'aiguille gauche sur la droite, comme pour la tricoter à l'envers, repassez le fil entre les 2 aiguilles en faisant en sorte qu'il passe par-dessus la m glissée (= vous avez désormais 1 jeté au-dessus de la m glissée), le fil est devant l'ouvrage, tricotez 2 m envers, laissez le fil devant l'ouvrage et glissez la m suivante à l'envers, repassez le fil entre les 2 aiguilles pour qu'il passe par-dessus la m glissée et tricotez 2 m envers, etc. Bon tricot!
06.01.2022 - 07:47
![]() Paula G Cole wrote:
Paula G Cole wrote:
I don't know what you want
21.12.2021 - 20:50
![]() Shanthi wrote:
Shanthi wrote:
Thank you for the wonderful explanation written so patiently. I still have doubts though. I am working on size S. so I had to cast on 78 stitches. I have reached the yoke. This confuses me - increase like this every 10th round ( every 5th round of visible English rib stitches) a total of 6 times at markers 1, 2, 4 and 5 and a total of 5 times at markers 3and 6. Also, what is visible English rib stitches ? Thank you in advance !,
18.10.2021 - 09:52DROPS Design answered:
Dear Shanthi, when working English rib with yarn overs, you will have to work 2 rounds (= 1 round slipping the stitch and making a yarn over + 1 round working the slipped stitch and the yarn over together), reason why you will have 2 rounds worked for 1 visible K stitch in height. Increase as explained under INCREASE TIP (for increases in English rib stitch): in each of the stitch with a marker (= increase 4 sts in each of these 6 sts). Then increase only 4 sts in markers 3 + 6 = 4 sts increased in each of these both markers (= only 8 sts increased). Happy knitting!
18.10.2021 - 16:05
|
|
Dublin Winter Sweater#dublinwintersweater |
|
 |
 |
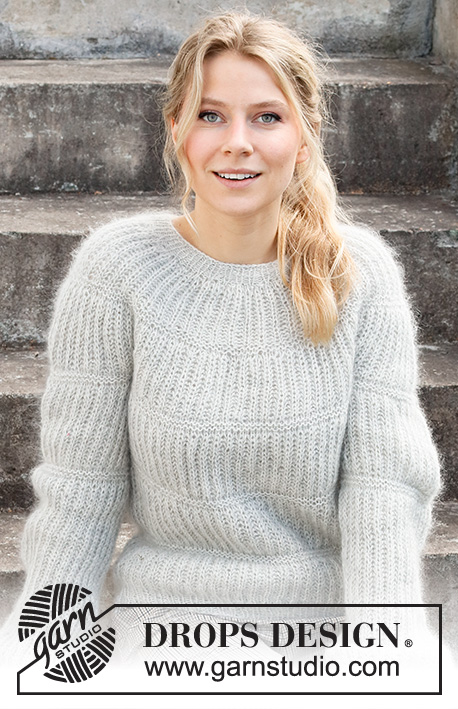
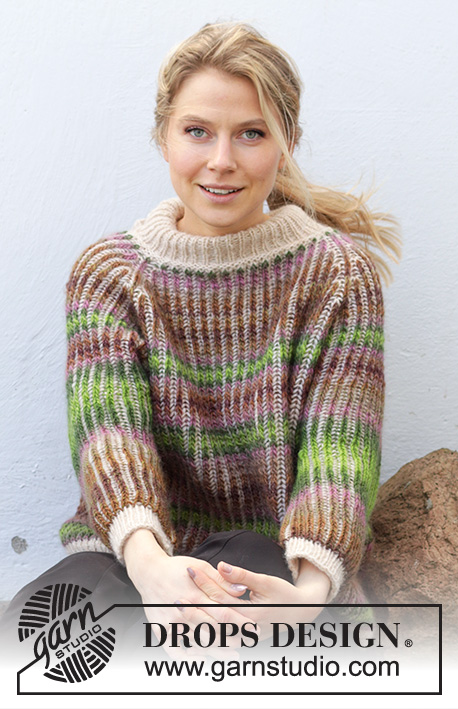
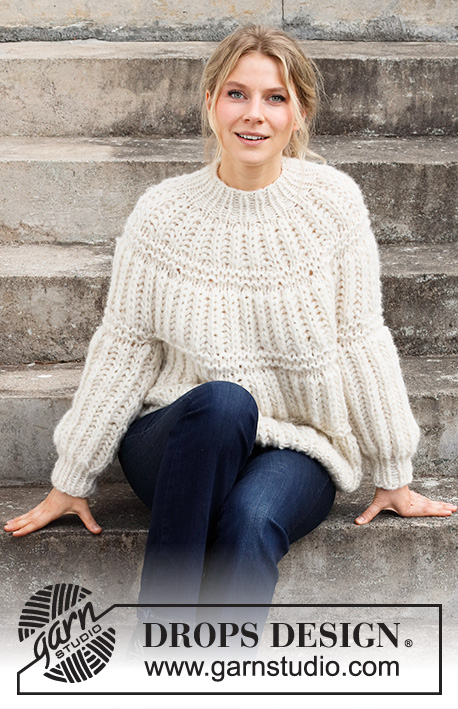
Knitted jumper with round yoke in DROPS Air. The piece is worked top down with English rib and A-shape. Sizes XS - XXL.
DROPS 215-12 |
|
|
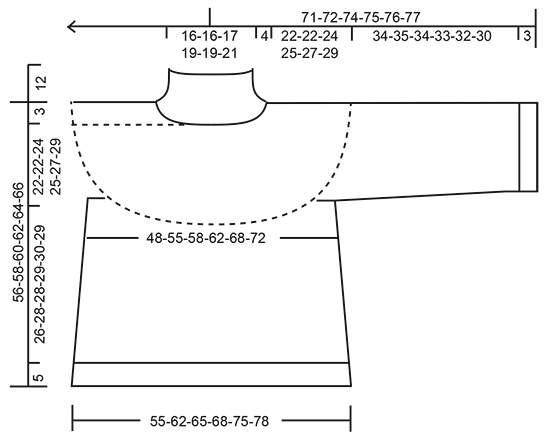
------------------------------------------------------- EXPLANATIONS FOR THE PATTERN: ------------------------------------------------------- RIB (in the round): ROUND 1: * Make 1 yarn over, slip 1 stitch as if to purl, purl 2 *, work from *-* to end of round. ROUND 2: * Knit together the yarn over and slipped stitch, purl 2 *, work from *-* to end of round. Repeat rounds 1 and 2. ENGLISH RIB (in the round): ROUND 1: * Knit together the yarn over and slipped stitch, make 1 yarn over, slip 1 stitch as if to purl, *, repeat from *-* to end of round. ROUND 2: * 1 yarn over, slip 1 stitch as if to purl, purl together the yarn over and slipped stitch *, repeat from *-* to end of round. Repeat rounds 1 and 2. INCREASE TIP (for increases in English rib stitch): All increases are worked on a round where the yarn overs and knitted stitches are knitted together (i.e. Round 1 in English rib). Increase 4 stitches in the English rib stitch as follows: Knit together the yarn over and knitted stitch, but do not slip them from the needle, make 1 yarn over the right needle, knit together the yarn over and knitted stitch again, move the marker to this stitch (= mid-stitch), make 1 yarn over the right needle, knit together the yarn over and knitted stitch again (= 3 stitches and 2 yarn overs), slip the stitches from the left needle. On the next round work the increased stitches as follows: * Make 1 yarn over, slip 1 stitch as if to purl, purl 1 *, work from *-* a total of 2 times, make 1 yarn over, slip 1 stitch as if to purl (= 3 knitted stitches and 2 purled stitches). The marker sits in the middle stitch of the increased stitches (in a knitted stitch). DECREASE TIP (mid under sleeve): All decreases are worked on a round where the yarn overs and knitted stitches are knitted together (i.e. Round 1 in English rib). Start mid under the sleeve (i.e. before the marker-stitch) and decrease 4 stitches on the round as follows: Work the first 2 stitches in English rib as before, slip the next stitch + its yarn over as if to knit, knit together the next 2 stitches + and their yarn overs and pass the slipped stitch + and its yarn-over over the knitted together stitches. Work until there are 4 stitches left before the marker stitch (= mid-stitch under the sleeve), knit together the next 3 stitches + and their yarn overs (= 2 stitches decreased), work the last stitch on the round. CASTING-OFF TIP: To avoid the cast-off edge being tight you can cast off with a larger size needle. If the edge is still tight, make 1 yarn over after approx. each 3rd stitch at the same time as casting off; the yarn overs are cast off as normal stitches. ------------------------------------------------------- START THE PIECE HERE: ------------------------------------------------------- JUMPER – SHORT OVERVIEW OF THE PIECE: The neck and yoke are worked in the round with circular needle, top down. On yoke, increase in 6 stitches marked with markers. The yoke is divided for body and sleeves and the body continued in the round with circular needle. The sleeves are worked in the round with short circular needle, top down. NECK: Cast on 78-78-84-90-90-96 stitches with circular needle size 4 mm and Air. Knit 1 round. Then work RIB – read description above, for 12 cm; finish after round 2. The next round is worked as follows: * Make 1 yarn over, slip 1 stitch as if to purl, purl 2 together *, work from *-* to end of round = 52-52-56-60-60-64 stitches. Change to circular needle size 6 mm. Insert 1 marker thread at the beginning of the round; the yoke is measured from this marker thread. YOKE: Insert 6 markers in the piece as described below (without working the stitches). All markers are in knitted stitches and are used when increasing on the yoke. Count 8-8-8-10-10-10 stitches, insert marker 1 in the next stitch (= back right sleeve), count 5-5-7-5-5-7 stitches, insert marker 2 in the next stitch (= raglan-line in front), count 7-7-7-9-9-9 stitches, insert marker 3 in the next stitch (= mid-front), count 7-7-7-9-9-9 stitches, insert marker 4 in the next stitch (= raglan-line in front), count 5-5-7-5-5-7 stitches, insert marker 5 in the next stitch (= back left sleeve), count 11-11-11-13-13-13 stitches, insert marker 6 in the next stitch (= mid-back), there are 3 stitches left on the round. Work ENGLISH RIB in the round – read description above. REMEMBER THE KNITTING TENSION! When you have worked 2-2-6-2-6-2 rounds of English rib, increase stitches on the next round as follows: Increase 4 stitches in all 6 marker-stitches - read INCREASE TIP (= 24 stitches increased on the round). Increase like this every 12th-10th-10th-10th-8th-10th round (every 6th-5th-5th-5th-4th-5th round of visible English rib stitches) a total of 5-6-6-7-8-8 times at markers 1, 2, 4 and 5 and a total of 4-5-6-6-7-8 times at markers 3 and 6 = 164-188-200-220-244-256 stitches on the needle. If the knitting tension is correct in height, the piece measures approx. 20-20-22-24-24-28 cm from the marker on the neck. Increases at markers 3 and 6 continue two more times on the piece (i.e. a total of 6-7-8-8-9-10 increases mid-front and mid-back); if the piece is shorter than 20-20-22-24-24-28 cm, some of these increases might be on the yoke. The number of stitches when dividing the yoke for body and sleeves will then not be the same as described below. The extra stitches will be on the front and back pieces. (Markers 1 and 5 also have further increases after the division, but these are described under SLEEVE.) Continue working until the piece measures 22-22-24-25-27-29 cm from the marker on the neck. On the next round divide for the body and sleeves as follows: Work the first 14-16-16-18-20-20 stitches as before, place the next 31-35-37-43-47-49 stitches on a thread for the sleeve, cast on 7 stitches under the sleeve, work the next 51-59-63-67-75-79 stitches as before, place the next 31-35-37-43-47-49 stitches on a thread for the sleeve, cast on 7 stitches under the sleeve and work the remaining 37-43-47-49-55-59 stitches as before. BODY: = 116-132-140-148-164-172 stitches – this stitch-count is only applicable if you have increased 4-5-6-6-7-8 times at markers 3 and 6 on the yoke. If you have increased more times on the yoke there will be more stitches on the needle now). Continue in the round with English rib as before and work the last 2 increases at markers 3 and 6 if necessary. The stitches under the sleeve are worked without knitting together stitches and yarn overs on the first round. When all the increases are finished there are 132-148-156-164-180-188 stitches on the body. Work until the piece measures 26-28-28-29-30-29 cm from the division (adjust so the next round is one where stitches and yarn overs are knitted together). There is approx. 5 cm left to finished length; try the jumper on and work to desired length. Change to circular needle size 4 mm and work rib as follows: * Knit the first stitch and yarn over together as before, 1 yarn over (= 1 stitch increased), purl 1 *, work from *-* to end of round = 198-222-234-246-270-282 stitches. Then work the same rib as on the neck for 5 cm (yarn overs worked twisted on the first round). Loosely cast off with knit over knit and purl over purl - read CASTING-OFF TIP! The jumper measures approx. 56-58-60-62-64-66 cm from the shoulder down. SLEEVE: Place the 31-35-37-43-47-49 stitches from the thread on the one side of the piece on short circular needle size 6 mm and knit up 1 stitch in each of the 7 stitches cast on under the sleeve = 38-42-44-50-54-56 stitches. Insert a marker thread in the middle of the 7 stitches under the sleeve (a knitted stitch in the English rib pattern). This stitch will be where you decrease under the sleeve later. Start the round before the mid-stitch and work as follows: Continue in the round with English rib as before; the knitted-up stitches under the sleeve are worked without knitting together stitches and yarn overs on the first round. At the same time increase at marker 1 (or 5 depending on which sleeve you are working) from the yoke and decrease stitches under the sleeve as described below: INCREASES: Continue to increase as before at marker 1/5 (= 4 stitches increased on each increase-round). Increase like this every 12th-10th-10th-10th-8th-10th round a total of 4 times. After the first increase there are 42-46-48-54-58-60 stitches (subsequently the number of stitches stays the same as you decrease at the same time as you increase). DECREASES: When working increase 2, decrease at the same time under the sleeve – read DECREASE TIP (= 4 stitches decreased on each decrease-round). Decrease like this on every round where you also increase (a total of 3 times). In other words, at increase 1, you are left with 42-46-48-54-58-60 stitches. Then the number of stitches remains the same on subsequent increase/decrease rounds. Continue with English rib until the sleeve measures 34-35-34-33-32-30 cm (there are 3 cm left to finished length). Now work the next round in rib in the same way as on the body; i.e. the yarn overs and knitted stitches are knitted together, increase 1 stitch after each knitted stitch and purl the purled stitch = 63-69-72-81-87-90 stitches. Change to circular needle size 4 mm and work rib as on the neck (1 English rib stitch, purl 2) for 3 cm. Loosely cast off with knit over knit and purl over purl - remember CASTING-OFF TIP. The sleeve measures approx. 37-38-37-36-35-33 cm from the division. Work the other sleeve in the same way. |
|
 |
|
Have you finished this pattern?Tag your pictures with #dropspattern #dublinwintersweater or submit them to the #dropsfan gallery. Do you need help with this pattern?You'll find 23 tutorial videos, a Comments/Questions area and more by visiting the pattern on garnstudio.com. © 1982-2026 DROPS Design A/S. We reserve all rights. This document, including all its sub-sections, has copyrights. Read more about what you can do with our patterns at the bottom of each pattern on our site. |
|


With over 40 years in knitting and crochet design, DROPS Design offers one of the most extensive collections of free patterns on the internet - translated to 17 languages. As of today we count 324 catalogues and 12290 patterns translated into English (UK/cm). 12290
We work hard to bring you the best knitting and crochet have to offer, inspiration and advice as well as great quality yarns at incredible prices! Would you like to use our patterns for other than personal use? You can read what you are allowed to do in the Copyright text at the bottom of all our patterns. Happy crafting!
Post a comment to pattern DROPS 215-12
We would love to hear what you have to say about this pattern!
If you want to leave a question, please make sure you select the correct category in the form below, to speed up the answering process. Required fields are marked *.