
Popular categories
Looking for a yarn?


Comments / Questions (88)
![]() Brigitte wrote:
Brigitte wrote:
Thank you again! This is however before we split into body and arms, so I still don't know what to do at the front and back markers when knitting the eighth increase in XL.
16.01.2023 - 09:49DROPS Design answered:
Dear Brigitte, in XL increase 7 times 4 sts in each of the 6 marker- stitches and then increase 1 time 4 sts at markers 1,2, 4 and 5 = you increase 7 times x 4 sts x 6 = 168sts then 1 time 4 sts x 4 markers = 16 sts, there were 60 sts on needle + 168+16 = 244 sts. Happy knitting!
16.01.2023 - 10:49
![]() Suzanne wrote:
Suzanne wrote:
Bonjour! je ne tricoteà l'anglaise avec le fil dans la main droite et je ne trouve pas de vidéo qui explique les augmentations et surtout, le tour suivant pour les cotes anglaises avec jetés. Tous ceux que je visionne qui utilise la main droite tricote d'une autre méthode (piquer sous la maille sans jeté). Tous vos vidéos sont de la méthode continentale. pourriez vous me diriger vers une vidéo qui me conviendrait s'il vous plaît.
15.01.2023 - 21:03DROPS Design answered:
Bonjour Suzanne, dans la vidéo, suivez le fil au niveau de l'aiguille, car c'est ce mouvement qui est important (pas de là où le fil vient, de gauche ou de droite, la technique sera ensuite la même). Cette vidéo vous montre comment augmenter plusieurs mailles dans une seule, ex au time code 0:50 pour la 1ère puis comment tricoter ces augmentations (time code 02.22)/*1 jeté, glissez le 1er jeté comme pour le tricoter à l'envers, tricotez le jeté suivant à l'envers*, tricotez 2 fois de *-* et tricotez le dernier jeté ainsi: 1 jeté, glissez ce jeté comme pour le tricoter à l'envers. Bon tricot!
16.01.2023 - 10:20
![]() Brigitte wrote:
Brigitte wrote:
Thank you for your reply, but that didn't quite clear it up for me. I am wondering how I can end up with 8 increases on the raglan markers and 7 on the front and back as descrived in the pattern, when the instruction is to increase on all 6 markers until this point. I have now stopped before the 8th increase until I know how to increase on this round.
15.01.2023 - 12:48DROPS Design answered:
Dear Brigitte, the increases worked on sleeves only are not for the raglan nor for yoke anymore, they are just to shape the sleeves. Happy knitting!
16.01.2023 - 09:09
![]() Brigitte wrote:
Brigitte wrote:
Hi! In size XL I am confused as to what to do at marker 3 and 6 when I increase the 8th time on the yoke. Do I just knit normal English rib at 3 and 6 and increase the two next on the 10th round instead? i.e. at a larger interval than the previous 7? If not I don't understand how it can be 8 times at the raglan markers and 7 times at front at back when the instruction is to increase at all 6 marker stitches.
14.01.2023 - 19:33DROPS Design answered:
Dear Brigitte, 3 and 6 are the markers for the front and back, while the others are the markers for the raglan. You increase in all of the markers, but you increase differently for the raglan and the front and back, to get different shaping. So, the last time you increase at the markers 3 and 6 you will increase as the previous times. Happy knitting!
15.01.2023 - 12:15
![]() Margret wrote:
Margret wrote:
Liebes Dropsteam,,verstehe nicht die Zunahmen am1.und 5.Markierer nicht ,wenn ab dem 2.Mal ja die Maschen gleich bleiben,warum dann die Zu - und Abnahmen,undvwenn die Zunahmen wie bisher erfolgen,habe ich pro Runde 8 Maschen statt 4 zugenommen ,und wie ist das mit den seitlichen aufgenommenen Maschen am Rumpf,ohne Umschläge ,kein Patentmuster ?
09.01.2023 - 20:08DROPS Design answered:
Liebe Margret, es wird so bei der 1. bzw 5. Markierung wie zuvor zugenommen aber damit die Maschenanzahl nicht zunimmt, wird es gleichzeitig abgenommen. (also es wird nur einmal zugenommen, dann wird es gleichzeitig zu- und abgenommmen). Es wird pro Ärmel nur bei dem 1. Markierer (entweder 1. oder 5.) zugenommen = 4 Maschen. Alle Zunahmen werden im Patentmuster gestrickt, aber bei der nächste Runde mit Umschläge stricken Sie diese Umschläge im Patentmuster (entweder links oder rechts aber ohne "links/rechts zusammen mit dem Umschlag", da es noch kein gibt). Viel Spaß beim stricken!
10.01.2023 - 09:15
![]() Brigitte wrote:
Brigitte wrote:
Hei! Jeg forstår ikke hva jeg skal gjøre ved siste raglanøkning. XL: "Øk slik på hver 8. omgang (dvs på hver 4. synlige omgang med patentmasker) totalt 8 ganger ved 1., 2., 4. og 5. merke og totalt 7 ganger ved 3. og 6.merke " Når jeg øker den 8. gangen på 1, 2, 4 og 5 (raglan, altså er det ikke skilt til bol og ermer enda) hva gjør jeg ved 3 og 6 siden det ikke skal økes der på den runden? Jeg forstår jeg skal øke to ganger til etterpå, men trenger en oppklaring her.
09.01.2023 - 17:04
![]() Eva Loena wrote:
Eva Loena wrote:
Beste, Ik begrijp niet goed waar je precies moet meerderen bij de mouwen. Er staat in de tekst bij markeerdraad 1 en 5? Als ik het goed heb, is markeerdraad 1= middenachter, 2=raglan links achter, 3=raglan links voor, 4=middenvoor, 5=raglan rechts voor en 6=raglan rechts achter. Ik zou dus verwachten dat het meerderen gebeurt op 3 en 5 (voorkant) OF op 2 en 6 (achterkant). Kunt u mij toelichten of het meerderen op de voor-of achterkant van de mouwen gebeurt?
05.01.2023 - 17:04DROPS Design answered:
Dag Eva,
Markeerdraad 3 geeft midden voor aan en markeerdraad 6 geeft midden achter aan. Markeerdraden 1, 2, 4 en 5 geven de raglanlijnen aan, deze zitten dus tussen de mouwen en de panden. Je meerdert in alle 6 steken van de markeerdraden , dus op de raglanlijnen en midden voor en midden achter. (Bij een bepaalde hoogte, meerder je nog een paar keer midden voor en midden achter en niet meer op de raglanlijnen.
08.01.2023 - 10:32
![]() Eva Loena wrote:
Eva Loena wrote:
Beste, Ik begrijp niet goed waar je precies moet meerderen bij de mouwen. Er staat in de tekst bij markeerdraad 1 en 5? Als ik het goed heb, is markeerdraad 1= middenachter, 2=raglan links achter, 3=raglan links voor, 4=middenvoor, 5=raglan rechts voor en 6=raglan rechts achter. Ik zou dus verwachten dat het meerderen gebeurt op 3 en 5 (voorkant) OF op 2 en 6 (achterkant). Kunt u mij toelichten of het meerderen op de voor-of achterkant van de mouwen gebeurt?
05.01.2023 - 17:03
![]() Lisanne wrote:
Lisanne wrote:
Hallo ik brei maat xl. Na de meerderingen 8 en 7 keer heb ik 244 steken. Dan staat er dat ik nog 2x door moet meerderen op 3 en 6 om voor het lijf op 180 steken te komen. Als ik pas na de splitsing van lijf en armen verder ga met meerderen dan is de afstand tussen meerderingen 7 en 8 groter dan die tussen bijvoorbeeld meerderingen 6 en 7. Is dit de bedoeling? Op de foto's is het namelijk niet te zien
18.08.2022 - 06:26
![]() Lisanne wrote:
Lisanne wrote:
Hallo ik brei maat xl. Na de meerderingen 8 en 7 keer heb ik 244 steken. Dan staat er dat ik nog 2x door moet meerderen op 3 en 6 om voor het lijf op 180 steken te komen. Als ik pas na de splitsing van lijf en armen verder ga met meerderen dan is de afstand tussen meerderingen 7 en 8 groter dan die tussen bijvoorbeeld meerderingen 6 en 7. Is dit de bedoeling? Op de foto's is het namelijk niet te zien
18.08.2022 - 06:25
|
|
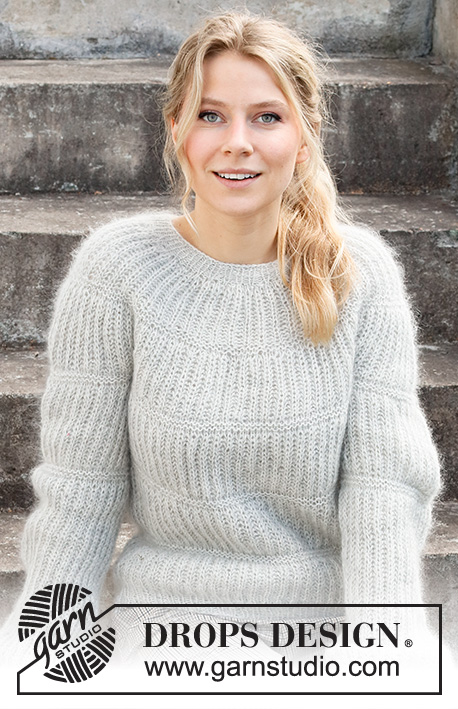
Dublin Winter Sweater#dublinwintersweater |
|
 |
 |
Knitted jumper with round yoke in DROPS Air. The piece is worked top down with English rib and A-shape. Sizes XS - XXL.
DROPS 215-12 |
|
|
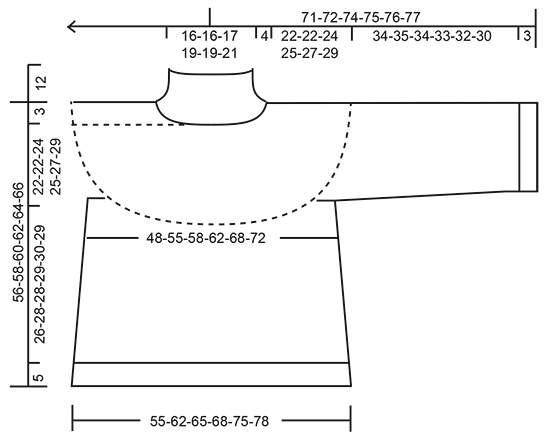
------------------------------------------------------- EXPLANATIONS FOR THE PATTERN: ------------------------------------------------------- RIB (in the round): ROUND 1: * Make 1 yarn over, slip 1 stitch as if to purl, purl 2 *, work from *-* to end of round. ROUND 2: * Knit together the yarn over and slipped stitch, purl 2 *, work from *-* to end of round. Repeat rounds 1 and 2. ENGLISH RIB (in the round): ROUND 1: * Knit together the yarn over and slipped stitch, make 1 yarn over, slip 1 stitch as if to purl, *, repeat from *-* to end of round. ROUND 2: * 1 yarn over, slip 1 stitch as if to purl, purl together the yarn over and slipped stitch *, repeat from *-* to end of round. Repeat rounds 1 and 2. INCREASE TIP (for increases in English rib stitch): All increases are worked on a round where the yarn overs and knitted stitches are knitted together (i.e. Round 1 in English rib). Increase 4 stitches in the English rib stitch as follows: Knit together the yarn over and knitted stitch, but do not slip them from the needle, make 1 yarn over the right needle, knit together the yarn over and knitted stitch again, move the marker to this stitch (= mid-stitch), make 1 yarn over the right needle, knit together the yarn over and knitted stitch again (= 3 stitches and 2 yarn overs), slip the stitches from the left needle. On the next round work the increased stitches as follows: * Make 1 yarn over, slip 1 stitch as if to purl, purl 1 *, work from *-* a total of 2 times, make 1 yarn over, slip 1 stitch as if to purl (= 3 knitted stitches and 2 purled stitches). The marker sits in the middle stitch of the increased stitches (in a knitted stitch). DECREASE TIP (mid under sleeve): All decreases are worked on a round where the yarn overs and knitted stitches are knitted together (i.e. Round 1 in English rib). Start mid under the sleeve (i.e. before the marker-stitch) and decrease 4 stitches on the round as follows: Work the first 2 stitches in English rib as before, slip the next stitch + its yarn over as if to knit, knit together the next 2 stitches + and their yarn overs and pass the slipped stitch + and its yarn-over over the knitted together stitches. Work until there are 4 stitches left before the marker stitch (= mid-stitch under the sleeve), knit together the next 3 stitches + and their yarn overs (= 2 stitches decreased), work the last stitch on the round. CASTING-OFF TIP: To avoid the cast-off edge being tight you can cast off with a larger size needle. If the edge is still tight, make 1 yarn over after approx. each 3rd stitch at the same time as casting off; the yarn overs are cast off as normal stitches. ------------------------------------------------------- START THE PIECE HERE: ------------------------------------------------------- JUMPER – SHORT OVERVIEW OF THE PIECE: The neck and yoke are worked in the round with circular needle, top down. On yoke, increase in 6 stitches marked with markers. The yoke is divided for body and sleeves and the body continued in the round with circular needle. The sleeves are worked in the round with short circular needle, top down. NECK: Cast on 78-78-84-90-90-96 stitches with circular needle size 4 mm and Air. Knit 1 round. Then work RIB – read description above, for 12 cm; finish after round 2. The next round is worked as follows: * Make 1 yarn over, slip 1 stitch as if to purl, purl 2 together *, work from *-* to end of round = 52-52-56-60-60-64 stitches. Change to circular needle size 6 mm. Insert 1 marker thread at the beginning of the round; the yoke is measured from this marker thread. YOKE: Insert 6 markers in the piece as described below (without working the stitches). All markers are in knitted stitches and are used when increasing on the yoke. Count 8-8-8-10-10-10 stitches, insert marker 1 in the next stitch (= back right sleeve), count 5-5-7-5-5-7 stitches, insert marker 2 in the next stitch (= raglan-line in front), count 7-7-7-9-9-9 stitches, insert marker 3 in the next stitch (= mid-front), count 7-7-7-9-9-9 stitches, insert marker 4 in the next stitch (= raglan-line in front), count 5-5-7-5-5-7 stitches, insert marker 5 in the next stitch (= back left sleeve), count 11-11-11-13-13-13 stitches, insert marker 6 in the next stitch (= mid-back), there are 3 stitches left on the round. Work ENGLISH RIB in the round – read description above. REMEMBER THE KNITTING TENSION! When you have worked 2-2-6-2-6-2 rounds of English rib, increase stitches on the next round as follows: Increase 4 stitches in all 6 marker-stitches - read INCREASE TIP (= 24 stitches increased on the round). Increase like this every 12th-10th-10th-10th-8th-10th round (every 6th-5th-5th-5th-4th-5th round of visible English rib stitches) a total of 5-6-6-7-8-8 times at markers 1, 2, 4 and 5 and a total of 4-5-6-6-7-8 times at markers 3 and 6 = 164-188-200-220-244-256 stitches on the needle. If the knitting tension is correct in height, the piece measures approx. 20-20-22-24-24-28 cm from the marker on the neck. Increases at markers 3 and 6 continue two more times on the piece (i.e. a total of 6-7-8-8-9-10 increases mid-front and mid-back); if the piece is shorter than 20-20-22-24-24-28 cm, some of these increases might be on the yoke. The number of stitches when dividing the yoke for body and sleeves will then not be the same as described below. The extra stitches will be on the front and back pieces. (Markers 1 and 5 also have further increases after the division, but these are described under SLEEVE.) Continue working until the piece measures 22-22-24-25-27-29 cm from the marker on the neck. On the next round divide for the body and sleeves as follows: Work the first 14-16-16-18-20-20 stitches as before, place the next 31-35-37-43-47-49 stitches on a thread for the sleeve, cast on 7 stitches under the sleeve, work the next 51-59-63-67-75-79 stitches as before, place the next 31-35-37-43-47-49 stitches on a thread for the sleeve, cast on 7 stitches under the sleeve and work the remaining 37-43-47-49-55-59 stitches as before. BODY: = 116-132-140-148-164-172 stitches – this stitch-count is only applicable if you have increased 4-5-6-6-7-8 times at markers 3 and 6 on the yoke. If you have increased more times on the yoke there will be more stitches on the needle now). Continue in the round with English rib as before and work the last 2 increases at markers 3 and 6 if necessary. The stitches under the sleeve are worked without knitting together stitches and yarn overs on the first round. When all the increases are finished there are 132-148-156-164-180-188 stitches on the body. Work until the piece measures 26-28-28-29-30-29 cm from the division (adjust so the next round is one where stitches and yarn overs are knitted together). There is approx. 5 cm left to finished length; try the jumper on and work to desired length. Change to circular needle size 4 mm and work rib as follows: * Knit the first stitch and yarn over together as before, 1 yarn over (= 1 stitch increased), purl 1 *, work from *-* to end of round = 198-222-234-246-270-282 stitches. Then work the same rib as on the neck for 5 cm (yarn overs worked twisted on the first round). Loosely cast off with knit over knit and purl over purl - read CASTING-OFF TIP! The jumper measures approx. 56-58-60-62-64-66 cm from the shoulder down. SLEEVE: Place the 31-35-37-43-47-49 stitches from the thread on the one side of the piece on short circular needle size 6 mm and knit up 1 stitch in each of the 7 stitches cast on under the sleeve = 38-42-44-50-54-56 stitches. Insert a marker thread in the middle of the 7 stitches under the sleeve (a knitted stitch in the English rib pattern). This stitch will be where you decrease under the sleeve later. Start the round before the mid-stitch and work as follows: Continue in the round with English rib as before; the knitted-up stitches under the sleeve are worked without knitting together stitches and yarn overs on the first round. At the same time increase at marker 1 (or 5 depending on which sleeve you are working) from the yoke and decrease stitches under the sleeve as described below: INCREASES: Continue to increase as before at marker 1/5 (= 4 stitches increased on each increase-round). Increase like this every 12th-10th-10th-10th-8th-10th round a total of 4 times. After the first increase there are 42-46-48-54-58-60 stitches (subsequently the number of stitches stays the same as you decrease at the same time as you increase). DECREASES: When working increase 2, decrease at the same time under the sleeve – read DECREASE TIP (= 4 stitches decreased on each decrease-round). Decrease like this on every round where you also increase (a total of 3 times). In other words, at increase 1, you are left with 42-46-48-54-58-60 stitches. Then the number of stitches remains the same on subsequent increase/decrease rounds. Continue with English rib until the sleeve measures 34-35-34-33-32-30 cm (there are 3 cm left to finished length). Now work the next round in rib in the same way as on the body; i.e. the yarn overs and knitted stitches are knitted together, increase 1 stitch after each knitted stitch and purl the purled stitch = 63-69-72-81-87-90 stitches. Change to circular needle size 4 mm and work rib as on the neck (1 English rib stitch, purl 2) for 3 cm. Loosely cast off with knit over knit and purl over purl - remember CASTING-OFF TIP. The sleeve measures approx. 37-38-37-36-35-33 cm from the division. Work the other sleeve in the same way. |
|
 |
|
Have you finished this pattern?Tag your pictures with #dropspattern #dublinwintersweater or submit them to the #dropsfan gallery. Do you need help with this pattern?You'll find 23 tutorial videos, a Comments/Questions area and more by visiting the pattern on garnstudio.com. © 1982-2026 DROPS Design A/S. We reserve all rights. This document, including all its sub-sections, has copyrights. Read more about what you can do with our patterns at the bottom of each pattern on our site. |
|


With over 40 years in knitting and crochet design, DROPS Design offers one of the most extensive collections of free patterns on the internet - translated to 17 languages. As of today we count 324 catalogues and 12290 patterns translated into English (UK/cm). 12290
We work hard to bring you the best knitting and crochet have to offer, inspiration and advice as well as great quality yarns at incredible prices! Would you like to use our patterns for other than personal use? You can read what you are allowed to do in the Copyright text at the bottom of all our patterns. Happy crafting!
Post a comment to pattern DROPS 215-12
We would love to hear what you have to say about this pattern!
If you want to leave a question, please make sure you select the correct category in the form below, to speed up the answering process. Required fields are marked *.