
Popular categories
Looking for a yarn?


Comments / Questions (22)
![]() Reidun Dale Haugestad wrote:
Reidun Dale Haugestad wrote:
Hei! Jeg ser at det nederst på bolen skal legges UT masker før vrangborden , det er jo helt ulogisk å ha større vrangbord enn bol. Her er ikke fletting, så er dette feil? Kan ikke se at andre har spurt om dette før.. er oppskriften her oppdatert med rettinger dom er gjort?
11.12.2023 - 13:04DROPS Design answered:
Hei Reidun. For å få en pen overgang mellom bol og vrangbord, byttes det til mindre pinne str. og det økes masker. Da slipper man å få den trange vrangborden man gjerne hadde på -80-tallet. Om man ønsker vrangborden smalere, kan man fint droppe økningen. Bare husk å ha et maskeantall som vrangborden (2 rett/2 vrang) går opp i. mvh DROPS Design
11.12.2023 - 13:36
![]() Boulart Jocelyne wrote:
Boulart Jocelyne wrote:
Bonjour, Comment faites vous pour calculer le nombre de pelotes pour un pull jacquard ? en 2 couleurs Je vous remercie
21.03.2023 - 14:38DROPS Design answered:
Bonjour Mme Boulart, si vous voulez réaliser ce modèle en 2 couleurs, il vous faudra additionner les 2 couleurs du jacquard - il vous en faudra probablement un peu moins, mais nous n'avons d'expérience qu'avec 3 couleurs - votre magasin pourra vous aider si besoin, même par mail ou téléphone. Bon tricot!
21.03.2023 - 14:42
![]() Bente Virenfeldt wrote:
Bente Virenfeldt wrote:
Bærestykket... På runder hvor der skal laves udtagning og der startes med hvid, fx 5. række i A2a, er denne udtagning /nye maske så hvid eller grå??? Vh Bente
20.01.2023 - 23:11DROPS Design answered:
Hei Bente. På neste omgang skal den økte masken strikkes med mørk grå, ville ha laget kastet med samme farge, altså mørk grå. mvh DROPS Design
23.01.2023 - 11:06
![]() Niamh wrote:
Niamh wrote:
I am working on the elevation in size L. I am confused about the instruction regarding moving the marker thread. I have \'knit 48 stitches back.\' When I turn the piece and purl 15 stitches, this does not pass the marker thread. There are 24 stitches on either side if the marker thread.
21.12.2022 - 02:14DROPS Design answered:
Dear Niamh, the elevation started on mid back, but after the elevation is done, you will have to start yoke and yoke doesn't start on mid back but 15 sts after the marker mid-back (seen from the wrong size) in your size and you are now ready to work all stitches on back piece. Happy knitting!
21.12.2022 - 08:20
![]() Marie wrote:
Marie wrote:
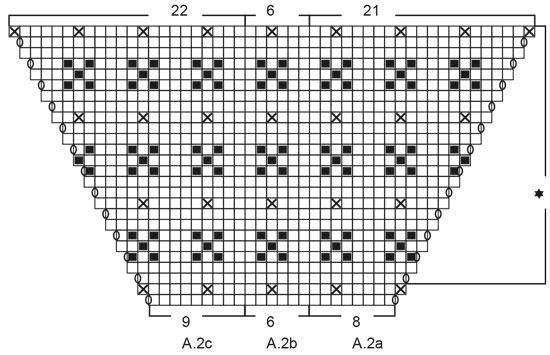
I beskrivningen till OKet står det: "Diagram A.2b stickas 4 gånger mer på bredden för varje gång de 24 varven upprepas på höjden". Ska jag alltså sticka A.2b 3 gånger (18 maskor) alla dom första 24 varven och sen 12 gånger (72 maskor) alla nästkommande 24 varv?
03.11.2022 - 08:50DROPS Design answered:
Hej Marie, du skal fortsætte mønsteret fra ryg & forstykke og ærmerne ud mod raglanovergangen efterhånden som du tager ud :)
04.11.2022 - 09:35
![]() Joan Bengtson wrote:
Joan Bengtson wrote:
Når man har strikket diagrammet 1gang=192 m, fortsætter man så med udtagninger på hver 6 omg,på ryg og forstykke?
14.09.2022 - 13:22DROPS Design answered:
Hej Joan, du har taget ud på hver 2.omgang og det fortsætter du med :)
16.09.2022 - 07:34
![]() Amanda wrote:
Amanda wrote:
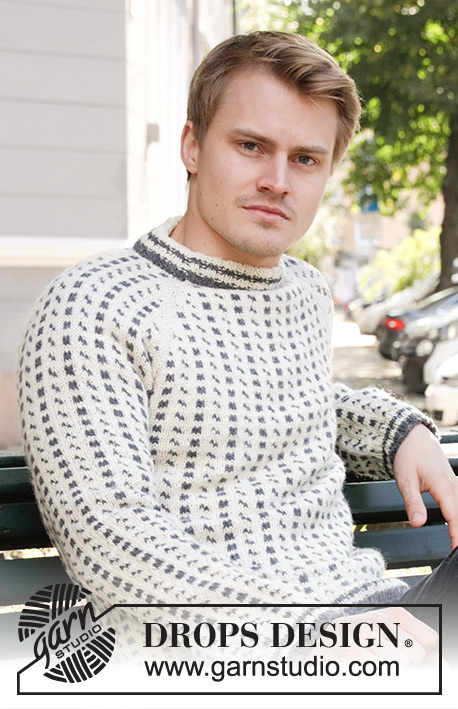
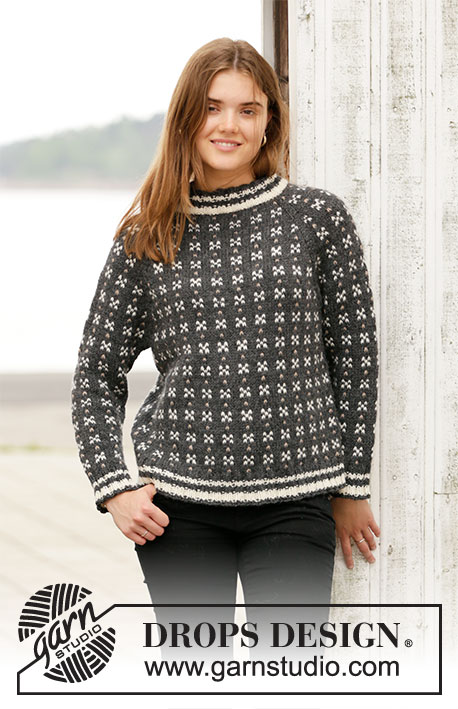
Vilken storlek har modellen på bilden?
29.01.2022 - 17:34DROPS Design answered:
Hei Amanda. Modellen har på seg str S eller M. For å finne riktig str til deg, kan du ta en titt på cm målene på målskissen nederst på siden. mvh DROPS Design
31.01.2022 - 13:55
![]() Annica Holmström wrote:
Annica Holmström wrote:
Jag vill byta till garnet DROPS BRUSHED Alpaca Silk. storlek XL dam. Hur många nystan behöver jag för detta
06.04.2021 - 14:03DROPS Design answered:
Hej Annica, prøv vores garn konverterare. Vælg DROPS Nepal, vælg 1 tråd og vælg antal gram i din størrelse, så får du antal gram i DROPS Brushed Alpaca Silk - husk at tröjan vil få et helt andet udtryk i denne kvalitet :)
06.04.2021 - 14:43
![]() Caroline wrote:
Caroline wrote:
Si je veux réaliser ce projet, j'ai besoin de combien de pelote de laines?
10.03.2021 - 22:14DROPS Design answered:
Bonjour Caroline, vous trouverez la quantité pour chaque taille, au poids, sous l'en-tête, autrement dit, il vous faut en taille S par exemple: 300 g DROPS Nepal/50g la pelote = 6 pelotes gris foncé + 2 pelotes Nepal naturel + 2 pelotes beige (100 g de chacune de ces 2 couleurs). Bon tricot!
11.03.2021 - 08:12
![]() Maiken wrote:
Maiken wrote:
Det er feil i mønsteret når man skal sette av masker til armene. Er 2 masker for lite på hver av størrelsene.
16.01.2021 - 12:06
|
||||||||||||||||
Akranes#akranessweater |
||||||||||||||||
 |
 |
|||||||||||||||
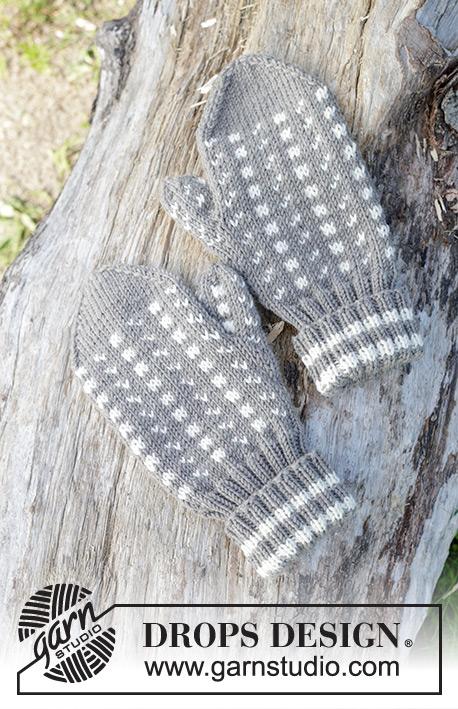
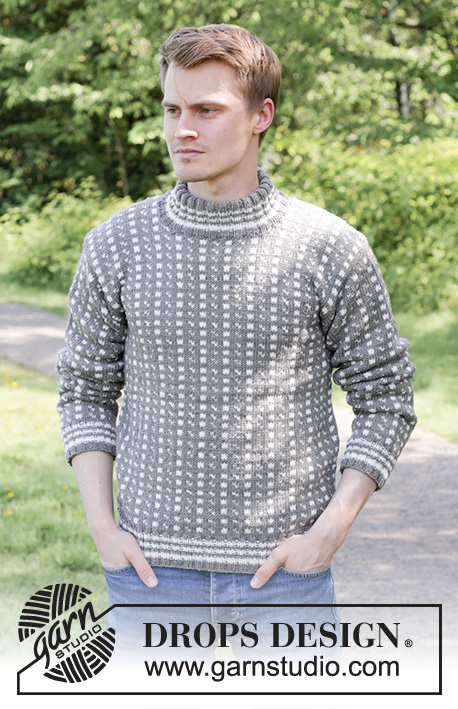
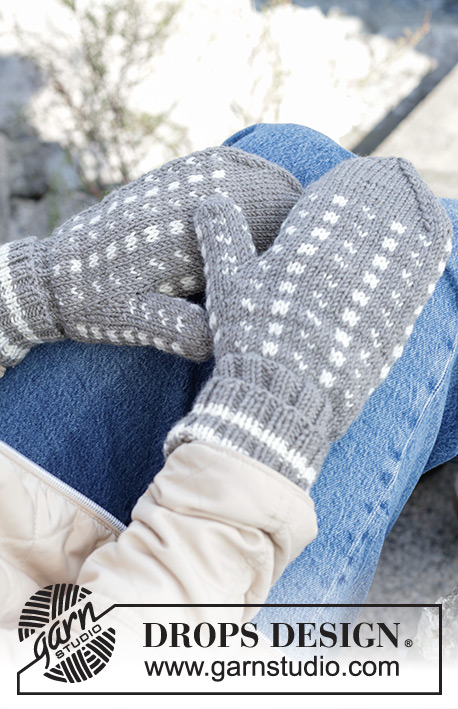
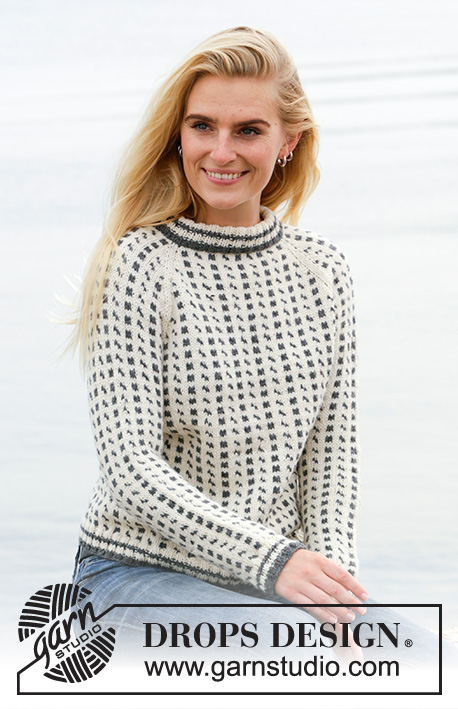
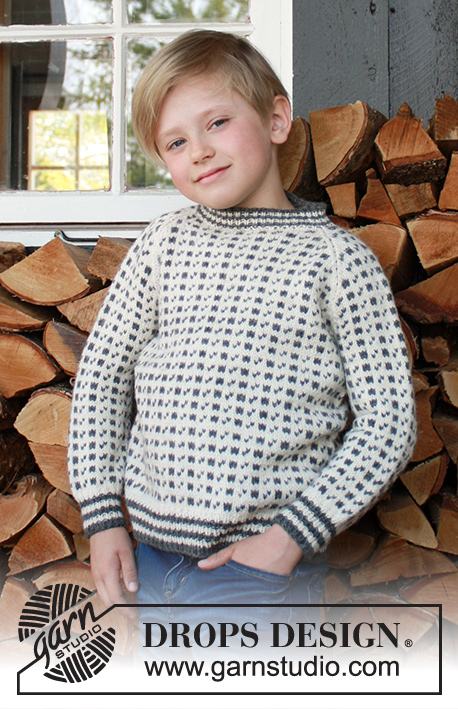
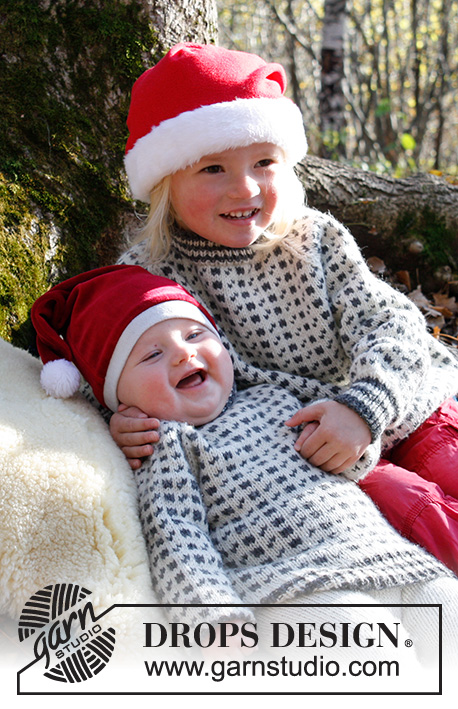
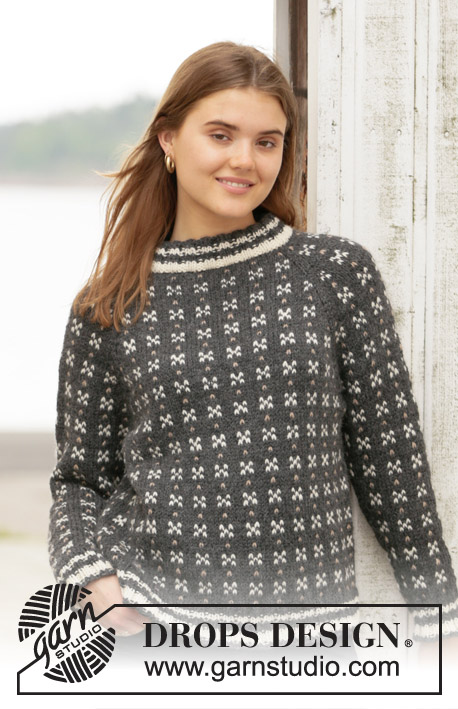
Knitted jumper with Nordic Icelandic pattern and raglan in DROPS Nepal. The piece is worked top down. Sizes S - XXXL.
DROPS 205-20 |
||||||||||||||||
|
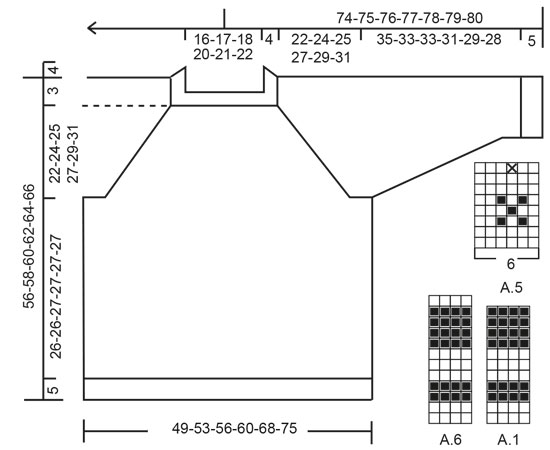
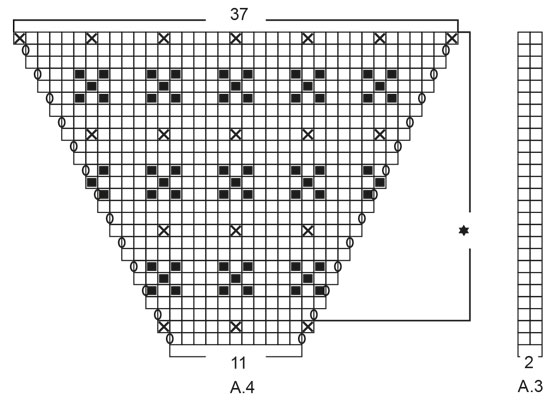
------------------------------------------------------- EXPLANATIONS FOR THE PATTERN: ------------------------------------------------------- PATTERN: See diagrams A.1 to A.6. Patterns A.1 and A.6 are worked in rib. Patterns A.2 to A.5 are worked in stocking stitch. INCREASE TIP (evenly spaced): To work out how to increase evenly, count the total number of stitches on the needle (e.g. 76 stitches) and divide by the number of increases to be made (e.g. 12) = 6.3. In this example, increase by making 1 yarn over after approx. each 6th stitch. On the next round knit the yarn overs twisted to avoid holes ELEVATION (back of neck): Skip this section if you do not want an elevation. Start from the wrong side with dark grey and purl 8-8-8-9-9-9 stitches past the marker thread at the beginning of the round, turn, tighten strand and knit 16-16-16-18-18-18 stitches back. Turn, tighten strand and purl 24-24-24-27-27-27 stitches, turn, tighten strand and knit 32-32-32-36-36-36 stitches back. Turn, tighten strand and purl 40-40-40-45-45-45 stitches, turn, tighten strand and knit 48-48-48-54-54-54 stitches back. Turn, tighten the strand and purl 15-15-15-18-18-18 stitches past the marker thread at the beginning of the round. Move the marker thread here. Then work YOKE as described in the text. KNITTING TIP: To avoid the knitting tension becoming tighter when working pattern it is important that the strands at the back are not tight. Use a size larger needle when working pattern if this is a problem. CASTING OFF TIP: To avoid the cast-off edge being tight you can cast off with a ½ size larger needle. DECREASE TIP (for sleeves): Decrease 1 stitch on each side of the marker thread as follows: Work until there are 2 stitches left before the marker thread, knit 2 together with dark grey, (marker thread sits here), slip 1 stitch as if to knit, knit 1 with dark grey and pass the slipped stitch over the knitted stitch. ------------------------------------------------------- START THE PIECE HERE: ------------------------------------------------------- JUMPER – SHORT OVERVIEW OF THE PIECE: The neck, yoke and body are worked in the round with circular needle, top down. After the neck you can work an elevation to make the neck slightly higher at the back. This elevation can be left out; the neck will then be the same front and back – see description in text. The sleeves are worked in the round with short circular needle/double pointed needles, top down. NECK: Cast on 76-80-80-88-88-92 stitches with short circular needle size 4.5 mm and off-white. Change to dark grey and knit 1 round, then work rib (= knit 2/ purl 2) for 4 cm, then A.1 in rib – take CARE with the symbol-explanations. Knit 1 round with dark grey where you increase 12-8-8-12-12-12-8 stitches evenly spaced – read INCREASE TIP = 88-88-88-100-100-100 stitches. Change to circular needle size 5.5 mm. Insert a marker thread at the beginning of the round. You can now work an ELEVATION in the back of the neck – read description above or go straight to YOKE. YOKE: The first round is worked as follows: Work A.2a (= 8 stitches), A.2b over the next 12-12-12-18-18-18 stitches (= 2-2-2-3-3-3 repeats of 6 stitches) and A.2c (= 9 stitches) (= back piece), work A.3 (= 2 stitches, raglan-line), A.4 (= 11 stitches, sleeve), A.3 (= 2 stitches, raglan-line), A.2a (= 8 stitches), A.2b over the next 12-12-12-18-18-18 stitches (= 2-2-2-3-3-3 repeats of 6 stitches) and A.2c (= 9 stitches) (= front piece), work A.3 (= 2 stitches, raglan-line), A.4 (= 11 stitches, sleeve), A.3 (= 2 stitches, raglan-line). There are now 96-96-96-108-108-108 stitches on the needles (= first increase to raglan is finished). Continue this pattern onwards; i.e. increase 1 stitch on each side of A.2 and A.4 as shown in the diagrams (= a total of 8 stitches increased every 2nd round). Read KNITTING TIP and REMEMBER THE KNITTING TENSION! When patterns A.2 to A.4 have been worked 1 time in height there are 192-192-192-204-204-204 stitches on the needle. Continue onwards, repeating the patterns as shown in A.2/A.4. Diagram A.2b is worked 4 more times in width each time the 24 rows are repeated in height. Continue like this increasing a total of 19-22-25-25-28-31 times on each side of A.2/A.4. When the last increase are finished, there are 240-264-288-300-324-348 stitches on the needle and the piece measures approx.19-22-25-25-28-31 cm from the neck-edge. Continue the pattern as before but without further increases. When the piece measures 22-24-25-27-29-31 cm from the neck – adjust so the next round is without pattern, work the next round as follows: Work 70-76-82-88-94-103 stitches as before (= back piece), place the next 48-54-60-60-66-66 stitches on 1 thread for sleeve, cast on 6-6-6-6-12-12 new stitches on the needle (= in side under sleeve), work 72-78-84-90-96-108 stitches as before (= front piece), place the next 48-54-60-60-66-66 stitches on 1 thread for sleeve, cast on 6-6-6-6-12-12 new stitches on the needle (= in side under sleeve), work the last 2-2-2-2-2-5 stitches as before (= back piece). Cut the strand. Body and sleeves are finished separately. THE PIECE IS NOW MEASURED FROM HERE! BODY: = 156-168-180-192-216-240 stitches. Insert 1 marker thread on the one side of the piece, in the middle of the 6-6-6-6-12-12 stitches cast on under the sleeve. Allow the thread to follow you work onwards; it marks the beginning of the round. Work A.5 in the round (= 26-28-30-32-36-40 repeats of 6 stitches) – start with the correct stitch and row in the diagram so the pattern is repeated as before in both width and height. Continue working until the piece measures approx. 26-26-27-27-27-27 cm from the division – adjust to after round 2 or 7 in A.5. Change to circular needle size 4.5 mm and knit 1 round with dark grey where you increase 28-32-36-36-40-48 stitches evenly spaced = 184-200-216-228-256-288 stitches. Work A.6 in rib (= knit 2/ purl 2). When A.6 has been completed, cast off with knit over knit and purl over purl using dark grey – read CASTING OFF TIP. SLEEVE: Place the 48-54-60-60-66-66 stitches from the thread on the one side of the piece on short circular needle/double pointed needles size 5.5 mm and knit up 1 stitch in each of the 6-6-6-6-12-12 stitches cast on under the sleeve = 54-60-66-66-78-78 stitches. Insert 1 marker thread in the middle of the 6-6-6-6-12-12 new stitches and allow it to follow your work onwards; it will be used when decreasing mid under sleeve. Start the round by the marker thread and work A.5 in the round (= 9-10-11-11-13-13 repeats of 6 stitches) – start with the correct stitch and row in the diagram so the pattern is repeated as before in both width and height, but the first and last stitch of the round are always worked with dark grey (to give neat decreases under the sleeve). When the piece measures 1 cm from the division decrease 2 stitches mid under sleeve – read DECREASE TIP. Decrease like this every 2nd round a total of 1-2-1-1-3-2 times = 52-56-64-64-72-74 stitches. Then decrease every 3-2½-2-1½-1-1 cm a total of 8-9-12-12-14-15 times = 36-38-40-40-44-44 stitches left on needles. Continue working until the piece measures 35-33-33-31-29-28 cm from the division (shorter measurements in larger sizes due to wider neck and longer yoke) – adjust so you finish after round 2 or 7 in A.5. Change to double pointed needles size 4.5 mm and knit 1 round with dark grey where you increase 8-6-8-8-8-8 stitches evenly spaced = 44-44-48-48-52-52 stitches. Work A.6 in rib (= knit 2/ purl 2). When A.6 has been completed, cast off with knit over knit and purl over purl using dark grey – remember CASTING OFF TIP. Work the other sleeve in the same way. ASSEMBLY: Fold the neck to the wrong side. Sew the cast-on edge down using off-white – sew small, neat stitches on the inside of the jumper (make sure the seam does not show on the right side and the seam is not tight). |
||||||||||||||||
Diagram explanations |
||||||||||||||||
|
||||||||||||||||
 |
||||||||||||||||
 |
||||||||||||||||
 |
||||||||||||||||
Have you finished this pattern?Tag your pictures with #dropspattern #akranessweater or submit them to the #dropsfan gallery. Do you need help with this pattern?You'll find 29 tutorial videos, a Comments/Questions area and more by visiting the pattern on garnstudio.com. © 1982-2026 DROPS Design A/S. We reserve all rights. This document, including all its sub-sections, has copyrights. Read more about what you can do with our patterns at the bottom of each pattern on our site. |
||||||||||||||||


With over 40 years in knitting and crochet design, DROPS Design offers one of the most extensive collections of free patterns on the internet - translated to 17 languages. As of today we count 324 catalogues and 12290 patterns translated into English (UK/cm). 12290
We work hard to bring you the best knitting and crochet have to offer, inspiration and advice as well as great quality yarns at incredible prices! Would you like to use our patterns for other than personal use? You can read what you are allowed to do in the Copyright text at the bottom of all our patterns. Happy crafting!
Post a comment to pattern DROPS 205-20
We would love to hear what you have to say about this pattern!
If you want to leave a question, please make sure you select the correct category in the form below, to speed up the answering process. Required fields are marked *.