Comments / Questions (8)
![]() Wioletta wrote:
Wioletta wrote:
W opisie są oczka ścisłe a na filmie półsłupki, więc jak robić tułów?
16.12.2022 - 12:36DROPS Design answered:
Witaj Wioletto, w języku polskim funkcjonują równolegle obie terminologie. Tłumacząc musieliśmy wybrać jedną wersję i jej się trzymać. Zawsze patrz video i przerabiaj zgodnie z nim. Pozdrawiamy!
16.12.2022 - 15:28
![]() Wioletta wrote:
Wioletta wrote:
Nie rozumiem opisu jak zrobić aby wyszły w sumie te cztery rogi, co to znaczy ominąć dwa oczka? Czy jest jakiś filmik jak wykonać te dodatkowe rogi bo wychodzi mi tylko jeden rulon
16.12.2022 - 11:42DROPS Design answered:
Witaj Wioletto, wykonujesz 1 tubę do której później dołączysz 2 odnogi (w miejscu dziurek powstałych przez ominięcie oczek: czyli tam gdzie przerabiasz: 2 oł, omijasz 2 kolejne oś poprzedniego okrążenia i przerabiasz 1 oś w kolejne oczko ścisłe). Dziurki będą po przeciwnych stronach tuby, a po wykonaniu 2 odnóg otrzymasz pożądany kształt. Pozdrawiamy!
20.12.2022 - 08:20
![]() Dea wrote:
Dea wrote:
Grazie, con la vostra spiegazione ho già risolto e attaccato le orecchie. Potete inserire ciò che avete detto a me nella spiegazione? Sarebbe utile per chi vuole realizzarlo. :)
10.12.2014 - 12:29
![]() Yanne Cantin wrote:
Yanne Cantin wrote:
Merci ! il est très mignon ce petit renne et je vais le faire pour mon petit fils de 10 mois !
02.12.2013 - 16:16
![]() Yanne Cantin wrote:
Yanne Cantin wrote:
Merci ! je trouve ce petit cerf très mignon et je vais le faire pour mon petit fils de 10 mois !
02.12.2013 - 16:15
![]() Levering wrote:
Levering wrote:
Patroonrudolf
17.12.2012 - 19:09
![]() Wilck wrote:
Wilck wrote:
Bitte Kontrolle ab Runde 22 falsche maschenanzahl
05.12.2012 - 12:44
![]() Barbara Schraga wrote:
Barbara Schraga wrote:
22. RD: * je 1 fM in die nächsten 7 fM, die nächsten 2 fM zusammenhäkeln *, von *-* bis Rd-Ende wdh (= 36 fM)." Hier müssten es nicht zusammenhäkeln heißen sondern 2 fM in die nächste fM. Sonst würde die MZ am Ende nicht 36 lauten.
05.12.2012 - 11:48DROPS Design answered:
Liebe Barbara, danke für den Hinweis, die Anleitung ist nun korrigiert!
06.12.2012 - 12:08
Rudolf#dropsrudolf |
|
|
|
|
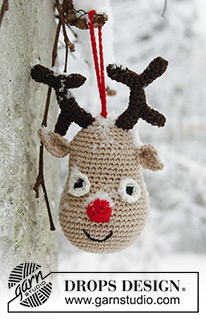
Crochet DROPS Christmas reindeer in ”Safran”.
DROPS Extra 0-858 |
|
|
MAGIC CIRCLE: When piece is worked in the round, start with this technique to avoid holes in the middle (instead of ch-ring): Hold the yarn end and wind the yarn one time around the index finger to make a loop. Hold the loop with left thumb and middle finger, place the thread over left index finger. Insert hook through the loop, make a YO and pull thread through loop, work 1 ch, then work dc around the loop. When the desired no of dc have been reached, pull the yarn end to tighten the loop. Fasten the yarn end at the back. Continue to work in the round in a circle. WORK IN THE ROUND IN A CIRCLE: After last dc on the round, continue to next round with 1 dc in next dc (= first dc from previous round). NOTE: Insert a marker at the beg of round between last dc and first dc on the round, move the marker upwards. WORKING 2 DC TOG: * Insert hook in next st, get thread *, repeat from *-* one more time, make a YO and pull thread through all 3 sts on hook. WORKING 3 DC TOG: * Insert hook in next st, get thread *, repeat from *-* 2 times, make a YO and pull thread through all 4 sts on hook. COLOUR CHANGE - DC: To get a nice colour change work last dc on round as follows: Insert hook in last st, get thread, make a YO with the new colour and pull it through all sts on hook. Continue on to next round with the new colour. -------------------------------------------------------- HEAD: Worked in the round in a circle with beige on hook size 3 mm. Start at the bottom of head by making a MAGIC CIRCLE - Read explanation above. ROUND 1: Work 8 dc in the magic circle. Read WORK IN THE ROUND IN A CIRCLE above. ROUND 2: Work 2 dc in every dc = 16 dc. ROUND 3: * 1 dc in next dc, 2 dc in next dc *, repeat from *-* the entire round = 24 dc. ROUND 4: * 1 dc in each of the next 2 dc, 2 dc in next dc *, repeat from *-* the entire round = 32 dc. ROUND 5: Work 1 dc in every dc = 32 dc. ROUND 6: * 1 dc in each of the next 3 dc, 2 dc in next dc *, repeat from *-* the entire round = 40 dc. ROUND 7: Work 1 dc in every dc = 40 dc. ROUND 8: * 1 dc in each of the next 4 dc, 2 dc in next dc *, repeat from *-* the entire round = 48 dc. ROUND 9-15: Work 1 dc in every dc = 48 dc on the round. ROUND 16: * 1 dc in each of the next 4 dc, then work the next 2 dc tog * - Read explanation above, repeat from *-* the entire round = 40 dc. ROUND 17-18: Work 1 dc in every dc = 40 dc on the round. ROUND 19: * 1 dc in each of the next 3 dc, then work the next 2 dc tog *, repeat from *-* the rest of the round = 32 dc. ROUND 20-21: Work 1 dc in every dc = 32 dc on the round. ROUND 22: * 1 dc in each of the next 7 dc, 2 dc in next dc *, repeat from *-* the entire round = 36 dc. ROUND 23-26: Work 1 dc in every dc = 36 dc on the round. ROUND 27: * 1 dc in each of the next 4 dc, then work the next 2 dc tog *, repeat from *-* the rest of the round = 30 dc. ROUND 28: Work 1 dc in every dc = 30 dc. ROUND 29: * 1 dc in each of the next 3 dc, then work the next 2 dc tog *, repeat from *-* the rest of the round = 24 dc. ROUND 30: Work 1 dc in every dc = 24 dc. ROUND 31: * 1 dc in each of the next 2 dc, then work the next 2 dc tog *, repeat from *-* the entire round = 18 dc. ROUND 32: Work 1 dc in every dc = 18 dc. ROUND 33: * 1 dc in next dc, then work the next 2 dc tog *, repeat from *-* the entire round = 12 dc. Fill the head with some cotton wool. ROUND 34: Work all dc tog 2 by 2 = 6 dc. Cut the thread and baste it up and down the last sts, pull tog and fasten. EAR: Worked back and forth. Beg at the tip of the ear, work 6 ch with beige, then 1 dc in 2nd ch from hook, 1 dc in every ch = 5 dc. Work 3 more rows with 1 dc in every dc (beg every row with 1 ch). Work next row as follows: 1 ch, work the first 2 dc tog, 1 dc, work the last 2 dc tog = 3 dc. On next row work the 3 dc tog - Read explanation above, cut the thread and keep 30 cm for assembly. Work another ear the same way. ANTLERS: Worked in the round in a circle. Beg at the top of the antler, work 6 ch with brown. Work 1 dc in 1st ch worked, 1 dc in every ch = 6 dc. Then work 1 dc in every dc until piece measures approx. 2½ cm. Then work as follows: * Work 2 ch, skip the next 2 dc (= opening for branch), continue with 1 dc in every dc, on next round work 1 dc in each of the 2 ch *. Then inc 1 dc on next round = 7 dc on round. Continue with 1 dc in every dc until piece measures approx. 5 cm, then repeat from *-* 1 more time (work 2 ch on the other side of the antler). Then inc 1 dc on next round = 8 dc on round. Then work 1 dc in every dc until piece measures approx. 6½ cm in total. Cut the thread and keep 30 cm for assembly. Work around the upper opening as follows: Work 6 dc around the entire opening, continue with 1 dc in every dc until branch measures approx. 1½ cm, then work the 6 dc on round tog 2 by 2 = 3 dc remain. Cut the thread and baste it up and down the last sts, pull tog and fasten. Repeat around the lower opening. Work another antler the same way. NOSE: Worked in the round in a circle. Start by making a magic circle in red. ROUND 1: Work 5 dc in the magic circle. ROUND 2: Work 2 dc in every dc = 10 dc. ROUND 3-4: Work 1 dc in every dc = 10 dc on the round. Cut the thread and keep 30 cm for assembly. EYE: Worked in the round in a circle. Start by making a magic circle in black. ROUND 1: Work 4 dc in the magic circle. Switch to off white in the last dc - Read COLOUR CHANGE - DC. ROUND 2: Work 2 dc in every dc = 8 dc. ROUND 3: * 2 dc in the next 2 dc, 1 dc in each of the next 2 dc *, repeat from *-* one more time = 12 dc. Finish with 1 sl st in next dc. Cut the thread and keep 30 cm for assembly. Work another eye the same way. ASSEMBLY: Sew the antlers at the top of the head, fold the ears double and sew them on to each side. Sew the eyes and the nose on the front of the head. Embroider on mouth with black. Work a ch-row with red for approx. 15 cm, sew ch-row on to the middle of the head. |
|
Have you finished this pattern?Tag your pictures with #dropspattern #dropsrudolf or submit them to the #dropsfan gallery. Do you need help with this pattern?You'll find 6 tutorial videos, a Comments/Questions area and more by visiting the pattern on garnstudio.com. © 1982-2026 DROPS Design A/S. We reserve all rights. This document, including all its sub-sections, has copyrights. Read more about what you can do with our patterns at the bottom of each pattern on our site. |


Post a comment to pattern DROPS Extra 0-858
We would love to hear what you have to say about this pattern!
If you want to leave a question, please make sure you select the correct category in the form below, to speed up the answering process. Required fields are marked *.