
Popular categories
Looking for a yarn?


Comments / Questions (41)
![]() Kay Pritchard wrote:
Kay Pritchard wrote:
What is the circumference of the bag?
11.03.2016 - 22:19DROPS Design answered:
Dear Mrs Pritchard, bag is approx. 38 cm / 15" in width (see final measurements under tab "Materials". Happy crocheting!
12.03.2016 - 17:27
![]() Xivia wrote:
Xivia wrote:
Bonjour, Je suis en train de réaliser ce joli sac, j'ai bien respecté les augmentations jusqu'à obtenir 100 mailles mais le fond du sac n'est pas droit et forme des plis, Et c'est pas très joli. Peut-être cela vient-il des augmentation de 10 mailles après le 4ème rang je les ai réalisé à partir de la maille 3 jusqu'à la 23 en alternant deux dB 1 dB soit 2 dB ds la maille 3 et 1 dB ds maille 4, 2 dB dans la 5 et 1 dB ds 6...jusquà la maille 23. Merci de voir réponse.
31.03.2015 - 17:07DROPS Design answered:
Bonjour Xivia, pour que les augmentations soient bien régulières, on doit continuer à augmenter 10 B par tour, au 5ème tour: *1 dB dans les 3 m suiv, 2 dB dans la suiv*, puis au 6ème tour: *1 dB dans les 4 m suiv, 2 dB dans la suiv*, et ainsi de suite, à chaque tour, on crochète 1 dB en plus entre chaque augmentation jusqu'à ce qu'on ait un total de 100 m. Bon crochet!
01.04.2015 - 09:13
![]() Laurel Kriegler wrote:
Laurel Kriegler wrote:
I needed three balls of each of the colour yarns, instead of the two balls specified in the pattern, in order to complete the bag. I think you should reflect this in the pattern.
02.03.2015 - 12:38
![]() Letty wrote:
Letty wrote:
Mijn proeflapje werd precies 10 cm Maar ipv 38 cm word hij aan de boven kant wel 48 cm... Op de foto lijkt het net of er geminderd is, staat niet in het patroon, vraag me af wat ik verkeerd doe
05.10.2014 - 13:45DROPS Design answered:
Hoi Letty. Er wordt niet geminderd in dit patroon. Als het proeflapje correct is, dan denk ik dat je verkeerd hebt gemeten (te veel gerekt misschien). Je moest gewoon doorhaken tot 40 cm, maar omdat je met een dubbele draad haakt op naald 5 zit er best rek in het werk. Dus meet plat liggend en trek niet in het werk.
06.10.2014 - 16:45
![]() Kräutertee wrote:
Kräutertee wrote:
Bei der Farbangabe steht cotton light nr.21 diese wirkt wenn ich alle 4 farben zusammen häkele zu dominant und zu hell, anders als auf dem Bild. Was mache ich falsch
29.07.2014 - 20:58DROPS Design answered:
Die Farben wirken von Bildschirm zu Bildschirm leider immer etwas unterschiedlich, auch kommt es auf die Belichtung beim Fotografieren an, sodass der Farbeindruck auf den Fotos letztlich immer nur näherungsweise und nie genau sein kann. Wenn Ihnen Nr. 21 zu hell ist, können Sie Nr. 22 probieren oder sich selbst von der Farbkarte inspirieren lassen, wobei auch hierbei gilt, dass die Farben am Bildschirm von der realen Wollfarbe abweichen kann.
31.07.2014 - 12:00
![]() Elena wrote:
Elena wrote:
Tengo una duda. ¿Usando cuatro hilos de distintos colores a la vez, formando un solo hilo, hace el efecto que aparece en la foto, haciendo rayas?
15.04.2014 - 14:01DROPS Design answered:
Hola Elena. Exactamente, el efecto lo conseguimos trabajando los 4 hilos a la vez, pero el cambio de colores y las rayas depende de la combinación de los colores dentro del ovillo y puede ser que no salga idéntico que en la foto (depende de las tintadas).
22.04.2014 - 11:08
![]() Linda Ward wrote:
Linda Ward wrote:
Do I hold the four yarns together and crochet them as one yarn in each stitch and if so isn't a 5mm hook too small or should I use the yarns singly and change to a different one in each round?
19.01.2014 - 01:45DROPS Design answered:
Dear Mrs Ward, you are correct, you hold 4 yarns together at the same time, you should have 13 htr (= with 4 threads) = width 10 cm, you may use a crochet 5 mm or smaller/larger if required to get the correct tension so that the texture is correct. Happy crocheting!
20.01.2014 - 08:52
![]() Katja wrote:
Katja wrote:
Ich habe gerade diese wunderschöne Tasche fertiggestellt. Allerdings habe ich von jeder Farbe je ein Knäuel mehr benötigt.
15.01.2014 - 10:15
![]() Chiti wrote:
Chiti wrote:
Es mejor forrarlo ya que sí no se pueden meter cosas entre los puntos. Podríais indicar las medidas del forro y la forma de hacerlo? Muchas gracias
25.09.2013 - 10:53DROPS Design answered:
Hola Chiti! Es difícil sin ver el tamaño del bolso contestar sobre las medidas del forro. Lo mejor es que pasas por la tienda donde compraste la lana para que te aconsejen.
25.09.2013 - 18:26
![]() Caroline wrote:
Caroline wrote:
Bis jetzt gefällt mir die Tasche sehr gut, aber mir ist noch nicht klar, wie genau ich mit dem Träger beginne! Wie vermeide ich, dass beim Beutel durch das Beenden der letzten Reihe kein "Huckel" entsteht? Und wie genau schließe ich den Träger an? Freue mich über schnelle Antworten! :)
10.04.2013 - 13:15DROPS Design answered:
Liebe caroline, es muss heissen, den Faden NICHT abschneiden, wir haben dies nun korrigiert. Dann wird klar, wo der Träger beginnt, Sie häkeln einfach nach Anleitung weiter. Der Träger wird auf der anderen Seite angenäht. Ihre Bemerkung bez. „Huckel“ habe ich leider nicht verstanden.
14.04.2013 - 08:36
|
|
Rondo#rondobag |
|
 |
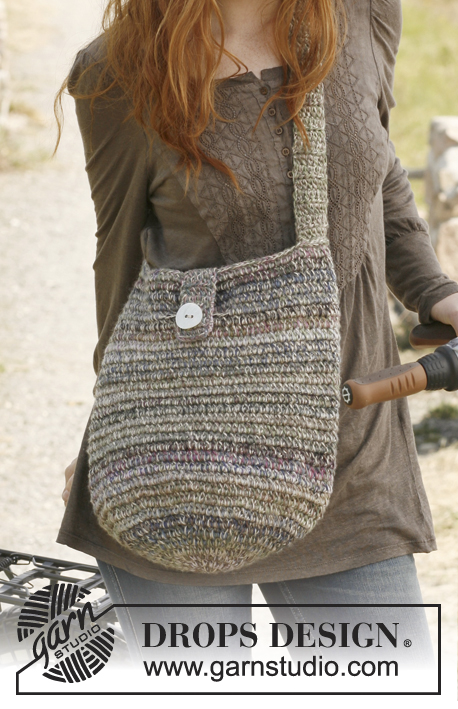 |
Crochet DROPS bag in ”Delight” and “Cotton Light”.
DROPS 132-20 |
|
|
WORK IN THE ROUND IN A CIRCLE: After last htr on the round, continue to next round with 1 htr in next st (= first st on next round). NOTE: Insert a marker at the beg of round between last st and first st on the round, move the marker upwards. -------------------------------------------------------- BAG: Worked in the round from bottom up. Work 2 ch on hook size 5 mm with 1 thread in each colour/material (= 4 threads). ROUND 1: Work 10 htr in 1st ch - Read WORK IN THE ROUND IN A CIRCLE above. ROUND 2: 2 htr in every st = 20 htr (10 new sts). ROUND 3: * 1 htr in next st, 2 htr in next st *, repeat from *-* the rest of the round = 30 htr. ROUND 4: * 1 htr in the next 2 sts, 2 htr in next st *, repeat from *-* the rest of the round = 40 htr. Continue to inc 10 sts on the round by working 2 htr in next st after every 3rd, 4th, 5th st etc. until 100 sts have been worked on the round. Continue with 1 htr in every st until piece measures 40 cm vertically (or desired height). Do not cut the threads. SHOULDER STRAP: Turn piece, work 2 ch and 1 htr in each of the next 7 sts = 7 htr. Turn piece with 2 ch and work 7 htr on the row until shoulder strap measures 80 cm, cut the threads. Fasten strap in the other side of bag. FLAP: With 1 thread in each colour/material (= 4 threads) work 7 htr on the upper edge (between shoulder strap). Turn piece with 2 ch and work 7 htr on the row until flap measures 6 cm. Then work button hole as follows: 2 htr, 3 ch and skip 3 sts, finish with 2 htr. On next row, work 1 htr in every ch from previous row. Continue with htr for 2 cm. Cut and fasten the thread. Sew button on to bag. |
|
Have you finished this pattern?Tag your pictures with #dropspattern #rondobag or submit them to the #dropsfan gallery. Do you need help with this pattern?You'll find 3 tutorial videos, a Comments/Questions area and more by visiting the pattern on garnstudio.com. © 1982-2026 DROPS Design A/S. We reserve all rights. This document, including all its sub-sections, has copyrights. Read more about what you can do with our patterns at the bottom of each pattern on our site. |
|


With over 40 years in knitting and crochet design, DROPS Design offers one of the most extensive collections of free patterns on the internet - translated to 17 languages. As of today we count 324 catalogues and 12290 patterns translated into English (UK/cm). 12290
We work hard to bring you the best knitting and crochet have to offer, inspiration and advice as well as great quality yarns at incredible prices! Would you like to use our patterns for other than personal use? You can read what you are allowed to do in the Copyright text at the bottom of all our patterns. Happy crafting!
Post a comment to pattern DROPS 132-20
We would love to hear what you have to say about this pattern!
If you want to leave a question, please make sure you select the correct category in the form below, to speed up the answering process. Required fields are marked *.