
Popular categories
Looking for a yarn?


Comments / Questions (23)
![]() Cattin wrote:
Cattin wrote:
Question numéro 1 : je tricote le Bonnet en taille S. M. Les 28 cm de hauteur totale avant arrêt des mailles doit on les mesurer à partir des marqueurs après bordure à replier, Pour réaliser le pompon de 20 cm de diamètre, il faut avec un compas, faire un cercle de 20 cm. De combien de centimètres faut-il faire le trou central du cercle qui sert à enrouler la laine pour la réalisation de ce pompon ? Merci de me répondre rapidement. Bonne journée.
28.01.2026 - 10:35DROPS Design answered:
Bonjour Mme Cattin, les 28 cm sont à mesurer après les 10 cm, (cf. Mesurer désormais à partir d'ici); retrouvez ici, en vidéo un aperçu de la réalisation d'un pompon (pour vous donner une idée de l'échelle pour le trou intérieur). Bon tricot!
29.01.2026 - 08:35
![]() Maria wrote:
Maria wrote:
Buonasera Secondo me la spiegazione del cappello è sbagliato perché dice: 1 maglia a diritto una maglia a legaccio ma il disegno del cappello sembrerebbe un ferro a diritto un ferro a legaccio
26.02.2020 - 21:37DROPS Design answered:
Buongiorno Maria. Le spiegazioni del modello sono corrette. Deve lavorare inizialmente a maglia rasata rovescio per 10 cm, poi prosegue a maglia rasata normale. I primi 10 cm verranno poi piegati in modo che si veda come maglia rasata normale. Quello che in fotografia vede come un ferro a legaccio, è la parte iniziale del lavoro (ferro di avvio + 2 ferri a legaccio). Buon lavoro!
27.02.2020 - 09:00
![]() Maria wrote:
Maria wrote:
Ho fatto due ferri a maglia legaccio ...... dal terzo ferro dice 1 maglia a rovescio 1 maglia a legaccio sarebbe giusto così ?
19.02.2020 - 19:33DROPS Design answered:
Buonasera Maria, a quale punto fa riferimento? All'inizio, dopo i 2 ferri a maglia legaccio, sul 3° ferro lavora in questo modo: 1 maglia a maglia legaccio, maglia rasata rovescia fino a quando rimane 1 maglia, 1 maglia a maglia legaccio. Buon lavoro!
19.02.2020 - 22:38
![]() Maria wrote:
Maria wrote:
Buonasera, Sono giuste le spiegazione del cappello ?
18.02.2020 - 22:26DROPS Design answered:
Buonasera Maria, in che punto sta riscontrando dei problemi? Buon lavoro!
18.02.2020 - 22:43
![]() Nathalie wrote:
Nathalie wrote:
Hallo, ik wil dit patroon maken met breiwol voor nr 4-5 kan ik dit met 2 draden breien met breinaald nr 9 ? Hoeveel steken zet ik dan op?
29.01.2020 - 21:44DROPS Design answered:
Dag Nathalie,
Je maakt eerst een proeflapje en kijkt hoeveel steken er in 10 cm gaan. Op basis daarvan en de stekenverhouding in het patroon kan je uitrekenen hoeveel steken je op moet zetten om hetzelfde formaat (33 cm) te krijgen.
01.02.2020 - 19:58
![]() Margret Camponovo wrote:
Margret Camponovo wrote:
Bitte überprüfen Sie die deutsche Übersetzung, sie ist bei der Mütze unverständlich, sogar für meine Freundin, die eine geübte Strickerin ist! Das Modell an sich ist aber wunderschön.
01.01.2020 - 12:31
![]() Lea wrote:
Lea wrote:
Moc krásný model :-) Upletu.
13.02.2019 - 13:49
![]() Giovanna wrote:
Giovanna wrote:
Buongiorno. Io volevo provare a lavorare il poncho. Mi piace molto questo modello. Ma ho letto di avviare 20m e mi sembrano un po' poche. Da disegno sembrano di più. Grazie in anticipo
20.01.2019 - 17:03DROPS Design answered:
Buonasera Giovanna, il numero di maglie da avviare è corretto, tenga presente che alla fine otterrà un rettangolo e il poncho verrà confezionato cucendo il ferro di chiusura a uno dei lati lunghi. Buon lavoro!
20.01.2019 - 22:12
![]() Carole wrote:
Carole wrote:
Et pour finir, avec mon échantillon 8 mailles = 10 cm, 34 mailles font donc 42.5 cm. Comme il n'y a pas de côtes sur ce modèle, cela me parait insuffisant, je crains que le bord ne soit pas assez extensible pour un tour de tête de 54 cm. Merci d'avance de votre réponse et de votre aide
06.12.2017 - 20:59DROPS Design answered:
Bonjour Carole, le nombre de mailles est prévu plus petit que le tour de tête pour que le bonnet s'ajuste bien. Vous pouvez volontiers ajuster en fonction de votre échantillon et de la taille souhaitée. Bon tricot!
07.12.2017 - 09:54
|
|
DROPS 116-21 |
|
|
|
|
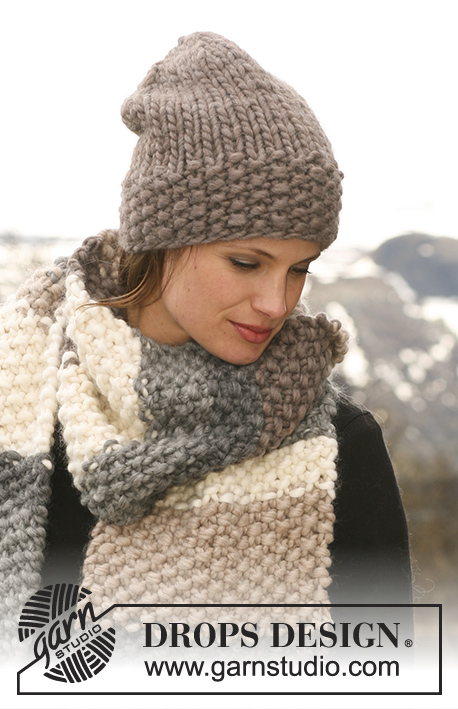
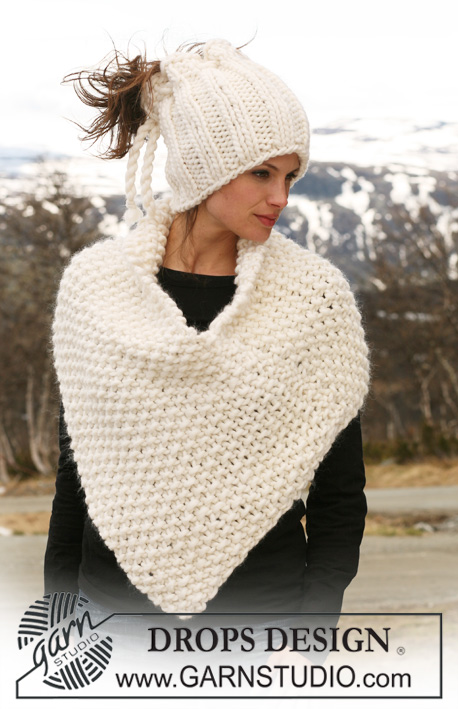
Set comprises: Knitted DROPS hat with pompom and poncho in moss st in ”Polaris”.
DROPS 116-21 |
|
|
HAT: GARTER ST (back and forth on needle): K all rows. NEW BALL TIP: when starting a new ball of yarn, split, moisten and twist thread ends. -------------------------------------------------------- HAT: Worked back and forth on needle. Leave thread approx 40 cm long when casting on, use this to sew hat tog afterwards. Cast on 34-36 sts on needle size 12 mm with Polaris. Work 2 rows GARTER ST - see above – and work next row from RS as follows: 1 garter st, reverse stocking st until 1 st remain, finish with 1 garter st. REMEMBER THE KNITTING TENSION! See NEW BALL TIP! Continue like this until piece measures 10 cm (= edge to be folded towards RS afterwards). Now measure piece from here. Work next row as follows from RS: 1 garter st, stocking st until 1 st remain, 1 garter st. Insert 5 markers in piece (from RS) as follows: first marker after st 3-5 and then 1 marker after every 6th st. Continue in stocking st, AT THE SAME TIME when piece measures 20-22 cm from markers dec 1 st to the right of each marker and 1 st at the end of row by K2 tog (= 6 dec sts). Repeat the dec on every other row a total of 3 times = 16-18 sts. Continue until piece measures 28-30 cm. Cut the thread, pull through remaining sts, tighten and fasten. Use thread end from cast on to sew hat tog, edge to edge. Fold the bottom 10 cm towards RS. POMPOM: Make 1 loose pompom with a diameter of approx 20 cm with Polaris. Cut thread ends, but a little uneven. Attach pompom to top of hat. -------------------------------------------------------- PONCHO: MOSS ST: Row 1: * K1, P1 *, repeat from *-*. Row 2: K over P and P over K. Repeat row 2. NEW BALL TIP: when starting a new ball of yarn, split, moisten and twist thread ends. -------------------------------------------------------- PONCHO: Worked back and forth on circular needle. Cast on 20 sts on circular needle size 20 mm with Polaris. REMEMBER THE KNITTING TENSION! See NEW BALL TIP! Work moss st until piece measures 112 cm. Cast off. ASSEMBLY: Sew cast off row to the end of one long side, edge to edge to avoid a chunky seam (the opposite long side is now the point towards mid front). |
|
Have you finished this pattern?Tag your pictures with #dropspattern or submit them to the #dropsfan gallery. Do you need help with this pattern?You'll find 13 tutorial videos, a Comments/Questions area and more by visiting the pattern on garnstudio.com. © 1982-2026 DROPS Design A/S. We reserve all rights. This document, including all its sub-sections, has copyrights. Read more about what you can do with our patterns at the bottom of each pattern on our site. |


With over 40 years in knitting and crochet design, DROPS Design offers one of the most extensive collections of free patterns on the internet - translated to 17 languages. As of today we count 324 catalogues and 12290 patterns translated into English (UK/cm). 12290
We work hard to bring you the best knitting and crochet have to offer, inspiration and advice as well as great quality yarns at incredible prices! Would you like to use our patterns for other than personal use? You can read what you are allowed to do in the Copyright text at the bottom of all our patterns. Happy crafting!
Post a comment to pattern DROPS 116-21
We would love to hear what you have to say about this pattern!
If you want to leave a question, please make sure you select the correct category in the form below, to speed up the answering process. Required fields are marked *.