
Popular categories
Looking for a yarn?


Comments / Questions (11)
![]() Casu Anna Laura wrote:
Casu Anna Laura wrote:
Buona sera. Sto realizzando questo cardigan nella taglia M. Non capisco quando (a quanti cm a partire dalla base) devo iniziare a lavorare coi ferri accorciati e non capisco se il collo va lavorato separatamente, a partire dai ferri accorciati e poi il collo va cucito. Ringrazio anticipatamente
18.10.2025 - 20:13DROPS Design answered:
Buonasera Anna Laura, i ferri accorciati si lavorano a partire dalla maglie messe in sospeso del davanti destro. Buon lavoro!
18.10.2025 - 21:24
![]() Anna Laura Casu wrote:
Anna Laura Casu wrote:
Buongiorno. Non ho capito come fare il collo. Mi potete per cortesia spiegare meglio? Ringrazio anticipatamente
16.10.2025 - 17:47DROPS Design answered:
Buonasera Anna Laura, il collo si lavora a ferri accorciati, quindi non su tutte le maglie del ferro, ma seguendo le indicazioni riportate. Buon lavoro!
17.10.2025 - 23:39
![]() Mel Rose wrote:
Mel Rose wrote:
Pattern 0-963 Ruby Bay (L) - I am sorry but I just need to clarify. I do not know why I am struggling with this. Is this right? Row 1 & 2- Work all 13 Sts. Row 3 - work over to last 6 sts. Row 4 - turn and work to end of row. Row 5 & 6 - Work all 13 sts. Row 7 - Work over to last 6 sts. Row 8 - turn and work to the end. and continue with row 1-4 until you each desired measurement of 3" at shortest. Also, is this short row wrap and turn method? Thanks for your patience.
01.02.2022 - 18:40DROPS Design answered:
Dear Mel Rose, when working the collar on right front piece, start from the right side and work short rows as follows: *2 rows over all sts, 2 rows over the first 6 sts only (leaving the remaining 7 sts unworked)*, repeat these 4 rows. You can use wrap & turn method or just turn and tighten thread to avoid a big hole (see here). Happy knitting!
02.02.2022 - 07:53
![]() Mel Rose wrote:
Mel Rose wrote:
I am very confused and do not understand how to work the short rows in this pattern. What does 2 rows over all sts, 2 rows over 6 sts. I have read everything I can find and watched videos but this does not make sense to me. I have my sweater knit and this is the last thing to do. Frustrating. Please help. Can you simplify. Ruby bay 0-963 pattern.
31.01.2022 - 23:12DROPS Design answered:
Dear Mel Rose, Taking as an example size S, you work rows 1 and 2 over all the 13 stitches. In row 3, you work over the first 6 stitches only, then you turn and work back (over these 6 stitches). You can watch the videos of short rows to see how to turn and place the thread correctly. Rows 5 and 6 are worked as row 1 and 2, the next 2 rows as rows 3 and 4 and repeat. Happy knitting!
31.01.2022 - 23:50
![]() Ester wrote:
Ester wrote:
Buonasera, nella spiegazione del modello viene indicata la diminuzione nel davanti destro, senza specificare se sul lato della chiusura o se sul letto della manica. È indifferente? Grazie per la risposta.
31.10.2020 - 22:56DROPS Design answered:
Buonasera Ester, nelle spiegazioni del davanti destro viene indicato di diminuire lateralmente. Buon lavoro!
02.11.2020 - 10:43
![]() Lin wrote:
Lin wrote:
Jullie beschrijving hierboven van een gerstekorrel steek klopt niet volgens mij. Als je jullie beschrijving breit, dan krijg je een boord(steek). Bij gerstekorrel moet je juist wel recht boven recht en averecht boven averecht breien.
24.05.2020 - 19:27
![]() Sarah Zollinger wrote:
Sarah Zollinger wrote:
Liebes DROPS-Team Ich habe mit den Abnahmen meine liebe Mühe. Danach bleiben zwei rechte bzw. linke Maschen auf der Nadel. Wie muss ich weiter stricken, um das Perlmuster beizubehalten? Dürfen sich die Randmaschen verändern oder stricke ich die beiden gleichen Maschen nicht im Perlmuster? Vielen Dank für eure Hilfe.
06.02.2019 - 14:36DROPS Design answered:
Liebe Frau Zollinger, die Randmaschen werden krausrechts gestrickt, siehe auch TIPP ZUR ABNAHME. Dann immer weiter im Perlmuster wie zuvor stricken (li über re und re über li). Viel Spaß beim stricken!
06.02.2019 - 16:15Ginny wrote:
Hello! I'm at the end of this jacket and i really don't understand how to work the short rows. :/ What does it mean work 2 rows over 7 sts? Do i work 7 from the right side, turn, knit till the end of wrong side and that counts as 2 rows, or not? Or is the 2nd row for picking up the wrap? I'm confused :/
15.11.2017 - 14:43DROPS Design answered:
Dear Ginny, work the short rows as follows starting from RS (right shawl collar, ie on right front piece): work 14 sts in seed stitch from RS, turn and work 14 sts in seed st from WS, work 7 sts in seed st from RS, turn and work 7 sts from WS = 4 rows. Repeat these 4 rows until piece measure 9 cm on the shorter side (= towards shoulder, this side will be sewn along neckline). Happy knitting!
15.11.2017 - 14:46
![]() Marjan wrote:
Marjan wrote:
Hartelijk dank voor de uitleg, ik kwam er niet uit en heb beide geprobeerd maar zag geen verschil. Nu weet ik hoe het moet. Dank!
28.09.2017 - 16:06
![]() Marjan wrote:
Marjan wrote:
Waar komen de verkorte toeren: aan de hals-of schouderkant? vriendelijk groet, Marjan
27.09.2017 - 15:13DROPS Design answered:
Hallo Marjan, De verkorte toeren komen aan de kant van de hals. In het patroon staat ook dat je de steken van het rechter voorpand opneemt en aan de goede kant begint met breien. Hierdoor komen de verkorte toeren aan de kant van de hals.
27.09.2017 - 20:21
|
|
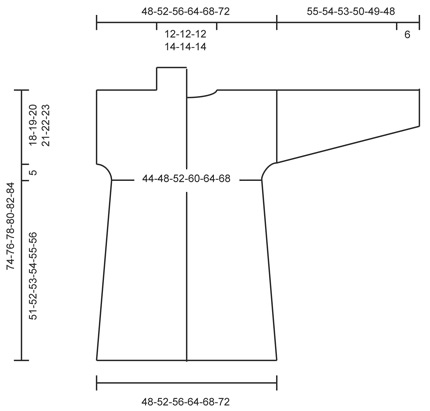
Ruby Bay |
|
|
|
|
Knitted DROPS jacket in moss st with shawl collar in ”Snow”. Size: S - XXXL.
DROPS Extra 0-963 |
|
|
KNITTING TIP: Always switch yarn in the side of the piece. This is done to avoid visible fastened strands. MOSS ST: Row 1: * K 1, P 1 *, repeat from *-*. Row 2: K over P and P over K. Repeat 2nd row. BUTTONHOLES: Dec for buttonholes on right band. 1 buttonhole = K tog third and fourth st from edge and make 1 YO. Dec for buttonholes when piece measures: SIZE S: 29, 37 and 45 cm SIZE M: 30, 38 and 46 cm SIZE L: 31, 39 and 47 cm SIZE XL: 32, 40 and 48 cm SIZE XXL: 33, 41 and 49 cm SIZE XXXL: 34, 42 and 50 cm DECREASE TIP: Dec inside 1 edge st in garter st. All dec are done from RS! Dec before 1 edge st as follows: K 2 tog. Dec after 1 edge st as follows: Slip 1 st as if to K, K 1, psso. INCREASE TIP: Inc 1 st in the side by working 2 sts in the last st on needle. ---------------------------------------------------------- RIGHT FRONT PIECE: Worked back and forth on circular needle. Read KNITTING TIP! Cast on 31-33-35-39-41-43 sts on circular needle size 9 mm with Snow. Work MOSS ST - see explanation above, and beg with P 1. REMEMBER THE KNITTING TENSION! When piece measures 8 cm, dec 1 st in the side - SEE DECREASE TIP. Repeat dec when piece measures 20 cm = 29-31-33-37-39-41 sts on needle. REMEMBER BUTTONHOLES on band - see explanation above. When piece measures 51-52-53-54-55-56 cm, inc 1 st for sleeve at end of every row from RS towards the side 2 times - Read INCREASE TIP = 31-33-35-39-41-43 sts on needle. When piece measures 74-76-78-80-82-84 cm, cast off the first 18-20-22-25-27-29 sts for shoulder from WS. Then work the remaining 13-13-13-14-14-14 sts on needle before slipping them on a stitch holder (= collar sts). LEFT FRONT PIECE: Work as right front piece but reversed. It is important to finish with the same row of moss st on both front pieces so that each shoulder is the same when collar is worked. BACK PIECE: Cast on 48-52-56-64-68-72 sts on circular needle size 9 mm with Snow. Work moss st, beg with K 1. When piece measures 8 cm, dec 1 st on each side as on front piece. Repeat dec when piece measures 20 cm = 44-48-52-60-64-68 sts on needle. When piece measures 51-52-53-54-55-56 cm, inc 1 st for sleeve at end of every row 2 times in each side - Read INCREASE TIP = 48-52-56-64-68-72 sts on needle. When piece measures 72-74-76-78-80-82 cm, cast off the middle 10-10-10-12-12-12 sts for neck and finish each shoulder separately. On next row cast off 1 st towards the neck, 18-20-22-25-27-29 sts remain on each shoulder. Cast off when piece measures 74-76-78-80-82-84 cm. COLLAR: Slip the 13-13-13-14-14-14 collar sts from right front piece back on circular needle size 9 mm. Then work short rows over collar while AT THE SAME TIME continuing with moss st as before, starting from RS: * 2 rows over all sts, 2 rows over 6-6-6-7-7-7 sts *. Repeat from *-* until collar measures 8-8-8-9-9-9 cm at the shortest. Cast off. Work left part of collar the same way but reversed, i.e starting short rows from WS. SLEEVES: Worked back and forth on circular needle. Cast on 24-24-26-26-26-28 sts on circular needle size 9 mm with Snow and work moss st. When piece measures 12 cm, inc 1 st in each side of piece. Repeat inc every 6-5-5-4-3½-3½ cm 5-6-6-7-8-8 more times (6-7-7-8-9-9 times in total) = 36-38-40-42-44-46 sts on needle. When piece measures 55-54-53-50-49-48 cm (shorter measurements in the larger sizes because of wider shoulders), loosely cast off all sts. ASSEMBLY: Sew in sleeves. Sew seams under sleeve and side seams in one in front loop of outermost st. Sew collar tog mid back and sew to back of neck. Sew the buttons on to left front piece. |
|
 |
|
Have you finished this pattern?Tag your pictures with #dropspattern or submit them to the #dropsfan gallery. Do you need help with this pattern?You'll find 15 tutorial videos, a Comments/Questions area and more by visiting the pattern on garnstudio.com. © 1982-2026 DROPS Design A/S. We reserve all rights. This document, including all its sub-sections, has copyrights. Read more about what you can do with our patterns at the bottom of each pattern on our site. |


With over 40 years in knitting and crochet design, DROPS Design offers one of the most extensive collections of free patterns on the internet - translated to 17 languages. As of today we count 324 catalogues and 12290 patterns translated into English (UK/cm). 12290
We work hard to bring you the best knitting and crochet have to offer, inspiration and advice as well as great quality yarns at incredible prices! Would you like to use our patterns for other than personal use? You can read what you are allowed to do in the Copyright text at the bottom of all our patterns. Happy crafting!
Post a comment to pattern DROPS Extra 0-963
We would love to hear what you have to say about this pattern!
If you want to leave a question, please make sure you select the correct category in the form below, to speed up the answering process. Required fields are marked *.