
Popular categories
Looking for a yarn?


Comments / Questions (49)
![]() Sylvie wrote:
Sylvie wrote:
Je ne comprends pas pourquoi la maille centrale est en jersey end sur le diagramme A1 puis en point mousse ensuite. Cela a t-il une importance?
18.06.2014 - 14:32DROPS Design answered:
Bonjour Sylvie, votre question a été transmise à notre équipe Design, nous reviendrons dès que possible. Merci d'avance pour votre patience.
18.06.2014 - 14:52
![]() Sylvie wrote:
Sylvie wrote:
Pourquoi faire la maille centrale au début en jersey endroit puis au point mousse? Est-ce une erreur ou cela a t-il une importance?
18.06.2014 - 08:16
![]() Inge Hammer Pedersen wrote:
Inge Hammer Pedersen wrote:
Drops 146-15 Jeg forstår ikke rigtig, hvordan afslutningen på sjalet skal være. Kan det evt. forklares på en mere forståelig måde ? Jeg kan se, at der er en mere, som har spurgt til afslutningen, men det står som en kommentar, så det er vel derfor, at der ikke er noget svar på dette spørgsmål. Hilsen Inge
09.04.2014 - 14:03DROPS Design answered:
Hej Inge. Du strikker til sidst diagram A.2/A.3/A4 = kanten.
09.04.2014 - 16:40
![]() Kirstin Wiggert wrote:
Kirstin Wiggert wrote:
Bei 301 Maschen 17 Maschen A1 u A2 dann 11 x A3 = 132 Maschen = 149 Maschen bis 2 Maschen vor der mittel Masche um A4 zu stricken. Mir fehlt aber 1 Masche. Mit Sicherheit habe ich einen Denkfehler. Bitte um Hilfe
20.11.2013 - 09:44DROPS Design answered:
Liebe Kirstin, die eine Maschen scheint mir die Maschen von A2 zu sein. Wenn Sie diese mitzählen geht es auf: 3 M kraus re, A.2 (1 M), A.3 über die nächsten 144 M, bis 2 M vor der mittleren M, A.4 (3+1+144+2=150 M) 150 M + 1 M (Mitte) + 150 M = 301 M.
25.11.2013 - 09:02
![]() Susan Petersen wrote:
Susan Petersen wrote:
Hvor er kanten på sjalet beskrevet henne?
18.10.2013 - 13:43
![]() Susann Otto wrote:
Susann Otto wrote:
Hallo zusammen, kann es sein, dass die Strickanleitung nicht mit dem Bild übereinstimmt? Laut dem Bild folgt auf den schmalen Rand (A.1) ein breiter Streifen im Lochmuster. Folgt man der Anleitung und strickt nach A.1 das Muster aus A.2 bis A.4, erhält man kein Lochmuster, sondern das Muster, das im Foto im Bereich des Nackens ist. Ist das richtig so???
11.10.2013 - 13:32DROPS Design answered:
Liebe Susann, es stimmt alles, denn das Tuch beginnt ja mit einem kleinen Dreieck oben im Nacken. Das Lochmuster kommt erst gegen Ende.
12.10.2013 - 08:53
![]() Martin wrote:
Martin wrote:
Je viens de commencer cette petite merveille mais en Alpaga afin d'avoir un maximum de douceur en hiver, le début est déjà magnifique...
21.09.2013 - 16:00
![]() Colleen Callanan wrote:
Colleen Callanan wrote:
Are the charts only shown from right side? If so do I pearl wrong side except 3 garter stichs?
26.06.2013 - 08:20DROPS Design answered:
Dear Mrs Callanan, correct, from WS all sts - except 3 sts each side - will be P (1 square in diagram = 1 st x 1 row). Happy knitting!
26.06.2013 - 09:05
![]() Gosia wrote:
Gosia wrote:
Witam, wg dagramow otrzymuje inny efekt/wzor na chuscie niz na zalaczonym na stronie zdjeciu, czy zaszla tu pomylka?
13.06.2013 - 22:57DROPS Design answered:
Dokładnie sprawdziłam wzór i komentarze do niego. We wzorze nie stwierdziłam pomyłek, a w komentarzach nikt nie zgłaszał problemów ze wzorem. Spróbuję jeszcze wykonać go sama i dam znać jaki efekt. Proszę jeszcze raz dokładnie sprawdzić czy nie wkradła się jakaś pomyłka podczas robienia. Powodzenia
17.06.2013 - 09:07
![]() Mathieu wrote:
Mathieu wrote:
Que signifie: trempé,étiré et bloqué. salutations Dominique Mathieu
25.03.2013 - 09:15DROPS Design answered:
Bonjour Madame Mathieu, cela signifie quand le châle a été mis en forme "bloqué" selon les instructions figurant sous "assemblage". Bon tricot !
25.03.2013 - 12:10
|
|||||||||||||||||||
Lisa#lisashawl |
|||||||||||||||||||
 |
 |
||||||||||||||||||
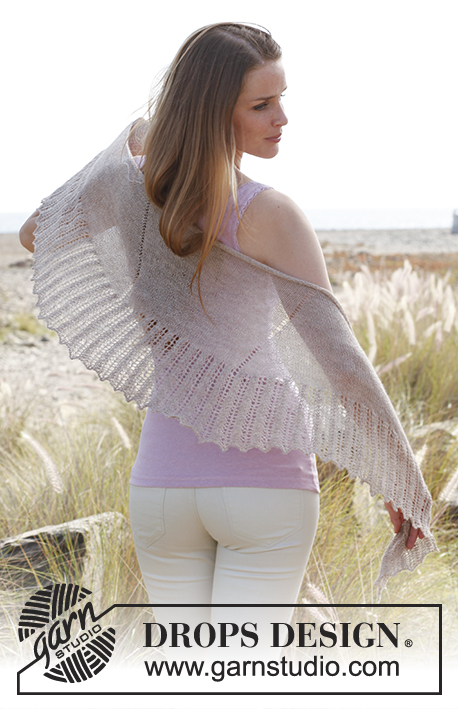
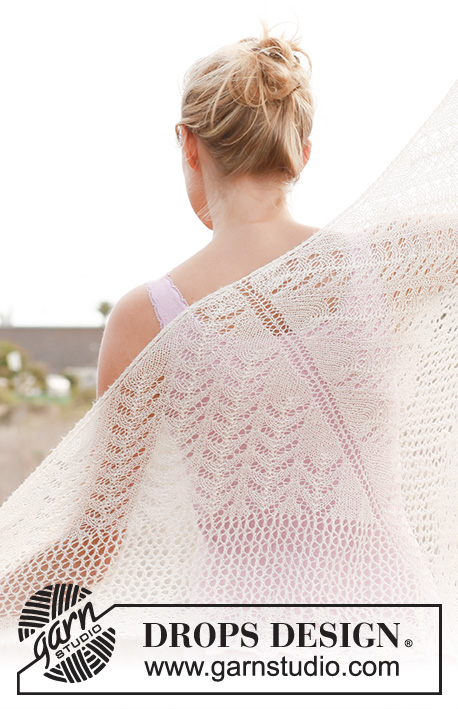
Knitted DROPS shawl with lace pattern in ”Lace”.
DROPS 146-15 |
|||||||||||||||||||
|
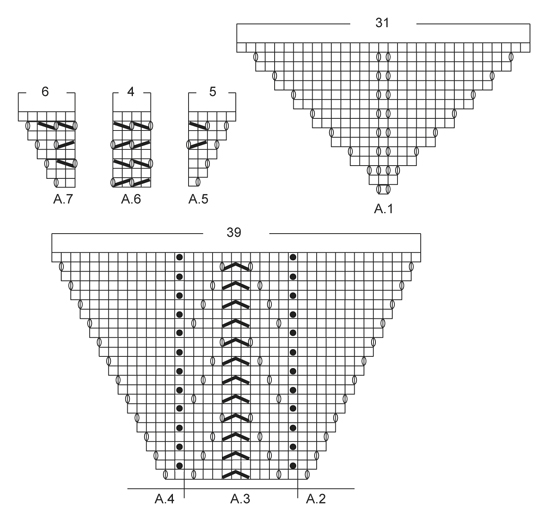
GARTER ST (back and forth on needle): K all rows. 1 ridge = 2 rows K. PATTERN: See diagrams A.1 to A.7. Diagrams show all rows in pattern seen from RS. ---------------------------------------------------------- SHAWL: Worked back and forth on circular needle to make room for all the sts. Cast on 7 sts on circular needle size 3.5 mm with Lace. Insert 1 marker in the 4th st and move it upwards when working (= mid st - marks mid back of shawl). Then work as follows: (1st row = RS) 3 sts in GARTER ST – see explanation above, diagram A.1 and 3 sts in garter st. On next row P YOs to make holes = 9 sts. Continue to work according to diagram A.1 with 3 sts in garter st in each side, when diagram A.1 has been worked 1 time vertically, there are 37 sts on row. Now continue as follows: 3 sts in garter st, diagrams A.2/A.3/A.4 and K 1 st (= mid st), diagrams A.2/A.3/A.4 and 3 sts in garter st. When diagrams have been worked 1 time vertically (= 85 sts), start over; 3 repetitions of A.3 will fit between A.2 and A.4. Work diagrams a total of 4 times vertically, every time you start over, there is room for 2 more repetitions of A.3 between A.2 and A.4. When diagrams have been worked 4 times vertically, there are 229 sts on row. Piece measures approx. 37 cm measured in knitting direction from cast on edge up to needle. Now continue as follows: 3 sts in garter st, A.5, A.6 over the next 108 sts, work until 2 sts remain before mid st, work A.7, K 1 st (= mid-st), A.5, A.6 over the next 108 sts until 5 sts remain, work A.7 and 3 sts in garter st. Continue to work according to diagrams A.5/A.6/A.7 until diagrams have been worked 4 times vertically. Every time A.5/A.6/A.7 have been worked 1 time vertically, there is room for 2 more repetitions of A.6 between A.5 and A.7 on each side of mid st - AT THE SAME TIME on last row of last repetition (= WS), inc 8 sts evenly by working 2 sts in 1 st = 301 sts. Piece measures approx. 48 cm measured in knitting direction. Now continue as follows: 3 sts in garter st, A.2, A.3 over the next 144 sts, work until 2 sts remain before mid st, work A.4, K 1 st (mid-st), A.2, A.3 over the next 144 sts, 5 sts remain, work A.4 and 3 sts in garter st. Continue to work according to diagrams A.2/A.3/A.4 until diagrams have been worked 1 time vertically = 349 sts. On next row from RS, loosely cast off as follows – NOTE: It is very important to cast off very LOOSELY otherwise the edge cannot be shaped into tips: Cast of the first 3 edge sts (lightly pull them when casting off so that they are loose), * make 1 loose YO on right needle, cast off YO, cast off 2 sts (lightly pull when casting off so that they are loose) *, repeat from *-* the entire row. BLOCKING: Place the shawl in lukewarm water until it is soaking wet. Carefully squeeze the water out of the shawl - do not twist the shawl - then roll the shawl in a towel and squeeze to remove more water - the shawl will now only be moist. Place the shawl on a carpet or mattress - carefully stretch it out to size and fasten it with pins. NOTE: 1 pin in the outermost st in each side of shawl, fasten 1 pin in the middle of every repetition along the 2 diagonal sides and 1 pin in mid st (= at the bottom of tip on shawl), lightly pull at every pin so that the edge is shaped into small tips. Leave to dry. Repeat the process when the shawl has been washed. |
|||||||||||||||||||
Diagram explanations |
|||||||||||||||||||
|
|||||||||||||||||||
 |
|||||||||||||||||||
Have you finished this pattern?Tag your pictures with #dropspattern #lisashawl or submit them to the #dropsfan gallery. Do you need help with this pattern?You'll find 14 tutorial videos, a Comments/Questions area and more by visiting the pattern on garnstudio.com. © 1982-2026 DROPS Design A/S. We reserve all rights. This document, including all its sub-sections, has copyrights. Read more about what you can do with our patterns at the bottom of each pattern on our site. |
|||||||||||||||||||


With over 40 years in knitting and crochet design, DROPS Design offers one of the most extensive collections of free patterns on the internet - translated to 17 languages. As of today we count 324 catalogues and 12290 patterns translated into English (UK/cm). 12290
We work hard to bring you the best knitting and crochet have to offer, inspiration and advice as well as great quality yarns at incredible prices! Would you like to use our patterns for other than personal use? You can read what you are allowed to do in the Copyright text at the bottom of all our patterns. Happy crafting!
Post a comment to pattern DROPS 146-15
We would love to hear what you have to say about this pattern!
If you want to leave a question, please make sure you select the correct category in the form below, to speed up the answering process. Required fields are marked *.