
Popular categories
Looking for a yarn?


Comments / Questions (37)
Sally Driscoll wrote:
Hi, I understand about the short rows, but as I follow the chart, each return at neck end is only knit (garter stitch), therefore no picot edging. What am I doing wrong please?
08.10.2016 - 09:32DROPS Design answered:
Dear Mrs Driscoll, in the diagrams you will work the eyelet rows at beg of row from RS (and these sts will be K on next row from WS) on one side of the piece and the eyelete rows on the other side of piece will be worked at beg of row from WS (and these sts will be K on next row from RS). Happy knitting!
10.10.2016 - 08:56
![]() Antonella wrote:
Antonella wrote:
Buongiorno, ho iniziato questo collo. Ho fatto il motivo A2 sulle prime 12 maglie dopo il motivo A1. Ma devo farlo anche sulle ultime 12 maglie dal ferro a rovescio dopo il motivo A1? Dalla spiegazione non è molto chiaro, grazie
04.01.2016 - 10:01DROPS Design answered:
Buongiorno Antonella. Il diag. A.2 viene lavorato sulle prime 12 m di ogni ferro (come fatto per il diag. A.1), quindi sia sul diritto del lavoro che sul rovescio. Buon lavoro!
04.01.2016 - 11:54
![]() Antonella wrote:
Antonella wrote:
Buongiorno, ho iniziato questo collo. Ho fatto il motivo A2 sulle prime 12 maglie dopo il motivo A1. Ma devo farlo anche sulle ultime 12 maglie dal ferro a rovescio dopo il motivo A1? Dalla spiegazione non è molto chiaro, grazie
04.01.2016 - 09:03DROPS Design answered:
Buongiorno Antonella. Il diag. A.2 viene lavorato sulle prime 12 m di ogni ferro (come fatto per il diag. A.1), quindi sia sul diritto del lavoro che sul rovescio. Buon lavoro!
04.01.2016 - 11:54
![]() Catherine FITOUSSI wrote:
Catherine FITOUSSI wrote:
Bonjour j'ai enfin compris comment ce tricote ce col!!!! merci
08.04.2014 - 17:54
![]() Catherine FITOUSSI wrote:
Catherine FITOUSSI wrote:
Bonjour encore moi sur le diagramme nous avons 4 jetés et 3 fois 2 mailles ensemble donc une maille de plus à chaque rang, mais dans les explications on nous que le nombre de mailles varie entre 62 et 68 en fonction du rang tricoté !!! je ne comprends pas moi je me retrouve avec beaucoup plus de mailles !!!! pouvez vous m'aider je voudrais tellement y arriver!!! merci et bonne journée
07.04.2014 - 11:51DROPS Design answered:
Bonjour Mme Fitoussi, effectivement, dans A.2, on augmente d'1 m aux rangs 1,3, 5 et 7. Pour vous y retrouvez, mettez un marqueur avant/après le point fantaisie, ainsi votre nombre de mailles sera plus facile à repérer. Bon tricot!
07.04.2014 - 12:02
![]() Catherine FITOUSSI wrote:
Catherine FITOUSSI wrote:
Merci pour l'info mais les 4 dim se font de chaque cote ou cote "haut"(pas coté marqueurs!!! et les motifs sont décalés????il y a quelques chose que je n'ai pas compris ds ce tricot!!!il faut bien faire les motifs de chaque coté??, merci de me donner quelques explications je voudrais tant le réussir ce col pour ma fille. merci encore
29.03.2014 - 15:17DROPS Design answered:
Bonjour Mme Fitoussi, on tricote le diagramme en début de rang en commençant à droite vers la gauche, chaque diagramme se lit au début de chaque rang (d'un côté 1er rang = sur l'end, de l'autre côté, le 1er rang sera sur l'envers) pour bien commencer à chaque fois le rang par le diagramme. Les 4 m dim sont rabattues au début du rang. Bon tricot!
31.03.2014 - 10:10
![]() Fitoussi wrote:
Fitoussi wrote:
Dans le diagramme de ce modele je ne comprends pas comment rabattre 4 mailles en plein milieu de rangs sans faire de trou???? pouvez vous m'expliquez s'il vous plait??? d'avance merci
28.03.2014 - 18:34DROPS Design answered:
Bonjour Mme Fitoussi, le 7ème rang de M.1 se tricote en lisant de droite à gauche, en début de rang, on rabat ainsi les 4 premières m sur l'aiguille et on continue comme indiqué. Bon tricot!
29.03.2014 - 10:34
![]() Boulanger wrote:
Boulanger wrote:
Bonjour;dans le diagra,a2 4 jetés 3 diminutions donc une augm elle n'apparait pas dans le diagr? merçi de mexpliquer
22.03.2014 - 10:10DROPS Design answered:
Bonjour Mme Boulanger, au 6ème rang de A.2, on a 16m, au début du 7ème rang, on rabat 4 m (= restent 12 m), puis on a 4 jetés et 3 dim = 13 m. On reprend au 1er rang de A.2 sur 13 m et on augm. 1 m au 1er rang = 14 m. Bon tricot!
23.03.2014 - 18:08
![]() Rousset wrote:
Rousset wrote:
Bonjour a vous ! Le zig-zag qui borde cet ouvrage en haut et en bas n'est pas mentionné dans les explications . Merci anticipé pour votre aimable réponse qui permettra la realisation de ce tour de cou .
26.11.2013 - 10:41DROPS Design answered:
Bonjour Mme Rousset, le point fantaisie A.1 se tricote des 2 côtés: commencez à partir du bas et tricotez le 1er rang de A1 puis toutes les mailles à l'end, tournez et tricotez le 1er rang de A1 puis toutes les mailles à l'end. Ainsi, vous avez commencé le point fantaisie des 2 côtés, en haut (côté cou) et en bas. Bon tricot!
26.11.2013 - 10:58
![]() Ilona Hoch wrote:
Ilona Hoch wrote:
Diesen Kragen finde ich wunderschön und ich würde ihn gerne stricken,doch ich verstehe nicht die Bezeichnung:Oberkante und Unterkante.Ich würde mich freuen wenn Sie mir dies erklären würden. Mit freundlichem Gruß Ilona Hoch
04.12.2012 - 19:55DROPS Design answered:
Liebe Ilona, dieser Kragen wird quer gestrickt und Ober-und Unterkante bezieht sich darauf, wie Sie den Kragen nachher tragen werden: Oberkante = zum Hals zu, Unterkante = zur Brust zu.
05.12.2012 - 07:30
|
|||||||||||||
Ellie#ellieneckwarmer |
|||||||||||||
 |
 |
||||||||||||
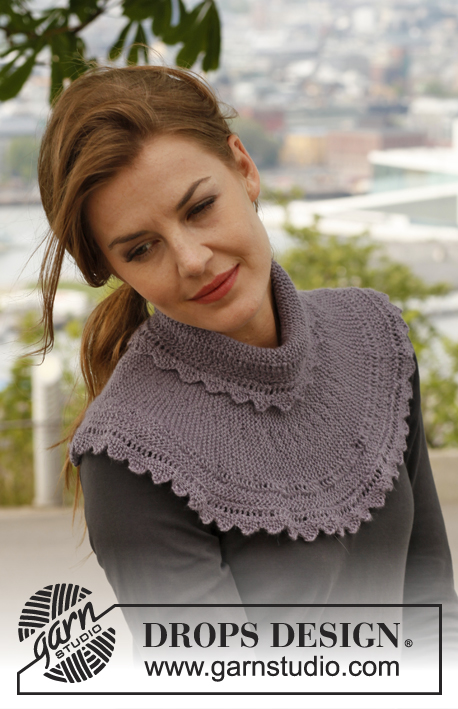
Knitted DROPS neck warmer with garter st and zigzag edges in ”BabyAlpaca Silk”.
DROPS 141-2 |
|||||||||||||
|
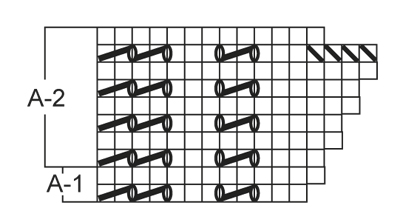
PATTERN: See diagrams A-1 and A-2. Diagrams show all rows in pattern seen from RS. SHORT ROWS: 1st row beg from bottom edge. * Work until 1st marker, turn and work back, work 2 rows over all sts, work until 2nd marker, turn and work back, work until 3rd marker, turn and work back, work 2 rows over all sts *, repeat from *-*, i.e. 1 repetition = 10 rows (5 ridges) in one side (= bottom) and 4 rows (= 2 ridges) in the other side (= top). ---------------------------------------------------------- NECK WARMER: Worked back and forth on needle. There is no difference between RS and WS, the piece is the same on both sides. Start therefore every row as if it is worked from RS. Cast on 60 sts on needle size 3 mm with BabyAlpaca Silk. K 1 row over all sts. Turn, then insert 3 markers in the piece as follows from bottom edge (do not work the row): 1st marker after 12 sts, 2nd marker after 12 more sts and 3rd marker after another 12 sts, there are 24 sts after last marker. READ THE REST OF THE PATTERN BEFORE CONTINUING! Continue as follows from bottom edge: Work diagram A-1 over the first 12 sts, then K the rest of row. Turn and work as follows from the top: Diagram A-1 over the first 12 sts, then K the rest of row. PATTERN: When diagram A-1 has been worked 1 time in each side of piece, continue with A-2 until finished measurements, all sts between A-2 are K on all rows (= garter st). No of sts will vary from 62 to 68 depending on where you are in the diagram. Make sure that all the markers stays in the same place the entire time. SHORT ROWS: At the same time after the first 2 rows have been worked, work SHORT ROWS – see explanation above. Work like this until piece measures approx. 40 cm at the top and 100 cm at the bottom – finish after 1 whole repetition of A-2, loosely cast off. Then sew neck warmer tog mid back, cast on edge against cast off edge to avoid a chunky seam. |
|||||||||||||
Diagram explanations |
|||||||||||||
|
|||||||||||||
 |
|||||||||||||
Have you finished this pattern?Tag your pictures with #dropspattern #ellieneckwarmer or submit them to the #dropsfan gallery. Do you need help with this pattern?You'll find 6 tutorial videos, a Comments/Questions area and more by visiting the pattern on garnstudio.com. © 1982-2026 DROPS Design A/S. We reserve all rights. This document, including all its sub-sections, has copyrights. Read more about what you can do with our patterns at the bottom of each pattern on our site. |
|||||||||||||


With over 40 years in knitting and crochet design, DROPS Design offers one of the most extensive collections of free patterns on the internet - translated to 17 languages. As of today we count 324 catalogues and 12290 patterns translated into English (UK/cm). 12290
We work hard to bring you the best knitting and crochet have to offer, inspiration and advice as well as great quality yarns at incredible prices! Would you like to use our patterns for other than personal use? You can read what you are allowed to do in the Copyright text at the bottom of all our patterns. Happy crafting!
Post a comment to pattern DROPS 141-2
We would love to hear what you have to say about this pattern!
If you want to leave a question, please make sure you select the correct category in the form below, to speed up the answering process. Required fields are marked *.